Swarovski® Peridot Jewelry Tutorials

We have three exciting projects using September’s Swarovski Psychology of Color: Peridot. See how to energize yourself with this natural hue!


Peridot Wheel Pendant with Ball Chain Necklace

GoodyBeads Blog - Swarovski Peridot Wheel Pendant with FREE Pattern Tutorial

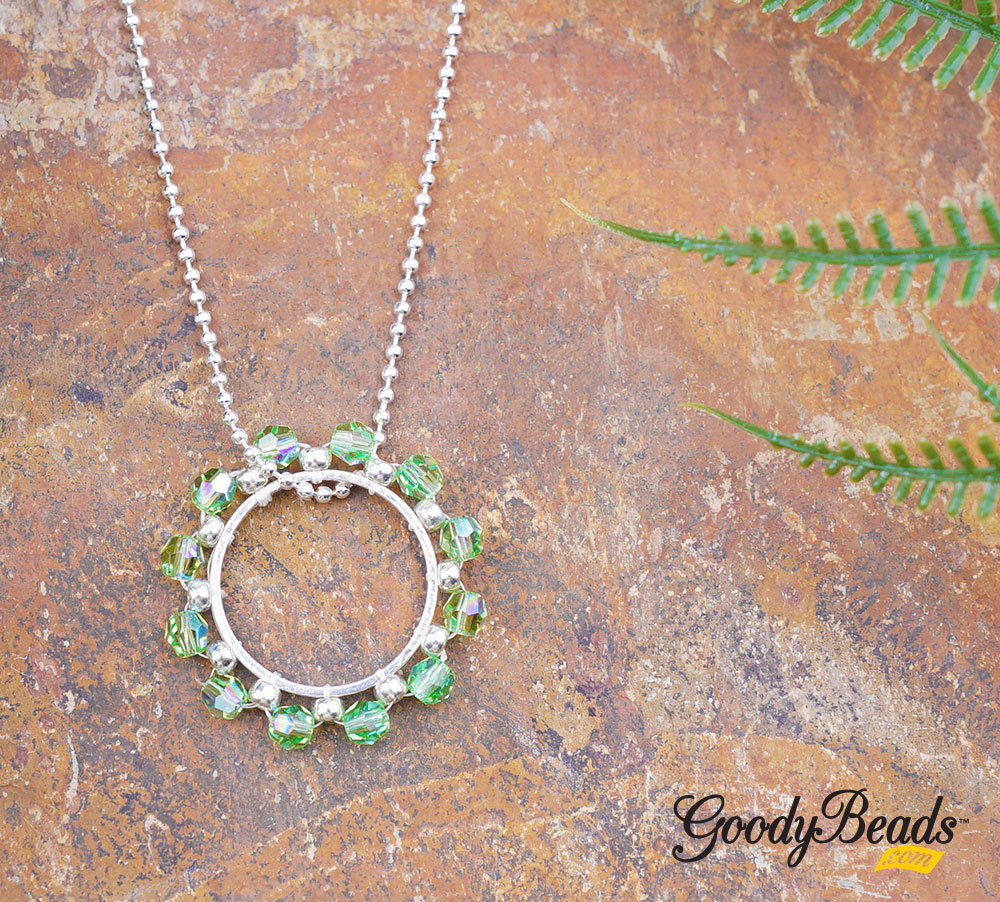
We designed a simple beaded wheel with round Peridor Shimmer crystals. Check out the simple TUTORIAL and all you need to make this Peridot Wheel Pendant on a a ball chain necklace!

What you’ll need:


Brushed Peridot Earrings

GoodyBeads Blog - Swarovski Peridot with Brushed Silver Beads and Components. FREE Tutorial

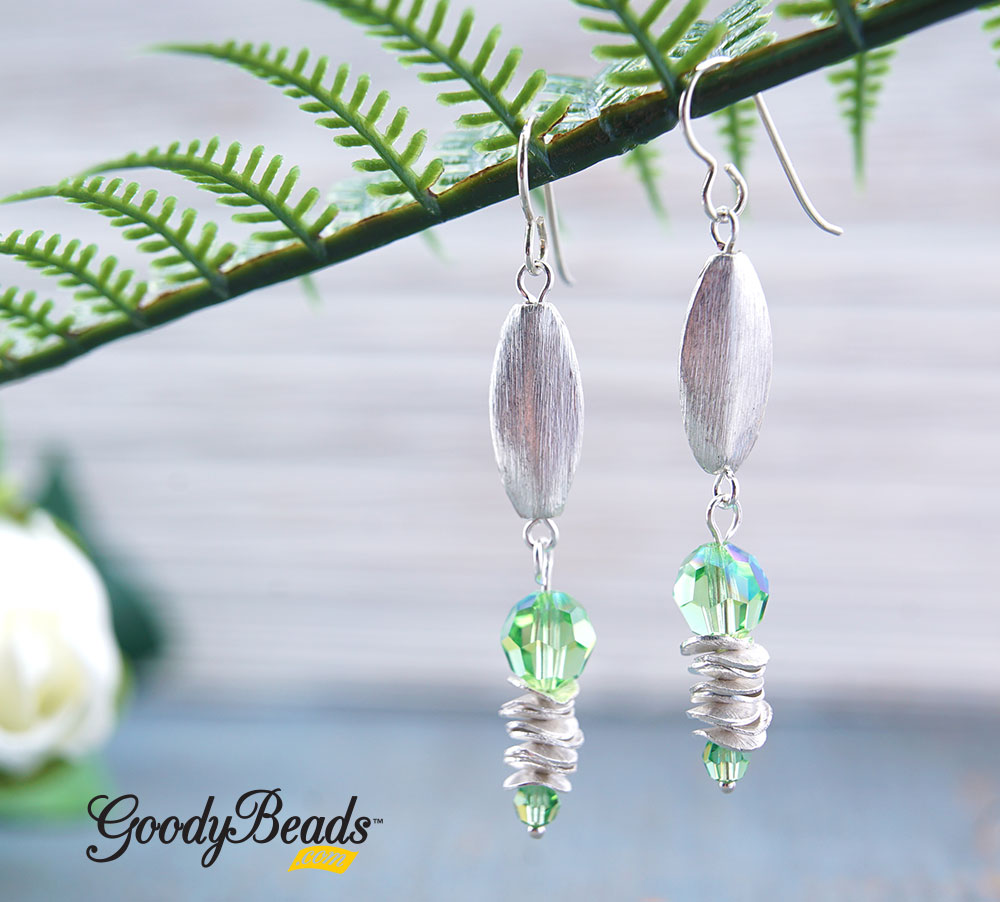
Make your Peridot colors POP with brushed silver beads and components!

Items used in earrings: SW02060 (2), SW02058 (2), Z018411, A019694, A019606, Y018086 and TC02297.

  1. On a headpin, slide on a 4mm crystal, 8 wavy disc (alternating them so it creates a wavy look) and an 8mm crystal. Make a simple loop.
  2. Open eyepin loop, slide on loop from step 1, close eyepin loop.
  3. On eyepin, slide on brushed silver bead and make a simple loop.
  4. Open earwire loop and slide on brushed silver loop. Close loop.
  5. Repeat all steps for other earring.


Swarovski: Peridot Passion

GoodyBeads Blog | Swarovski Peridot Passion Necklace

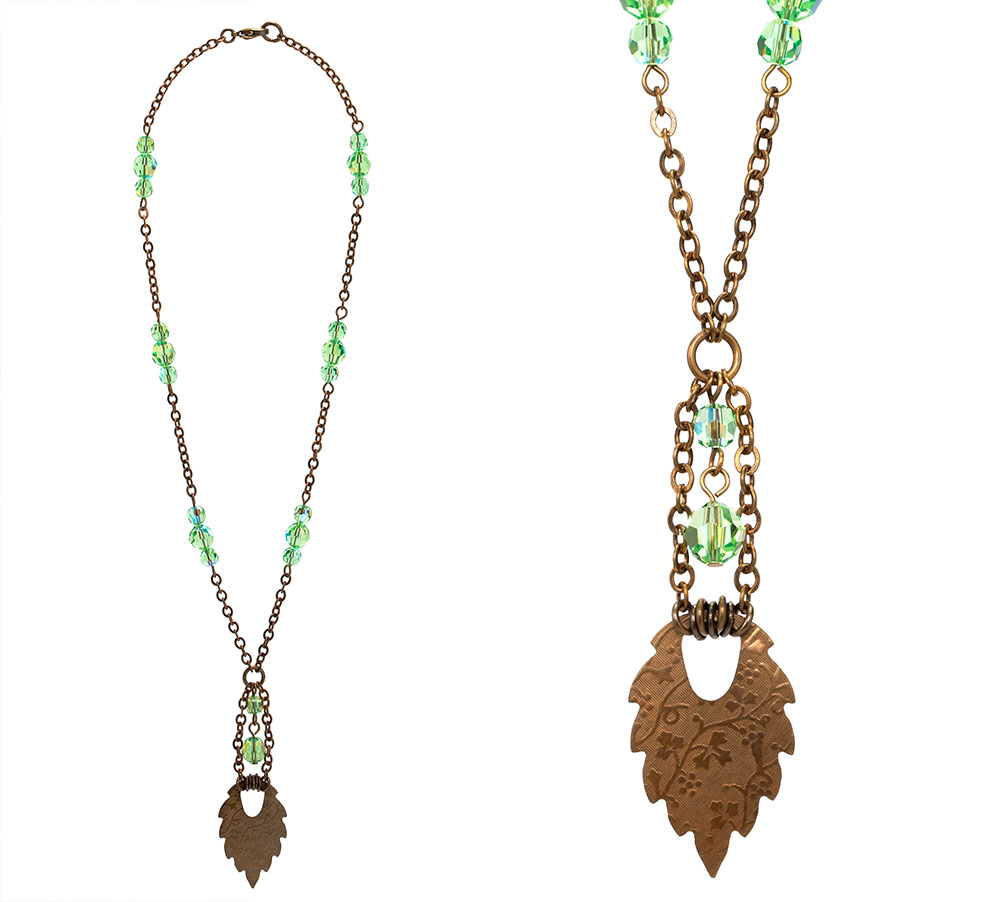
This sample and tutorial comes from our friends at Swarovski: Create Your Style, called Peridot Passion. You see how stunning Peridot looks with brass findings!

What you’ll need for necklace:


Instructions

  1. Cut the chain into fifteen 1 ½” pieces and set aside.
  2. Using one eye pin slide on one 6mm Crystal, one 8mm Crystal and one 6mm Crystal and make a simple loop. Repeat this step 5 more times and set aside.
  3. Using one eye pin slide on one 6mm Crystal and make a simple loop. Set aside.
  4. Using one head pin slide on one 8mm Crystal and make a simple loop. Set aside.
  5. Using the leaf pendant attach seven of the 5mm jump rings across the top of the opening.
  6. Using the 1st jump ring on the left of the top of the leaf pendant attach one piece of chain, then attach one 9mm jump ring, then attach another piece of chain. Now attach one component made in Step 2 and to the other side of the component attach another piece of chain. Repeat this pattern two more times and then attach the lobster clasp with a 5mm jump ring.
  7. Using the last jump ring on the right of the top of the leaf pendant attach one piece of chain, then attach to the 7.25mm jump ring already on the left of the necklace, then attach another piece of chain. Now attach one component made in Step 2 and to the other side of the component attach another piece of chain. Repeat this pattern two more times and then attach one 9mm jump ring.
  8. Using the component made in Step 3 attach one end of this component to the bottom middle of the 9mm jump ring hanging above the leaf pendant. Now attach the component made in Step 4 to the bottom of the 6mm bead.


DIY Jewelry with Beadable Components

Make easy DIY jewelry using Beadable Components and adding POPS of color with Miyuki Delica Seed Beads. Here are ways to bead and use the beadable components.

From our recent Trends We Love, our new Beadable Components are what you need for an easy bead-stitch project. These pairs well with our 11/0 Miyuki Delica Seed Beads or beads with a width of 1.5mm or thinner. Our projects uses the basic ladder stitch. Here is a look at how a ladder stitch is done to sew through the channels. Make sure when you’ve sewn through your pattern or channels, to sew through them again to strengthen the pattern.

ladderstitch

Here are some projects using these beadable components:

Beadable Ring Pendant

Beadable_11336_11337

The Beadable Ring Pendant (Silver or Gold) has 24 channels and fun options to designing with this piece. Each channel holds 3 Delica beads. Here are a few ideas.

GoodyBeads | Blog - DIY Jewelry with Beadable Components and Miyuki Delica seed beads. Free tutorial

On the left is a pretty pair of pink and gold earrings. We even added a pearl dangle at the bottom! Make sure to use size 24-gauge headpins if adding dangles to beadable components.

Items used in earrings: Z011337 (2), A019635, SW00665 (2), TC02298, SB00269, SB02332 (A015211 & A006587)

In the middle, we’ve made a rainbow wheel with the beadable pendant. Attach it to your necklace chain for this easy DIY necklace!

Items used in rainbow pendant necklace: Z011336 (2), SB03546, SB02343, SB02336, SB02310, SB02311, SB03545, SB02327, SB02349, A001528, Z001033 (A015211 A006587)

And lastly we created an ombré effect with the pendant on the right.

Items used in right pendant: Z011336 (2), SB01824, SB01822, SB01826 (A015211 A006587)

Beadable Teardrop Pendant

Beadable_11339_11342

Love the shape of the classic teardrop! This beadable component is much easier to sew through since it only has 5 channels to work with. Each channel holds different amounts of Delica beads. The outer channel holds 13 Delicas, the inner two holds 15 Delicas and the middle holds 16. Here are two ways to using this beadable component.

GoodyBeads | Blog - DIY Jewelry with Beadable Components and Miyuki Delica seed beads. Free tutorial

The necklace on the right uses the amount of correct amount of Delicas for each channel. We’ve also used two colors to add a design to its channels. Then, using 24-gauge jump rings, we’ve added small tassels to the bottom holes of the pendant before making a fun necklace with it!

Items used in necklace: Z011339, SB00269, SB02336, A002413, Z013681, Z001033 (A015211 & A006587)

And who wouldn’t love a pair of earrings! On the right, we have a charming pair of gold earrings using Delica beads and metal tube beads. The tube beads has the small thickness as Delica seed beads and works perfectly for these beadable components.

Items used in earrings: Z011342 (2), Z009196, SB003545, A014108 (A015211 & A006587)


DIY Beadable Cuff LInks – Pattern Tutorial

Our selection of beadable accessories are one of our favorite categories to play with. We’re giving you a basic pattern at how to bead stitch a beadable cuff link with Miyuki Delica beads.


What you’ll need for beadable link:


Tutorial

As you can see from the illustration, you will see how to ladder stitch across the channel of the beadable cuff link, while adding 3 Delica seed beads inside the channel. Add different colors and create fun patterns to complete your Cuff Link.

Screen Shot 2019-08-07 at 4.56.54 PM


Make sure to Click and Download the PDF Tutorial Pattern. You will also have a blank template for you to design and color a custom pattern for yourself. Here are some sample patterns you can see in the downloadable pdf also:

GoodyBeads | Blog - FREE Pattern Tutorial for Beadable Cuff Link.


Items used in samples:


Swarovski® Rose Water Opal Jewelry Tutorials

We have three lovely projects using August’s Swarovski Psychology of Color: Rose Water Opal.

Beaded Fan Necklace with Swarovski Crystals

GoodyBeads Blog | Swarovski Rose Opal Water Beaded Fan Necklace with FREE Pattern Tutorial

Items used in necklace: (12) SWZ0469, SB00107, SB00423, A021148, A006585, A015211, A011519, (2) CH01096

Get FREE Downloadable PDF Pattern Tutorial Here!

Gold & Silver Rose Opal Earrings

GoodyBeads | Blog - Rose Water Opal Gold and Silver Earrings with FREE tutorial

Items used in earrings: (4) SWZ0469, SB00423, A011519, Y018889, Z010751, A007659, A011528, Z012031

We mixed up the fun in this pair of earrings with gold and silver findings. It adds stunning layers and surely makes the crystals stand out!

Directions:

  1. On a headpin, slide on a gold seed bead, bicone and another seed bead.
  2. On an eyepin, slide on a gold seed bead, bicone and another seed bead.
  3. Open loop from Step One and slide on brushed ring link. Close loop.
  4. Open gold jump ring, slide on brushed ring link and one hole of gold brushed disc. Close jump ring.
  5. Open a loop of link from Step Two, slide on other hole of gold brushed disc and close loop.
  6. Open earwire loop and slide on other end of crystal link and close earwire loop.
  7. Repeat all steps for other earring.

Rose Water Rhapsody

DSC08523

Our friends at Swarovski Create your Style, designed this stunning necklace with Rose Water Opal crystals and Fine Rocks Tube beads.

What you’ll need:

Directions:

  1. Using alcohol to wipe clean all the findings and set to dry.
  2. Using one fancy stone, blue in matching setting and set aside for 24 hours to dry. Repeat two times and set aside.
  3. Using one eyepin, attach one pendant made in Step 2, then slide on a bead cap, on SW02020 and another bead cap. Make a simple loop. Repeat one more time and set aside. Repeat one more time and set aside.
  4. Using another eypin, attach one pendant made in Step 2, then slide on a bead cap, on SW01733 and another bead cap. Make a simple loop.
  5. Cut beading wire into two 20″ pieces.
  6. Using both wires together, slide on a SW01902, component made in Step 3, SW01902, SWZ0469, SWZ0470, SWZ0469, SW01902, one component made in Step 4, SW01902, SWZ0469, SWZ0470, SWZ0469, SW01902, component made in Step 3, and SW01902. Position all these in the center of the two strands of wire.
  7. Take all remaining 4mm bicone beads and pour them onto your bead mat. Mix them all together.
  8. Starting with the right side of the necklace and only using one of the two wires coming out of the 6mm bicone bead, string on three 3mm bicone beads. Now using your bead mix you created in Step 7 randomly string on 42 4mm bicone beads. String on three 3mm bicone beads. Repeat for this step for the second empty wire.
  9. Using both wires, slide on one crimp bead and one end of the toggle. Crimp to close and add crimp cover.
  10. Repeat Steps 8-9 to make left side of the necklace.


Cymbal Remata Beaded Earrings – Pattern Tutorial

We have a very simple pattern for you today using the Cymbal Remata Bead Ending and 8/0 seed beads. Check out this free pattern today, designed by So Vang.


What you’ll need:


Geometric Drop Earrings with Cymbal Remata

GoodyBeads | Blog - Geometric Drop Earrings with Cymbal Remata and Size 8 Miyuki Seed Beads - FREE Pattern Tutorial

Items used in Earrings: Z004568, SB00076, SB00107, TCZ0139, A006585, A015211


GoodyBeads | Blog - Geometric Drop Earrings with Cymbal Remata and Size 8 Miyuki Seed Beads - FREE Pattern Tutorial

Because we love tassels, throw a tassel on it!

Items used in Earrings: Z004564, SB00114, SB00106, TCZ0077, A006585, A015211, A002413, Z013685


Ginko Fan Earrings with Pattern Tutorial

So Vang has conjured up another super simple pair of earrings using Czech Ginko Two Hole Beads. Free downloadable pattern tutorial.


These pair of earrings are easy to make with minimal amounts of components. You can make a load of Ginko Fan Earrings with a tube of 11/0 Seed beads and Ginko Beads!


Ginko Fan Earrings

GoodyBeads Blog | Ginko Fan Earrings with FREE Pattern Tutorial

So Vang had a few beads from her previous Ginko Scale Bracelet, so she used them here to make these earrings to possibly match the bracelet!

What you’ll need:

Items used in Ginko Fan Earrings above: SB03708, SB00422, A002413, TCZ0078, A006585, A015211 


Ginko Fan Earrings with Swarovski® Crystals

GoodyBeads Blog | Ginko Fan Earrings with Swarovski Crystals FREE Pattern Tutorial

Embellish your fan earrings with a link of Swarovski crystals. Doll up your earrings and sparkle!

What you’ll need for earrings:

Items used in Ginko Fan Earrings with Swarovski Crystals above: SB03697, SWZ0581(2), SB00422, A019595, Z012031, A006585, A015211 


Cymbal Vourkoti SuperDuo Bracelet

We’re continuing our LOVE for the new Cymbal Components with a simple bracelet pattern using the Cymbal Vourkoti bead ending and Czech SuperDuo beads.


cymbalVourkotiCymbal Vourkoti bead endings are used with Czech SuperDuo beads. The bead ending caps your bracelet and finishes it off beautifully and professionally. Find the easy pattern tutorial below along with SuperDuo pattern options to play with.


What you’ll need for bracelet:


Purple Blush SuperDuo Bracelet

GoodyBeads Blog | FREE Pattern Tutorial with Cymbal Vourkoti components and Czech SuperDuos.

Items used in this bracelet: Z004582, SB01782, SB00423, A006587, Z011514, A008658, A015211


Color & Pattern Samples

This pattern is certainly a versatile basic pattern to mixing up SuperDuo colors of your own choosing. Here are 4 different color ways and patterns you can use with this pattern using Cymbal Vourkoti components.

GoodyBeads Blog | Cymbal Vourkoti Czech SuperDuo Pattern and Colorways

  • This first example uses SuperDuo beads with a Capri finish. The Capri finish has splotching of colors all around the SuperDuo bead, so when you bead stitch the, you get some lovely splotch of color without a….
    Items used in this example:SB02114, SB00422, Z004581
  • Second example uses two colors of SuperDuo with an outer color a Picasso finish and the middle beads are an opaque color.
    Items used in this example: SB01440, SB01441SB00424Z004582
  • Third example uses two different SuperDuo beads consisting of SuperDuo Duets and an opaque color to compliment the inner color. This creates a track pattern in the middle.
    Items used in this example: SB01406, SB03491SB00422Z004581
  • Lastly, try pattern out with three colors, while creating a chevron pattern.
    Items used in this example: SB01406SB01441, SB03093, SB00424Z004582


Czech Chevron Tassel Earrings – Pattern Tutorial

New easy earrings pattern using two-hole Czech Chevron beads. Get your free tutorial today.


We love love love these Czech Chevron shapes. They are a trendy geometric shape and this pair of earrings go perfectly with everything you wear.

Items you’ll need:

Items used in Earrings: TCZ0139, A011519, Z010318, Z010298, SB00107, Z013767, A006587, A015211

GoodyBeads Blog Czech Chevron Two-Hole Tassel Earrings with FREE Pattern Tutorial


Bead Stitched Bracelets with Cymbal Soros – Pattern Tutorial

One the newest additions to GoodyBeads is the Cymbal Components. Here are three projects, with patterns; using the Cymbal Soros.


Z012249_1Z012250_1

Cymbal Components are bead endings, bead substitutes and side beads that give your bead stitched patterns a cleaner, finished ending. The Cymbal Soros Bead Ending, in Silver and Gold, is noted to use with Miyuki Tilas and 1/2 Tilas. But the wonderful thing about using the Soros is how versatile this bead ending is. In these three bracelets, you will notice how similar the bead stitching patterns/sequence. One pattern will show how to incorporate Tilas and 1/2 Tilas, while the other two mixes up different beads like SuperDuos, Tilas, seed beads and even two-hole Swarovski Spike Beads.


Playful Tila Bracelet

GoodyBeads Blog: Playful Tila Bracelet with Cymbal Components and Miyuki Tila Beads, Pattern Tutorial

What you’ll need for this bracelet:

Items used in bracelet below: SB00870, SB01934, Z012249, A006588, A015211, A011535, Z011500, X003062


Tila Stripe Bracelet

GoodyBeads Blog: Tila Stripe Bracelet with Cymbal Components and Miyuki Tila. FREE Tutorial

What you’ll need for this bracelet:

Items used in bracelet:SB00870, SB01406, SB00107, SB00402, Z012250A006588, Z007861, Z011522A015211


Elegant Spike Bracelet

GoodyBeads Blog: Elegant Spike Bracelet with Cymbal Components and Swarovski two-hole Spike Crystal Beads, Pattern tutorial

What you’ll need for this bracelet:

Items used in bracelet: SB01406SB00107SB00423A006588Z012250A015211, SW01715 (23), Z007861, Z001925


Lattice Beaded Bead with 6mm Round Gemstone

We’ve got a fun lattice beaded bead pattern tutorial for you using 6mm round gemstones. Can’t you image the possibilities!


GoodyBeads | Blog Lattice Beaded Bead 6mm Round Gemstone - FREE Tutorial

As a request from our viewers, So Vang is sharing her pattern to making a lattice beaded bead using 6mm round gemstones. You don’t have to use 6mm gemstones. You can use 6mm bicone beads or 6mm round Chinese Crystals or Pearls. You can decide on the colors, that’s the fun of taking a tutorial and making it your own!

This pattern is also an altered version to the 2mm Pearl blog.


For this tutorial you’ll need:

And of course…

Adjusting Your Pattern

Sometimes, when designing your lattice beaded bead, you will find that the tutorial pattern won’t work as well and you’ll need to adjust the pattern. In this example, we have the 6mm Labradorite round beads. These beads are a slight smaller than the white Howlite, so in Step 6 I had adjusted to using THREE 11/0 seed beads instead of FOUR. This way, the lacing of the seed beads will hug the round gemstones.

GoodyBeads | blog - Lattice Beaded Bead with 6mm Round Gemstone FREE tutorial

Items used in image above:

What will you design today! We would love to see them. Make sure to tag us on Social Media so we can see your lovely creations!


Easy SuperDuo Bracelet – Tutorial

Czech SuperDuos are a versatile two-hole bead that can be easily made into a simple stitched bracelet. Check out this super simple tutorial using only Czech SuperDuos, size 11/0 Miyuki seed beads and beading thread.

If you know So Vang, you know that SuperDuos are her favorite two-hole bead to use when bead stitching. It creates fun angles and combines easily with her other favorites like Czech Honeycomb beads and DiamonDuos. But a simple basic way to make a bracelet using SuperDuos is combining it with size 11/0 and warping the strands around for this easy DIY bracelet.

Things you will need for this bracelet:

— Download Multi-Wrap Golden Bracelet Pattern —

Multi-Wrap Golden Bracelet

GoodyBeads | Blog - Czech Easy SuperDuo Bracelet FREE tutorial

Items used in this bracelet: SB01406, SB02087, SB01367, SB01390, SB00423, SB00332, Y001366, A011536, A006587, A015211)

You can make a one wrap bracelet with this tutorial or make a multi-wrap. To make this bracelet, start out with your bracelet length (in this case we did 7 inches), multiply that by the amount of  wraps we wanted and add another foot. This length will be the amount of beading thread you will need. In this case, we used about 4 feet. We strung 4 sections of 4 different color ways to make this bracelet. Each section measures 7 inches in length.

A quick tip, when you are finished sewing all the necessary beads, lay your piece straight and smooth out the piece so that everything lays flat before you tie off your ends.

GoodyBeads | Blog - Easy Czech SuperDuo Bracelet FREE Tutorial

Sample Color ways

GoodyBeads \ Blog - Czech SuperDuo Bracelet FREE Tutorial

Test out different colors to play with. Here we have four samples of various color ways you can make your bracelet.

Items used in these sample color ways:(SB01787 & SB0367), (SB02140 & SB02402), (SB01782 & SB00387), (SB01439SB00423)

— Download Multi-Wrap Golden Bracelet Pattern —


Czech Ginko Two-Hole Scale Bracelet Tutorial

New from the 2019 Tucson show are these lovely Czech Ginko beads from BeadSmith. Check out today’s free tutorial using Ginko beads.


GoodyBeads | Blog Czech Ginko Two Hole Beads with Free Bracelet tutorial

Czech Ginko beads are a two-hole bead in the shape of Ginkgo leaves.


Scale Bracelet

GoodyBeads | Blog - Czech Ginko Scale Bracelet with Free Tutorial

This bracelet tutorial was inspired by Nela Kábelová’s (www.gianelle.beadforum.cz) pattern called Snake Skin Bracelet. We used her pattern and tweaked it slightly to add 4mm Swarovski® bicone crystals instead of 4mm round beads. And used 8/0 Miyuki seed beads in place of the seed beads she used. Don’t they look like fish scales? Dragon scales? Mermaid scales? They are a beautiful shape with lots of option for bead stitching.


What you’ll need for this bracelet:


GoodyBeads | Blog - Ginko Scale Bracaelet clasp ends - FREE tutorial

Items used in bracelet above: SB03708, SW02072 (36), A008804, A019945, A006587, A015211, SB00117 or SB00063


Even Peyote Stitch on Czech Carrier Beads with FREE Patterns

New to GoodyBeads are the oh-so popular Czech Carrier Beads. We have an easy even count peyote stitch pattern to get you started.

Czech Carrier beads are making waves in the DIY jewelry making world. They have two holes and can be used for a stretch bracelet or intricate necklaces! Because they have two holes, they can be easily used in your favorite bead-stitching projects! The typical way to style carrier beads is bead stitching a tube of beads or seed beads to encase the carrier beads. We are using the classic peyote stitch tubes to slide over the carrier beads. Check out this tutorial and pattern ideas below!


Even Count Peyote Stitch

For these patterns, we used an even count peyote stitch pattern and created tubes to side over Czech Carrier beads. Check out this simple illustration below to understand how to do an even count peyote stitch pattern. Don’t forget to PIN this for later!

Even Count Peyote Bead Stitch Delica Seed Beads
Even Count Peyote Stitch Tutorial


Peyote Stitch Patterns

CarrierBEads02

We adore these colors! We used four colors to design these 15 different patterns. Make sure to DOWNLOAD PDF of these patterns and a quick tutorial of how to create tubes to add to your Czech carrier beads.

Plus, you can download this Carrier Bead Pattern Template, where you can create your own designs!


Glue/Adhesive

This step is important because this avoids the tubes from sliding off the carrier beads. We would recommend using GS Hypo Cement (A007224). It has a precision applicator, which helps get into small openings and a cap that stops overflowing glue from escaping and drying up. You have two options of when to add your glue.

First option is before you zip up your tube pattern. Apply glue to both sides of the carrier bead and lay it in the middle of your pattern. Fold your pattern around the carrier bead and sew the ends to zip up the tube patter.

Second option is after making your peyote stitch tubes. Complete your tubes and slide carrier bead half way through, still exposing the bead. Run your glue around the exposed area of the bead, let it sit for a second or two and slide the tube over the rest of the carrier bead.

Let it the beads dry completely before using. Make sure to read instructions for more information.


Pearly Pastel Necklace

Here’s a simple necklace we created with the beads we made above. It’s strung on using Fine Soft Flex Beading Wire (FTBW0001) and ivory miracle beads.

First we cut a 4 feet piece of wire. Fed one end of the wire through a 2′ piece of chain (this will be the extender chain for the necklace) and centered the chain at the middle of the beading wire. Slide on a 2mm crimp tube and using the Magic Crimper (TL00288) crimped the tube into a bead. You can check out our previous blog post HERE about the tool. Next, with both ends, slide on (25) size 4mm ivory miracle bead, (3) size 6mm miracle bead and (3) size 8mm miracle bead. Slide a 6mm miracle bead on each wire thread and slide on first carrier bead. As you can see we added a miracle bead in between each carrier bead. from the top strand, we used size 6mm miracle bead and the bottom used size 8mm miracle bead. This helps the necklace take shape. Reverse the pattern of strung beads to the end and crimp off the end with a lobster claw clasp.


Items used for necklace: SB02334, SB00269, SB01822, SB02346, A006587, A015211, Z016460, A007224, A011534, FTBW0001, TC01897 (2), A010140 (2 pks), A010141, A010142 (2 pks) and CHZ0101


Beadable Findings: Fancy Fanned Earrings

One of our popular project request is our beadable fan earrings with 11/0 Miyuki Delicas and long tassels. Check our video to see how easy they are made.


Components used:

  1. Beadable Fan: Z001471 (2)
  2. Delicas: SB03543, SB02334, SB00269
  3. Pearl: SW00736 (2)
  4. Tassel: Z013818
  5. Findings: A002413, TCZ0078
  6. Beading Tools: A006587, A015211


Tutorial:

  1. Starting with 2.5′ to 3′ of beading thread, attach a stopper bead leaving a 6″ tail end.
  2. Start from one end of the fan, come up through the bottom hole.
  3. Add your three delicas and go across the beadable opening and down the hole.
  4. Sew up the next hole, add your three delicas, go across the beadable opening and down the hole.
  5. Repeat this until you’ve gone across the beadable fan pendant.
  6. You will now add your pearl bead by sewing up the hole closest to the round opening, add your pearl bead and go across the circle opening and down the hole.
  7. Sew through the pearl bead again and up the hole, through the pearl again and down the hole.
  8. Tie off your ends and cut excess off.
  9. Open small jump ring and slide on tassel and through the middle hole of your fan pendant. Close jump ring.
  10. Open earwire loop and attached top fan pendant loop to earwire. Close loop.
  11. Repeat all steps for other earring.


Honeycomb Rosebud Oval Earrings – FREE Tutorial

So Vang has created these beautiful Honeycomb Rosebud earrings using Czech Honeycomb, SuperDuos, Miyuki seed beads and the Oval Groovy Bead Frame. Check out this FREE tutorial on how to make your own.

Inspired by the gorgeous Frida Kahlo and the iconic flowers in her hair, is a pair of beautiful earrings that Frida would’ve love to wear!

Supplies you will need:

Make sure to try different colors and combinations even a monochromatic purple pair of earrings with cream seed beads.

Honeycomb-Rosebud

Don’t forget to get the FREE Honeycomb Rosebud Oval Earrings Tutorial!