Heidi’s Geometric Jewelry with Tutorials

Heidi’s jewelry style has a lot of geometric shapes and simplistic angles. Her use of connectors, dangles and findings are everything you’d love in minimalistic jewelry!


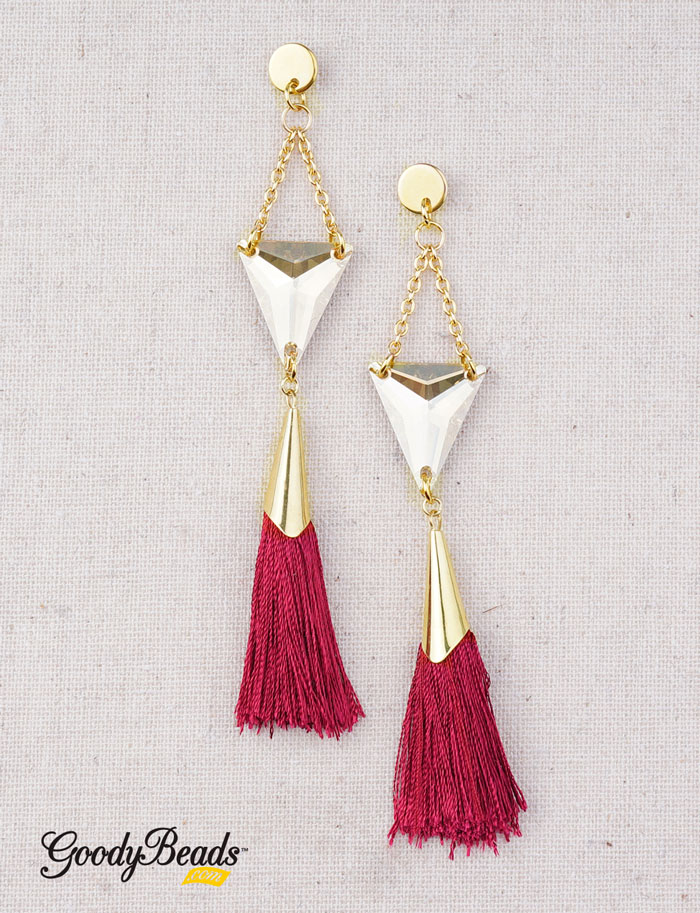
Tiered Crescent Earrings

GoodyBeads | Blog - Heidi's Holiday Jewelry with Geometric Shapes, Free Tutorials

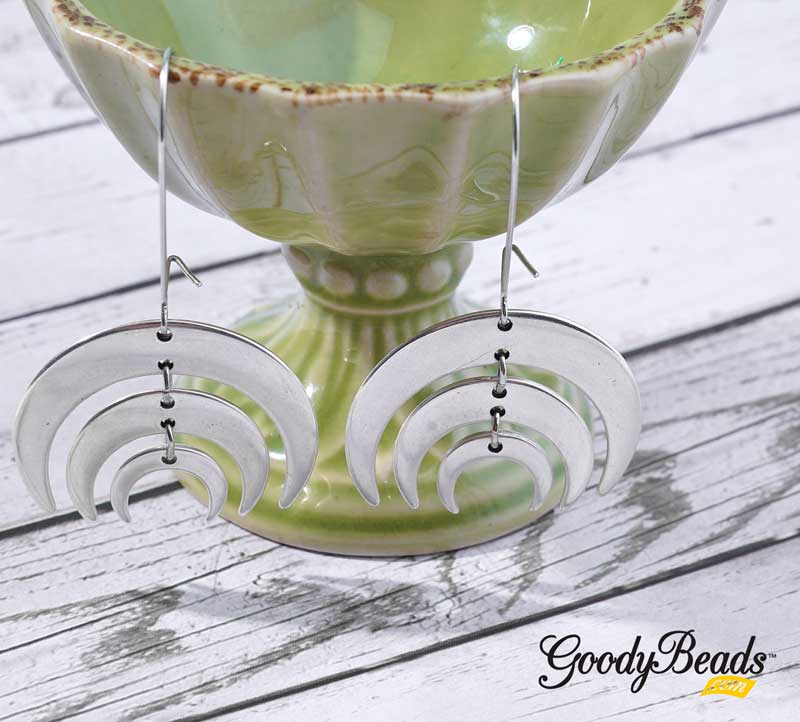
Items used in earrings: A008799, Z016771 (2), Z016773 (2), Z016775 (2) & Z003942

Directions:

  1. Open jump ring, slide on small crescent charm and inner hole of medium crescent connector. Close jump ring.
  2. Open another jump ring, slide on other hole of medium crescent connector and through inner hole of large crescent connector. Close jump ring.
  3. Slide other hole of large crescent connector through kidney earrings to sit inside earring loop. Cinch the opening of the hole to close.
  4. Repeat all steps for other earring.


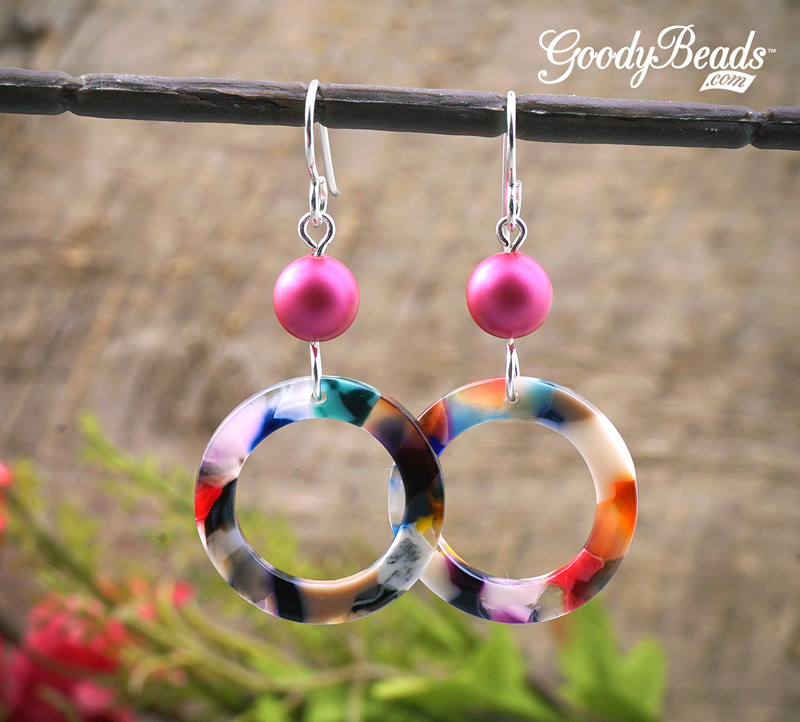
Black Diamond Earrings

GoodyBeads | Blog - Heidi's Holiday Jewelry with Geometric Shapes, Free Tutorials

Items used in earrings: Z010760, Z001829 & A008807

Directions:

  1. Open jump ring and slide on wood/resin charm and through hole of post earrings. Close jump ring.
  2. Repeat for other earring.


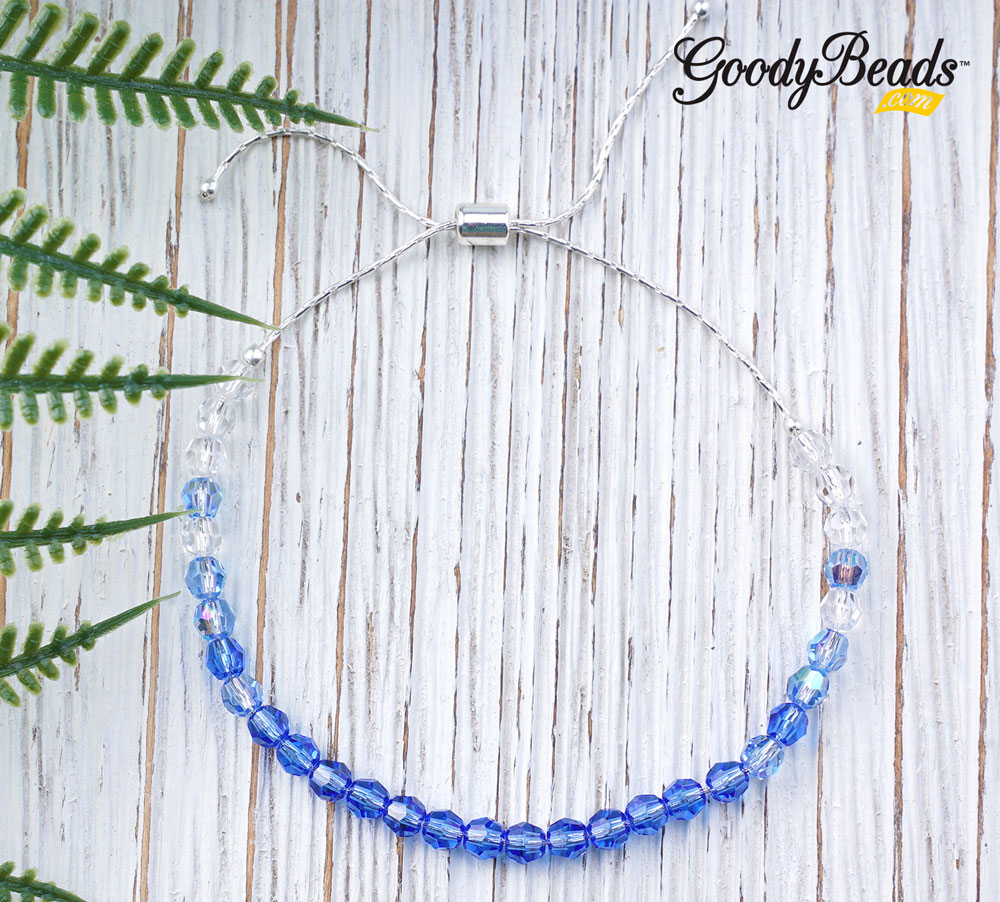
Double Diamond Bracelet

GoodyBeads | Blog - Heidi's Holiday Jewelry with Geometric Shapes, Free Tutorials

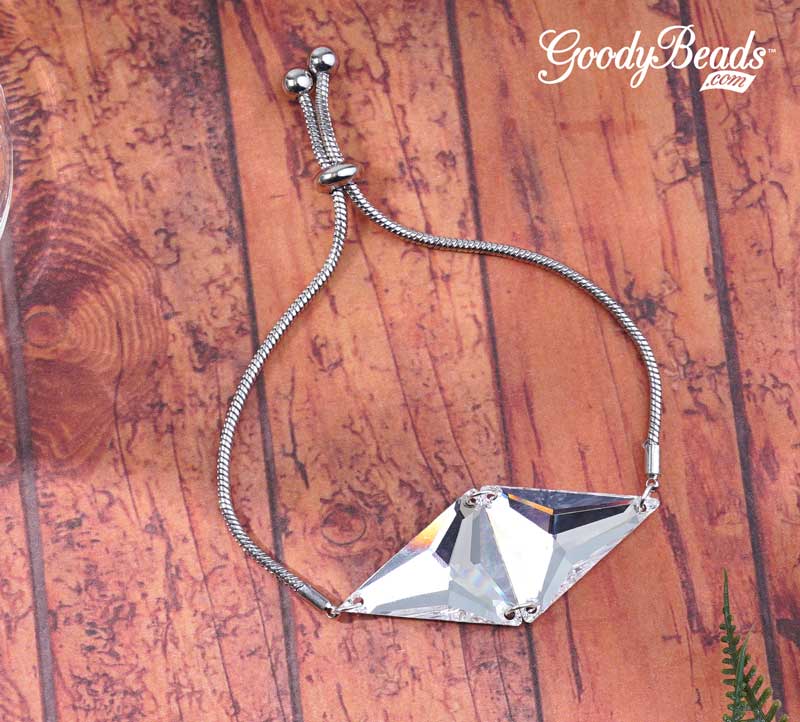
Items used in bracelet: SW02265 (2), Z011872 & A001529

Directions:

  1. Connect both Swarovski triangle sew-ons with two jump rings (A001529) at the bottom/base of the connector.
  2. Remove both jump rings on sliding clasp.
  3. Connect each end or points of the triangle to either ends of the sliding clasp with 6mm jump ring (A001529).


Illusion Necklace with Swarovski® Crystals

Our illusion necklace is made with gorgeous Swarovski Aquamarine Shimmer crystal beads and using the simple technique of flat crimping.

What you’ll need for necklace:

  • Fine Beading Wire – FTBW0001
  • Ring End Cap – X001505
  • 2mm Crimp Tubes – A004830
  • 3mm Jump Ring – Z007586
  • Your choice of clasp (Clasp used in example: A021129)
  • Swarovski Aquamarine Shimmer Round Crystal – 4mm SW02034 (12), 6mm SW02035 (8), 8mm SW02036 (6)
    Add more crystals for more sparkle!

GoodyBeads | Blog - Illusion Necklace with Swarovski Crystals FREE Tutorial

Directions:

  1. Cut beading wire at 18″, 20″, 22″ and 24″ long
  2. Flush all pieces of wire at one end and slide all ends in the end cap. Crimp the end cap.
  3. On each wire, slide on sequences of crimp tube, crystal and crimp tube. Crimp the crimp tubes on both sides of the crystal. Space out the sequences of beads throughout your strands.
  4. Once you have all your crystals crimp down, flush the other ends of your beading thread, slide another end cap over it and crimp the end cap.
  5. Attach your clasp to the end of your end caps with jump ring.


Holiday Lightbulb Snowflake Ornament with Swarovski® Crystals

We LOVE the holidays because of the bright and beautiful decorations. Are you busting out your lights and tree soon? Why not make some festive holiday snowflake ornaments to elevate your holiday design! These are designed with glass lightbulb beads and Swarovski crystals.

What you’ll need for snowflake ornament:

GoodyBeads | Blog - Holiday Lightbulb Snowflake Ornament with Swarovski® Crystals

Directions:

  1. On a spoke, slide on a seed bead, an emerald bicone, red lightbulb, seed bead, crystal rondelle, seed bead & white lightbulb bead. Make a simple loop with memory finishing pliers.
  2. Skip a spoke and on the third spoke, slide on a seed bead, clear bicone, green lightbulb, seed bead, crystal rondelle, seed bead & red lightbulb bead. Make a simple loop.
  3. Skip a spoke and on the fifth spoke, slide on a seed bead, red bicone, white lightbulb, seed bead, crystal rondelle, seed bead & green lightbulb bead. Make a simple loop.
  4. On the next spoke, slide on a seed bead, clear bicone, green lightbulb, seed bead, crystal rondelle, seed bead & red lightbulb bead. Make a simple loop. (This sequence should mimic the spoke across.)
  5. On the next open spoke, slide on a seed bead, red bicone, white lightbulb, seed bead, crystal rondelle, seed bead & green lightbulb bead. Make a simple loop. (This sequence should mimic the spoke across.)
  6. On the last open spoke, an emerald bicone, red lightbulb, seed bead, crystal rondelle, seed bead & white lightbulb bead. Make a simple loop with memory finishing pliers. (This sequence should mimic the spoke across.)


DIY Earrings with Swarovski Mulberry Pearl and Acetate

The new Swarovski pearl color, mulberry, is a bold and fall-suitable hue! We paired it with some colorful acetate components, to make a fun pair of earrings!

Items used in earrings: SW02201 (2), A019612, Z020493, TC02297

GoodyBeads | Blog - Mulberry Pearl and Acetate Earrings with FREE Tutorial

Directions:

  1. Open eyepin and slide on earwire loop. Close eyepin loop.
  2. On the eyepin, slide on pearl and make a simple loop. (Make a larger loop to fit round acetate.)
  3. Open loop and slide on acetate ring. Close loop.
  4. Repeat all steps for earring.


DIY Acorn Pearl Earrings

Acorns are a symbolism of fall weather, so these pair of earrings are fitting for the season.


What you’ll need for earrings:

GoodyBeads | Blog - Acorn Pearl Earrings with FREE Tutorial

Directions:

  1. Cut ball chain with 10 ball links. Cut two pieces.
  2. Cup each end of the ball chain with clam shell end caps.
  3. On a headpin, slide on a pearl, an end cap and make a simple loop.
  4. Open pearl dangle loop and slide on loop of clam shell. Close loop.
  5. Open earwire loop and slide on other end of ball chain loop. Close loop.
  6. Repeat steps 3 – 5 to other ball chain link.


Swarovski® Sapphire Jewelry Tutorials

We’ve got THREE easy projects using October’s Swarovski Psychology of Color: Sapphire. Design bold and confident jewelry with this hue!


Sapphire Ombré Bracelet

GoodyBeads | Blog - Swarovski Sapphire Crystal Bracelet FREE Tutorial

GoodyBeads | Blog - Swarovski Sapphire Crystal Bracelet FREE Tutorial

Items used in bracelet: CH00724 (10″), TC01897 (4), Z008576, SW00072 (15), SW02049 (8) and SW00001 (8). Tool: Magical Crimping Pliers

This bracelet is designed using our popular beading chain, 2mm crimps and slide on clasp. We’ve also used Magical Crimping Pliers to finish the crimps! Check out how to use this tool in our BeadSmith Magical Crimping Pliers blog post.

  1. Slide beading chain through slide on clasp.
  2. On the beading chain, slide on the following:
    Crimp tube, 3 clear crystal, 1 light sapphire, one clear, 2 light sapphire, 1 sapphire, 1 light sapphire, 11 sapphire, 1 light sapphire, 1 sapphire, 2 light sapphire, 1 clear, 1 light sapphire, 3 clear crystal and crimp tube.
  3. Slide chain through slide on clasp in the same direction you did in step one.
  4. Center beads and make a crimp on both ends of your crystals with magical crimping pliers. Make sure to leave a gap so that the crystals lay nicely and not too rigid on the chain.
  5. Slide bracelet over the larges width of your hand and cut excess chain ends if needed.
  6. Add a crimp to both ends of the beading chain and make a crimp with the magical crimping pliers.


Sapphire Icicle Earrings

GoodyBeads | Blog - Swarovski Sapphire Earrings with FREE Tutorial

Items used in earrings: SW00183 (2), SW00182 (4), SW00181 (2), SW02088 (2), SW00634 (2), TCZ0078, A001495, A019697, TC00006 (4) and TC00032 (2).

  1. On headpin, slide on the following and make a simple loop:
    8mm bicone, 5mm spacer, 2 6mm bicone, 4mm spacer and 4mm sapphire bicone.
  2. Open eyepin loop, slide on crystal dangle from Step 1 and close loop.
  3. On the eyepin, slide on the following and make a simple loop:
    4mm sapphire, 4mm spacer, 4mm light sapphire and 3mm crystal.
  4. Open earwire loop, slide one crystal dangle and close loop.
  5. Repeat all steps for other earring.


Swarovski Sapphire Bracelet

GoodyBeads | Blog - Swarovski Sapphire Bracelet with FREE Tutorial

Our friends at Swarovski: Create Your Style has this stunning bracelet made with classic cut crystal pendants!

What you’ll need for bracelet:

Directions:

  1. Using 7mm jump rings attach one 8mm Sapphire pendant to one Heavy Hammered Ring. Then attach one 10mm Sapphire pendant, one 14mm pendant, one 10mm pendant and one 8mm pendant onto the hammered ring. Make sure all pendants face forward. Repeat this step 3 more times and set aside.
  2. Now using the large charms made in Step 1 attach them evenly along the bracelet. Do this with a 7mm jump ring and attach the Heavy Hammered Ring and Dotted Dap Circles together.


Swarovski Psychology of Color: Sapphire

For October, Swarovski’s Psychology of Colors pick is Sapphire. Check out how bold and confident this hue is!

SW_POC_Newsletter_Sapphire_generic

Cool down with this perfect color for fall/winter! Sapphire is a color loved by many and quite popular in jewelry. Here are some Swarovski colors to match this rich hue:

  • Sapphire
  • Light Sapphire
  • Light Sapphire Shimmer
  • Metallic Blue
  • Blue Shade
  • Denim Blue

Sapphire Jewelry

SW_POC_SapphireProject_Main2
Check out our other blog post with designs using Swarovski Sapphire!


Swarovski Triangle Earrings with Tassel

Design a modern and boho style earrings with Swarovski Triangle Shaped Sew-On Stone and tassels!

GoodyBeads | Blog: Swarovski Triangle Sew-On crystal stone and tassel earrings. FREE tutorial.

What you’ll need for earrings:

Instructions:

  1. Cut chain with 10 links. Cut 2 pieces total.
  2. Open 3mm jump ring, slide on tassel loop and close jump ring.
  3. Open 5mm jump ring, slide through 3mm from Step 2 and hole of Swarovski triangle (point end). Close jump ring.
  4. Open another 5mm jump ring, slide through other Triangle hole and through a piece of chain end. Close jump ring.
  5. Repeat Step 4 to other Triangle hole.
  6. Open another 5mm jump ring, slide through both chain ends and close jump ring.
  7. Open another 5mm jump ring, slide through 5mm from Step 6 and through post earring hole. Close jump ring.
  8. Repeat all steps for other earring.

Designed by Tory.


Swarovski® Peridot Jewelry Tutorials

We have three exciting projects using September’s Swarovski Psychology of Color: Peridot. See how to energize yourself with this natural hue!


Peridot Wheel Pendant with Ball Chain Necklace

GoodyBeads Blog - Swarovski Peridot Wheel Pendant with FREE Pattern Tutorial

We designed a simple beaded wheel with round Peridor Shimmer crystals. Check out the simple TUTORIAL and all you need to make this Peridot Wheel Pendant on a a ball chain necklace!

What you’ll need:


Brushed Peridot Earrings

GoodyBeads Blog - Swarovski Peridot with Brushed Silver Beads and Components. FREE Tutorial

Make your Peridot colors POP with brushed silver beads and components!

Items used in earrings: SW02060 (2), SW02058 (2), Z018411, A019694, A019606, Y018086 and TC02297.

  1. On a headpin, slide on a 4mm crystal, 8 wavy disc (alternating them so it creates a wavy look) and an 8mm crystal. Make a simple loop.
  2. Open eyepin loop, slide on loop from step 1, close eyepin loop.
  3. On eyepin, slide on brushed silver bead and make a simple loop.
  4. Open earwire loop and slide on brushed silver loop. Close loop.
  5. Repeat all steps for other earring.


Swarovski: Peridot Passion

GoodyBeads Blog | Swarovski Peridot Passion Necklace

This sample and tutorial comes from our friends at Swarovski: Create Your Style, called Peridot Passion. You see how stunning Peridot looks with brass findings!

What you’ll need for necklace:


Instructions

  1. Cut the chain into fifteen 1 ½” pieces and set aside.
  2. Using one eye pin slide on one 6mm Crystal, one 8mm Crystal and one 6mm Crystal and make a simple loop. Repeat this step 5 more times and set aside.
  3. Using one eye pin slide on one 6mm Crystal and make a simple loop. Set aside.
  4. Using one head pin slide on one 8mm Crystal and make a simple loop. Set aside.
  5. Using the leaf pendant attach seven of the 5mm jump rings across the top of the opening.
  6. Using the 1st jump ring on the left of the top of the leaf pendant attach one piece of chain, then attach one 9mm jump ring, then attach another piece of chain. Now attach one component made in Step 2 and to the other side of the component attach another piece of chain. Repeat this pattern two more times and then attach the lobster clasp with a 5mm jump ring.
  7. Using the last jump ring on the right of the top of the leaf pendant attach one piece of chain, then attach to the 7.25mm jump ring already on the left of the necklace, then attach another piece of chain. Now attach one component made in Step 2 and to the other side of the component attach another piece of chain. Repeat this pattern two more times and then attach one 9mm jump ring.
  8. Using the component made in Step 3 attach one end of this component to the bottom middle of the 9mm jump ring hanging above the leaf pendant. Now attach the component made in Step 4 to the bottom of the 6mm bead.


Swarovski Psychology of Color: Peridot

For September, Swarovski’s Psychology of Colors pick is Peridot. Check out how earthy and natural this hue is!


SW_POC_Newsletter_Peridot


Jump into this color with high spirits and peacefulness! Peridot is a fresh and energetic color that makes you want to just relax and smell the roses! Here are some Swarovski colors to match this earthy hue:

  • Peridot
  • Peridot Shimmer
  • Chartreuse
  • Light Green
  • Iridescent Green
  • Chrysolite Opal
  • Luminous Green


Peridot Jewelry

SW_POC_PeridotProject_Main

Check out our other blog post with designs using Swarovski Peridot and Peridot Shimmer crystals!


Swarovski® Rose Water Opal Jewelry Tutorials

We have three lovely projects using August’s Swarovski Psychology of Color: Rose Water Opal.

Beaded Fan Necklace with Swarovski Crystals

GoodyBeads Blog | Swarovski Rose Opal Water Beaded Fan Necklace with FREE Pattern Tutorial

Items used in necklace: (12) SWZ0469, SB00107, SB00423, A021148, A006585, A015211, A011519, (2) CH01096

Get FREE Downloadable PDF Pattern Tutorial Here!

Gold & Silver Rose Opal Earrings

GoodyBeads | Blog - Rose Water Opal Gold and Silver Earrings with FREE tutorial

Items used in earrings: (4) SWZ0469, SB00423, A011519, Y018889, Z010751, A007659, A011528, Z012031

We mixed up the fun in this pair of earrings with gold and silver findings. It adds stunning layers and surely makes the crystals stand out!

Directions:

  1. On a headpin, slide on a gold seed bead, bicone and another seed bead.
  2. On an eyepin, slide on a gold seed bead, bicone and another seed bead.
  3. Open loop from Step One and slide on brushed ring link. Close loop.
  4. Open gold jump ring, slide on brushed ring link and one hole of gold brushed disc. Close jump ring.
  5. Open a loop of link from Step Two, slide on other hole of gold brushed disc and close loop.
  6. Open earwire loop and slide on other end of crystal link and close earwire loop.
  7. Repeat all steps for other earring.

Rose Water Rhapsody

DSC08523

Our friends at Swarovski Create your Style, designed this stunning necklace with Rose Water Opal crystals and Fine Rocks Tube beads.

What you’ll need:

Directions:

  1. Using alcohol to wipe clean all the findings and set to dry.
  2. Using one fancy stone, blue in matching setting and set aside for 24 hours to dry. Repeat two times and set aside.
  3. Using one eyepin, attach one pendant made in Step 2, then slide on a bead cap, on SW02020 and another bead cap. Make a simple loop. Repeat one more time and set aside. Repeat one more time and set aside.
  4. Using another eypin, attach one pendant made in Step 2, then slide on a bead cap, on SW01733 and another bead cap. Make a simple loop.
  5. Cut beading wire into two 20″ pieces.
  6. Using both wires together, slide on a SW01902, component made in Step 3, SW01902, SWZ0469, SWZ0470, SWZ0469, SW01902, one component made in Step 4, SW01902, SWZ0469, SWZ0470, SWZ0469, SW01902, component made in Step 3, and SW01902. Position all these in the center of the two strands of wire.
  7. Take all remaining 4mm bicone beads and pour them onto your bead mat. Mix them all together.
  8. Starting with the right side of the necklace and only using one of the two wires coming out of the 6mm bicone bead, string on three 3mm bicone beads. Now using your bead mix you created in Step 7 randomly string on 42 4mm bicone beads. String on three 3mm bicone beads. Repeat for this step for the second empty wire.
  9. Using both wires, slide on one crimp bead and one end of the toggle. Crimp to close and add crimp cover.
  10. Repeat Steps 8-9 to make left side of the necklace.


Swarovski Psychology of Color: Rose Water Opal

For August, Swarovski’s Psychology of Colors pick is Rose Water Opal. Check out how feminine and sophisticated this hue is!


SW_POC_Newsletter_RoseWaterOpal_generic


Indulge yourself with this color! Rose Water Opal is light and sweet like a glass of Pink Lemonade! Here are some Swarovski colors to match this lovely hue:

  • Rose Water Opal & Rose Water Opal AB
  • Vintage Rose
  • Rose & Light Rose
  • Rosaline
  • Blush Rose


Rose Opal Jewelry

SW_POC_RoseWaterOpal_Main

Swing over to our other blog post with designs with Swarovski Rose Water Opal crystals.


Swarovski® Aquamarine Jewelry Tutorials

We have three COOL projects using July’s Swarovski Psychology of Color: Aquamarine. Revamp your DIY jewelry with these ideas!


Aquamarine Bubble Earrings

GoodyBeads Blog | Swarovski Psychology of Color: Aquamarine Bubble Earrings - Free Tutorial

Create cascading bubbles in this pair of Aquamarine earrings.

Items used in earrings: TCZ0077, TC00198 (2), A019672, A019606, SW00071 (6), SW00070 (10), SW00069 (6)


Directions:

  1. On a headpin slide on a 6mm round crystal and make a simple loop. Repeat to make a total of FOUR 6mm dangle.
  2. On a headpin slide on a 8mm round crystal and make a simple loop. Make a total of SIX 8mm dangle.
  3. Open loop on eyepin, slide on a 6mm dangle from Step One and close loop. Slide a 4mm round crystal on the eyepin and make a simple loop.  Repeat to make a total of FOUR links.
    1. Open loop of link, slide through outer loop of the TierraCast Bali 1-to-5 Link and close loop. Repeat to the other outer loop of TierraCast Link
    2. Repeat to other TierraCast Bali 1-to-5 Link.
  4. Open loop on eyepin, slide on a 8mm dangle from Step Two and close loop. Slide a 6mm round crystal on the eyepin and make a simple loop. Repeat to make a total of SIX links.
    1. Open loop of link, slide through second loop of the TierraCast Bali 1-to-5 Link and close loop. Skip middle loop and repeat to attached link to the fourth loop of TierraCast Link.
    2. Repeat to other TierraCast Bali 1-to-5 Link.
  5. Open loop on eyepin, slide loop of link you make in Step Four and close loop. Slide a 4mm round crystal on the eyepin and make a simple loop. Repeat to make a total of TWO links.
    1. Open loop of link, slide through the middle loop fo the TierraCast Bali 1-to-5 Link and close loop.
    2. Repeat to other TierraCast Bali 1-to-5 Link.
  6. Open ear wire loop and slide on top loop of TierraCast Bali Link. Close loop. Repeat to other ear wire and Bali Link.


Aquamarine Raindrop Necklace

GoodyBeads Blog | Swarovski Psychology of Color: Aquamarine Drop Necklace - Free Tutorial

This easy DIY necklace requires minimal effort to make and a gorgeous piece to wear!

Items used in Necklace: SW02134, TC02317, Y003724


Directions:

  1. Slide prong of the pinch bail to pendant hole and gently pinch the bail.
  2. Open clasp on necklace and slide necklace chain through bail.


Swarovski: Triple Ocean Waves Necklace

GoodyBeads Blog | Aquamarine Tripe Ocean Waves Necklace- Free Tutorial

Our friends at Swarovski Create your Style, designed this stunning necklace.

What you’ll need:


Directions:

  1. Cut stringing wire into three 32” pieces.
  2. Using all three wires together string on one Pave Bead, two SW02036, one nugget bead, three SW02036, one nugget bead, three SW02036, one nugget bead, three SW02036, one nugget bead, two SW02036 and one Pave Bead. Position all these in the center of the three strands of wire.
  3. Starting with the right side of the necklace, and only using one of the three wires coming out of the pave bead, string on one SW00621, one SW02068, one SW02035, one SW00729, one Sw01462, one nugget bead, one SW02036, one nugget bead, one SW01462, one SW00729, one SW02035, one SW02068 and one SW00621. Repeat this two more times for the two remaining open wires.
  4. Now take all three wires together again and slide on one Pave Bead, two SW02036, one nugget bead, one SW02036, one nugget bead, two SW02036 and one Pave Bead.
  5. Repeat Step 3.
  6. Now take all three wires together again and slide on one Pave Bead, two SW02036, one nugget bead, three SW02036, one nugget bead, and two SW02036. Using all three wires slide on one crimp bead and one end of the toggle. Crimp to close and add crimp cover.
  7. Repeat Steps 3 – 6 to make left side of the necklace.


Swarovski Psychology of Color: Aquamarine

For July, Swarovski’s Psychology of Colors pick is Aquamarine. Check out how purifying and cool this hue is!


SW_POC_Newsletter_Aquamarine_generic

Wrap yourself up in this color! Aquamarine is a refreshing color like a cool sip of water on a hot day or the clear sky with no clouds in sight! Here are some Swarovski colors to match this cool hue:

  • Aquamarine Shimmer
  • Aqua
  • Erinite Shimmer
  • Turquoise
  • Ocean DeLite
  • Crystal Iridescent Light Blue
  • Blue Shade


Aquamarine Jewelry

Jul19_SWPOC_Aquamarine_Main

Make sure you stop over to our other blog post for jewelry designed with Aquamarine.


Swarovski® Pearl Drop Necklace

Dainty and beautiful describes this DIY necklace using a Swarovski Pearl and beading chain. Check out how easy it is to making this piece of jewelry!

Items you need for necklace:

GoodyBeads Blog | Swarovski Pearls Drop Necklaces - Free Tutorial

Directions:

  1. Taking a piece of wire like a headpin or very thin awl, ream the holes of the pearl. This will help with getting the chain through.
  2. Cut beading chain to desired length. Slide chain through pearl.
  3. Crimp an end cap to each chain end.
  4. Attach your choice of clasp to your necklace ends with jump rings.