Swarovski Psychology of Color: Peridot

For September, Swarovski’s Psychology of Colors pick is Peridot. Check out how earthy and natural this hue is!


SW_POC_Newsletter_Peridot


Jump into this color with high spirits and peacefulness! Peridot is a fresh and energetic color that makes you want to just relax and smell the roses! Here are some Swarovski colors to match this earthy hue:

  • Peridot
  • Peridot Shimmer
  • Chartreuse
  • Light Green
  • Iridescent Green
  • Chrysolite Opal
  • Luminous Green


Peridot Jewelry

SW_POC_PeridotProject_Main

Check out our other blog post with designs using Swarovski Peridot and Peridot Shimmer crystals!


Lariat Gemstones and Tassel Necklace – Video Tutorial

Our DIY lariat feature many of our most popular products: beading chain, tassels, slide clasp, gemstones and clamshell bead tips! Check out all you need to make one of your own along with our previous Facebook LIVE video!

We’ve combined many of our favorite products in this lovely necklace set. It’s adjustable with the sliding clasp, colorful with quality gemstones and simplistic with the popular beading chain. Plus, it’s tied together at the front with clamshell bead tips and tassels!

What you’ll need:

Video Tutorial

Blue Impression Jasper Necklace

Items used in necklace: CH00724 (3 feet), A004830Z010740Z008576Z019080IJR6RL and Z004964.

OR Buy All the Products you need to make this project with this one sku – BAP0013

69931608_10157709248573469_4714030635209981952_o

Purple Impression Jasper Necklace

We’ve used 4mm Purple Impression Jasper & Pyrite Round Beads by Dakota Stones (PPLPYR4RD) in this necklace. It’s definitely a stunning color!

Items used in necklace: CH00724 (3 feet), A004830Z010740Z008576Z019080PPLPYR4RD and Z006096.

69872703_10157709484638469_3921350723735912448_o

Blue is always one of the most popular color to design with. There’s no exception to how the earthy blues and browns are in this Impression Jasper Rondelle Beads (IJR6RL) look.


Macrame Leather Bracelet with Square Knots

Here is a simple bracelet braided with macrame square knots using Chinese knotting cord and 1.5mm leather cord.

With the boho, fiber and minimalistic trend, macrame is making its comeback to wall decor and even jewelry making. Like our Macrame Leather Bracelet, we used Chinese knotting cord and made square knots on two strands of leather for a simple bracelet. The contrast of the white Chinese knotting cord still brings out the natural colors of the leather!

What you’ll need:

You can use 2mm Chinese knotting cord or leather for this tutorial also!

Tutorial

Let’s get knotting!


Rainbow Tassel Earrings

Brighten up your days with a DIY rainbow tassel earrings.

These pair of earrings use our popular cap tassels, all strung on hoop earrings! Flaunt this trendy and cheerful look.

GoodyBeads Blog: Rainbow Tassel Earrings

Directions

  1. Slide the following seed beads and tassels onto the hoop finding:
    Seed bead, purple, seed bead, blue, seed bead, green, seed bead, yellow, seed bead, orange, seed bead, red and seed bead.
  2. Slide hoop end through the hole of the other hoop end.
  3. Using your round nose pliers, roll a simple loop with the hoop end.
  4. Open ear wire loop and slide on loop of tassel hoop. Close ear wire loop.
  5. Repeat all steps for other earring.

Items used in earrings: SB00106, A013204, Z013686, Z013685, Z013684, Z013687, Z014017, Z013688, TCZ0078


Double Strand Bracelet with Slide on Clasp

Make a customizable and adjustable bracelet using your favorite beads, Griffin Silk Cord and Slide on Clasps.

Make sure to check out our FB video we did LIVE running through how easy it is making this bracelet. We made an adjustable bracelet with double strands of griffin cord strung with a side of metal beads and the other with seed beads and 4mm Gemstone beads.

What you’ll need:

Directions

  1. Unravel both your Silk Cord from its card and straighten them by running them through a wet towel a few times.
    Straighten-Silk-Cord-Tutorial
  2. Flush both cord ends together and make an overhand knot with both ends.
  3. Using both needles, slide on a gemstone bead.
  4. Make another overhand knot with both cords about 4″ from the first knot you’ve made.
  5. Using both needles, slide on the Slide on Clasp and pull it down next to the knot you’ve made.
  6. With one silk cord, slide on a sequence of seed bead and metal bead until the length of these beads are long enough to wrap around your wrist. Make sure to end with a seed bead. Set this cord and needle aside.
  7. With the other silk cord, slide on a sequence of seed bead and 4mm gemstone until the length of these beads are the same as the ones in step 6. Make sure to send with a seed bead..
  8. Take both cords and make an overhand knot close enough to your seed bead.
  9. Sew both needle through the Slide on Clasp, going the same way as you did in Step 4. This will criss cross the ends.
  10. Using both needles, slide on a gemstone bead.
  11. Slide the bracelet around your wrist to the widest part, which is around the middle part of your hand. This will lengthen your cord ends and determine where you will knot your ending knot. Make your knot and cut off excess cord.
  12. The other end will be longer, so you will need to make another knot to sit closer to the Slide on Clasp.
  13. Done! Slide your bracelet on and with your middle finger, hold one gemstone end while you pull the other gemstone end with your other hand to cinch the bracelet around your wrist.
    Slide-Clasp-Bracelet_image3

Facebook Video

Bracelet Samples

GoodyBeads | Blog - Gemstone and Metal Beads Multi-Strand DIY Bracelet with Adjustable Clasp. GoodyBeads | Blog - Gemstone and Metal Beads Multi-Strand DIY Bracelet with Adjustable Clasp.

We are LOVING this blue and silver combo! Heidi would agree also.

Items used in bracelet: SDL4RD-8A006569 (2), SB00422, Z008576, A021442 (2)

GoodyBeads | Blog - Gemstone and Metal Beads Multi-Strand DIY Bracelet with Adjustable Clasp. GoodyBeads | Blog - Gemstone and Metal Beads Multi-Strand DIY Bracelet with Adjustable Clasp.

In this bracelet, we did a full row of brass beads instead of a seed bead and metal sequence. Go ahead and make it your own!

Items used in Apple Jasper Bracelet: A022196, A006569, SB00423, APL4RD-8, Z008577


LeatherCord USA: Josephine Knot Collar Necklace

Check out this lovely tutorial courtesy of Leather Cord USA. Learn to make celtic knots with leather cord and use the skill to make fun jewelry designs!


Our friend, Michelle from Leather Cord USA provided us with this great tutorial on how to tie the double celtic knot using two pieces of leather cord! Make yours today.


Aug19_LeathercordUSA_3


What You’ll Need:


Step by step instructions:

  1. Take the two strands of Round Leather Cords and place evenly side by side then fold in half, creating four strands grouped in two.
  2. Lay leather flat on a table or board
  3. Take the right side group of two strands and create a loop laying it on top of the left strands. This will create three openings: top, middle and left (outside) as indicated in the photo below.
  4. Take the left side and cross the cord over the tail of the right side then under the base of the top opening and feed through then back down the middle opening and up through the left opening.
  5. Gently pull both tails while adjusting the knot into place. (Be sure to keep the strands lying flat while pulling.)
  6. Repeat steps 3-5 for the left side: Take the left tail and create a loop laying it on top of the right strands. Take the right side and feed the cord over the left tail then under the base of the top opening and feed through then back down the middle opening and up through the left opening.
  7. Repeat all steps to create five individual knots.
  8. Feed one Large Hole Bead on the two center strands
  9. Feed one Large Hole Bead on the two left strands and one on the two right strands
  10. Feed a final Large Hole Bead on the two center strands
  11. Repeat the knot pattern from above for another five knots.
  12. Cut the top loop (starting point) in half
  13. Add a drop of adhesive to the inside of the end cap and place all four strands in, give a slight twist and hold everything in place for a few seconds.
  14. Repeat step 13 for the opposite side
  15. Take the chain provided and judge the exact length you want the final piece to be. Cut chain in half.
  16. Attach each side of the chain to the leather piece by attaching chain to end cap with jump ring. Repeat process to other end cap and chain.
  17. Attach the lobster claw to one end of your chain with a jump ring. Add a jump ring to other chain end.
  18. Voila!!!! You are done! Now go show off your work of art for the world to see!


Visual look at how you will continue your necklace braids:

NeckTutorial1

Other Examples

Aug19_LeathercordUSA_1

Simplify this knot by making one knot and adding a gemstone pendant to it’s center loop!


Aug19_LeathercordUSA_2

You can even make a smaller version for earrings!


Statement Bib Necklace with Chinese Crystals

This DIY statement necklace will become your glamorous accessory of the season. Designed with our Bib connectors and Chinese crystals, all you need to know in order to make this necklace is the basics of making a simple loop and opening a jump ring!


What you’ll need to make this necklace:

GoodyBeads | Blog - Statement Bib Necklace with Chinese Crystals, FREE tutorial


Directions

  1. On a headpin, slide on a round bead and teardrop bead. Make a simple loop. Open loop and slide dangle to first hole of bib connector.
  2. On a headpin, slide on a round bead, teardrop bead and round bead. Make a simple loop. Open loop and slide dangle to next hole of bib connector.
  3. On a headpin, slide on a round bead, teardrop bead, round bead and teardrop. Make a simple loop. Open loop and slide dangle to next hole of bib connector.
  4. On a headpin, slide on a round bead, teardrop bead, round bead, teardrop and two round bead. Make a simple loop. Open loop and slide dangle to next hole of bib connector.
  5. On a headpin, slide on a round bead, teardrop bead, round bead, teardrop, round bead and teardrop. Make a simple loop. Open loop and slide dangle to next hole of bib connector.
  6. On a headpin, slide on a round bead, teardrop bead, round bead, teardrop, round bead, teardrop and two round bead. Make a simple loop. Open loop and slide dangle to next hole of bib connector.
  7. On a headpin, slide on a round bead, teardrop bead, round bead, teardrop, round bead, teardrop, round bead and teardrop. Make a simple loop. Open loop and slide dangle to next hole of bib connector.
  8. On a headpin, slide on a round bead, teardrop bead, round bead, teardrop, round bead, teardrop, round bead, teardrop and round bead. Make a simple loop. Open loop and slide dangle to next hole of bib connector.
  9. Repeat step 7 for next hole on bib connector.
  10. Repeat step 6 for next hole on bib connector.
  11. Repeat step 5 for next hole on bib connector.
  12. Repeat step 4 for next hole on bib connector.
  13. Repeat step 3 for next hole on bib connector.
  14. Repeat step 2 for next hole on bib connector.
  15. Repeat step 1 for next hole on bib connector.
  16. Cut two pieces of chain at 6″ to 8″ long.
  17. Open jump ring and slide on one end of chain and one end of bib connector. Close jump ring.
  18. Open another jump ring and slide on other chain and to other end of bib connector. Close jump ring.
  19. Open another jump ring and slide on one end of the chain and through ring of clasp.
  20. Repeat steps 9 with another jump ring and other clasp ring.

NecklaceChineseCrystal_image2


GoodyBeads Challenge: Drop Chandelier Earrings

Our GoodyBeads Designers came together to challenge their skills in designing with one product. Today’s product is the Long Drop Chandelier Earrings/Pendants (Z013693). Check out our three different pairs of earrings our designers came up with.

Y013693

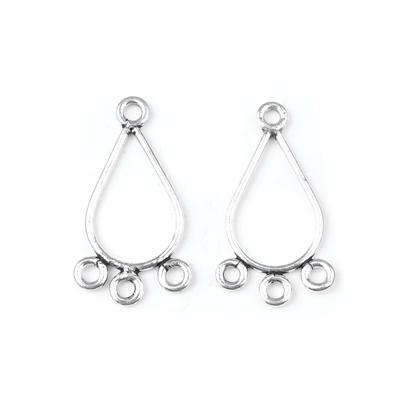
Get this featured component today and have fun creating!

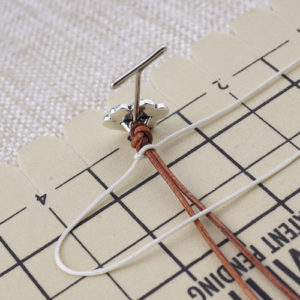
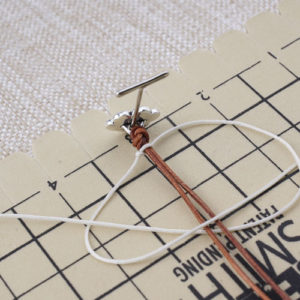
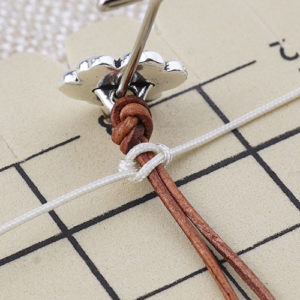
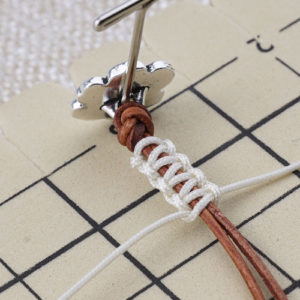
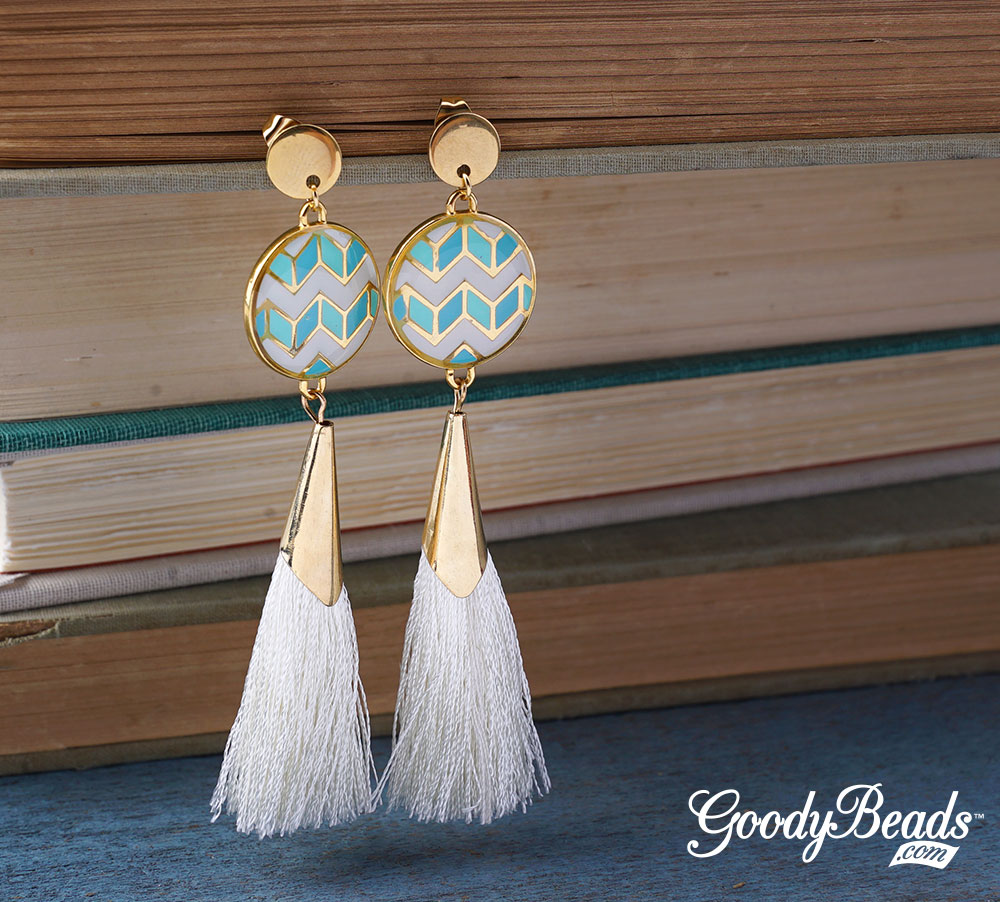
Heidi Tassel Chandelier Earrings

Heidi’s design is true to her love of tassels and TierraCast components. Her gorgeous design turned out very “HEIDI” like!

GoodyBeads | Blog - Heidi Tassel Earrings

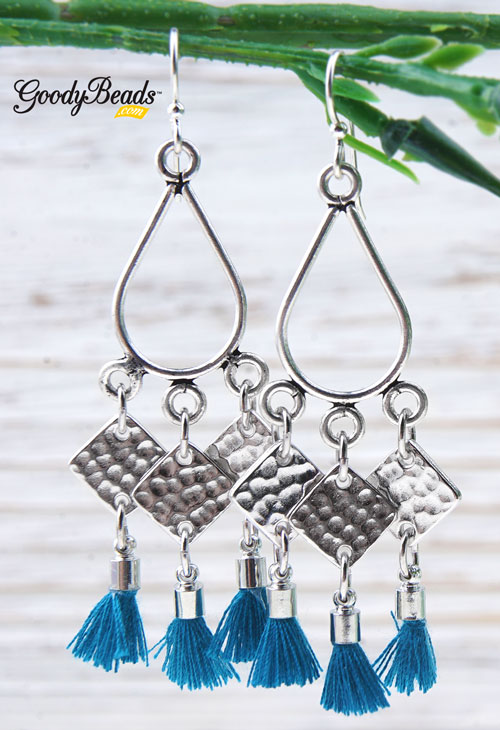
Items used in earrings: Z013693, Z014010, TC00201 (6),  TCZ0077, TC01259 (12)

Tory Acetate Post Earrings

Tory created some Statement Earrings with a beautiful acetate component and Swarovski® round crystals. Plus, playing off on a popular jewelry trend, she finished off her design with Post Earrings.
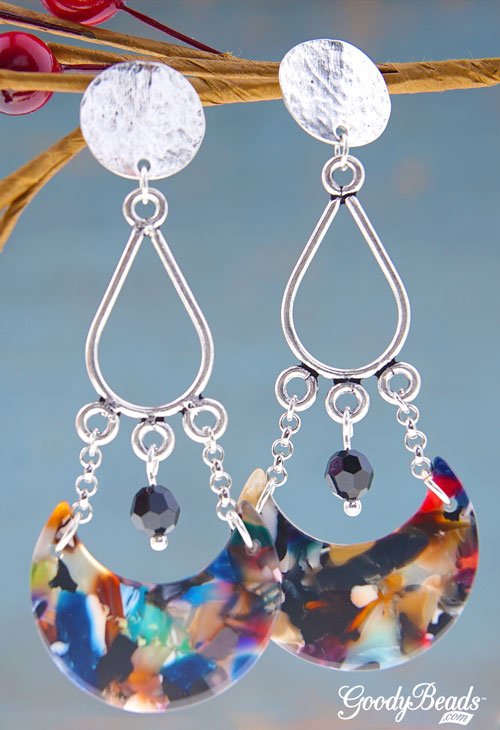
GoodyBeads | Blog - Tory's Acetate Statement Earrings

Items used in earrings: Z012450Z013693, A008182, Z011550, A001529, Z007586 Z008989, Z019697, SW00100 (2)

So Moon & Star Earrings

So went rogue and designed a cute pair of earrings with a celestial theme. She created a staggering effect and added a charm to each loop on the chandelier component.

GoodyBeads | Blog - So Vang's Celestial Moon and Star Earrings

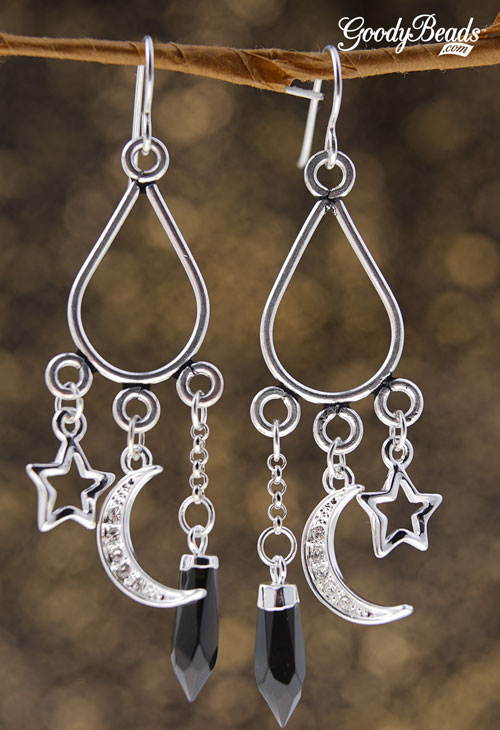
Items used in earrings: Z013693, CH01194A002413, TC02297, Z020488 (2), TC00055 (2), Z011883 (2)


Straw and Leather Macrame Earrings – Tutorial

Learn how easy it is to macrame 3mm deerskin lace on a Woven Straw Ring for a cool and hip pair of earrings!


Macrame is making waves along side the fiber trend. Our Designer, Tory did a tutorial on how to make a single half hitch knot with 3mm deerskin lace around a woven straw ring. It revises our favorite woven straw component into fall fashion and even back to school wear!


What you’ll need:


Tutorial

  1. Cut two pieces of 1 meter of lace each.
  2. Fold lace in half and make a lark’s head knot on the straw ring. (Make sure to keep the smooth side sitting outwards.)
  3. With each strand of lace, make a single half hitch knot working outward around the ring to both sides of the lark’s head knot you made in step 2.
  4. Make 6-8 half hitch knots on both sides of the lark’s knot on the straw ring.
  5. Take the lace end and tuck it behind your third loop on the backside of your knotted straw ring. Do the same to other end.
  6. Add a small dab of glue to keep ends in place.
  7. Cut excess lace.
  8. Complete your earrings with making a hole in your woven opposite of lace/leather knots, with a bead reamer or awl. Add your earring finding to woven straw with a jump ring and through the hole you made.
  9. Repeat all steps for other earrings.


Video Tutorial

Tutorial starts at 4:20 minutes.


Examples

Strawleathermacrameearrings_1

Items used in examples using Deertan lace: Z001659Z015550Z015610

In this example, Deertan lace was used. The one the left is 3mm and the left is 5mm.


Strawleathermacrameearrings_image

Items used in earrings: Z001659, A010962, Z008989, A001529


Gemstone Leather Necklace with Leather Knot Tutorial

Leather necklaces with a gemstone pendant are easy to make once you get the basic sliding/slip leather knot down. Check out our easy tutorial to tying a gemstone necklace of your own.

The functionality of the sliding knot is mainly what it states, it slides. When you make a sliding knot, you are making a knot over the other leather piece so that the other piece slides back and forth, which can make a necklace or bracelet adjustable. You can check out our previous blog post on making a sliding knot.

If you’ve watched the video, you will see that we’ve altered the first portion of the necklace video by creating a two, coiled sliding knot to pinch the leather together at the top of the pendant. This will create somewhat of a bail so that pendant swingings nicely back and forth.

What you’ll need for tutorial:

Tutorial

Sliding/Slip Knot Tutorial

Check out video/blog post on how to make a sliding knot in Step 8. Knot tutorial begins at 0:40.

Necklace with Gemstones

GoodyBeads | Blog - gemstone leather necklace with leather knot tutorial

Items used in necklaces: Z019148,  PEN-YJD28X32DP-FF, MRQ16-60NUG, PEN-PDC35-64FF


DIY Beadable Cuff LInks – Pattern Tutorial

Our selection of beadable accessories are one of our favorite categories to play with. We’re giving you a basic pattern at how to bead stitch a beadable cuff link with Miyuki Delica beads.


What you’ll need for beadable link:


Tutorial

As you can see from the illustration, you will see how to ladder stitch across the channel of the beadable cuff link, while adding 3 Delica seed beads inside the channel. Add different colors and create fun patterns to complete your Cuff Link.

Screen Shot 2019-08-07 at 4.56.54 PM


Make sure to Click and Download the PDF Tutorial Pattern. You will also have a blank template for you to design and color a custom pattern for yourself. Here are some sample patterns you can see in the downloadable pdf also:

GoodyBeads | Blog - FREE Pattern Tutorial for Beadable Cuff Link.


Items used in samples:


Swarovski® Rose Water Opal Jewelry Tutorials

We have three lovely projects using August’s Swarovski Psychology of Color: Rose Water Opal.

Beaded Fan Necklace with Swarovski Crystals

GoodyBeads Blog | Swarovski Rose Opal Water Beaded Fan Necklace with FREE Pattern Tutorial

Items used in necklace: (12) SWZ0469, SB00107, SB00423, A021148, A006585, A015211, A011519, (2) CH01096

Get FREE Downloadable PDF Pattern Tutorial Here!

Gold & Silver Rose Opal Earrings

GoodyBeads | Blog - Rose Water Opal Gold and Silver Earrings with FREE tutorial

Items used in earrings: (4) SWZ0469, SB00423, A011519, Y018889, Z010751, A007659, A011528, Z012031

We mixed up the fun in this pair of earrings with gold and silver findings. It adds stunning layers and surely makes the crystals stand out!

Directions:

  1. On a headpin, slide on a gold seed bead, bicone and another seed bead.
  2. On an eyepin, slide on a gold seed bead, bicone and another seed bead.
  3. Open loop from Step One and slide on brushed ring link. Close loop.
  4. Open gold jump ring, slide on brushed ring link and one hole of gold brushed disc. Close jump ring.
  5. Open a loop of link from Step Two, slide on other hole of gold brushed disc and close loop.
  6. Open earwire loop and slide on other end of crystal link and close earwire loop.
  7. Repeat all steps for other earring.

Rose Water Rhapsody

DSC08523

Our friends at Swarovski Create your Style, designed this stunning necklace with Rose Water Opal crystals and Fine Rocks Tube beads.

What you’ll need:

Directions:

  1. Using alcohol to wipe clean all the findings and set to dry.
  2. Using one fancy stone, blue in matching setting and set aside for 24 hours to dry. Repeat two times and set aside.
  3. Using one eyepin, attach one pendant made in Step 2, then slide on a bead cap, on SW02020 and another bead cap. Make a simple loop. Repeat one more time and set aside. Repeat one more time and set aside.
  4. Using another eypin, attach one pendant made in Step 2, then slide on a bead cap, on SW01733 and another bead cap. Make a simple loop.
  5. Cut beading wire into two 20″ pieces.
  6. Using both wires together, slide on a SW01902, component made in Step 3, SW01902, SWZ0469, SWZ0470, SWZ0469, SW01902, one component made in Step 4, SW01902, SWZ0469, SWZ0470, SWZ0469, SW01902, component made in Step 3, and SW01902. Position all these in the center of the two strands of wire.
  7. Take all remaining 4mm bicone beads and pour them onto your bead mat. Mix them all together.
  8. Starting with the right side of the necklace and only using one of the two wires coming out of the 6mm bicone bead, string on three 3mm bicone beads. Now using your bead mix you created in Step 7 randomly string on 42 4mm bicone beads. String on three 3mm bicone beads. Repeat for this step for the second empty wire.
  9. Using both wires, slide on one crimp bead and one end of the toggle. Crimp to close and add crimp cover.
  10. Repeat Steps 8-9 to make left side of the necklace.


DIY Jewelry using Enamel Components

We have some NEW exclusive enamel components that we could not help but make some gorgeous DIY jewelry with! Here are 5 different DIY jewelry to inspire you!


Enamel Earrings

GoodyBeads | Blog - DIY jewelry using Enamel Components FREE tutorial


Items used in earrings: Z001831, (2) Z016108, Z004939, A011517

Directions:

  1. Open loop of tassel, slide on a loop on enamel link and close loop.
  2. Open jump ring, slide on other loop on enamel link and through hole of post earrings. Close jump ring.
  3. Repeat all steps for other earring.


GoodyBeads | Blog - DIY jewelry using Enamel Components FREE tutorial

Items used in earrings: (2) Z015957, Z016027, A011517

Directions: Open small jump ring and slide on enamel dangle and loop of post earrings. Close jump ring and repeat.


Enamel Bracelet


GoodyBeads | Blog - DIY jewelry using Enamel Components FREE tutorial

Items used in bracelet: Z016188, Z012152

Directions: Open jump rings on adjustable bracelet, slide on a loop from enamel link. Close jump ring. Repeat for other link loop.


Enamel Necklace

Enamel_image05


Items used in Necklace #1: A002735, (2)A008135, Z016017, A011517, A008808

Directions: 

  1. Cut large Oval Chain with 4 Links.
  2. Cut 2 inches off of the 2 feet of A008135, rollo chain.
  3. Open large jump ring and attach oval chain to the 2″ rollo chain. Close jump ring.
  4. Open another large jump ring and attach other end of oval chain and the remainder of the rollo chain. Close jump ring.
  5. Open small jump ring, slide on one end of chained piece and through enamel pendant loop. Close jump ring.
  6. Repeat step 5 with another small jump ring and other chain end.


Items used in Necklace #2: Z016327, Z007681, (2) CH00976, Z011514Z011397

Directions:

  1. Open large jump ring and slide through one hole of connector pendant and tassel loop. Close jump ring.
  2. Open another large jump ring and slide through other hole of connector pendant. Close jump ring.
  3. Open oval jump ring and slide on one end of your chain and through jump ring from Step 2. Close jump ring.
  4. Repeat Step 3 to other chain end another another oval jump ring.


Cymbal Remata Beaded Earrings – Pattern Tutorial

We have a very simple pattern for you today using the Cymbal Remata Bead Ending and 8/0 seed beads. Check out this free pattern today, designed by So Vang.


What you’ll need:


Geometric Drop Earrings with Cymbal Remata

GoodyBeads | Blog - Geometric Drop Earrings with Cymbal Remata and Size 8 Miyuki Seed Beads - FREE Pattern Tutorial

Items used in Earrings: Z004568, SB00076, SB00107, TCZ0139, A006585, A015211


GoodyBeads | Blog - Geometric Drop Earrings with Cymbal Remata and Size 8 Miyuki Seed Beads - FREE Pattern Tutorial

Because we love tassels, throw a tassel on it!

Items used in Earrings: Z004564, SB00114, SB00106, TCZ0077, A006585, A015211, A002413, Z013685


Two Tone Hook Clasp

Today’s product highlight is the Two Tone Hook Clasp it uses two different 4mm or 5mm round cords to make a complete bracelet. See below for instructions on how to make a trendy bracelet with this hook clasp.


What you’ll need:

  • Two Tone Hook Clasp (X005030)
  • 3-4″ of 4mm or 5mm Round Leather or Bolo Cord (item used in bracelet: CH01028)
  • 13-16″ of 4mm or 5mm Round Leather or Bolo Cord (item used in bracelet: CH01025)
    OR cord should be double the length of desired wrist size.
  • Super New Glue (A015821)


GoodyBeads | Blog - Two Tone Hook clasp with Leather or Bolo Cotton Cord

Directions

  1. Add a drop of glue into the clasp channel, on the side opposite of where the hook is curved. (Swirl glue around to coat the channel)
  2. Fold the short piece of round cord and insert both cord ends into glued channel. Hold for a few seconds before letting go of the cords.
  3. Add a drop of glue into the other side of the clasp. (Swirl glue around to coat the channel)
  4. Fold the long piece of round cord and insert both cord ends into the other glued channel. Hold for a few seconds before letting go of the cords.
  5. Let glue set and dry for a few hours before wearing bracelet.