Honeycomb Drop Earrings

Love Czech Honeycomb beads? Our Designer So Vang always has a plethora of miscellaneous Honeycombs around her area! Here’s a simple way to use them in this Honeycomb Drop Earrings.

What you’ll need:

Directions:

  1. Cut beading chain at 2 inches. Cut two pieces.
  2. Slide on crimp tube to one end of beading chain and make a flat crimp.
  3. Slide on beading chain 5 honeycomb beads.
  4. Cap the other end with the end cap. Crimp the middle part of the end cap.
  5. Open earwire loop and slide on dangle. Close loop.
  6. Repeat Steps 2 – 5 for other earring.


DIY Swarovski Crystal Heart Bracelet

Our friends from Swarovski Create Your Style has this gorgeous Swarovski Crystal Heart Bracelet, in time for Valentine’s (or Galentine’s) Day!

Items used in bracelet: SW01138 (21), SW02083 (22), FTBW0001, Z001702, Z005838, X003062, A008807, TC01897 (2) & TC01899 (2). Heart charm is substituted with Z011847.

Directions

  1. Slide onto a 9″ beading wire a sequence of bicone crystal and heart bead, alternating and ending with a bicone crystal.
  2. Slide crimp tube to one end and loop end through wire protectors and down through the crimp tube. Crimp the crimp tube.
  3. Repeat Step 2 to other end of beading wire.
  4. Slide a crimp cover over the crimp tube and close cover. Repeat to other end.
  5. Open 7mm jump ring, slide through one end, through wire protector and through heart charm. Close jump ring.
  6. Open 5mm jump ring, slide through other end, through wire protector and through lobster clasp loop. Close jump ring.


Fan Flare Hoop Earrings with Czech SuperDuos

Brush up on your bead stitching skills with this Fan Flare Hoop Earrings with Czech SuperDuos. Even if you have minimal bead-stitching knowledge, our illustrated tutorial on making this flashy pair of earrings will be easy to follow.

What you’ll need:

GoodyBeads Blog | FREE Tutorial on Fan Flare Hoop Earrings with Czech SuperDuos.

Items used in earrings: Z011593, Z013491, SB01406, SB00107, SB00423, A006587 & A015211.


DIY Golden Turquoise Wrap Bracelet

Design this fancy Golden Turquoise Wrap Bracelet with memory wire, Czech beads, Swarovski® crystals, cork cord and curve tube with loop.

What you’ll need to make bracelet:

  • 5mm Cork Cord – CH00881 (16 Inches)
  • 5mm Gold Cord End – Z006380 (8 pieces)
  • Gold Memory Wire – WR00126
  • 9x6mm Czech Rondelle – Item in bracelet Z011353
  • 8mm Swarovski Briolette Beads – Item in bracelet SW02236 (12 pieces)
  • 10mm Gold Wavy Disc – Z018416 (5 packs)
  • 6mm Gold Wavy Disc – Z018412
  • 50mm Curve Tube with Loop – Z011737 (2 pieces)
  • 5mm Gold Jump Ring – A011519
  • 11mm Antique Gold Ethnic Dart Drop Charm by TierraCast – TC02440
  • Tassel with Gold Cap – Item in bracelet Z013767

GoodyBeads Blog | DIY Golden Turquoise Wrap Bracelet with Memory Wire, Swarovski, Czech Beads and Leather. Free Tutorial

Directions

  1. Make a coiled loop at one end of the memory wire with Memory Wire Finishing Pliers.
  2. Cut cork cord into 4 pieces, measured at about 4 inches.
  3. Slide the following sections onto the memory wire:
    a. End cap, cork piece and end cap.
    b. Czech Bead, TWO 10mm wavy discs (one concave in and the other concave out). Repeat 5 more times (omitting the last 2 wavy discs).
    c. TWO 6mm wavy disc (one concave in and the other concave out), THREE crystals, TWO 6mm wavy disc, THREE crystals, TWO 6mm wavy disc.
    d. Repeat Step 3b.
    e. End cap, cork piece, end cap, curve tube with loop, end cap, cork piece and end cap.
    f. TWO 6mm wavy disc, THREE crystal beads and TWO 6mm wavy disc.
    g. Czech Bead, TWO 10mm wavy discs (one concave in and the other concave out). Repeat 11 more times (omitting the last 2 wavy discs).
    h. TWO 6mm wavy disc, THREE crystal beads and TWO 6mm wavy disc.
    i. Curve tube with loop, end cap, cork piece and end cap.
  4. Cut memory with Memory Wire Cutters leaving half an inch end. Coil and make a simple loop.


3 DIY Earrings with Abalone Shell Gemstones

Design using these new Abalone Shell Gemstones from Dakota Stones. We have 3 stunning DIY earring designs highlighting the glow of the Abalone Shell Gemstones.

Abalone

As a foodie, Abalone is a delicacy in seafood cuisine. Take away the meat of the shellfish and you have the iridescent sheen of its hard outer shell.

‘Abalone Shell is strong and is made of stacked calcium carbonate tiles. When the abalone shell is struck, the tiles slide instead of shattering absorbing the energy of the blow. The inner layer of the shell is composed of nacre (mother-of-pearl), which in many species is highly iridescent, which make the shells attractive as decorative objects, jewelry, and as a source of colorful mother-of-pearl.’ (Dakota Stones)

There are also healing properties for Abalone. As it holds the richness of the ocean, it gives the wearer strength, stability and life like the ever-moving, powerful waves of ocean.

DIY Earrings with Abalone Shell

We love a good pair of earring and have 3 pair of earrings highlighting the loveliness of Abalone Shell Gemstones along with tutorials.

GoodyBeads Blog | DIY Earrings with Abalone Shell beads - Free Tutorial

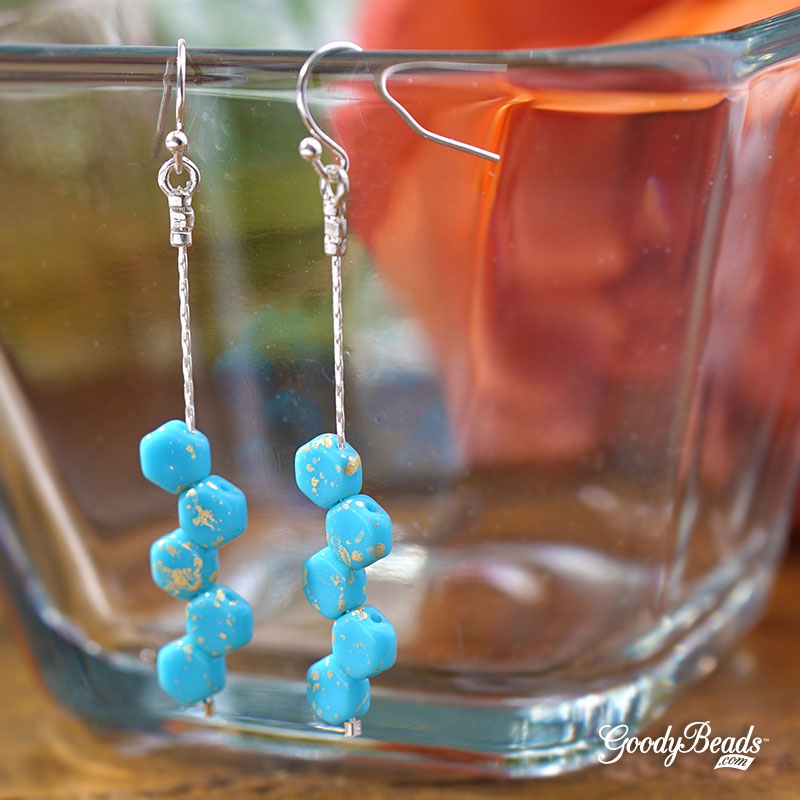
Items used in earrings: Y003787 (2), Z003795 (2), Y003798 (2), TCZ0077, A008799, A019647 & ABA8CN-FL.

Directions:

  1. On a headpin, slide on an abalone bead and make a wrapped loop, making sure to slide on small connector before finishing off wrap. (You can also make a simple loop and connecting loop to small connector.)
  2. Open jump ring and slide on other hole of small connector and through a hole of medium connector. Close jump ring.
  3. Open another jump ring and slide on other hole of medium connector and through a hole of large connector. Close jump ring.
  4. Open earwire loop and slide through other hole of large connector. Close loop.
  5. Repeat all steps for other earring.

GoodyBeads Blog | DIY Earrings with Abalone Shell beads - Free Tutorial

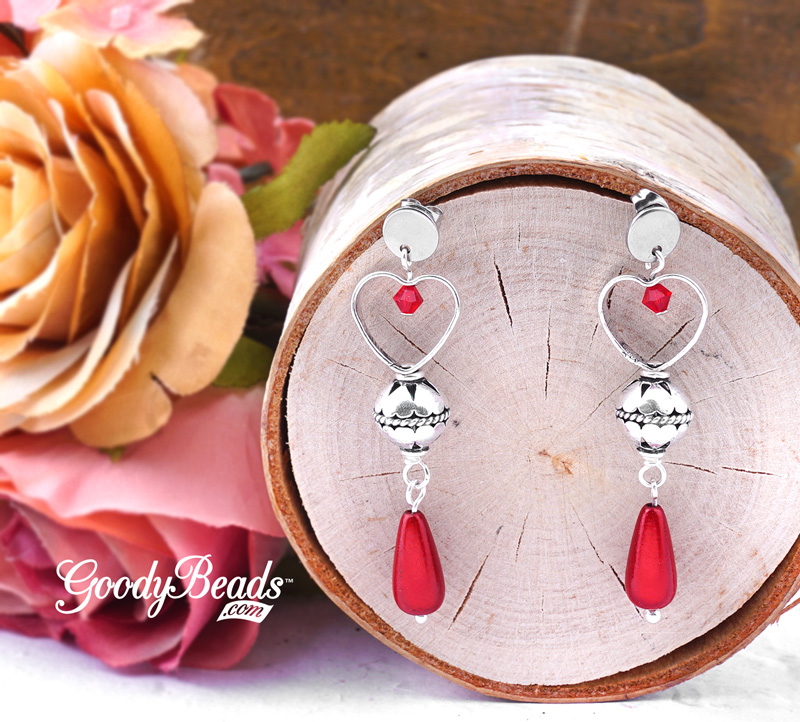
Items in earrings: Z012031, A019647, CH01048 & ABA10RD.

Directions:

  1. Cut chain to consist of 4 linked beaded chain.
  2. Slide an abalone bead on a headpin and make a wrapped loop, making sure to loop through chain end before finishing wrap. (You can also make a simple loop and connecting it to beaded chain.)
  3. Open earwire loop and slide on other end of beaded chain. Close loop.
  4. Repeat other steps for other earring.

GoodyBeads Blog | DIY Earrings with Abalone Shell beads - Free Tutorial

Items used in earrings: Z016761, A019685 & ABA18CN-FL.

Directions:

  1. Slide an abalone bead onto a headpin and make a simple loop.
  2. Open loop and slide on earring hole. Close loop.
  3. Repeat all steps for other earring.


DIY Skipping Heartbeat Earrings

Today, we have this cute pair of DIY Skipping Heartbeat Earrings for Valentine’s Day. Get dolled up with this pair of heart stopping earrings!

What you’ll need:

GoodyBeads Blog | DIY Skipping Heartbeat Earrings with tutorial.

Directions:

  1. On a headpin with ball, slide on a miracle bead and make a simple loop.
  2. Slide a headpin through the heart frame from the inside outwards (bottom heart side). Slide on metal bead and make a simple or wrapped loop.
  3. Open loop of miracle bead dangle from step 1, slide through you made in step 2 and close loop.
  4. On a headpin, slide on 4mm bicone bead and slide headpin through the heart frame from the inside outwards (top heart side). Make a simple loop.
  5. Open loop you made in Step 4, slide onto post earring hole and close loop.
  6. Repeat all steps for other earring.


DIY Josephine Infinity Leather Knot Bracelet

One of our recent popular request is the leather knot bracelet using the Josephine infinity knot. We did a previous tutorial on a variation of this knot HERE. In our tutorial today, we’re using 5mm flat leather or as another option, two piece of round leather.

What you’ll need:

GoodyBeads Blog | DIY Josephine Infinity Knot bracelet with leather.

Items used in bracelet example: A015688, Z012736 (2) & CH00043 (24)

Knot Tutorial

  1. Start with 2 pieces of 5mm leather at 12″ each or four pieces of 2mm round leather at 15″ each.
  2. Follow illustrated diagram to make knot.
  3. At the end, after you gently pull your ends to create your knot, slide on your slider beads through both leather cinch the knot in the middle.
  4. Measure the bracelet to desired length, making sure to center your knot. Cut leather with sharp shears or Xuron Shears.
  5. Add a small dab of Super New Glue to clasp channel and slide one side of your leather ends through. Repeat to other clasp end.
  6. Let it fully dry for a few hours before wearing!

GoodyBeads Blog | DIY Josephine Infinity knot with leather Tutorial

You can also checkout this video tutorial clipped from our Facebook Live episode featuring Tory’s Birthday.

Tutorials starts at 10 minutes and 35 seconds.

https://www.facebook.com/GoodyBeads/videos/2426376794140741/


ImpressArt®: How to Metal Stamp Mandala Patterns

This week’s tutorial from ImpressArt is a popular trend in Mandala metal stamping. A mandala design is a circular shape with geometric patterns.

Here is what you’ll need to start your mandala designs:

  • Mandala Design Stamp Pack: These packs comes with a set of 4 stamps. Combine these stamps endlessly to create intricate jewelry designs. Easily stamp beautiful on-trend mandalas, frames, accents, or borders.
    Here are 4 sets we have: Z018002, Z018004, Z009934, Z009935.
  • Stamp Enamel: An acrylic ink used to darken stamped impressions so your design will be clearly seen. We have this enamel pen in Black, Green, Gold & Brown.
  • Sticker Book Stamp Guides (Z021582): Stamp Guides makes it easy to space out letters, stamp in a straight line or curve, and stamp Mandalas and other intricate patterns
  • 1″ Circle w/ Hole (A019450)

Mandala Necklace Tutorial

Make a DIY necklace with your mandala stamped design!

Check out our other Mandala tutorial!


Swarovski® Light Peach Jewelry Tutorials

We’ve got THREE easy projects using January’s Swarovski Psychology of Color: Light Peach. Design jewelry with this lovely hue!

Just Peachy Earrings with Acetate Drops

GoodyBeads Blog - FREE Tutorial - DIY earrings with Swarovski Crystals and acetate components.

This pair of earring combines the sparkle of Swarovski crystals with trendy acetate components.

Items used in earrings: SW02308 (6), Z014422, A001495, SB00422 & TCZ0078.

Directions:

  1. Open loop of eyepin and slide through earwire loop. Close loop.
  2. On eyepin, slide on a seed bead, 3 crystals and seed bead. Make a simple loop. (Make sure loop is big enough to slide over hole of acetate drop.)
  3. Open loop, slide on acetate drop and close loop.
  4. Repeat all steps for other earring.

Light Peach Chevron Drop Earrings

GoodyBeads Blog - FREE Tutorial - DIY chevron drop earrings with Swarovski Crystals.

Items used in earrings: CH00802, SW02308 (6), SW02307 (4), Z016754, A019605 & A019662

Directions:

  1. Cut chain with 3 chevron links.
  2. On a headpin, slide on a 6mm and 4mm crystal bead. Make a simple loop.
  3. Open crystal dangle loop and slide on chevron chain at the point. Close loop.
  4. Open eyepin, slide on other end of chevron chain and close loop.
  5. On eyepin, slide on a 4mm, 6mm and 4mm crystal. Make a simple loop.
  6. Open loop you made in step 5, slide on post earring loop. Close loop.
  7. Repeat all steps for other earring.

Peach Crystal Lariat Necklace

GoodyBeads Blog - FREE Tutorial - DIY lariat necklace with Swarovski Crystals.

GoodyBeads Blog - FREE Tutorial - DIY lariat necklace with Swarovski Crystals.

Items used in necklace: CH00724 (2′), SW02308 (5), SW02307 (1), X001505, Z010360, A001495, A001493 & A021442.

Directions:

  1. Slide end cap to one end of the chain and crimp end cap. Repeat to other end of chain and end cap.
  2. Open eyepin loop, slide on loop of one end cap and close loop. On eyepin, slide on a 4mm crystal and make a simple loop. Open loop and slide on quick link and close loop.
  3. Open another eyepin loop and slide on other end cap and close loop. One eyepin, slide on 4mm crystal, metal bead and 4mm crystal. Make a simple loop.
  4. On a headpin, slide on a 6mm crystal and 4mm crystal. Make a simple loop. Open loop and slide on loop you made in step 3. Close loop.


Swarovski® Psychology of Colors: Light Peach

For January, Swarovski’s Psychology of Colors pick is Light Peach. Check out how lovely this hue is!

Light Peach is a subtle, pale color, yet romantic and powerful!  Here are some Swarovski colors to matches this hue:

  • Peach and Peach Delite
  • Crystal Rose Gold
  • Ivory Cream
  • Pink Coral Pearl
  • Pink Crystal
  • Blush Rose
  • Vintage Rose
  • Rose Peach
  • Crystal Powder Rose
  • Rose
  • Light Rose

Light Peach Jewelry

Make sure you stop over to our other blog post for jewelry designed with Light Peach.


EZ DIY Series: Stackable Bracelets with Adjustable Bracelet Sliding Clasps

Layering and stacking bracelets are still going strong for 2020. Especially when it comes to simple and minimalistic designs. We have three GOLDEN and easy DIY bracelet designs using one of our 2019 favorite, Bracelet Sliding Clasps.

GoodyBeads: How to make Easy DIY stackable bracelets with GoodyBeads Bracelet Sliding Clasps.

What makes the bracelet sliding clasp easy to us is the functionality of the finding. It comes with two chain pieces thread through a sliding piece that easily lets you adjust the bracelet to make it longer and shorter. Plus, each chain is linked with a jump ring already attached so all you need is a connector or link piece, two-hole acetate connector, glass connector or even create a link of your own with an eyepin and bead.

Here is a simple tutorial to making three stackable bracelets

Tutorial

GoodyBeads: How to make Easy DIY stackable bracelets with GoodyBeads Bracelet Sliding Clasps.

Items used in bracelet examples: Z018046, Z015026, A021761, Z012178, Z012152 & Z011893