


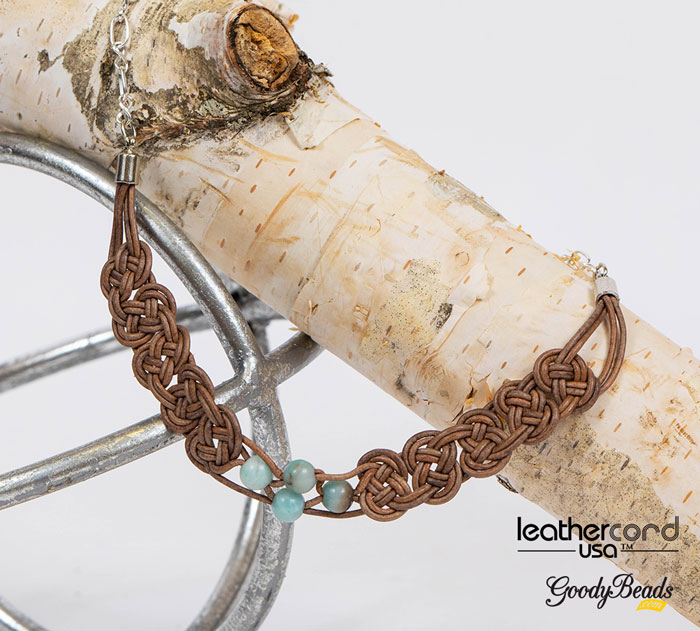
Check out this lovely tutorial courtesy of Leather Cord USA. Learn to make celtic knots with leather cord and use the skill to make fun jewelry designs!
Our friend, Michelle from Leather Cord USA provided us with this great tutorial on how to tie the double celtic knot using two pieces of leather cord! Make yours today.
What You’ll Need:
- 2 – 1.5mm LeatherCord USA Leather (2 Meter Length)
- 2 – End Cap (Suggestion item# A010436)
- Large-Hole Gemstones
- 10″ or More of Chain link
- Clasp & Jump Ring
- Needle Nose Pliers & Cutter
Step by step instructions:
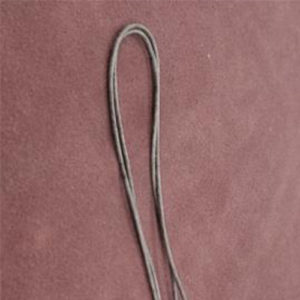
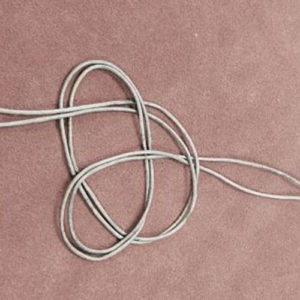
- Take the two strands of Round Leather Cords and place evenly side by side then fold in half, creating four strands grouped in two.
- Lay leather flat on a table or board
- Take the right side group of two strands and create a loop laying it on top of the left strands. This will create three openings: top, middle and left (outside) as indicated in the photo below.
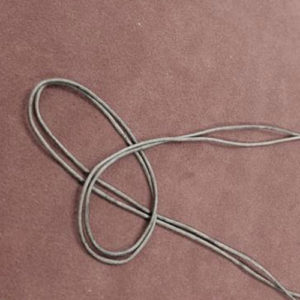
- Take the left side and cross the cord over the tail of the right side then under the base of the top opening and feed through then back down the middle opening and up through the left opening.
- Gently pull both tails while adjusting the knot into place. (Be sure to keep the strands lying flat while pulling.)
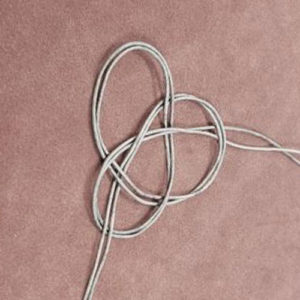
- Repeat steps 3-5 for the left side: Take the left tail and create a loop laying it on top of the right strands. Take the right side and feed the cord over the left tail then under the base of the top opening and feed through then back down the middle opening and up through the left opening.
- Repeat all steps to create five individual knots.
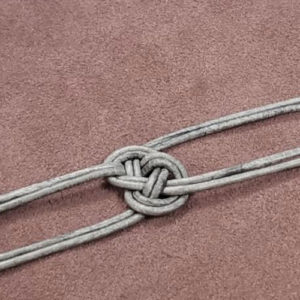
- Feed one Large Hole Bead on the two center strands
- Feed one Large Hole Bead on the two left strands and one on the two right strands
- Feed a final Large Hole Bead on the two center strands
- Repeat the knot pattern from above for another five knots.
- Cut the top loop (starting point) in half
- Add a drop of adhesive to the inside of the end cap and place all four strands in, give a slight twist and hold everything in place for a few seconds.
- Repeat step 13 for the opposite side
- Take the chain provided and judge the exact length you want the final piece to be. Cut chain in half.
- Attach each side of the chain to the leather piece by attaching chain to end cap with jump ring. Repeat process to other end cap and chain.
- Attach the lobster claw to one end of your chain with a jump ring. Add a jump ring to other chain end.
- Voila!!!! You are done! Now go show off your work of art for the world to see!
Visual look at how you will continue your necklace braids:

Other Examples
Simplify this knot by making one knot and adding a gemstone pendant to it’s center loop!
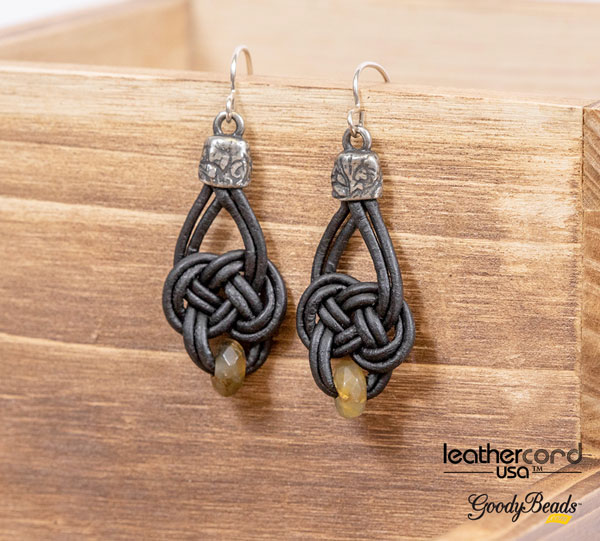
You can even make a smaller version for earrings!
I love your tutorials. I just wish there was an easy way to download them as a pdf and save them to my iPad for easy retrieval. When I have the materials and am ready to try something, I have to get online and hunt down the instructions again.
Hello Joyce. We added a PDF file you can download HERE. Let us know if you have any other concerns.
Thank you for the PDF – I have to search too. This saves me time to try your tutorials.
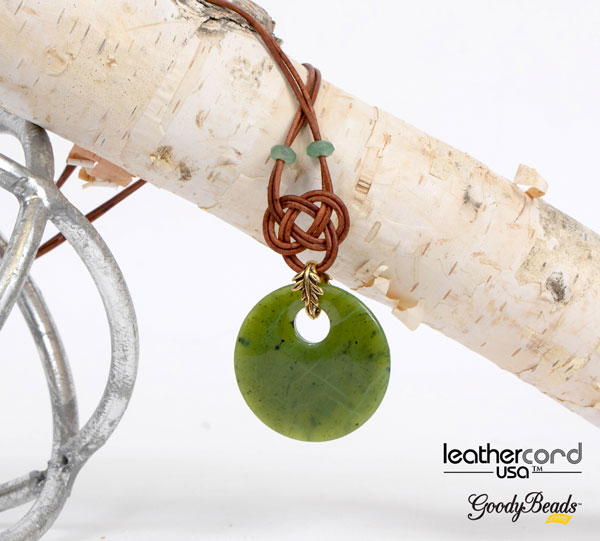
Love the necklace with the large green stone. What are the item numbers for that and the bail. Thanks
It’s Item# TC02405.
I love the ends on the earrings…Where will I find those?
These images and projects are from Leather Cord USA. We might not have all the components, but I can help you with most of them:
These ends are TC02359
Earwire TC02297
Leather Z019103
Large-Hole Rondelle Gemstones (it is possible that these are size 8mm)
Hello,
I’m not sure how you get from having two tails in the picture to having four tails. Do you start the first loop in the middle? Thanks!
You will see the image added above and HERE. Start your braid at the middle of your leather strands. For the short loop, cut the middle of that loop and those short strands, you will insert into your end cap. You will continue with your braids with the other longer leather strands.
Nice! 🙂