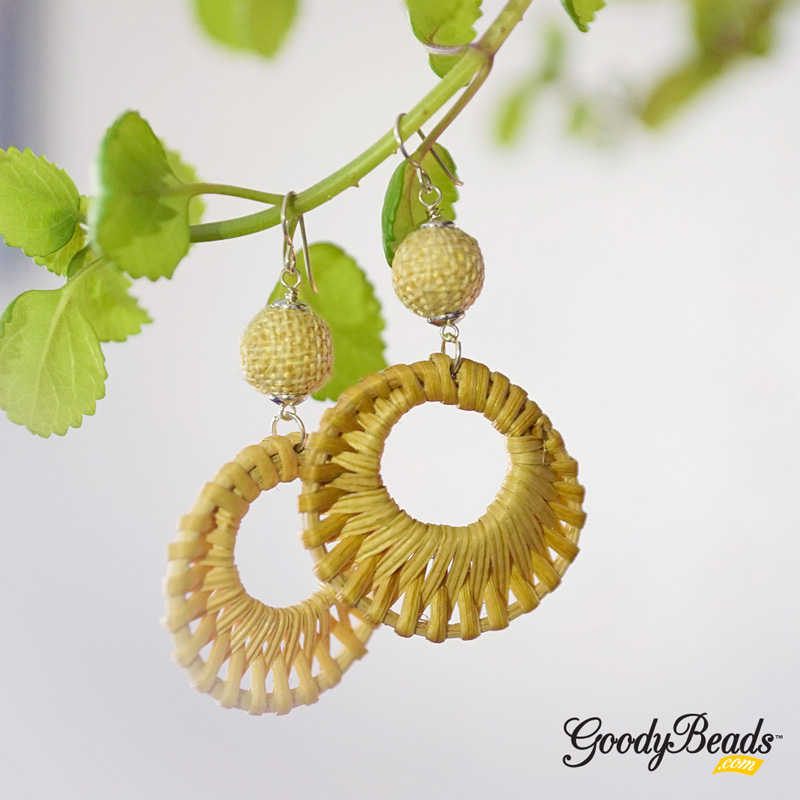
Heidi’s DIY Beaded Fringe Earrings with Seed Beads

A crowd favorite are these Beaded Fringe Flare Earring by our in-house designer, Heidi. They’re so easy to make that she even made 2 different color ways and planning for more!

What you’ll need for fringe earrings:

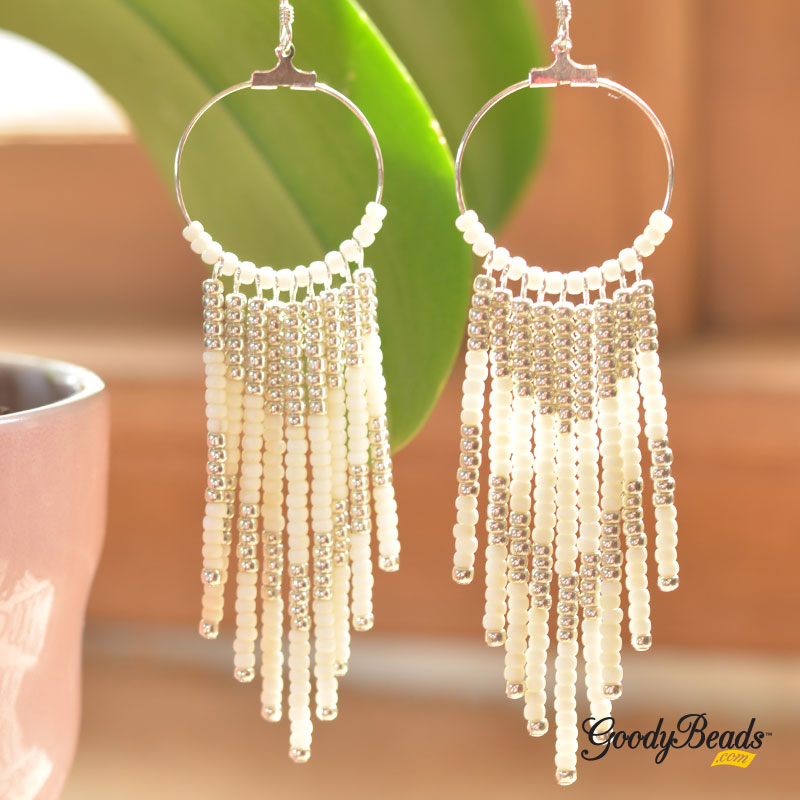
Cream Silver Beaded Fringe Earrings

GoodyBeads Blog | Heidi's DIY Beaded Fringe Earrings FREE Tutorial

Get all the components for this project here

Directions:

  1. On a headpin, slide on the following beads and make a simple loop. Make TWO dangles of each set of beads:
    A: silver, 5 cream, 5 silver, 6 cream, 5 silver.
    B: silver, 6 cream, 5 silver, 7 cream, 6 silver.
    C: silver, 7 cream, 5 silver, 8 cream, 7 silver.
    D: silver 8 cream, 5 silver, 9 cream, 8 silver.
  2. On a headpin, slide on the following beads and make simple loop:
    silver, 9 cream, 5 silver, 10 cream and 9 silver.
  3. Gently open your hoop and slide on the following sequence:
    A: 3 cream bead, 1.A dangle, cream bead, 1.B dangle, cream bead, 1.C dangle, cream bead, 1.D dangle, cream bead, and dangle from Step 2.
    B: cream bead, 1.D dangle, cream bead, 1.C dangle, cream bead, 1.B dangle, cream bead, 1.A dangle and 3 cream beads.
  4. Slide hoop end back into its insert and using a flat nose, gently crimp the back insert down on the hoop end. (Note: you can use a small dot of glue for extra security.)
  5. Open earwire loop and and slide on hoop and close loop.
  6. Repeat all steps for other earring.

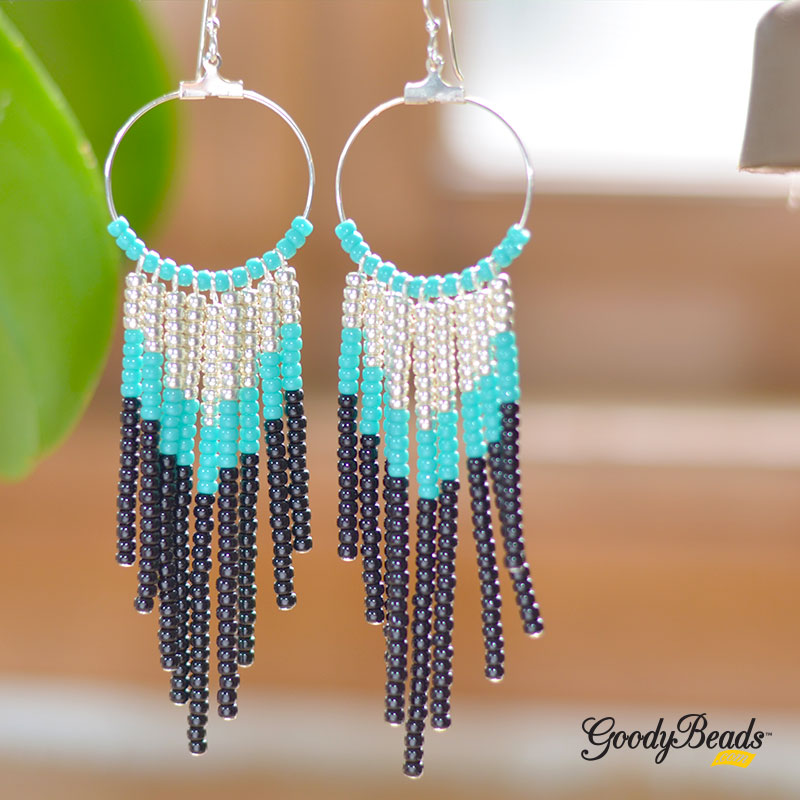
Turquoise/Black Beaded Fringe Earrings

GoodyBeads Blog | Heidi's DIY Beaded Fringe Earrings FREE Tutorial

Get all the components for this project here

Directions:

  1. On a headpin, slide on the following beads and make a simple loop. Make TWO dangles of each set of beads:
    A: 12 black, 5 turquoise, 4 silver.
    B: 14 black, 5 turquoise, 5 silver.
    C: 16 black, 5 turquoise, 7 silver.
    D: 18 black, 5 turquoise, 8 silver.
  2. On a headpin, slide on the following beads and make simple loop:
    silver, 20 black, 5 turquoise, and 9 silver.
  3. Gently open your hoop and slide on the following sequence:
    A: 3 cream bead, 1.A dangle, cream bead, 1.B dangle, cream bead, 1.C dangle, cream bead, 1.D dangle, cream bead, and dangle from Step 2.
    B: cream bead, 1.D dangle, cream bead, 1.C dangle, cream bead, 1.B dangle, cream bead, 1.A dangle and 3 cream beads.
  4. Slide hoop end back into its insert and using a flat nose, gently crimp the back insert down on the hoop end. (Note: you can use a small dot of glue for extra security.)
  5. Open earwire loop and and slide on hoop and close loop.
  6. Repeat all steps for other earring.


Long Cubed Tube Tassel Earrings with FREE Pattern Tutorial

We have a fun and free earrings pattern tutorial today using one of our newer products, 6mm Czech Two-Hole Bars.

What you’ll need for earring pattern:

Items used in earring samples: Z014017, SB03963, SB00422, SB00106, A006587, TCZ0078 and A002413.

GoodyBeads Blog | Long Cubed Tube Tassel Earrings with FREE Pattern Tutorial


DIY Jewelry with Swarovski® Around the World: Africa

This month’s trip is Africa. Find out how beautifully wild this continent is from its earthy tones and bright bold colors. Plus, check out the hues Swarovski suggests to inspire your Africa trip along with a DIY jewelry project for you to try.

Africa

The canvas upon which this continent’s epic story is written is not only beautiful but astonishing. Whether heading out at dawn on a safari game drive following millions of wildebeest on their Great Migration or soaring high in a hot-air balloon to embrace the Serengeti, Africa creates the wildlife encounter of a lifetime. Wherever you find yourself on this big, beautiful continent, you will be touched by the wild lands, rich traditions, artisan craftsmanship and natural beauty – all of which these pieces pay tribute to.

Africa – Swarovski Crystal Colors

  • Tangerine
  • Fern Green
  • Light Siam

African Inspired DIY Jewelry

Our pair of earrings embraces the vibrant colors! It also incorporates Black Kamagong Wood Beads, which breaks up the rich colors and gives it a more organic design, as well as an earthy aspect.

What you’ll need for earrings:

  • (2) SW00969 – 4mm Tangerine Bicone Crystal
  • (2) SW00968 – 8mm Tangerine Round Crystal
  • (2) SW02092 – 4mm Light Siam Shimmer Bicone Crystal
  • (2) SW02497 – 9mm Light Siam Pear Cut Pendant
  • (2) SW00134 – 6mm Light Siam Bicone Crystal
  • (4) SW00370 – 4mm Fern Green Bicone Crystal
  • (2) TC02452 – 15x19mm Antique Gold Ethnic Fan Link by TierraCast
  • (2) TC02816 – 15mm Bright Gold Hammertone Dagger Bead
  • WD-BKG4RD – 4mm Black Kamagong Wood Round Beads\
  • Z013671 – 10mm White Fabric Tassel with Gold Cap
  • A019617 – 2 Inch Gold plated Eyepins
  • A008801 – 5mm Gold Plated Oval Jump Rings
  • A011517 – 4mm Gold Plated Round Jump Ring
  • A014108 – Gold Plated French Wire Earrings
  • SB00423 – 11/0 Galvanized Gold Seed Bead
    OR SB00269 – 11/0 Galvanized Gold Delica Seed Bead

Directions:

  1. Open oval jump ring, slide on light siam pendant and eyepin loop. Close jump ring.
  2. On eyepin from step 1, slide on the following and make a simple loop:
    seed bead, 4mm fern green bicone, seed bead, wood bead, seed bead, wood bead, seed bead, 4mm tangerine bicone and seed bead.
  3. Open another eyepin loop and slide through loop you made in step 2. Close loop.
  4. On eyepin, slide on a seed bead, 4mm light siam bicone and seed bead. Make a simple loop. Open loop and slide through first hole of ethnic link and close loop.
  5. On another eyepin, slide on the following:
    seed bead, wood bead, seed bead, 8mm tangerine round bead, seed bead, wood bead, seed bead.
  6. Make a simple loop about 4-5 in diameter, or large enough to slide on TierraCast dagger bead. Open loop and slide on TierraCast dagger bead.
  7. Open another eyepin loop, slide on eyepin loop of previous dangle and close loop. On this eyepin, slide on a seed bead, wood bead, seed bead, 4mm fern green bicone and seed bead. Make a simple loop. Open loop and slide through middle hole of ethnic link and close loop.
  8. Open 4mm round jump ring, slide on tassel and loop of another eyepin. Close jump ring.
  9. On eyepin, slide on the following and make a simple loop:
    seed bead, wood bead, seed bead, 6mm light siam bicone, seed bead, wood bead and seed bead.
  10. Open another eyepin loop and slide on loop you made in step 9. Close loop. Slide the eyepin a seed bead, wood bead and seed bead, and make a simple loop. Open loop and slide last hole of ethnic link. Close loop.
  11. Open earwire loop and slide through top of ethnic link and close loop.
  12. Repeat all steps for other


DIY By The Sea Earrings with Swarovski crystals & pearls

You can hear crashing waves when you wear these By the Sea Earrings. Ok, you might not hear them, but you will definitely want to wear these earrings to your next seaside adventure. It features the brilliant hue of Swarovski® Majestic Blue crystals and the luminescent sheen from the crystal pearls.

What you’ll need to make earrings:

  • TC00113 – 14mm Small Spindle Shell Charm by TierraCast
  • TC02680 – 13mm Tiny Seastar Charm by TierraCast
  • (2) SW01448 – 10mm Crystal Pearlescent White Swarovski Pearl
  • (2) SW01446 – 6mm Crystal Pearlescent White Swarovski Pearl
  • (2) SW01723 – Swarovski® 4mm Majestic Blue Round Crystal
  • (2) SW01725 – Swarovski® 8mm Majestic Blue Round Crystal
  • TCZ0077 – Sterling Silver Earring Wire by Tierracast
  • A019629 – 1 Inch Silver Plated 20 Gauge Eyepin

GoodyBeads Blog | By the Sea DIY Earrings FREE Tutorial

Directions:

  1. Open eyepin loop, slide on a charm and close loop. Slide a 4mm Majestic Blue crystal on the eyepin and make a simple loop.
  2. Open another eyepin loop, slide on loop you made in step 1 and close loop. Slide a 6mm Crystal Pearlescent on eyepin and make a simple loop.
  3. Open another eyepin loop, slide on loop you made in step 2 and close loop. Slide an 8mm Majestic Blue crystal on the eyepin and make simple loop.
  4. Open another eyepin loop slide on loop you made in step 3 and close loop. Slide a 10mm Crystal Pearlescent on eyepin and make a simple loop.
  5. Open earwire loop and slide on loop you made in step 4. Close loop.
  6. Repeat all steps for other earring.


DIY Chunky Paperclip Earring

Today’s tutorial is about minimalism with its clean look but also a statement with its bold paperclip chain. Design the Chunky Paperclip Earrings today for your hot summer!

What you’ll need:

  • 10.9mm Paper Clip Cable Chain – CH01172
  • 26.5mm Imitation Rhodium Finish Jumbo Paperclip Cable Chain – CH01170
  • Pewter Curved Triangle Post Earring by Nunn Design – Z010287
  • Two pairs of flat or needle nose pliers

GoodyBeads Blog | DIY Chunky Paperclip Earring FREE Tutorial

Directions:

  1. Take a link from the 26.mm chain by gently opening one link with two pliers. Once you slide it off, close the link back up. Repeat again to take off another link.
  2. Take a link from the 10.9mm chain by gently opening one link with two pliers. Once you slide it off, add a link from Step 1 and slide through loop of post earring and gently close link.
  3. Repeat step 2 for other earring.


DIY Beadable Column Bead with Twist Off Bezel

One of our newest products and one of So’s favorites are the new Beadable Accessories: Column Bead with Twist Off Bezel. Use size 11/0 Delica seed beads to create a tubular design and encase it around the bezel area of the column bead. Plus, the bead has a twist off side that you can easily create your tube and slide it on the bezel and twist sides back on.

GoodyBeads Blog | DIY Beadable Column Bead with Twist Off Bezel - FREE Pattern Template

Make a cute and colorful necklace with one two or three column beads!

GoodyBeads Blog | DIY Beadable Column Bead with Twist Off Bezel - FREE Pattern Template

Even Peyote Count Stitch

For the column beads, you will be creating a tubular design with an Even Count Peyote Stitch. Below is an example how to stitch an Even Count Peyote design:

GoodyBeads Blog | Even Count Peyote Stitch

Beadable 10mm Column Bead & Pattern Template

GoodyBeads Blog | DIY Beadable Column Bead with Twist Off Bezel - FREE Pattern Template

To use the 10mm column bead, you can get them in Gold plated (Z001434) and Rhodium plated (Z001430). Use an Even Count Peyote Stitch starting with 6 Delica seed beads. Then you will be making 30 rows and then wrap pattern into a tube shape by stitching and zip up the sides. (Check out our previous blog on how we made a tubular design and zipping up the sides HERE.)

Plus, we have a Pattern Template for the SHORT Column bead that you can create your own designs with! DOWNLOAD TEMPLATE HERE.

As a side note, you can create a wider tube starting with 7 seed beads if your design needs an odd count stitch.

Beadable 18mm Column Bead & Pattern Template

GoodyBeads Blog | DIY Beadable Column Bead with Twist Off Bezel - FREE Pattern Template

To use the 18mm column bead, you can get them in Gold Plated (Z001456) and Rhodium Plated (Z001453). Use an Even Count Peyote Stitch starting with 12 Delica seed beads. Then you will be making 30 rows and then wrap pattern into a tube shape by stitching and zip up the sides.

Plus, we have a Pattern Template for the MEDIUM Column bead that you can create your own designs with! DOWNLOAD TEMPLATE HERE.


Summer Ginkgo Wave Earrings with FREE Pattern Tutorial

Summer is in full WAVES! One of our newer products consists of these Czech Gingko two-hole beads in a Bondelli finish. The finish is matte like and vibrant in colors! Make sure you check off your summer list with this Summer Ginkgo Wave Earrings!

Items used in pattern:

  • SB03830 – Bondeli Turquoise Matubo Ginkgo
  • SB03825 – Bondeli Orange Matubo Ginkgo
  • SB00422 – 11/0 Galvanized Silver Seed Bead
  • SB00106 – 8/0 Galvanized Silver Seed Bead
  • A002413 – 4mm Round Jump Ring
  • Z013689 – Turquoise Fabric Tassel with Silver Cap
  • Z017715 – White TOHO One-G Nylon Thread
    or A006587 6lb Crystal Fireline Thread
  • A015211 – Needle
  • A008998 – Ear Wire

Tutorial Pattern

GoodyBeads Blog | Summer Ginkgo Wave Earrings with FREE Pattern Tutorial

Get Pattern Tutorial HERE

GoodyBeads Blog | Summer Ginkgo Wave Earrings with FREE Pattern Tutorial


DIY Ombre Stretch Bracelet with Czech Chevron Two-Hole Beads

We love a good stretch bracelet. They are easy to make and easy to wear. Our design today uses two-hole Czech Chevron beads with Beadalon Elasticity.

What you’ll need for this bracelet:

GoodyBeads Blog | DIY Chevron Ombre Stretch Bracelet FREE Tutorial

GoodyBeads Blog | DIY Chevron Ombre Stretch Bracelet FREE Tutorial

Directions:

  1. Cut a piece of elastic at 2 feet. Stretch elastic to loosen the elasticity.
  2. Slide on elastic two beads of each chevron color. Repeat this sequence until you’ve reached a good amount to fit your wrist. Our sample bracelet consists of 6 sequences or 36 chevron beads.
  3. Loop through to the second holes of the chevron beads that you added in Step 2. Make sure to leave an elastic loop.
  4. Take both elastic ends and slide through metal bead.
  5. Now you’re going to make a Tricky Ricky knot with the elastic loop you made in step 3 and the two elastic ends. Follow illustration to make knot and cut excess elastic leaving a small stub. This will tuck inside the silver bead.

Video Tutorial

Catch the video tutorial Tory did on our previous Facebook Live episode HERE.


DIY Paperclip Punk Earrings

Being trendy might not be what you’re aspiring for, but this Paperclip Punk Earrings says it all about your wild style!

What you’ll need:

  • 10.9mm Paper Clip Cable Chain – CH01172
  • Sterling Silver Earrings – Z001008

GoodyBeads Blog | DIY Paperclip Punk Earrings FREE Tutorial

GoodyBeads Blog | DIY Paperclip Punk Earrings FREE Tutorial

Directions:

  1. Cut chain to consist of 8 links. Cut two pieces. (Note: if you would like a long chain earring, cut a long piece)
  2. Open earwire loop and slide on chain piece you cut in Step 1. Close loop.
  3. Repeat all steps for other earring.


DIY White Enamel Teardrop Earrings

Make and wear this COOL White Enamel Teardrop Earrings with enamel components and silver findings.

What you’ll need for earrings:

  • White Enamel Drop – Y008739 (2)
  • Silver Teardrop – Z017165
  • 5mm Jump Ring – Z011515
  • TierraCast Earwire – TCZ0078

Get all the components for this project here

GoodyBeads Blog | DIY White Enamel Teardrop Earrings FREE Tutorial

Directions:

  1. Open jump ring, slide on enamel drop and through inner loop on teardrop hoop. Close jump ring.
  2. Open earwire loop and slide on top loop of teardrop hoop. Close loop. Make sure white enamel is faced outwards.
  3. Repeat all steps for other earring.


DIY Men’s Bracelet Set with Leather and Silver Findings

Today’s tutorial features this men’s bracelet set. Ladies can even love them too! These three bracelets consists of leather, metal beads and even hematite beads.

GoodyBeads Blog | DIY Men's Leather Bracelet Set FREE Tutorial

Hematite Stretch Bracelet

GoodyBeads Blog | DIY Men's Leather Bracelet Set FREE Tutorial - Hematite Stretch Bracelet

Items used in bracelet: HEM6RD-F-8, A021474 & A021633.

Directions:

  1. Cut elastic to twice your wrist length or about 15 inches. Pull and pre-stretch your elastic to loosen the elasticity.
  2. Cut the tip of your needle. Fold your elastic in half and loop the needle at the mid point.
  3. Slide on the elastic the following beads: 4 hematite beads and silver tube. Repeat 4 more times.
  4. Wrap around your wrist to see if it enough to wrap around your wrist. If it is too much, remove a hematite bead. If it’s too tight, add another hematite bead.
  5. Follow illustrations below to make the Tricky Rick knot, to tie off your ends. Glue the knot if you would like. Cut excess elastic, leaving about a 1/4″ stub.

Rustic Round Leather Bracelet

GoodyBeads Blog | DIY Men's Leather Bracelet Set FREE Tutorial - Rustic Round Leather Bracelet

Items used in bracelet: CH00156 (7″), Z003438 (2), A015821, Z003436 & Z009583. NOTE: if 7″ is too short, order an inch or two more.

Directions:

  1. Glue the end of the leather cord and clasp end with super new glue. Let it dry for a minute.
  2. Slide on the leather the Stitch Bead, Plain Tube Bead and Stitch Bead. Slide to situate and centered on the leather.
  3. Glue the other leather end with other clasp end. Unclasp the clasp and let bracelet dry for a few minutes or hours.

Wide Leather Cross Bracelet

GoodyBeads Blog | DIY Men's Leather Bracelet Set FREE Tutorial - Wide Leather Cross Bracelet

Items used in bracelet: CH00040 (8), CH00769 (8), CH00861 (8), A015691 & A015821.

Directions:

  1. Cut all leather cord to 7.5″ or to your desired length.
  2. Glue all three leather cord ends to end clasp with super new glue, situating the 10mm to the bottom. (Make sure to face the fronts of your leather pieces to one side of the clasp.) Let glue dry for a few minutes.
  3. Cross the two 5mm leather and glue the other leather ends to the other side of the clasp. Hold leather in place for a minute or two to let the components bond. Let piece sit and dry for another few moments before wearing.

Check out other Leather Bracelet DIYs to inspired some fun men’s bracelets.


DIY Large Hoop Ring Earrings with Pinch Bail

Summer jewelry is about being big and making a statement. These pair of pinch bail earrings are the one you’ll need!

What you’ll need for pinch bail earrings:

  • (2) Z008275 – 50mm Bright Fine Silver Plated Flat Grande Hoop
  • Z016191 – 12x6mm Silver Plated Diamond Cut Open Charm/Connector
  • (2) TC02582 – 9mm Smooth Pinch Bail
  • Z012031 – Silver French Earwire Earrings

GoodyBeads Blog | DIY Large Hoop Ring Earrings with Pinch Bail - FREE Tutorial

GoodyBeads Blog | DIY Large Hoop Ring Earrings with Pinch Bail - FREE Tutorial

Directions:

  1. Slide large hoop and diamond cut connector through bail and pinch the bail to close.
  2. Open ear wire loop and slide on diamond cut connector. Close loop.
  3. Repeat all steps for other earring.


Honeycomb Lattice Licorice Leather Bracelet – FREE Pattern Tutorial

Today’s tutorial digs into the love of licorice leather bracelets and how casual it plays with any fashion style. Embellish it with a bead tube and you have a fun piece of jewelry for a dazzling summer!

GoodyBeads Blog | Honeycomb Lattice Licorice Leather Bracelet - FREE Pattern Tutorial

Items used in bracelet:

  • SB00066 – 8/0 Black Opaque Seed Bead
  • SB00423 – 11/0 Galvanized Yellow Gold Seed Bead
  • SB03303 – Chalk Champagne DiamonDuo
  • (8) SW00358 – Swarovski® 4mm Bacon Fuchsia AB 2X
  • Z001106 – Gold Plated Magnetic Clasp For Licorice Leather
  • A006585/A006587 – Crystal Fireline Thread
  • Z011831 – Crystal Full Amber Honeycomb
  • Z014871 – Turquoise Green Lumi Honeycomb
  • (2) A015841 – 12mm Black Rubber O-Rings
  • A015821 – Super New Glue
  • A022052 – Matte Black Regaliz Licorice Leather

Pattern Tutorial

GoodyBeads Blog | Honeycomb Lattice Licorice Leather Bracelet - FREE Pattern Tutorial

Get FULL and FREE pattern tutorial HERE.


DIY Chrysocolla & Hematite Collar Necklace

Variations of choker and collar necklaces are making a comeback. Here is our version with Chrysocolla gemstones with 2mm Hematite beads. It sits on your collarbone and creates a different and unique kind of statement.

What you’ll need:

GoodyBeads Blog | FREE Tutorial - DIY Chrysocolla & Hematite Collar Necklace

GoodyBeads Blog | FREE Tutorial - DIY Chrysocolla & Hematite Collar Necklace

Directions:

  1. Cut beading wire to 24 inches.
  2. Slide a crimp tube and split ring onto the beading wire and loop beading wire back down to create a small loop. Make a crimp with crimping pliers. Cut the small excess wire leaving a 1/4 inch tail.
  3. Slide on the following bead sequence: 5 gemstone and 1 hematite bead. Repeat this sequence 31 times. Then ending with 5 more gemstones. (Note, you can make a long necklace by using a longer piece of beading wire or shorten the sequence for a closer fit necklace/choker.)
  4. Slide on a crimp tube and split ring. Slide beading wire back through crimp tube and a bead or two. Pull wire to keep all your bead in place and crimp your crimp tube. Cut off excess wire.
  5. Open split ring and slide lobster clasp loop through.


DIY Sandy Wave Earrings

Sink your feet into this fun DIY. It consists of straw beads and connectors.

What you’ll need for earrings:

  • Rattan Straw Round Bead – Z017902
  • Rattan Straw Off Center Hoop Pendant – Z017897
  • 2 Inch Eyepin – A019599
  • TierraCast® Silver Bead Aligner – TC00356 (4)
  • 5mm Jump Ring – A001528
  • TierraCast® Earring Wire – TC02297

GoodyBeads Blog | DIY Rattan Straw Sandy Wave Earrings - FREE tutorial

Directions:

  1. Using a Bead Reamer, round nose pliers or awl, poke a hole at the top of the off center straw pendant, between the first and second outer ring.
  2. Open jump ring, slide through hole you make in Step 1, and through an eyepin loop. Close jump ring.
  3. Slide on the following on the eyepin and make a wrapped loop: bead aligner, rattan round bead and bead aligner.
  4. Open earwire loop, slide on dangle and close loop.
  5. Repeat all steps for other earring.