New from the 2019 Tucson show are these lovely Czech Ginko beads from BeadSmith. Check out today’s free tutorial using Ginko beads.
Czech Ginko beads are a two-hole bead in the shape of Ginkgo leaves.
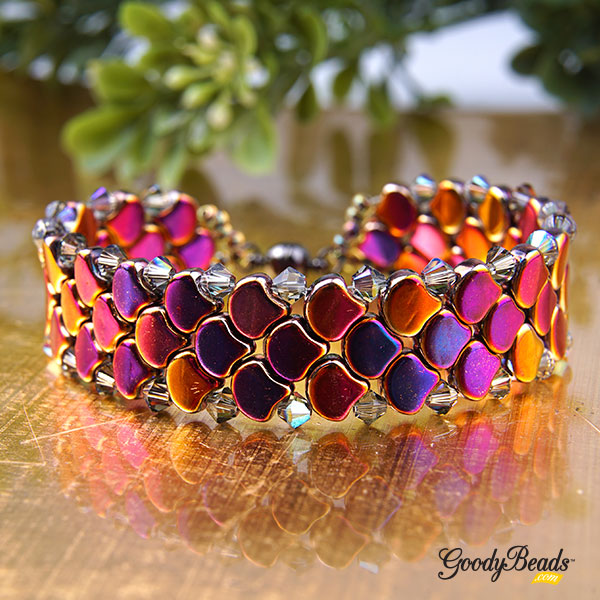
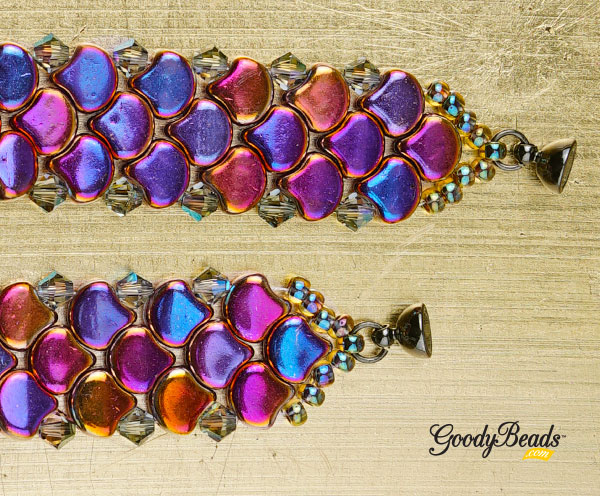
Scale Bracelet
This bracelet tutorial was inspired by Nela Kábelová’s (www.gianelle.beadforum.cz) pattern called Snake Skin Bracelet. We used her pattern and tweaked it slightly to add 4mm Swarovski® bicone crystals instead of 4mm round beads. And used 8/0 Miyuki seed beads in place of the seed beads she used. Don’t they look like fish scales? Dragon scales? Mermaid scales? They are a beautiful shape with lots of option for bead stitching.
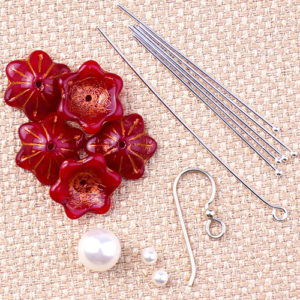
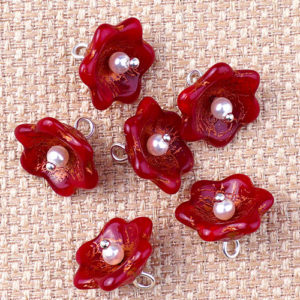
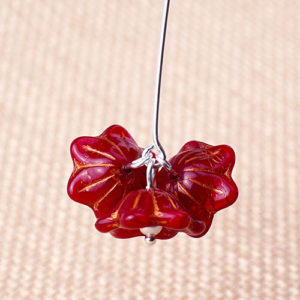
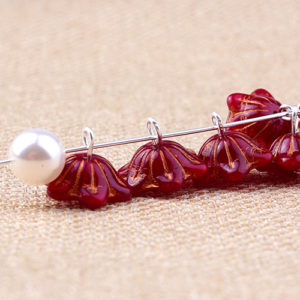
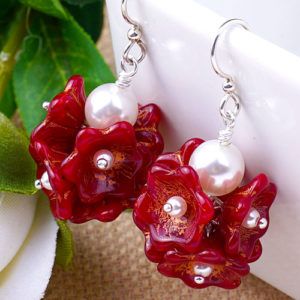
Flower Burst Earrings with Czech Bellflowers – Tutorial
Dreaming about warmer weather? Let’s get a kickstart to spring weather with a pair of flower burst earrings designed with Czech Bellflower glass beads from Raven’s Journey® and white pearls from Swarovski®.
We’re experiencing some cold and snowy weather in Minnesota. Our piles of snow keep going up and we cross our fingers that our drive into work is a safe and uneventful one. So we are dreaming of spring weather and flowers! Here is a fun and simple pair of earrings donned with colorful Bellflowers from Raven’s Journey.
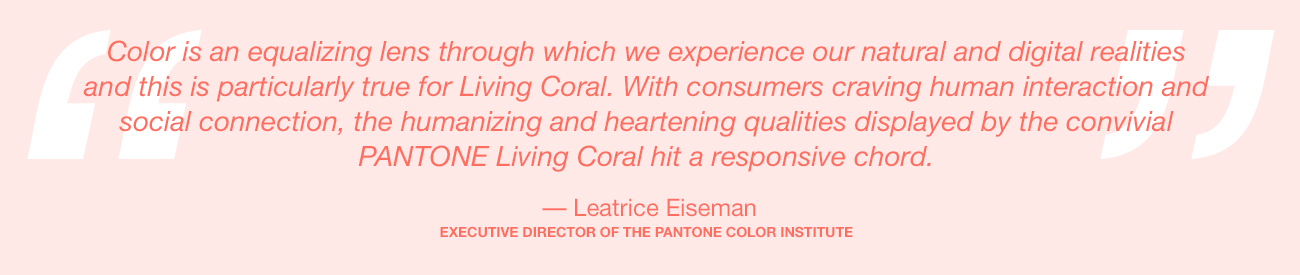
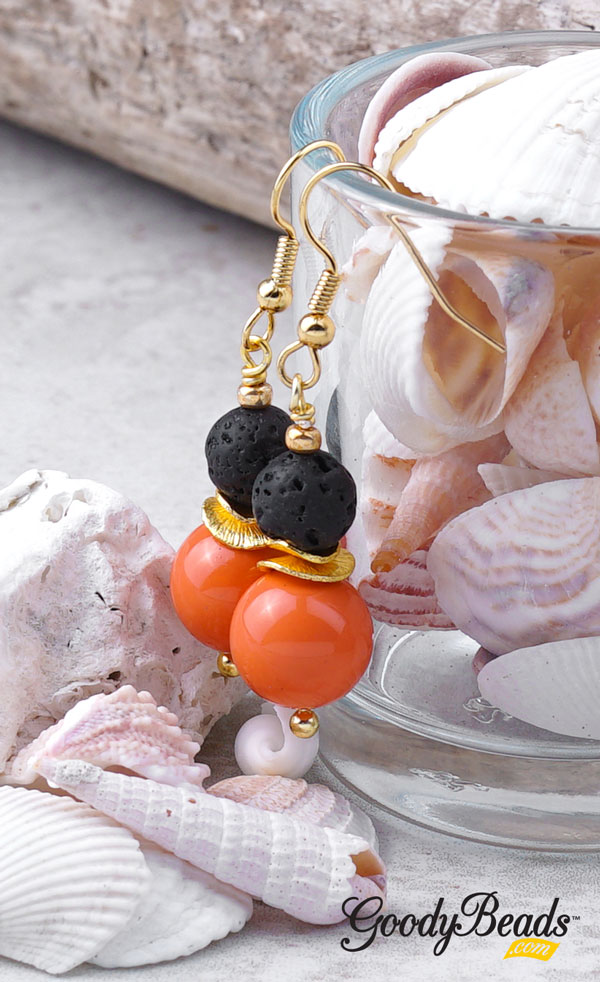
Pantone 2019 Color of the Year has come out and they’ve named Living Coral as their muse! Check out our bead and supply selection to play off this moving color!
Living Coral
Living Coral is a social statement that humanizes the consumers. It also mimics the literal meaning of coral reefs and how it gives home to a translucent array of colors, species and size. How would you define Living Coral?
Here, we’ve taken the color of Coral and found products that are similar in color to help with your inspired, Color of the Year designs. For gemstones, we chose Cherry Quartz that has a similar hue or Red Avertine like this collar pendant. Another thought I had when first looking at Living Coral, was how it reminded me of Rose Gold.So some Rose Gold Hematite beads would work nicely also. Even check out Swarovski Pearl – Coral, it’s similarity is close also.
We made a simple pair of earrings using Swarovski Pearl – Coral. And because coral reefs have porous corals, we accented the pearl with porous lava beads!
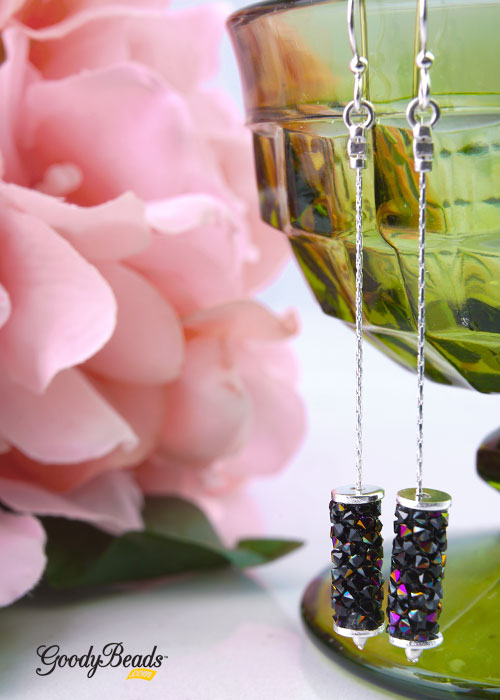
We are loving these Swarovski Fine Rocks tube beads. To make this pair:
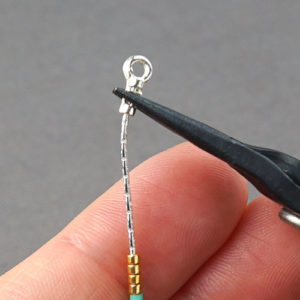
Cut two piece of beading chain at about 2.5 inches.
Use Magical Crimping Pliers, crimp one end of the beading chain with a 2mm crimp tube. (Make sure to leave a little beading chain sticking out of crimp tube so that when you crimp, the crimp tube will catch onto the beading chain.)
Use flush cutters to cut excess beading chain tip left from step two.
At this time, repeat steps 2 and 3 to other beading chain. After you’ve done this, make sure both beading chains are still the same length. Cut chain to adjust length if needed or for desired length.
Slide onto the crimped beading chain a silver spacer, crystal tube beads and another silver spacer.
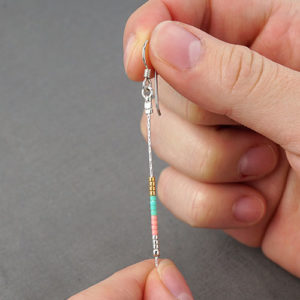
Slide top end of beading chain through end cap and flat crimp the middle of the end cap with flat nose pliers.
Open ear wire and slide on end cap loop. Close ear wire loop.
Repeat steps 6 and 7 on other crimped beading chain.
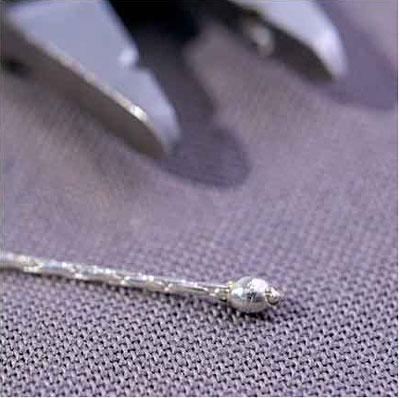
Here, we used the same instructions as above with a simple 8mm Swarovski Pearl bead. Use a piece of wire or headpin first, to slide through pearl bead, so that beading chain can run through it. We had also trimmed the beading chain to 1.5 inches after we crimped on the 2mm crimp tube.
A fun tip when making bracelet with beading chain, is for you not to be afraid to mix metals. Watch video for a step-by-step tutorial in making your own DIY adjustable bracelet!
Video
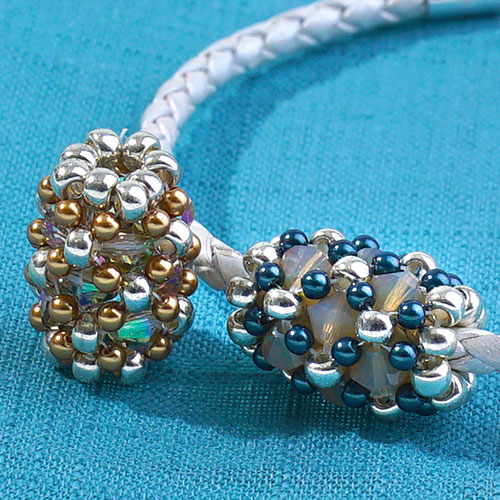
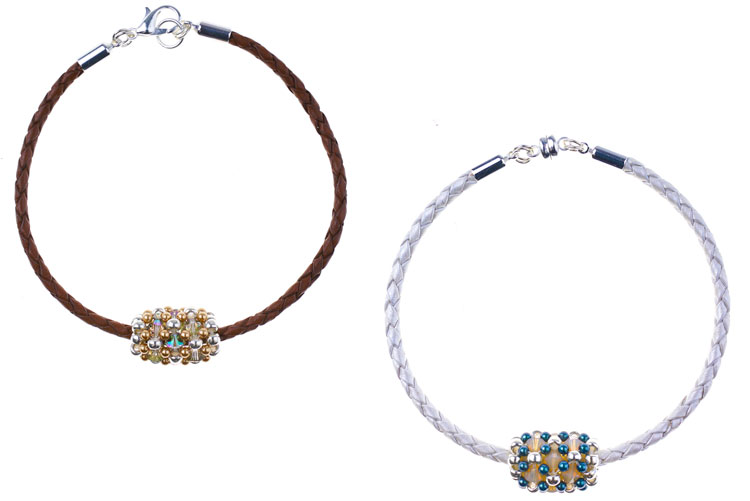
Beaded Bead with 2mm Swarovski® Pearl – Pattern Tutorial
New to GoodyBeads are 2mm Swarovski Pearls! Their glossy shine is sure to add fanciness to your designs. Here is a simple beaded bead using 2mm Swarovski pearls, 4mm Swarovski bicone crystals and 8/0 seed beads.
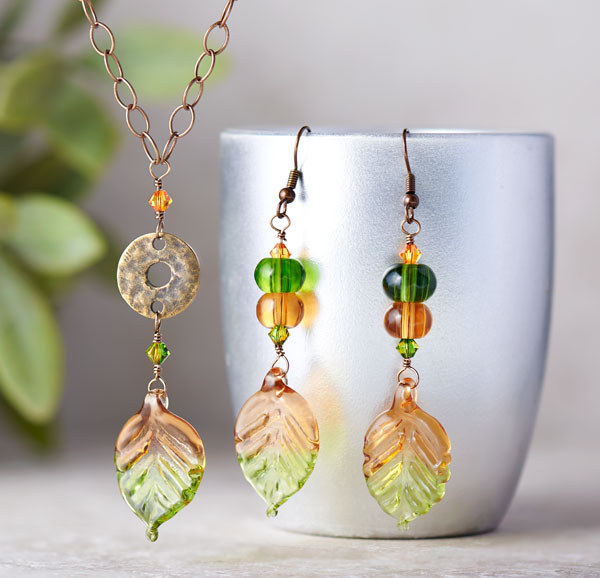
Falling Leaf Necklace and Earrings Set – Free Tutorial
We love Autumn. You get to bundle up and be cute in fashionable layers, scarves, boots and fluffy hats! We have this super simple DIY necklace and earrings set using Amber and Green Leaves Set (Y001056).
What you will need for Necklace and Earring:
Amber and Green Leaves and Rondelle Glass Beads Set (Y001056)
Cut a 4″ wire. Make a wrapped loop at one end while sliding on a glass bead before wrapping the loop. Make sure loop is big enough for glass leaf loop.
Slide on a fern/topaz bicone, the orange rondelle bead, the green bead and a topaz bicone.
Make a wrapped loop.
Open ear wire loop and slide on leaf dangle. Close loop.
Repeat all steps for other earrings.
Necklace Instructions:
Cut chain in half.
Cut a 3″ wire. Make a wrapped loop at one end while sliding on a glass bead before wrapping the loop. Make sure loop is big enough for glass leaf loop.
Slide on fern/topaz bicone and make a wrapped loop, while sliding on one end of the brass link. Finish wrapped loop.
Cut another 3″ wire and begin making a wrapped loop, while sliding on the other end of the brass link through. Finish wrapped loop.
Slide on topaz bicone crystal and beginning making another wrapped loop, while sliding on both ends of the two cut chain. Finish wrapped loop.
Open jump ring and slide on clasp loop and one end of chain. Close jump ring.
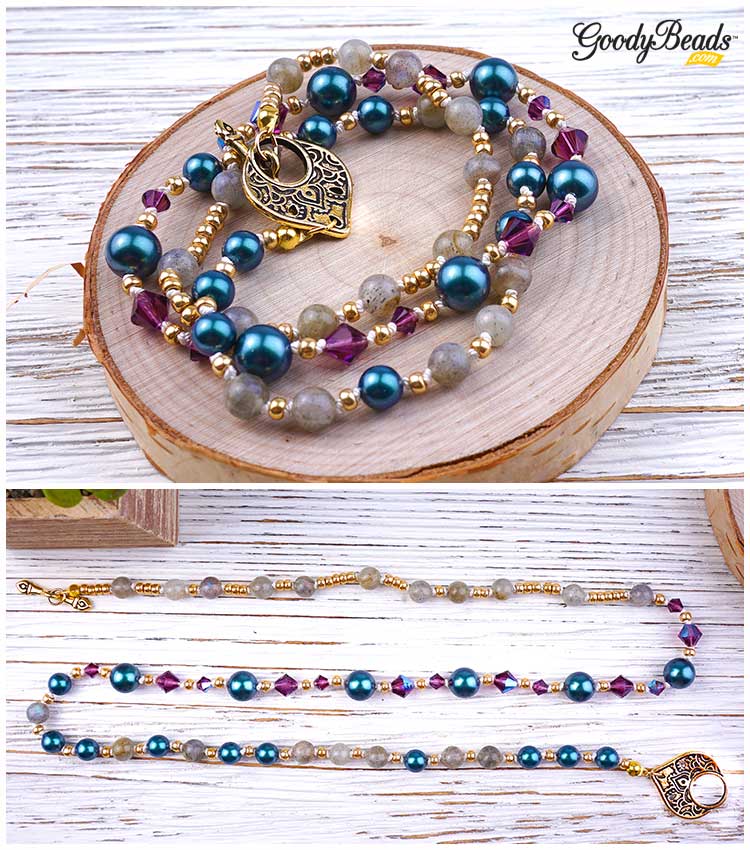
In this three -wrap bracelet, we used Griffin Silk Cord knotted with Tahitian Look Pearls, Amethyst Shimmer bicone crystals and 6mm Labradorite round beads with size 8/0 gold seed beads. Plus, we finished up this piece with gold findings.
Make a knot at the end of the silk cord and cut excess end. Slide over knot with a clamshell bead tip (Check previous blog on examples). Optional, add a small dab of Super New Glue to the knot before sliding the clamshell over.
Slide on a seed bead and make another knot flushed to the seed bead.
Slide on a 6mm Tahitian Pearl and make a knot.
Side on a seed bead and make another knot.
Repeat with alternating with pearl beads or 6mm Labradorite beads until you reach your desired wrist length. This will be your first row.
Next row, alternate a knot between an 8mm Amethyst Shimmer bicone crystal, seed bead, 4mm Amythest Shimmer bicone crystal, seed bead, 8mm Tahitian Pearl and seed bead. Repeat until your desired wrist length.
For your third row, alternate seed beads and Labradorite beads in no particular order to wrist length.
End with a knot, add a small dab of glue and cap off with a clamshell bead tip.
Open jump ring and attach either clamshell bead tip end to a toggle clasp. Repeat to other bead tip end.
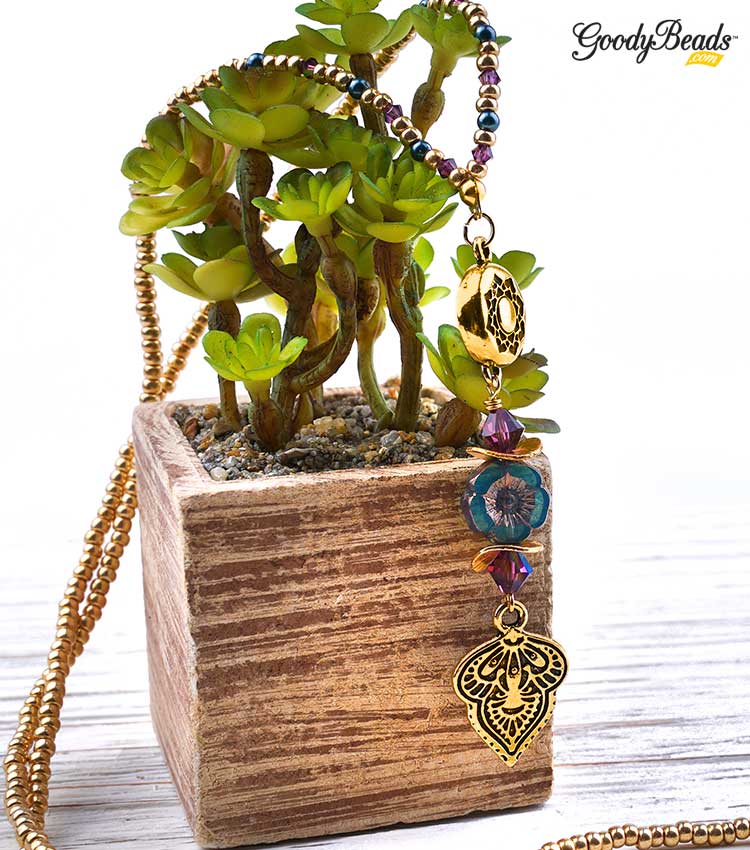
Passion Flower Necklace
We used the Griffin Silk cord to complete the bracelet with a necklace with similar beads as in the bracelet with TierraCast Findings.
Open loop of eyepin and slide on TierraCast Mehndi charm. Close loop.
Slide on the following beads onto the eyepin and make a simple loop or wrap loop: 8mm Ameythst Shimmer bicone crystal, wavy disc (concave down), Czech Hibiscus, wavy disc (concave up) and 8mm Amythest Shimmer bicone crystal. (If making a wrapped loop, make sure to slide on TierraCast magnetic clasp end before finishing loop off.)
Make a knot at the end of the silk cord. Slide on a seed bead, 3mm bicone, a seed bead, a pearl, 2 seed bead, 3mm bicone, 2 seed bead, a pearl, 3 seed bead, a 3mm bicone, 3 seed bead and a pearl.
Slide on seed beads to accomodate a length large enough to slide over your head.
End silk cord with pearl, 3 seed bead, 3mm bicone, 3 seed bead, a pearl, 2 seed bead, 3mm bicone, 2 seed bead, pearl, a seed bead, 3mm bicone and seed bead.
Take both ends of your silk cord and make a knot to tied the ends together.
Slide a clamshell bead tip over the knot.
Open jump ring and slide on loop of bead tip and other end of the TierraCast magnetic clasp. Close loop.
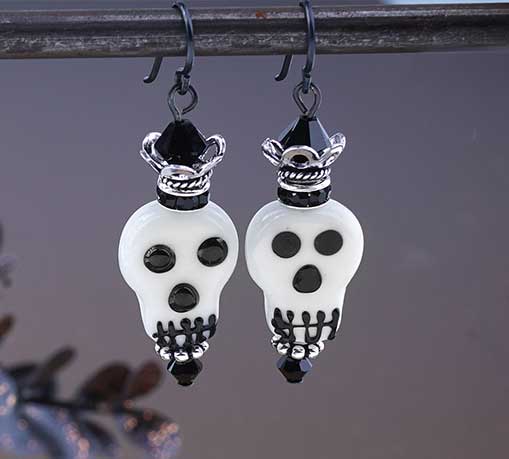
Halloween Pumpkin King Earrings
Halloween is creeping up on us soon! Inspired by a Halloween movie favorite, Nightmare Before Christmas, we have these spooky DIY earrings dedicated to the pumpkin king himself!
We dressed these lampwork skull beads with black findings, Swarovski® jet crystals, black rhinestone rondelles and shiney silver crown. Be ready for Halloween with this pair of frightening earrings.
Slide on a headpin the following and make a simple loop: 4mm bicone, heishi spacer, skull bead, rhinestone rondelle, bead cap (concave up) and 6mm bicone.
Open loop of earwire and slide on skull dangle. Close loop.
Repeat for other earring.
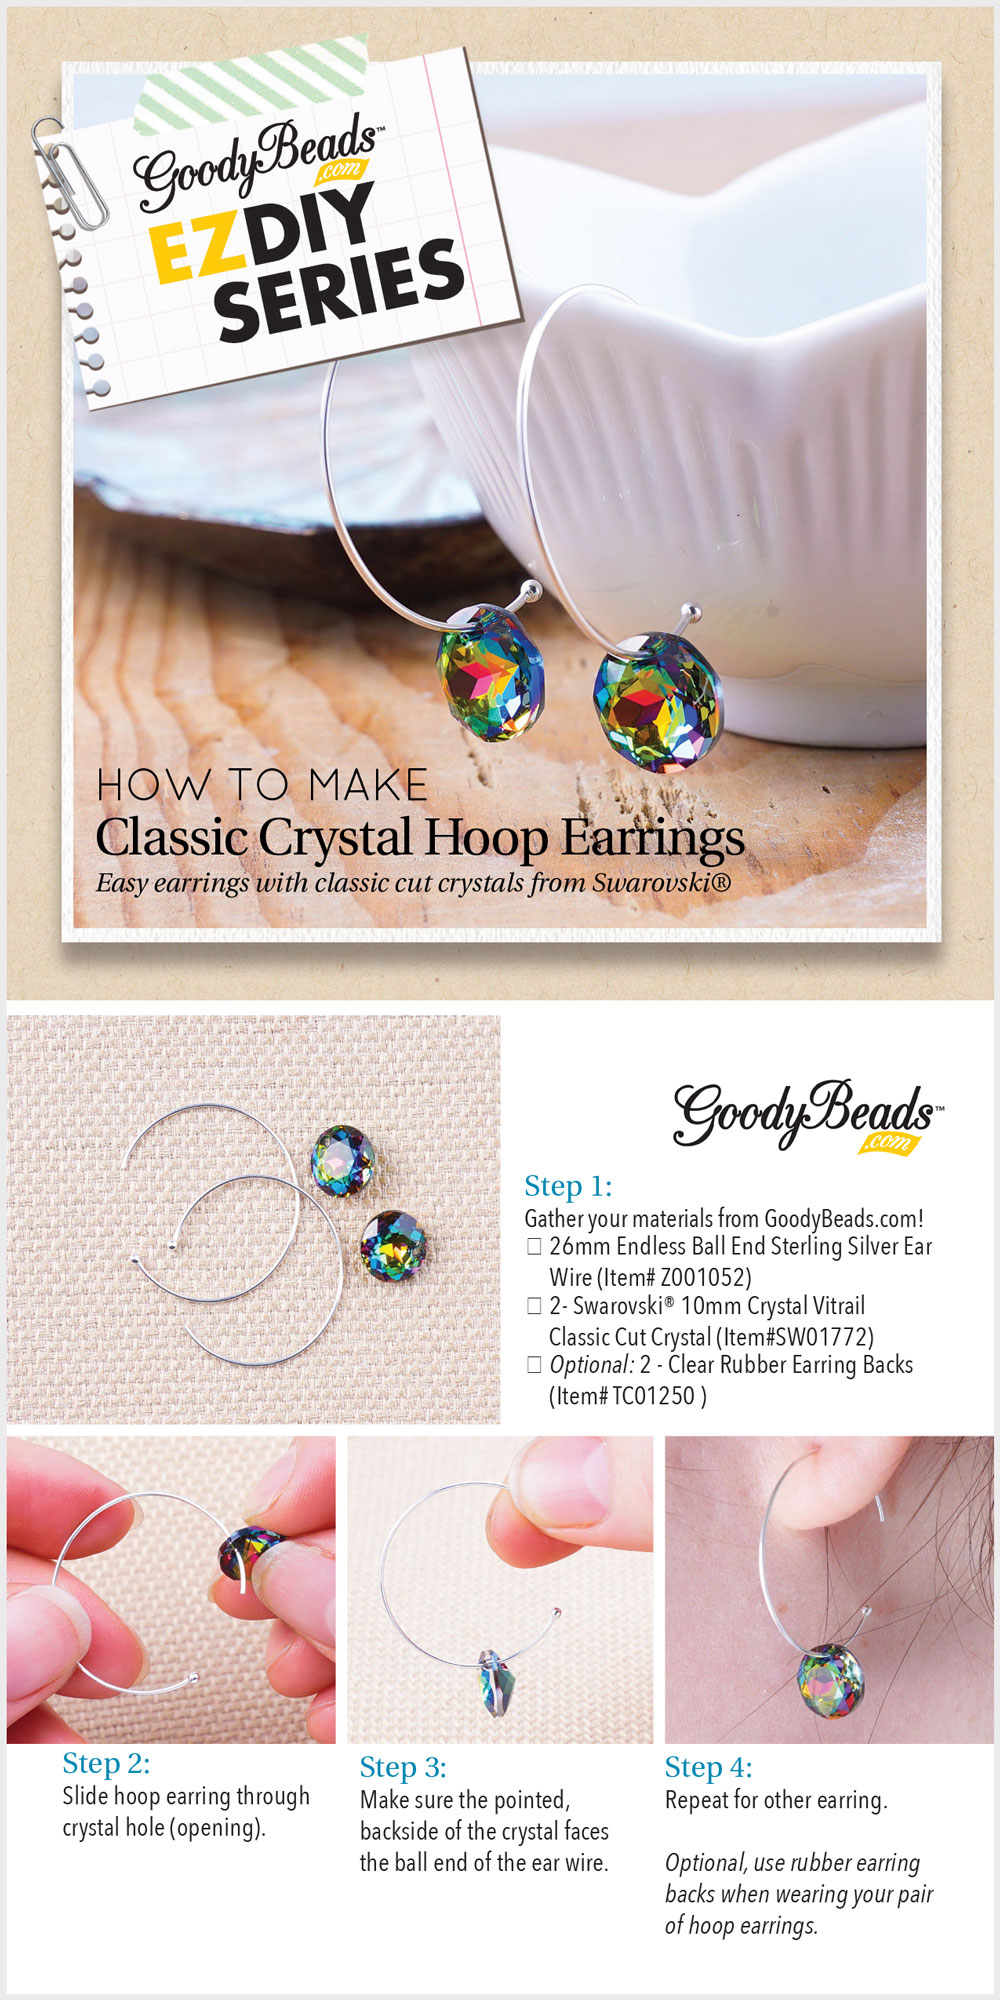
GoodyBeads EZ DIY Series: Classic Crystal Hoop Earrings
With only two components to make these earrings, all you need is a brilliant smile to top it off! Check out this easy tutorial on how to make these Classic Crystal Hoop Earrings with Swarovski® classic cut crystals.
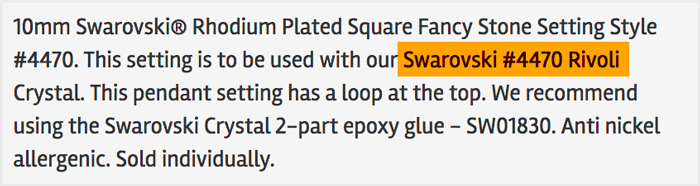
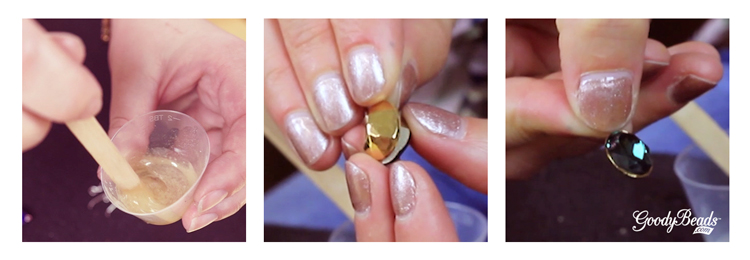
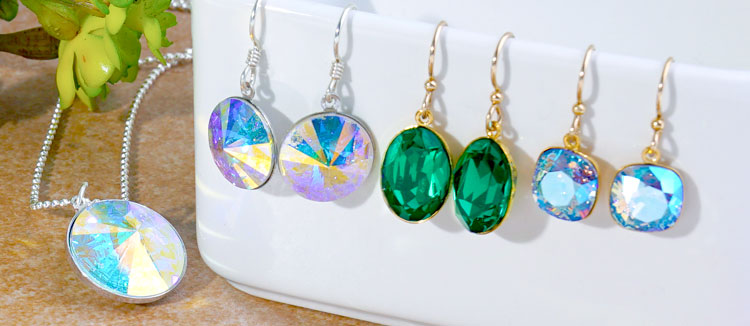
Statement jewelry is about making your presence known. So why not create your own earrings or necklace with Swarovski crystal fancy stones? In minutes, you can create sparkling jewelry!
Swarovski Crystal and Settings
What you will need to create your pendant or dangle crystals are the following:
When determining the right crystal stone for the right setting, read the description to determine the correct crystal style #. Take the style # and put that into the search bar to find crystals that will fit that setting.
Another key component to creating these crystal dangles is the two-part epoxy. CG 500 (A+B) is a high-performance gluing system for both foiled and unfoiled Swarovski crystals, exclusively distributed by Swarovski for professional use within the jewelry industry. CG 500 (A+B) absorbs impacts and withstands distortion. In addition, maximum elasticity protects the crystal foiling.
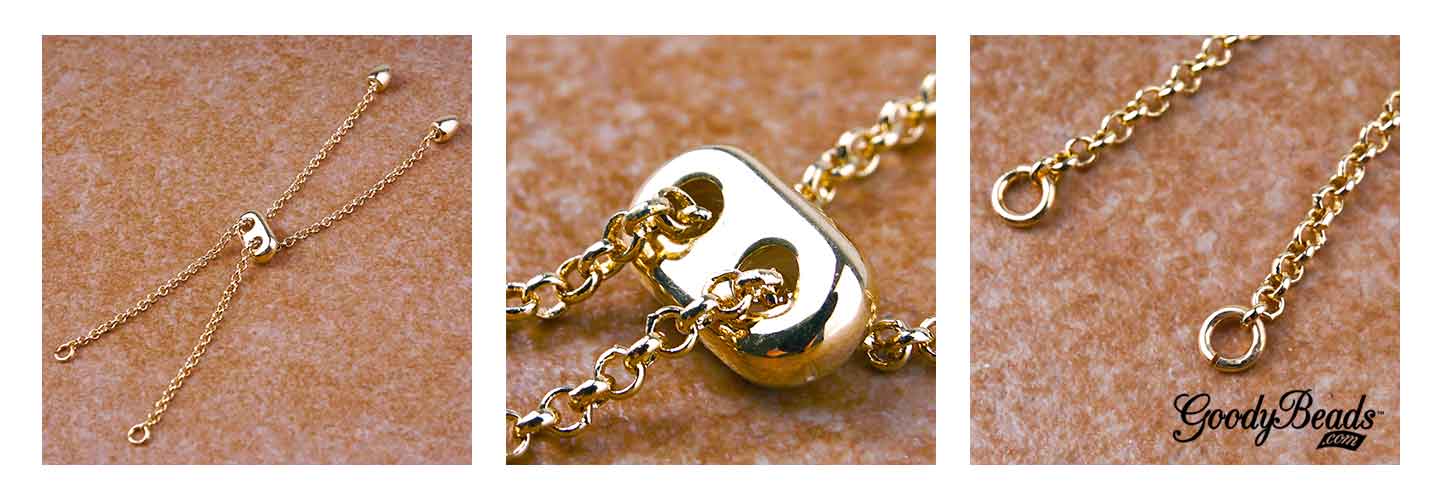
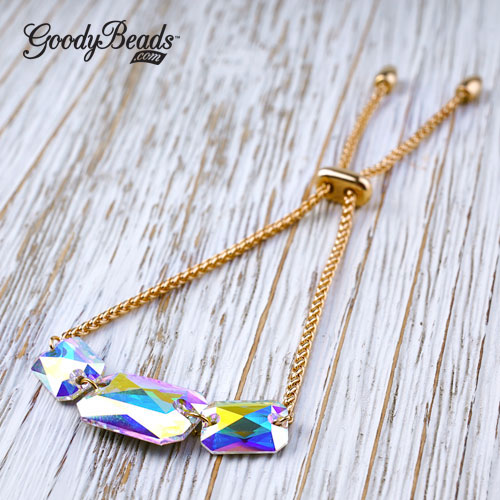
We have an easy DIY project for you that makes creating bracelets even easier. With the Adjustable Bracelet Sliding Clasp, all you need to add is your favorite link! This project consists of sparkling Swarovski Crystals and two simple ways to incorporate them with the adjustable bracelet finding!
Adjustable Bracelet Sliding Clasp
The Adjustable Bracelet Sliding Clasp comes in two different chain types in gold, silver or rhodium finishes. These findings come in wheat or rollo chain, with a sliding clasp that easily moves to adjust to your wrist size and jump rings that make attaching links, beads, connectors and more a breeze.
Link Swarovski Sew-On Stone Crystals with jump rings. We opened one of the jump rings on the chain and slid on one end of the crystal. Do the same to the other jump ring. Link a large sew-on crystal with 5mm oval jump rings. This bracelet is all set and ready to wear!
We can’t get enough of the Swarovski Fine Rocks Tube Crystal! We used 22-Gauge wire, cut a 3″ piece and made a wrapped loop on one end. Slide on a silver disc spacer (Z002570), tube crystal and another spacer. Made another wrapped loop to finish off the link! We love the jump rings on the clasp because you can easily open the jump rings and attach your tube crystal!
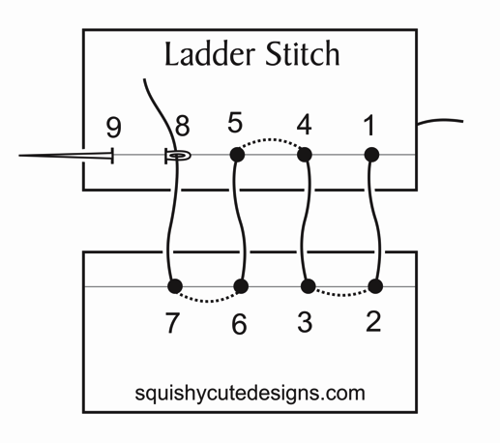
If you’ve done fabric sewing and done a ladder stitch to close openings, this technique would be easy for you. Below is a illustrated look at what a ladder stitch looks like from this external website we found. So every time you come up, that’s when you will sew through your bead hole before sewing across and down.
One of our popular demos was bead stitching Swarovski two-hole spike beads on Beadable Accessories like the cuff and rings. Download our components list HERE for this demo and watch our facebook video of how So Vang ladder stitches the spike beads on beadable rings and cuffs.
Make simple drop earrings using Memory Wire and a few tools. Watch as So shows you how easy it is to create hoops and dangle crystal pendants off it. Download the pdf file HERE to get components and tools used for this super easy demo!
One of our popular project request is our beadable fan earrings with 11/0 Miyuki Delicas and long tassels. Check our video to see how easy they are made.
Starting with 2.5′ to 3′ of beading thread, attach a stopper bead leaving a 6″ tail end.
Start from one end of the fan, come up through the bottom hole.
Add your three delicas and go across the beadable opening and down the hole.
Sew up the next hole, add your three delicas, go across the beadable opening and down the hole.
Repeat this until you’ve gone across the beadable fan pendant.
You will now add your pearl bead by sewing up the hole closest to the round opening, add your pearl bead and go across the circle opening and down the hole.
Sew through the pearl bead again and up the hole, through the pearl again and down the hole.
Tie off your ends and cut excess off.
Open small jump ring and slide on tassel and through the middle hole of your fan pendant. Close jump ring.
Open earwire loop and attached top fan pendant loop to earwire. Close loop.
Repeat all steps for other earring.
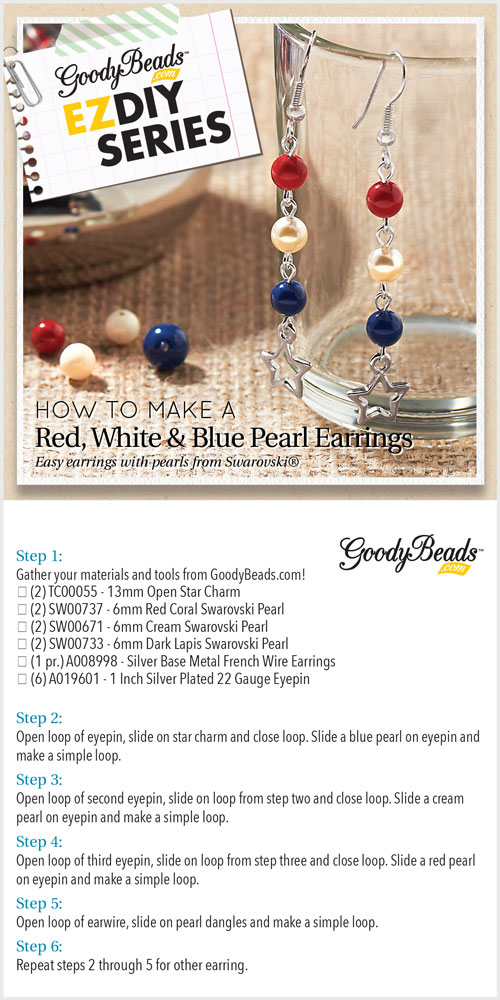
GoodyBeads EZ DIY Series: Red, White & Blue Pearl Earrings
Watch firecrackers, grill up some hotdogs and laugh it up with friends and family this July 4th! We have this cute red, white & blue Swarovski® pearl earrings to help you flaunt your patriotic side!