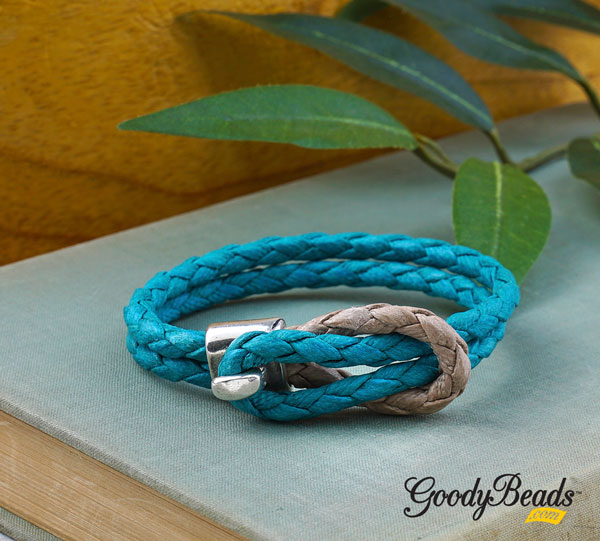
Two Tone Hook Clasp

Today’s product highlight is the Two Tone Hook Clasp it uses two different 4mm or 5mm round cords to make a complete bracelet. See below for instructions on how to make a trendy bracelet with this hook clasp.


What you’ll need:

  • Two Tone Hook Clasp (X005030)
  • 3-4″ of 4mm or 5mm Round Leather or Bolo Cord (item used in bracelet: CH01028)
  • 13-16″ of 4mm or 5mm Round Leather or Bolo Cord (item used in bracelet: CH01025)
    OR cord should be double the length of desired wrist size.
  • Super New Glue (A015821)


GoodyBeads | Blog - Two Tone Hook clasp with Leather or Bolo Cotton Cord

Directions

  1. Add a drop of glue into the clasp channel, on the side opposite of where the hook is curved. (Swirl glue around to coat the channel)
  2. Fold the short piece of round cord and insert both cord ends into glued channel. Hold for a few seconds before letting go of the cords.
  3. Add a drop of glue into the other side of the clasp. (Swirl glue around to coat the channel)
  4. Fold the long piece of round cord and insert both cord ends into the other glued channel. Hold for a few seconds before letting go of the cords.
  5. Let glue set and dry for a few hours before wearing bracelet.


Gemstone Donut Bails – Tutorial

We all love a good donut, right? Especially gemstone donuts! We have an easy way to dangle gemstone donut using a donut bail. See our easy tutorial today!


Donut bails are different from your traditional bails. Instead of cupping your dangle or pendant from the top, donut bails cup from the hole of the donut upwards. NOTE: be careful when opening up your bail. If you pull out too wide, it can weaken the curved part and snap in half.


What you’ll need for tutorial


Here are some examples using the donut bails!

GoodyBeads Blog | Gemstone Donut and Donut Bails Tutorial

Items used in necklace: Z001738, A022075, SDM40DNT


GoodyBeads Blog | Gemstone Donut and Donut Bails Tutorial

Items used in necklace: Z001740, MOB40DNT, Y003724


Teardrop Acetate & Leather Earrings

This Teardrop Acetate and Leather Earrings tutorial was one our most popular Make & Takes during the Spring 2019 Twin Cities Bead Bazaar. Learn how to make them today!


Read our previous leather blog on how to coil leather around a licorice leather. This will give you an easier idea at how to coil your leather around the acetate teardrop.


Directions

  1. Cut TWO pieces of leather at 24inch each.
  2. Add 9 seed beads to each strand of leather cord.
  3. Make a loop at one end and fit it on the back side of the teardrop.
  4. Do 3 wraps around acetate teardrop.
  5. On next wrap, center your first bead on the front of the teardrop and then do a wrap without a bead. Repeat this 8 more times. End with 3 wraps at the end.
  6. Slip the leather end through the loop you’ve made in step 3.
  7. Holding your coils, pull gently on the single cord, on the opposite side of the loop; you may need to use a pliers.
  8. Pull the cord until the loop is situated inside of your coils.
  9. Trim your ends.
  10. Grasp the loop of your ear wire and turn the loop 90 degrees or until the ear wire hole faces outwards.
  11. Open a jump ring and slide through the loop of the acetate teardrop and earwire loop. Close jump ring.
  12. Repeat all steps for the other earring.


GoodyBeads Blog | Free Tutorial - Teardrop Acetate Leather Earrings

Items used in Earrings: SB00106, A022070, TC02306, A008807, Z020567


Leather Band Bracelet with Adjustable Sliding Clasp

Design this easy DIY leather bracelet with flat leather, a clamp end and GoodyBeads’ Exclusive Bracelet Adjustable Sliding Clasp.


What you’ll need for bracelet:


Tutorial

Items used in bracelet tutorial: Z012150, CH00949 (6″), A012441


Adjustable Leather Bracelet with Rivets

Learn to use rivets on leather and make an easy adjustable leather bracelet.

Make sure to read our How to Rivet blog post to learn how to rivet leather. It also has a a quick summary about compression rivets, which are best to use with leather.

What you’ll need to make bracelets:

Video Tutorial

Leather Bracelets

GoodyBead Blog | FREE Video tutorial on how to rivet leather and make an adjustable leather bracelet.

Items used in bracelet: CH00232 (13), TC01677

GoodyBead Blog | FREE Video tutorial on how to rivet leather and make an adjustable leather bracelet.

Items used in bracelet: CH00694 (13), TC01677


Sizzix Rose Gold Earrings

Break out your style with this cute pair of earrings with Sizzix cut leather and a glass connector.


GoodyBeads Blog: Rose Gold Leather Earrings with Sizzix leather and glass faceted connectors.


What you’ll need for earrings:


Directions

  1. Cut your leather with the Sizzix Big Shot, using the 30mm circle die. Cut Two circles.
  2. Use the smallest hole setting on the Leather Hole Punch Pliers to punch a hole on your leather circles.
  3. Open jump ring and slide through the hole on your leather circle and through loop of glass connector. Close jump ring.
  4. Repeat Step 3 with other leather circle.
  5. Open ear wire loop and slide other end of the glass connector and close loop.
  6. Repeat Step 5 with other ear wire and glass connector.

Specific items used in Rose Gold earrings: SZ00014, Y005020, A021759 (2), TC02303


Leather & Gemstone DIY Keychain

Father’s Day is coming up and we have this easy DIY Keychain, made with large-hole gemstones and 1mm leather cord.

Try out this easy DIY keychain project you can simply make in minutes! What you’ll need for this project are the following:

GoodyBeads Blog | Father's Day DIY Keychain with Large-hole Gemstones and 1mm leather cord.

Directions

  • Cut a foot of 1mm leather cord.
  • Make sure jump ring is full closed. Feed one end of your leather cord through the jump ring. Center the jump ring on the leather cord.
  • With both leather cord ends, slide on three large-hole gemstone beads.
  • Make an overhand knot with the leather cord ends to sit closely below the gemstone beads.
  • Cut leather cords, leaving 1 to 2 inch tail.
  • Slide jump ring on to your key ring and you are done!

Specific items used in keychain sample: MCKR0001, Z007449, A022071, BGA8RDLH-8


Deertan Lace and Gemstone Necklace – Tutorial

Create and design this urban necklace using one of our newest products: Deertan Lace leather.


Softer than Calf Craft, yet incredibly strong, Deertan Lace is expertly cut from only the finest hides. Deertan lace is full grain leather cut from the top 5 percent of hand selected Italian calf hides. Each hide is specially treated to be water resistant. Great for all your jewelry and beading projects or for garment lacing. Deertan Lace is the softest leather lace around. This product comes from our friends at Leather Cord USA, always producing high-quality leather for DIY jewelry and crafts.


Deertan Lace and Gemstone Necklace

An easy jewelry project using Deertan lace is this simple DIY necklace. We’ve paired this necklace using 3mm Deertan Lace with Dakota Stones large-hole gemstones, Beadalon Quick Links and TierraCast beads and components.

GoodyBeads Blog: DIY Necklace tutorial with Deertan Leather Lace and Large-hole gemstones.


Directions:

  1. Cut a 3 feet piece of deertan lace.
  2. Fold lace in half and make a lark’s head to both the 20mm and 25mm ring.
  3. Slide on flat barrel bead through both lace pieces from Step 2.
  4. Make an overhand knot at the ends of the deertan lace. Adjust knot to get desired length.
  5. Cut two piece of lace at 10 inches. And one piece at 12 inches.
  6. With a 10″ lace, fold in half and make a lark’s head knot on the 25mm ring link. Repeat with the 12″ next and then the 10″. Bunch them together.
  7. On a lace fringe end, slide on a nugget bead, large-hole gemstone and another nugget bead. Make an overhand knot. Repeat to the other 5 lace fringe ends.
    Note: To assist in sliding on beads and gemstones, make an angled cut to leather ends.

Items used in necklace: Z015547, ATQ8RDLH-8, TC01492 (12), Z010360, Z010362TC01750


Leather Wrap Bracelet with Matubo Beads – Video Tutorial

We’ll show you how to make a leather wrap bracelet by fishtail braiding leather with new 2/0 Czech Matubo Beads.


For this bracelet tutorial, you’ll need:


Determine Length of 1.5mm Leather needed for a wrap bracelet

Use this method to determine the leather cord length you may need for a multi-wrap bracelet.

Take your wrist length and double the length. Multiply that by the number of wraps you want and then add 12”. That will give you an approximate cord length you will need to start your bracelet. (The extra 12” factors in the beads and leather you’ll be adding along with loop end.)

Example:

2 wraps for an 8.5” bracelet: (8.5” x2) x 2 wraps = 34 + 12 = 46” needed.

Or

4 wraps for a 7.5” bracelet: (7.5” x2) x 4 wraps = 60 + 12 = 72” needed.

Keep in mind, these total numbers are approximate. You will want to test the wrap length while you’re making your bracelet. Having extra length is better than being short on your wrapped length goal.


Video Tutorial

Leather bracelet tutorial begins at 15:00 mark.


DIY Spring Earrings and Necklace

Who doesn’t love warm weather and the bright colors of spring? We have two fun and easy projects for you to get you ready for spring weather!


Easy Flower Pendant

GoodyBeads Instant Pendant Flower Necklace - Free Tutorial

Instructions:

  1. With the instant pendant you easily unscrew the bottom piece and slide on the following: Silver bead, pink bead, flower bead, pink bead and silver bead.
  2. Screw back on the bottom piece.
  3. Unclasp your necklace chain and slide chain through top loop of your instant pendant. Clasp necklace chain.
  4. Open jump ring and slide on dangle and through bottom loop of the instant pendant. Close jump ring.

Items used in necklace: Z003706, A021423, Z009386 (2), Z005486, Z020510, A001529, Z001033


Pretty Pink Leather Earrings

GoodyBeads Pretty Pink Leather Earrings - FREE Tutorial

Instructions:

  1. Cut 2 pieces of leather at 3 inches.
  2. Slide pink bead, silver bead and pink bead on a leather piece.
  3. Take both ends of your leather and lay on crimp end. Fold both sides of crimp ends over the leather ends.
  4. Open ear wire loop, slide on loop of crimp end and close loop.
  5. Repeat steps 2-4 for other earring.

Items used in earrings: Z007632, Z003706, TC02297, A022076, Z009386 (2)


Gemstone Tassel Earrings – Tutorial

We love a good tassel, and these leather tassels from LeatherCord USA are no exception! Here is a fun and easy DIY gemstone tassel earrings you can make in seconds!


GoodyBeads | Blog - Gemstone Tassel Earrings FREE tutorial

We adore these leather tassels from LeatherCord USA, because they have a long enough loop at the top, which will hold these large-hole gemstone bead from DakotaStones and then topped off with a TierraCast ear wire. With high-quality materials from well-known brands, you’re sure to make a fabulous pair of earrings!


What you’ll need for earrings:


Earring Tutorial


Painted Leather Wrap Bracelet

Check out this bracelet Tory and Candie taught at the Spring 2019 Twin Cities Bead Bazaar, using Vintaj Patinas painted on leather.


If you were able to join us at the Twin Cities Bead Bazaar on March 2 & 3, you’ll know how much fun it was! We are sharing this super easy bracelet Candie Cooper and Tory taught at one of the hourly Make & Takes. It’s made with leather cord and TierraCast end caps on NEW Extra Heavy Duty Memory Wire. And then painted with Vintaj Patinas.


GoodyBeads | Blog - Memory Wire Leather with Vintaj Patinas

Instructions:

  1. Using Finishing Pliers, make a loop at one end of the memory wire.
  2. Slide on memory wire a bead cap, leather and a bead cap.
  3. Cut excess memory wire leaving about 1/2 inche to 3/4 inch end.
  4. Create a loop on other end of the memory wire.
  5. Paint Leather with Vintaj Patinas. Let it dry.


Components to Make Bracelet: TC01854 (2), CH00793 (10″), WR00132, Vintaj Patinas

Tools Used: TL00206, TLZ0207


Easy Sizzix Cuff Bracelet – Video Tutorial

Continuing from our Vintaj painted on Sizzix Leather blog/video, learn how to take your painted leather and make an easy cuff bracelet using Sizzix Cuff Dies and TierraCast buttons.


GoodyBeads Blog: Patina Leather and Sizzix Cuff Video Tutorial

Candie Copper is Back! She has tips and tricks for making a super simple leather cuff bracelet using the Cuff Dies and Button Hole Dies.


What you’ll need to make your cuff:


Video Tutorial


GoodyBeads Sizzix Leather with Vintaj Patina Cuff Tutorial


Leather Wrap Bracelet with 1.5mm Leather Cord

New from LeatherCordUSA is 1.5mm round leather cord. This popular size is a must-have for your leather projects. Here is a simple leather wrap bracelet project using 1.5mm leather cord, curved tubes and adjustable sliding clasp.

GoodyBeaeds Blog: 1.5mm Leather Cord Wrap Bracelet Tutorial

Here are components you will need to make the leather wrap bracelet:

Tutorial

  1. Measure your wrist length and multiple that by 3 and subtract 2 inches.
  2. Cut leather cord to 3 equal lengths to your measurement from step 1.
  3. Take an end from each of your 3 leather cords and pinch them.
  4. Add a drop of Super New Glue to your end cap and slide the cord ends into the end cap. Let it dry for a few minutes for it to set.
  5. Slide curved tubes onto your leather cords. You can add as many tubes you want to each leather cord.
  6. Add a drop of Super New Glue to the other end cap and slide the other three ends into the end cap. Let it dry for a few minutes.
  7. Open the jump ring of your sliding clasp and slide on end cap loop. Close jump ring.
  8. Repeat to other jump ring and end cap.
  9. Complete!

As an option, you can add your own choice of clasp with a jump ring or split ring instead of the sliding clasp.


Memory Wire Leather Bracelets – Video Tutorial

Tory and Candie Cooper are back in this video to demonstrate how to make simple bracelets using memory wire, leather, end caps and beads!Making bracelets with memory wire is one of the easiest way to make jewelry! Make sure to stop over to our Memory Wire Hot Category page to shop for memory wire, end caps, tools and leather with an inner hole that can be used with memory wire. Don’t forget to get some of our favorite beads to accompany your leather memory wire bracelet like glass beads, gemstones, TierraCast beads, Swarovski crystals and more.

Because memory wire comes pre-coiled, it will sustain and keep its shape. We personally like the Beadalon® Heavy Duty Memory Wire (WR00120/WR00121), which Tory and Candie use in the video. And most importantly, having the correct tools will help create your bracelets: Memory Wire Shears and Memory Wire Finishing Pliers

These pliers will help with looping the memory wire because wire itself is a thick and sturdy wire.

Video Tutorial

https://www.youtube.com/embed/YmVVh5O5yLI

Bracelet Examples

VideoMemoryWire_01

Here are different variations of bracelets we’ve made using a combination of gemstones, metal beads, spacers, Czech beads, Swarovski crystals and more.

You can find other ways we’ve used memory wire in other blog posts: 

How do you design your memory bracelets? We would love to know!