3 Ways to Wear DIY Suede and Gemstone Lariat Necklace

Today’s tutorial features the DIY Suede and Gemstone Necklace. This necklace is easy to make and can be worn three different ways. First, let’s get to designing this necklace!

What you’ll need: 

SuedeLeatherNecklace_Main

Directions:

  1. Cut 50-60″ of suede.
  2. Fold suede in half and make a lark’s head knot with the suede on the Hammertone ring.
  3. Slide two large-hole beads on to both suede cords. (Cut ends at and angle to help get both ends through large-hole bead.)
  4. At each suede end, fold over the Crimp Cover Ends.
  5. Open a jump ring, slide on feather charm and loop end of Crimp Cover Ends. Repeat to other end.

3 Ways to Wear the Necklace

Here are three ways that you can chnage up your suede and gemstone necklace.

GoodyBeads | Blog - Suede and Gemstone Lariat Necklace DIY Tutorial1. With the Hammertone ring at the front of your necklace, wrap the suede around your neck and slide both ends through the ring. This creates an illusion of two necklaces!

SuedeLeatherNecklace_2

2. Wrap both suede ends around your neck in the same direction and loop both ends into the Hammertone ring!

GoodyBeads | Blog - Suede and Gemstone Lariat Necklace DIY Tutorial

With the Hammertone ring at the front, tie your suede ends at the back of your neck. Adjust length as needed.


DIY Acorn Pearl Earrings

Acorns are a symbolism of fall weather, so these pair of earrings are fitting for the season.


What you’ll need for earrings:

GoodyBeads | Blog - Acorn Pearl Earrings with FREE Tutorial

Directions:

  1. Cut ball chain with 10 ball links. Cut two pieces.
  2. Cup each end of the ball chain with clam shell end caps.
  3. On a headpin, slide on a pearl, an end cap and make a simple loop.
  4. Open pearl dangle loop and slide on loop of clam shell. Close loop.
  5. Open earwire loop and slide on other end of ball chain loop. Close loop.
  6. Repeat steps 3 – 5 to other ball chain link.


Amazonite and Leather Wrap

Design this wrap bracelet with Amazonite large-hole faceted gemstones and Deertan Lace leather. It’s also adjustable with a sliding clasp and easy to make!


What you’ll need:

GoodyBeads | Blog - Amazonite & Leather Wrap Bracelet FREE Tutorial

Directions:

  1. Cut a 36′ piece of deertan lace.
  2. Slide 7 gemstones onto the leather. (Cut ends at and angle to help push leather through.)
  3. Take both of your leather ends and slide through TierraCast bead.
  4. Make a knot at each leather end.


Crystal Quartz Drop Earrings with Tutorial

Today’s FREE tutorial is wire wrapping Crystal Quartz points and making simple pair of earrings with them! All you need are a few tools and wire to get your started!

What you’ll need for tutorial:

Crystal Point Tutorial

Here are some earring examples to using your crystal points!

Crystal Hoop Earrings
We took three different graduated points and slid them over the hoop earrings for an easy pair of earrings!

Items used in earrings: CRY3-36PTAW00055, Z011592

GoodyBeads | Blog - Crystal Point Earrings with FREE Tutorial

Crystal Point Drop Earrings

In this example, we chose two points of the same length and dangled one point on either sides of the drop link. And a third point at a longer length at the middle.

Items used in example: CRY3-36PT, AW00055, Y013693, TCZ0077, A002413

GoodyBeads | Blog: Crystal Point Earrings with FREE Tutorial


DIY Wood Earrings with Vintaj Patina Paints

Wood jewelry is everywhere and it is a trend that will probably stick for a while. We took our favorite wood pendants and painted them with Vintaj Patinas. Patinas are great for painting on wood because it gives you an even and full coat of paint. Plus, they dry fast enough that if you need a second layer, you only need to wait a minute of two to add your next coat.

What you’ll need:

GoodyBeads | Blog - Vintaj Patina Wood Earrings with FREE Tutorial

Step-by-Step Tutorial


Rocky Butte Gemstone Hoop Earrings

Rocky Butte, from our friends at DakotaStones, “is mined in Oregon and may have either dendritic or landscape qualities. It may also be called Rocky Butte Picture Jasper. The combination of color and pattern variation are reminiscent of Red Creek Jasper, although the colors are much more muted. Rocky Butte Jasper strands are predominantly shades of gray, brown and tan with some beads or inclusions of rust and rose.” (DakotaStones.com)

If you love gemstones as much as we do, you’ll love this pair of hoop earrings with North American Rocky Butte gemstone beads. It’s a perfect pair of earrings for fall!

GoodyBeads | Blog - Rocky Butte Gemstone Chandelier Earrings with FREE Tutorial

What you’ll need for earrings:


Directions:

  1. On a headpin slide on the following amount of gemstones and make a simple loop:
    A. 1 gemstone, make a total of 8.
    B. 2 gemstones, make a total of 12.
    C. 3 gemstones, make a total of 8.
    D. 4 gemstones, make a total of 2.
  2. On open hoop on hoop frame and slide on the following seed bead and gemstone dangle:
    Seed bead, A, seed bead, A, seed bead, B, seed bead, B, seed bead, B, seed bead, C, seed bead, C, seed bead, D, seed bead, C, seed bead, C, seed bead, B, seed bead, B, seed bead, B, seed bead, A, seed bead, A and seed bead.
  3. Close hoop frame. Open earwire loop and slide on hoop frame loop. Close earwire loop.
  4. Repeat Step 2 and 3 for other earring.


Swarovski® Sapphire Jewelry Tutorials

We’ve got THREE easy projects using October’s Swarovski Psychology of Color: Sapphire. Design bold and confident jewelry with this hue!


Sapphire Ombré Bracelet

GoodyBeads | Blog - Swarovski Sapphire Crystal Bracelet FREE Tutorial

GoodyBeads | Blog - Swarovski Sapphire Crystal Bracelet FREE Tutorial

Items used in bracelet: CH00724 (10″), TC01897 (4), Z008576, SW00072 (15), SW02049 (8) and SW00001 (8). Tool: Magical Crimping Pliers

This bracelet is designed using our popular beading chain, 2mm crimps and slide on clasp. We’ve also used Magical Crimping Pliers to finish the crimps! Check out how to use this tool in our BeadSmith Magical Crimping Pliers blog post.

  1. Slide beading chain through slide on clasp.
  2. On the beading chain, slide on the following:
    Crimp tube, 3 clear crystal, 1 light sapphire, one clear, 2 light sapphire, 1 sapphire, 1 light sapphire, 11 sapphire, 1 light sapphire, 1 sapphire, 2 light sapphire, 1 clear, 1 light sapphire, 3 clear crystal and crimp tube.
  3. Slide chain through slide on clasp in the same direction you did in step one.
  4. Center beads and make a crimp on both ends of your crystals with magical crimping pliers. Make sure to leave a gap so that the crystals lay nicely and not too rigid on the chain.
  5. Slide bracelet over the larges width of your hand and cut excess chain ends if needed.
  6. Add a crimp to both ends of the beading chain and make a crimp with the magical crimping pliers.


Sapphire Icicle Earrings

GoodyBeads | Blog - Swarovski Sapphire Earrings with FREE Tutorial

Items used in earrings: SW00183 (2), SW00182 (4), SW00181 (2), SW02088 (2), SW00634 (2), TCZ0078, A001495, A019697, TC00006 (4) and TC00032 (2).

  1. On headpin, slide on the following and make a simple loop:
    8mm bicone, 5mm spacer, 2 6mm bicone, 4mm spacer and 4mm sapphire bicone.
  2. Open eyepin loop, slide on crystal dangle from Step 1 and close loop.
  3. On the eyepin, slide on the following and make a simple loop:
    4mm sapphire, 4mm spacer, 4mm light sapphire and 3mm crystal.
  4. Open earwire loop, slide one crystal dangle and close loop.
  5. Repeat all steps for other earring.


Swarovski Sapphire Bracelet

GoodyBeads | Blog - Swarovski Sapphire Bracelet with FREE Tutorial

Our friends at Swarovski: Create Your Style has this stunning bracelet made with classic cut crystal pendants!

What you’ll need for bracelet:

Directions:

  1. Using 7mm jump rings attach one 8mm Sapphire pendant to one Heavy Hammered Ring. Then attach one 10mm Sapphire pendant, one 14mm pendant, one 10mm pendant and one 8mm pendant onto the hammered ring. Make sure all pendants face forward. Repeat this step 3 more times and set aside.
  2. Now using the large charms made in Step 1 attach them evenly along the bracelet. Do this with a 7mm jump ring and attach the Heavy Hammered Ring and Dotted Dap Circles together.


Purple Persian Tassel Earrings

People will want to PURR with envy when they see you flaunting these tassels earrings made with Czech beads.

What you’ll need for earrings:


Purple Persian Tassel Earrings

GoodyBeads | Blog: Persian Cat Earrings with Czech Beads and Fan Tassels FREE Tutorial.

Items used in earrings: A019617, Z011514, Z011522, Z007650, Z019427 &  Z003693.

  1. Open large jump ring, slide on both tassels and close jump ring.
  2. Open small jump ring, slide through large jump ring in Step 1, and through eyepin loop. Close jump ring.
  3. On the eyepin, slide on a Czech cat bead and make a simple loop.
  4. Open loop you just made in Step 3, slide on earring loop and close loop.
  5. Repeat all steps for other earring.


Onyx and Acetate Link Necklace

Combining some of our favorite components, we have gemstones, acetate and an adjustable necklace sliding clasp in this simple link necklace!


What you’ll need:

  • 8mm round gemstone (item used in necklace ONX8RD-8)
  • 15mm Acetate Two Hole Coin Connector (Item used in necklace Z015018)
  • 20mm Acetate Two Hole Coin Connector (Item used in necklace Z015028)
  • 14mm Brush Silver Ring Connector/Link (Y018889)
  • Silver Plated Adjustable Wheat Chain Necklace Sliding Clasp (Z011945)
  • 1.5 Inch Silver Eyepin (A019606)
  • 5mm Silver Jump Ring (A001528)

AcetateLinkNecklace_image


Directions:

  1. Slide a gemstone on an eye pin and make a simple loop.
  2. Open a jump ring and slide through necklace loop end and a gemstone link. Close jump ring.
  3. Using jump ring in between each link, connect each link in the following order starting from gemstone link in Step 1:
    15mm acetate, brushed silver ring, gemstone link, 20mm acetate, brushed silver ring, gemstone link, 15mm acetate, brushed silver ring, gemstone link, 20mm acetate, brushed silver ring, and gemstone link.
  4. Open another jump ring, slide on other end of gemstone link and through other necklace loop end. Close jump ring.


Memory Wire Necklace with Tassels

Our love for memory wire extends beyond just bracelets. We have Beadalon memory wire that has a large diameter for necklace jewelry! Here is a dazzling way to making a collar/choker necklace with memory wire, TierraCast cord ends, rhinestone rondelles, LEATHER and tassels!

GoodyBeads | Blog - Beadalon Memory Wire Necklace with Leather and Tassels - Free Tutorial


What you’ll need:


Directions

  1. Cut a full circle of memory wire using Memory Wire Cutters.
  2. At one end, make a loop using Memory Wire Finishing Pliers.
  3. On the memory wire slide on the following pieces:
    Black crystal, green rondelle, black rondelle, fuchsia rondelle, green rondelle, black rondelle, fuchsia rondelle, cord end, leather, cord end, fuchsia rondelle, black rondelle, green rondelle, fushcia rondelle, black rondelle and green rondelle.
  4. Cut memory wire with with about 1/2 to 3/4 inch left. Use your finishing pliers to making a loop at their end. Tighten your loop ends if needed.
  5. Open loop of tassel and slide on one end of your memory wire loops. Close tassel loop. Repeat to other memory wire end.


Stackable Stretch Czech Bead Bracelets

We’re designing stretch bracelets with 50mm curve tubes beads and 3mm melon beads. Easy to make, stack and wear!


These bracelets are easy to make! Each bracelet is strung on and tied into one bracelet for fun stackable, arm candy fun.

What you’ll need:


GoodyBeads | Blog Stackable Stretch Bracelets with Czech Melon Beads

Items used in bracelets: A014097A021634A021914A021930A021929

Directions:

  1. Cut a 10″ piece of elastic. Stretch elastic to loosen the elasticity.
  2. Slide on the elastic the curve tube and 40 melon beads. (40 beads will loosely fit a 6.5″ wrist size. So add more melon beads to adjust to your sizing.)
  3. Make a Surgeon’s Knot to your elastic ends. Gently stretch elastic to tighten the knot.
    Step 5B: Illustrated look at the surgeon's knot.
  4. Cut off excess elastic and slide knot inside curve tube if you can.
    Optional: You can add a small spot of Super New Glue or Hypo Cement to the knot.
  5. Repeat for MORE bracelets!


Skull Hoop Earrings

DIY spooky skull earrings for Halloween or skull lovers! Get this easy tutorial today.


It’s the first day of October and what a good way to start this DIY month with some skull earring for Halloween! These earring are also perfect for skull lovers, like our Designer Heidi. She designed these earrings using hoop earrings in three different sizes (60mm, 50mm, 40mm) as the base, TierraCast skull beads and various metal beads.


What you’ll need:


Directions:

  1. Open earwire’s hinge and slide the following onto the hoop earring:
    5 metal beads, skull bead and 5 metal beads.
  2. Repeat for other earring.


Beaded Skull Hoop Earrings

GoodyBeads | Blog - DIY Skill Hoop Earrings with FREE Tutorial

Items used in 40mm Hoop Earrings: Z017100, TC01315 (20)& TC01099 (2)

GoodyBeads | Blog - DIY Skill Hoop Earrings with FREE Tutorial

Items used in 50mm Hoop Earrings: A014110, TC01489 (20) & TC01098 (2)

GoodyBeads | Blog - DIY Skill Hoop Earrings with FREE Tutorial

Items used in 60mm Hoop Earrings: A014111A003562 (2pks) & TC00196 (2)


Easy Knotted Gemstone Necklace and Bracelet

We’re highlighting the Imperial Jasper from Dakota Stones in these easy DIY tutorials using clam shell bead tips!


Imperial Jasper

Imperial Jasper occurs naturally in a beautiful range of colors including pinks, mossy greens, burgundy and milky white, with striking patterns of parallel banding. Jasper has a long and illustrious history, having been worn by shamans, priests and kings and believed to be a powerful protection stone. Ancient Egyptians sometimes buried their dead with amulets of Jasper for safe passage into the afterlife. Our stock of Imperial Jasper are from DakotaStones and North America mined!


For our tutorial, we’ve taken the large Oval Imperial Jasper (IMP20-40OV) and the Nugget Imperial Jasper (IMP6-20NUG-F) and making a simple necklace and bracelet. These two strands come pre-strung and knotted with cotton threads. The knots will help us add our chain and clasps for easy DIY jewelry.

 NOTE: If you are using different beads and are not strung on cotton thread, you can string them and knot them with Griffin Silk Cord. Refer to our previous blog posts on Knotting with Silk Cord. May I suggest using a Size 6 or 8 Griffin cord.


Imperial Jasper Knotted Necklace

GoodyBeads | Blog - Imperial Jasper Knotted Necklace with Tutorial

We love the chunkiness of the large Oval Imperial Jasper beads (IMP20-40OV) and makes a stunning collar necklace. Becuse these strands are strung out to be about 16 inches, we only need a short piece of chain to complete our necklace. Use about 4-6 inches of chain for a short necklace. You can also lengthen your necklace by adding longer pieces of chain.

Items used in necklace: IMP20-40OV, Z008717, Z001124, X003062, CH00313 & A015821.


Imperial Jasper Knotted Bracelet

GoodyBeads | Blog - Imperial Jasper Knotted Bracelet with Tutorial

We are loving these Imperial Jasper nuggets (IMP6-20NUG-F). Their variation in size and shape really adds an organic look to our bracelet. These strands are also knotted, which makes it easy to customize a bracelet.

Items used in bracelet: IMP6-20NUG-FZ008717Z001124X003062 & A015821.


Fancy Stripe Earrings with Cymbal Kolympos

We’re continuing our love for Cymbal components with these FANCY Stripe Earrings made with the Cymbal Kolympos bead ending. Check out this FREE pattern from our designer, So Vang.

If you haven’t yet seen the Cymbal components that just came out a few month ago, you’re missing out on some great components and findings for your bead stitching patterns. Here is a simple pair of earrings you can make using the Cymbal Kolympos bead ending.

Though this pattern was intended and can be used for a bracelet pattern, we’ve shorten the pattern to make some statement earrings instead!

What you’ll need for earrings:

Items used for earring example: Z013596, SB03303, SB00107, SB01916, Z004589, A006587, A015211 and TCZ0139

GoodyBeads | Blog - Fancy Stripe Earrings with Cymbal Kolympos Bead Endings FREE Pattern!


Leather Bracelets with Half Circle Magnetic Clasp Leather

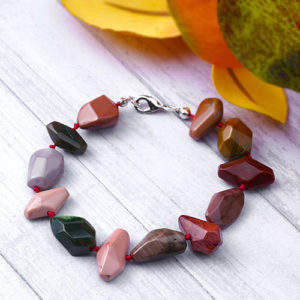
Learn how to make easy DIY bracelets using the Half-Circle Magnetic Clasp with round, flat and licorice leather.

The half-circle magnetic clasp really transforms the overall style of any bracelet because it circles around half of your wrist, it is a clasp but also a bold, statement look. The Half-Circle Magnetic Clasp comes in 4 specific styles and works only with a specific leather. It has an end bezel/opening that will only accommodate 5mm round leather, 5mm flat leather, 10mm flat leather or licorice leather. Let’s go through the 4 different clasps AND how to determine leather length for each of the Half-Circle Magnetic Clasp.

Determining Leather Length

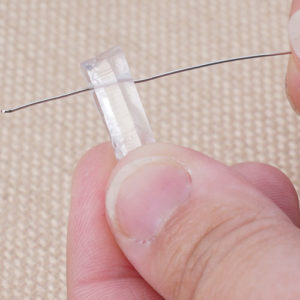
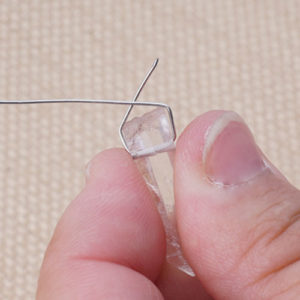
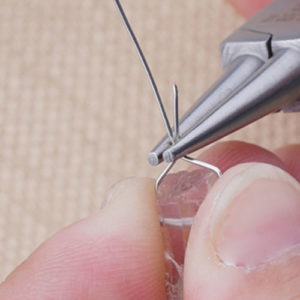
Before we start on the different types of clasps, let’s determine the length of leather you want to approximately use. This will depend on your wrist length and the amount of wraps you want.  These are approximate measurements, so make sure when you order or cut your leather, to give yourself an inch or two to test out your leather clasp. Always test out your leather length and clasp by assembling them together and carefully put your bracelet on. Cut excess leather if you need adjusting before finalizing with glue. There will be a bit of math involved, but don’t worry we aren’t testing you.

  • Single-wrap bracelet: Take your wrist length and subtract 2.75 inches. (i.e. for a a 6.5″ wrist, subtract 2.75 for a length of 3.75″ piece of leather.)
  • Double-wrap bracelet: Take your wrist length, multiply by 2 and take that total and subtract by 1.75 inches. (i.e for a 7″ wrist, you will get a total of 12.25″ of leather)
  • Triple-wrap bracelet: Take your wrist length, multiply by 3 and take that total and subtract by 1.5 inches. (i.e for an 8″ wrist, you will get a total of 22.5″)
  • Quadruple-wrap bracelet: Take your wrist length, multiply by 4 and take that total and subtract by 1. (i.e for a 6.5″ wrist, you will get a total of 25″)

Quick Tip for Leather Bracelets

  • Make sure to check out our Cutter Tool and Adhesive blog for the right tools to cutting your leather
  • Make sure when you make multi-wrap bracelets to work with the natural curve of your leather. When you gluing in your leather pieces, keep your magnetic clasp closed. Glue one side of your leather in your clasp with Super New Glue. Then mimic the wraps with your leather and then glue in the other end into your clasp.

5mm Flat Leather

When using 5mm Flat Leather you will want to use these half-circle magnetic clasp options because they are made specifically for 5mm flat leather.

With our two examples, we created a two and four wrap bracelet.

GoodyBeads | Blog - Half Circle Magnetic Clasp with 5mm Flat Leather - Tutorial

Items used in 6.5″ wrist bracelet example: CH00834 (12″) & Z001004.

GoodyBeads | Blog - Half Circle Magnetic Clasp with 5mm Flat Leather - Tutorial

Instead of using leather, we are using this bright neon orange synthetic flat leather. Make sure to try out the Neon Yellow and Green!

Items used in 6.5″ wrist bracelet example: A019004 & Z001190.

10mm Flat Leather

There is only one option for the 10mm Flat Leather and it’s the popular silver half-circle magnetic clasp: A007209 You can make a single wrap bracelet or multiple one. In our example, we went with the 10mm Pale Turquoise Flat Cork Cord.

GoodyBeads | Blog - Half-Circle Magnetic Clasp with 10mm flat leather - Tutorial

Items used in 6.5″ wrist bracelet example: CH00438 (11″) & A007209
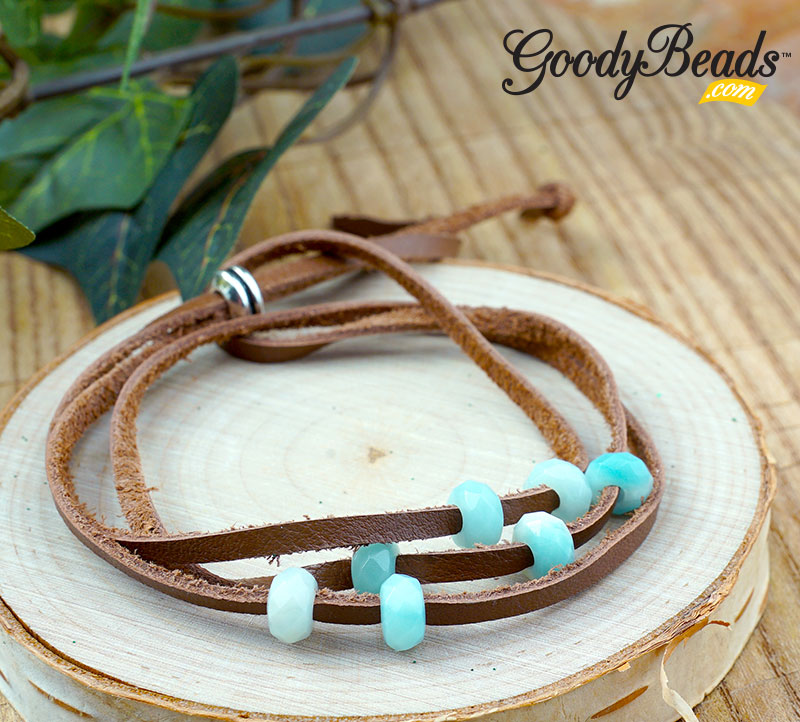
5mm Round Leather

When using 5mm Round Leather, you’ll want to use these half-circle clasp in four color options:

One thing to remember when using 5mm round leather on this clasp is the stiffness of the leather. It is rigid enough to hold its curve shape wonderfully but when making more than one wrap, the curves will be irregular. So when using the 5mm on this clasp, we suggest that you only make a single wrap bracelet.

GoodyBeads | Blog - Half-Circle Magnetic Clasp with 5mm Round Leather - Tutorial

Items used in this 6.5″ wrist bracelet: CH00605 (4″) & Z006715

In this example, because there wouldn’t be an issue with stiffness we made a double-wrap bracelet using 1.5mm leather. We’ve cut 5 strands of 1.5mm leather and insert the bulk ends to each end of your clasp.

GoodyBeads | Blog - Half-Circle Magnetic Clasp with 1.5mm Round Leather - Tutorial

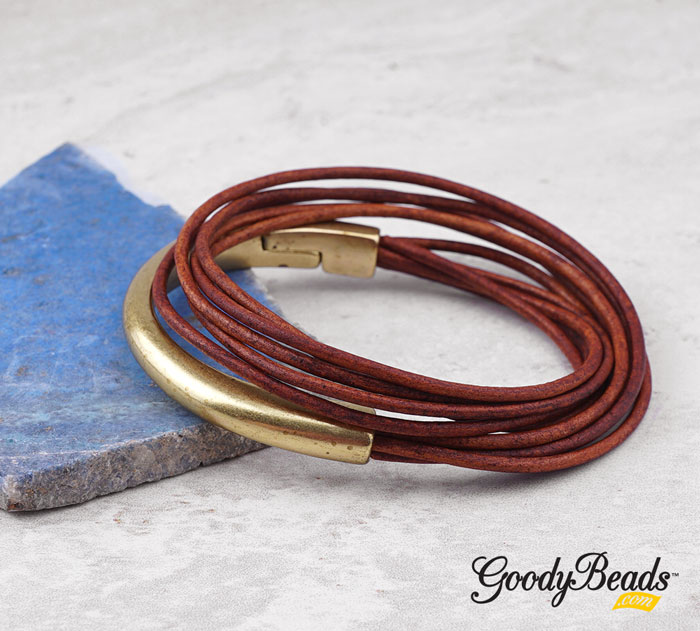
Items used in bracelet example: Z006785 & Z019114

Licorice Leather

When using Licorice Leather, pair it with one of these Half-Circle Magnetic Clasp:

Just like 5mm round leather, Licorice Leather has a stiffness to it, so making a simple wrap bracelet with this clasp is highly suggested.

GoodyBeads | Blog - Half-Circle Magnetic Clasp with Regaliz Licorice Leather - Tutorial

Items used in bracelet example: A015302 & A019018
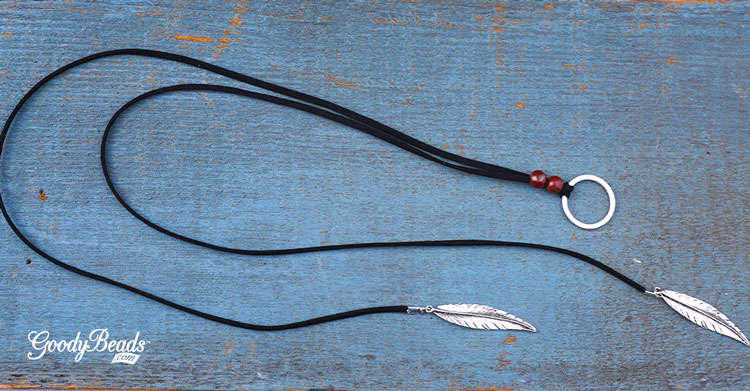
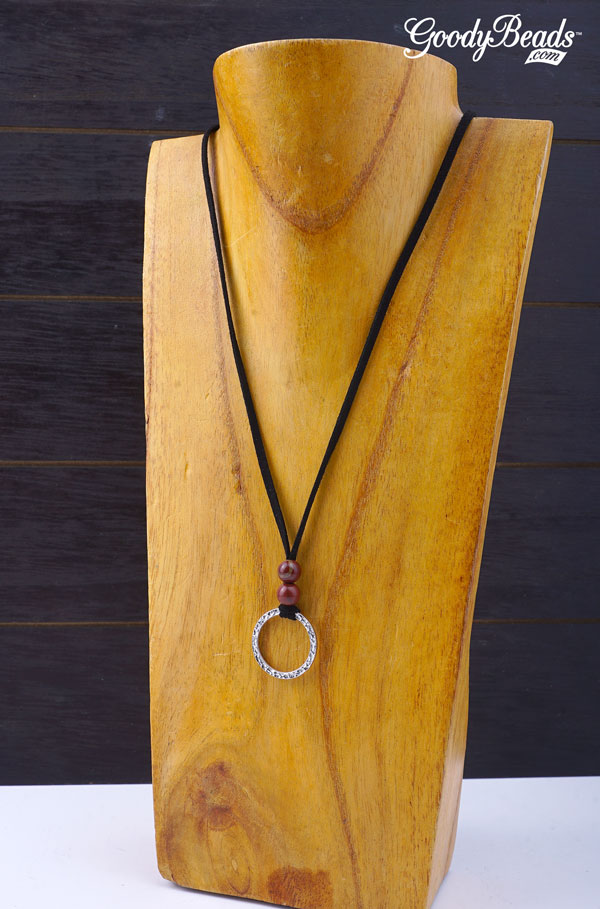