Men’s Jewelry, Everything you need to know

Hello everyone, John here. I wanted to take some time and do a write up on men’s jewelry from a guys perspective. It’s something people are asking us about a fair amount. So here’s what I think about the world of guys and wearing jewelry!

Men’s Jewelry, what’s the deal?

Men’s clothing options are generally limited, especially if you’re dressing up you’re mostly confined to a suit, where the only opportunity for some personal style is with the accessories and details. This is where men’s jewelry gives a unique space for a guy to add some personal flair to their outfits. Jewelry can go a long way to get a look that stands out in the crowd of suits. Not as many men wear jewelry compared to women so when they do, it doesn’t go unnoticed.

What do men prefer in their jewelry?

Typically, men will gravitate toward simpler designs. Bands of leather, chains or a metallic cuff. The personalization comes with small details of items, colors or life events that are meaningful to them, or simply colors they like that go with lots of their wardrobe.

As far as colorways and material earth tones, leather and chain are the biggest winners here. Matte, natural colors and a minimal amount of bling and shine. Men will typically prefer subtle jewelry that accents what their wearing, but is far from being the feature of their outfit.

A watch has been a long-standing staple for men’s jewelry. If a guy wears a watch there is no reason to not also have a bracelet on that wrist, but lean toward something small that matches the watch and doesn’t take away from it being the party piece in too big of a way.

Stacking bracelets is common for women and also works great for men’s styles! Stacking 2-3 thinner or generally smaller bracelets is a popular look. The styles of these bracelets can either be a perfect match or just styles and colors that complement each other well.

Paracord is another material that is pretty popular in men’s designs. Designs incorporating it are especially great for a guy who frequents a tent, canoe or other adventure style activities, since the paracord itself could end up being very useful for some practical purposes in a bind.

Overall, make it look like you aren’t trying. Effortless appearance in style is what makes it work best. Just like everyone who wears jewelry, wear something that brings you confidence.

Design, what to look for

Some of this we covered in the section above, but there are a few things that you should keep in mind when designing jewelry for men. When you’re planning your design consider making something durable. Men tend to be less careful with their jewelry than women and will also frequently wear them while doing projects, yardwork or other things around the house that could potentially break something fragile. If you decide on using some type of glass bead, consider trying to protect it a bit with leather on both sides, like the projects in this blog about wrap bracelets bracelet kit we have on our site.

Don’t forget to consider designs you’ve used for yourself or friends in the past. Many of those designs work great for Men’s jewelry but, with a few small changes to the materials and/or color way. I personally think almost all of the designs done by Diakonos Designs could be worn by men or women.

Always keep in mind that everyone’s taste is different, and, these are a general rule of thumb. Some guys will like lots of color and shine, it just depends on their personal taste. Plus, 2021 men’s jewelry trends are saying a dash of bright color will be a popular look in this coming year, so be bold. If you know the person you’re making your jewelry for make what you think they’ll like. But, if you’re designing for men in general these are a good set of ideas to start from. Make sure you don’t forget, rules are made to be broken, let your creativity go wild and make something you love! At the end of the day, enjoying what you’ve made is far more important than following trends.

My Design

Metal Bracelet Cuff

This one is pretty easy. Just a simple cuff, all you have to do is put it on. It adds a nice metallic flair while still being understated.
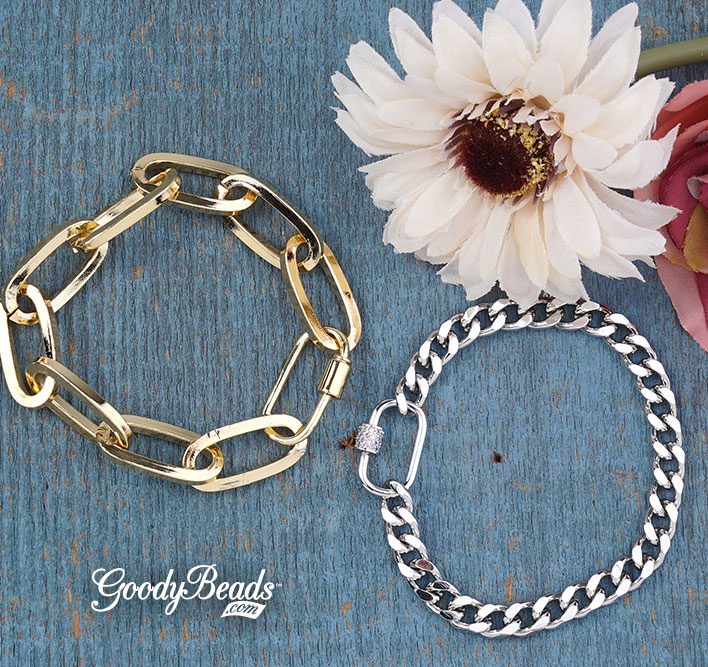
men's jewelry

Chain Bracelet

Overall these designs are pretty easy to put together. I’m going for an understated simple look that has just enough flair to be noticed but not be the feature of my look. First you want to get the right length of chain. I am using a matte black paperclip chain. If you’re able to measure for the person you’re making it for that’s the best option. But, if you’re not able to do that the average man’s wrist size is around 8 inches. That’s a good size to go with if you’re not making it for a specific person.

Anyway, on to the assembly of the chain bracelet. All you need to do is cut your length of chain to the appropriate length, then using pliers open the matte black jump rings and put them on the ends of the chain. Keeping the jump rings open add the magnetic clasp into the jump ring then close the jump ring. It’s as simple as that!

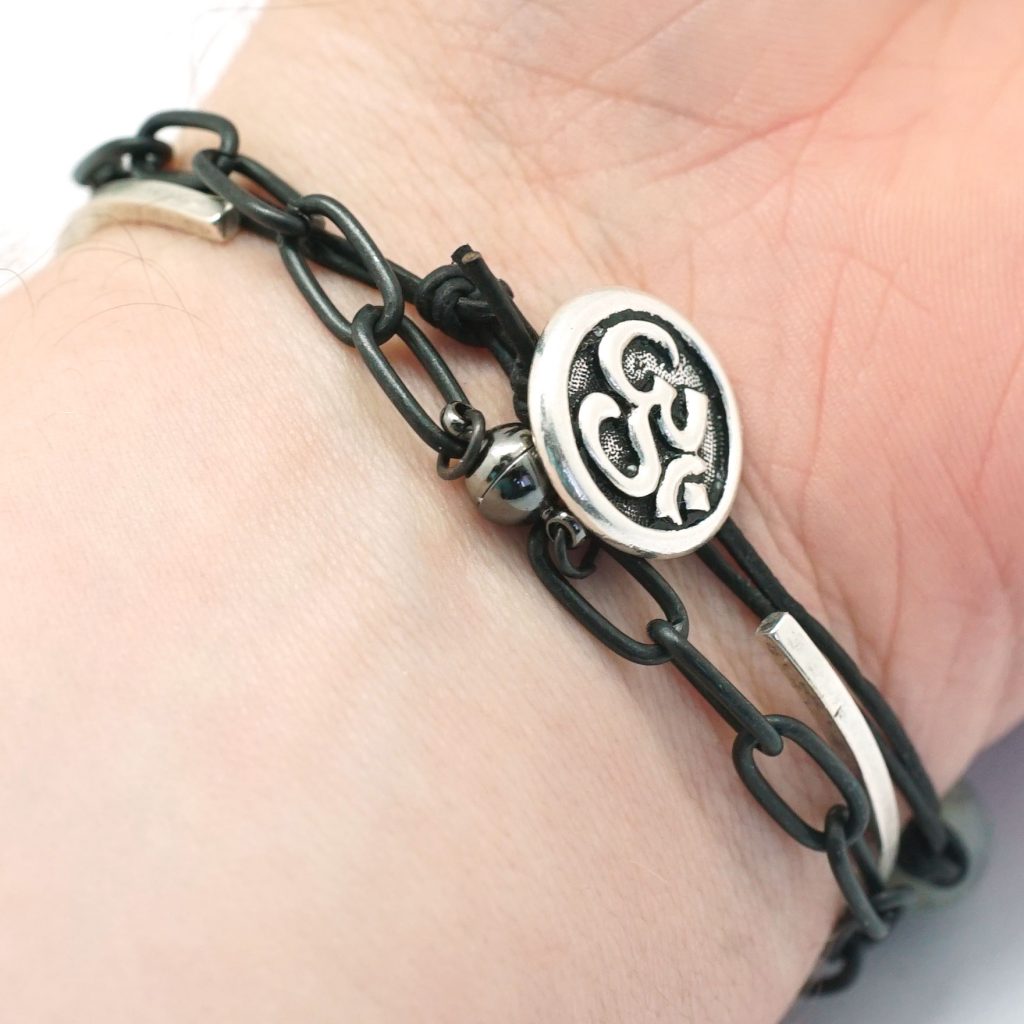
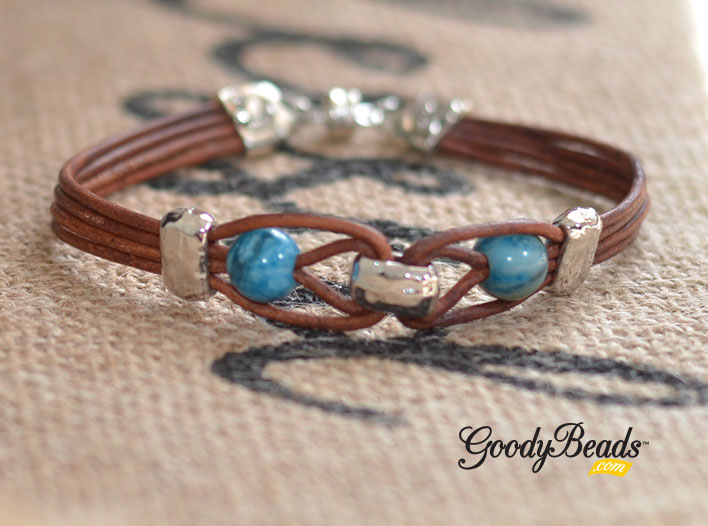
Leather with Gemstone Bracelet

I’m looking for this piece to be a small touch of color from the flashing blues of the large hole labradorite, which will contrast well with the black and silver we have in the rest of the design. Then, a nice finish with a TierraCast button.

To make this final piece of our stack you will start by cutting a length of .5mm black round leather. Cut it to twice the length of your chain from the previous bracelet, but you’ll be doubling up the leather. Also, leave an inch or two extra for your knot to finish it. First, tie the button in the middle of your length of leather. I used a simple overhand knot. I then added another knot about an inch further up to provide a stop for the gemstones. Next slide on your large hole labradorite beads. I’m going to be using 7 stones simply because I prefer not feeling the beads wrapping around my wrist and 7 will keep it on top. Of course you can change this and add more beads if you’d like! Once the beads are on you just tie your knot like you did on the other side to hold the beads together. Finally, add a knot to close the leather at the end and give a place for your button to hold it all together, then trim any leftover leather!

Then put all of these pieces on one wrist and you’re ready to go!

men's jewelry

men's jewelry


DIY Blue-Blue Straw Earrings with Deerskin Leather Lace

We’re ending the year with one of our favorites from 2020, straw earrings. We’ve paired our colored straw components with LeatherCord USA deerskin leather lace, a soft leather that can easily bend and shape.

Items used in earrings:

  • Z010962 – 3mm Saddle Deerskin Leather Lace
  • Z016790 – Turquoise Handmade Woven Rattan Straw
  • TC02360 – 11mm Brass Oxide Jardin Crimp End Cap by TierraCast®
  • Z002858 – Antique Brass Fishhook with 2mm Ball Earwires

GoodyBeads.com Blog | DIY Blue-Blue Straw Earrings with Deerskin Leather Lace FREE Tutorial

Directions:

  1. Cut two pieces of leather at 5 inches.
  2. Fold one piece of leather and make a lark’s head knot through the straw component. Make sure the leather is laid next to each other and the front of the leather is faced the same way. (Refer to our earrings tutorial to see step 1 and 2 on making a lark’s head knot with leather lace.)
  3. Repeat step 2 for other leather piece and straw.
  4. Determine the length you want your leather to be. You can cut a 1/4″ off the end of your leather. Make sure it is a flush cut.
  5. Cap your leather ends with the TierraCast end cap. Using nylon pliers, crimp the end cap to secure the leather ends. Repeat for other leather and end cap. (As an option, you can add a small dot of E-6000 inside the end cap. Use a toothpick to spread it around. Do not use Super New Glue, it may discolor the leather where it is inserted.)
  6. Open earwire loop, slide on end cap loop and close earwire loop. Repeat for other earring.


Design Simple Layers with Memory Wire Wrap Bracelets

Memory Wire Wrap Bracelets are an easy beginner level to jewelry making. Of course, it’s an easy and fun DIY for all levels. We’ll show you how to make a wrap bracelet with three layers and designing each layer differently.

When designing each layer for your wrap bracelet, you want to give off the look as if you’re wearing multiple bracelets. Since layering is the trend these days, it’s fitting for memory wire bracelets.

For our beginner bracelet, we’re only using three beads:

With our sample below, you can see that with only three types of beads, you can switch up the layers with different bead combinations. While our main stars are the gemstone and wood beads, using seed beads are a good option for spacing and sectioning grouping of beads. Plus, if you’re concern with your beads rubbing such as glass beads or crystals, a seed bead will help alleviate the rubbing so your beads don’t get chipped while wearing your creation!

Our first layer is our main star, the 6mm gemstone bead. We’ve spaced them out with a seed bead in between to make them pop. The second layer is our second star: wood beads. Since it would be too similar to our first layer to added a seed bead in between, we’ve added a seed bead between each grouping of 5 wood beads. I always find that odd numbers of grouping is pleasing to the eye. And lastly, we’ve incorporated both of our stars and added groupings of wood beads to sandwich between the gemstone beads.

There are a bunch of bead combinations to try out, give it a try!

GoodyBeads.com Blog | Design Simple Layers with Memory Wire Wrap Bracelets FREE Tutorial

Items used in bracelet: WR00109, PDA6RD, WD-WH6RL & SB00106.

Instructions:

  1. Make a simple loop to one end of the memory wire with Memory Wire Finishing Pliers.
  2. Slide on a seed bead and gemstone bead. Repeat until you’ve added 25 gemstones beads. End this row with a seed bead.
  3. Slide on 5 wood beads and a seed bead. Repeat until you’ve added 10 groupings.
  4. Slide on a gemstone, seed bead, 3 wood beads and seed bead. Repeat 9 more times.
  5. Cut memory wire end with Memory Wire Cutters, leaving a 1/4″ or 3/8″ tail. Make a simple loop.

Check out our other Memory Wire Wrap Bracelet with different layer options:

Make these with your friends during your next virtual get-together and see all the combinations there are!


Pantone 2021 Color of the Year: Ultimate Gray & Illuminating

Pantone has produced their color pick for 2021. Or should we say picks! With 2020 being a rough year for everyone around the world, Pantone’s color picks Ultimate Gray and Illuminating challenges a ‘forward’ thinking for the future. We will dive into Pantone’s meaning for their color picks for 2021 and we’ll give you a fun DIY jewelry to embrace this color combination!

2016 was the year Pantone debuted a first-time, duo-color that blurs the line of femininity and masculinity; Rose Quartz and Serenity. With the current event of 2020, it is no wonder their pick for 2021 doesn’t blur the line of colors but complement two opposite colors that works “together to support one another.” While Ultimate Gray is justly a neutral gray color, Illuminating is a bright yellow, it is “a marriage of color conveying a message of strength and hopefulness that is both enduring and uplifting.

Pantone states, ” Emboldening the spirit, the pairing of PANTONE 17-5104 Ultimate Gray + PANTONE 13-0647 [Illuminating] highlights our innate need to be seen, to be visible, to be recognized, to have our voices heard. A combination of color whose ties to insight, innovation and intuition, and respect for wisdom, experience, and intelligence inspires regeneration, pressing us forward toward new ways of thinking and concepts.”

How do you feel about Pantone’s picks for 2021?

DIY Beaded Silvery Yellow Diamond Color Block Earrings

We love the color combination and the emboldening message it represents. Here is a fun design using the two colors in our pair of DIY earrings. We’ve made a simple colorblock diamond earrings using Delica beads in a brick stitch.

FOLLOW the FREE Pattern Tutorial for these earrings HERE!

Items used in earrings: SB00290, SB00141, TCZ0078, A006585, A002413 & A006767


Spend the Holidays with Swarovski® – Christmas Holiday

We’re celebrating festive spirit with our friends at Swarovski: Create Your Style and celebrating with Christmas Holiday colors. Plus, we have a fun DIY project to get hype up the holidays.

Here are our selection of Swarovski crystals to embrace the festive and classic colors of Christmas Holiday:

  • Reds – Siam, Light Siam, Scarlet, Rouge Pearl & Red Coral Pearl.
  • Green – Emerald, Luminous Green Mystic, Vitrail Medium, Olivine, Iridescent Tahitian Look and Eden Green Pearl.
  • Yellow/Gold/Bronze: Topaz, Light Topaz, Golden Shadow, Metallic Sunshine, Yellow Opal, Sunflower, Citrine, Copper & Metallic Light Gold,

Red Currant Road Bracelet

Items used in Bracelet: SW02559 (24), SW02635 (5), TC02648 (5), TC01870, TL00265, A011531, Z012973 & Z001065.

Directions:

  1. Using alcohol wipes clean all off the links and set aside to dry.
  2. Using one 10mm Scarlet fancy stone glue into matching finding. Repeat four more times and set aside to dry for 24 hours.
  3. Using one head pin slide on one 6mm Rouge Pearl and make a simple loop. Repeat 23 more times and set aside.
  4. Using two 5mm jump rings attach each jump ring separately to the same side of one frame made in Step 2 (double jump ringing). Use two more 5mm jump rings to attach to the opposite side. Repeat this step four more times and set aside.
  5. Using two 9mm jump rings, connect together two links made in Step 4 so that it is double jump ringed. Continue this process until all five stone set links are connected.
  6. Using three pearl drops, attach to one side of the double medium jump ring connection between stone set links. Repeat for opposite side of the two 9mm jump ring connection. Repeat this step until you have 4 complete sets of 6 pearls between all 5 stone set links.
  7. Using one end of the Maker’s toggle attach two small jump rings by attaching each jump ring separately to the same side of the toggle (double jump ringing). Repeat for other side of the toggle piece.
  8. To attach the toggles to the ends of the bracelet use two medium jump rings to attach the double jump rings from the bracelet to the toggle. Repeat for the other side.

Bracelet and tutorial courtesy of Swarovski: Create Your Style.


5 DIY Jewelry Designs with Carabiner Lock Clasp

One of our newest products for 2020 is the Carabiner Lock Clasp. We have 5 examples for designing DIY jewelry with this clasp.

Chunky and Cool Bracelets

Items used in bracelets:

In our bracelet examples above, we’ve only used 2 components: chain and carabiner lock clasps. Because it opens by unscrewing its side, you can easily cut your chain to your bracelet length and slide your chain ends through the clasp. No jump rings required, just fun bracelets to pair with your arm candy collection. Plus, these bracelets are the perfect starter to add your charms or tassels to personalize it!

Neck Mess Love

Items used in necklace:

In our 3 necklaces, we’re making the clasp the focal/statement piece. Create a fun pendant drop with tassels, charms or baubles. Or design a modern, minimalistic lariat chain necklace.


DIY Carabiner Lariat Necklace with Swarovski® Baroque Pearl

Our lariat necklace tutorial today features the popular carabiner clasps, along with our newer Swarovski baroque pearls. Make this necklace long or short, it will be the start of some fun layering neck mess pieces.

Items you’ll need for Lariat Necklace:

GoodyBeads.com Blog | DIY Carabiner Lariat Necklace with Swarovski® Baroque Pearl FREE Tutorial

GoodyBeads.com Blog | DIY Carabiner Lariat Necklace with Swarovski® Baroque Pearl FREE Tutorial

Directions:

  1. Slide pearl onto the headpin and make a larger simple or wrapped loop. Make sure loop can slide on through clasp.
  2. Open jump ring, slide on charm and close jump ring.
  3. Cut chain to 16 inches. Or cut to your preferred length.
  4. Open carabiner clasp by unscrewing clasp, slide on jump ring with charm and pearl drop. Then slide on both ends of your paper clip chain. Close clasp.


DIY Irregular Nugget Necklace

We’ve got the perfect easy DIY necklace for you today that requires no tools! Our simple DIY Irregular Nugget Necklace compliments your style with its standout, statement pendant that already comes with its own loop. Top it off with a bail and ready-made necklace, this DIY will get you pumped up for a fun day!

Items used in necklace:

  • Z001033 – 32 Inch Rhodium Plated Cable Chain Necklace
  • TC02582 – 9mm Bright Rhodium Smooth Pinch Bail by TierraCast
  • Z017958 – Crystal Quartz Large Irregular Nugget Pendant

GoodyBeads.com Blog | DIY Irregular Nugget Necklace

Directions:

  1. Slide pendant loop and chain of necklace between the pinch bail.
  2. Pinch the bail down so the prongs are in the loop of the pendant.

    Note: if necklace is too long, open a jump ring and slide off chain end. Cut chain to your preferred length and connect jump ring to new length of chain end.


DIY Hoop Post Earrings with Wood Resin Bead

We love our selection of wood & resin charms that we’ve made some super cute beads out of them. And we’ve used them in our project today!

Items used in earrings:

  • Y003022 – 21mm Gold Hoop Post Earrings
  • Z015234 – 15mm Wood & Pale Pink Resin Disc Bead
  • TC02820 (2) – 7mm Bright Gold Hammertone Rondelle Bead by TierraCast
  • TC00567 (2) – 5mm Gold Nugget Spacer by TierraCast
  • A019696 – 2 Inch Gold Plated 21 Gauge Headpins with Ball Top
  • A011517 – 4mm Gold Plated 20 Gauge Round Jump Ring

Get all the components for this project here

GoodyBeads.com Blog | DIY Wood Resin Bead Hoop Post Earrings FREE Tutorial

Directions:

  1. Slide the following on a headpin and make a simple or wrapped loop:
    5mm nugget bead, wood/resin bead & 7mm hammertone bead.
  2. Open jump ring, slide on wood/resin dangle and hoop of earring. Close jump ring.
  3. Repeat all steps for other earring.

Check out more DIY Projects with Wood & Resin.


DIY Navette Adjustable Bracelet with Swarovski® Sew-On

Our easy project today will be using beautiful Swarovski crystals and satin Adjustable bracelet.

Items used in bracelet:

  • SW01976 – Swarovski® 29mm Crystal Navette Sew-On Stone
  • TC02347 (2) – 8mm Oval Jump Ring by TierraCast
  • Z014807 – Black Twisted Satin Adjustable Bracelet Sliding Clasp

GoodyBeads Blog | DIY Navette Adjustable Bracelet with Swarovski® Sew-On FREE Tutorial

Directions:

  1. Open a jump ring, slide on one side of the crystal link and through one ring on sliding clasp. Close jump ring.
  2. Repeat with other jump ring and ring of sliding clasp.


DIY Double Ring Mixed Media Earrings

We’ve compiled some of our favorites in today’s project! We have TierraCast findings with Leather Cord USA Nubuck leather lace and mixing metals with Nunn Designs hoops. Try these DIY earrings out today!

Items used in earrings:

  • TCZ0077 – Sterling Silver Earring Wire by Tierracast®
  • Z004551 (2) – 30mm Ant. Silver Grande Organic Hoop by Nunn Design
  • Z008273 (2) – 35mm 24k Gold Plated Frame Hoop by Nunn Designs
  • Z016427 – 10mm Black Nubuck Lace
  • A008807 – 7mm Silver Plated 16 Gauge Round Jump Rings
  • A008799 – 5mm Oval Silver Plated 21 Gauge Jump ROpings
  • Tools: TL00043 – Leather Hole Punch Pliers

GoodyBeads.com Blog | DIY Double Ring Mixed Media Earrings FREE Tutorial

Directions:

  1. Cut two pieces of leather at 1.5″ long.
  2. Punch a hole 1/8″ from the edge of your piece of leather. Punch a hole on each leather end. Repeat on the other leather piece.
  3. Open oval jump ring, slide on a hole of a leather piece, slide on a gold and silver ring and slide through other hole of that leather piece. Close jump ring.
  4. Open 7mm jump ring, slide on oval jump ring from step 3 and through ear wire loop. Close jump ring.
  5. Repeat Steps 3 and 4 for other earring.


Spend the Holidays with Swarovski® – Fall/Halloween

We’re going to dive into fall weather with our friends at Swarovski: Create Your Style and celebrating with Fall & Halloween colors. Because we live here in the Midwest, we’ve started to see trees bursting with fall colors like dark greens, bright yellows and oranges, flaming reds and popping purples! Plus, we have a fun DIY project to get your spooky Halloween going.

Here are our selection of Swarovski crystals to embrace the fall and Halloween colors:

  • Black Colors – Jet Black, Silver Shade
  • Browns – Topaz, Light Topaz, Light Colorado Topaz, Golden Shadow
  • Oranges – Tangerine, Fire Opal, Sunflower
  • Even try our Halloween Master MixesMX0028

Scaredy Cat Earrings

GoodyBeads.com Blog | pend the Holidays with Swarovski® - Fall/Halloween FREE Scaredy Cat Earrings Tutorial.

Items used in earrings: TC02297, SW01187 (2), SW00969 (2), A007659 & TC01590 (2).

Directions:

  1. Open eyepin loop, slide on cat charm and close loop.
  2. ON the eyepin slide on the following and make a simple loop (make sure loops are facing opposite directions):
    rondelle crystal and bicone crystal.
  3. Open earwire loop, slide on dangle and close loop.
  4. Repeat all steps for other earring.


DIY Leather Band Bracelet with Large-Hole Gemstones

Let’s welcome fall with a this fun DIY using LeatherCord USA 1.5mm leather, Blue Crazy Lace large-hole gemstones from Dakota Stones and the perfect findings from TierraCast to pull it all together.

What you’ll need:

GoodyBeads Blog | DIY Leather Band Bracelet with Large-Hole Gemstones FREE Tutorial

Directions:

  1. Cut 4 pieces of leather at 9″.
  2. Slide all 4 pieces of leather through a barrel bead and center the bead in the middle of the leather pieces.
  3. Divide 2 leather pieces to each side of the barrel bead.
  4. On one side, fold the inner leather in half and slide a gemstone bead onto both leather ends.
  5. Fold the outer leather strands in half, laying them on either side of the gemstone you added in Step 4 and slide all 4 ends through a barrel bead. Adjust leather strands to lay flat, and slide barrel up close to the gemstone you previously added.
  6. Using nylon pliers or a flat nose pliers, gently crimp down on the barrel bead to keep the middle leather and gemstone in place.
  7. Repeat steps 4 through 6 to other side of the bracelet.
  8. Trim to wrist size and minus about ½ inch; making sure your barrel/gemstone design is centered and you’re making a straight flush cut.
  9. Add an end cap to one end of your leather design, making sure all 4 leather strands fit inside and crimp down on your end cap using a flat nose or nylon pliers. Repeat on the other end of the bracelet.
  10. Open 1 jump ring and slide on your end cap loop and clasp loop. Repeat on the other end cap loop and magnet end.

— Click HERE for more DIY projects from GoodyBeads–


Swarovski® Create Your Own Style: Trio of Opulent Earrings

Our blog post today consists of three projects in one, using some of Swarovski’s newest pearl shapes! We are really loving these new shapes because they look organic with fun depths to them. Here are three pair of earrings pair the new pearls with some fitting TierraCast components.

Opulent Earrings #1

Items used in earrings: SW02568 (2), SW01454 (4), TC02572 (2), TC02568 & A019612.

Directions:

  1. Open eyepin loop, slide on TierraCast charm and close loop.
  2. Slide the following on the eyepin and make a simple loop:
    crystal, pearl and crystal.
  3. Open dangle loop and slide on earwire loop and close loop.
  4. Repeat all steps for other earring.

Opulent Earrings #2

Items used in earrings: SW02579 (2), SW01454 (4), TC02576 (2), TC02297 & A019697.

Directions:

  1. Slide the following on to the headpin and make a simple loop:
    Opulent bead, crystal, pearl and crystal.
  2. Open ear wire loop, slide on pearl dangle and close loop.
  3. Repeat all steps for other earring.

Opulent Earrings #3

Items used in earrings: SW02604 (2), SW01454 (4), TC02562 (2), TC02297 & A019697.

Directions:

  1. Slide the following on the headpin and make a simple loop:
    Pearl, crystal, dragon bead and crystal.
  2. Open ear wire loop, slide on pearl dangle and close loop.
  3. Repeat all steps for other earring.


DIY Porcelain Pineapple Necklace with Alphabet Charm

Summer is a HOT one and Summer means pineapples. Here is a simple DIY necklace with a porcelain pineapple bead and alphabet charms.

What you’ll need:

Directions:

  1. On a headpin, slide on the following and make a simple loop:
    8/0 seed bead, pineapple bead and 8/0 seed bead.
  2. Open a jump ring and slide on pineapple dangle and on chain necklace. Close jump ring.
  3. Open another jump ring, slide on alphabet charm and on chain necklace. Close jump ring.