Paint with Vintaj® Patinas on New Leather Cuffs

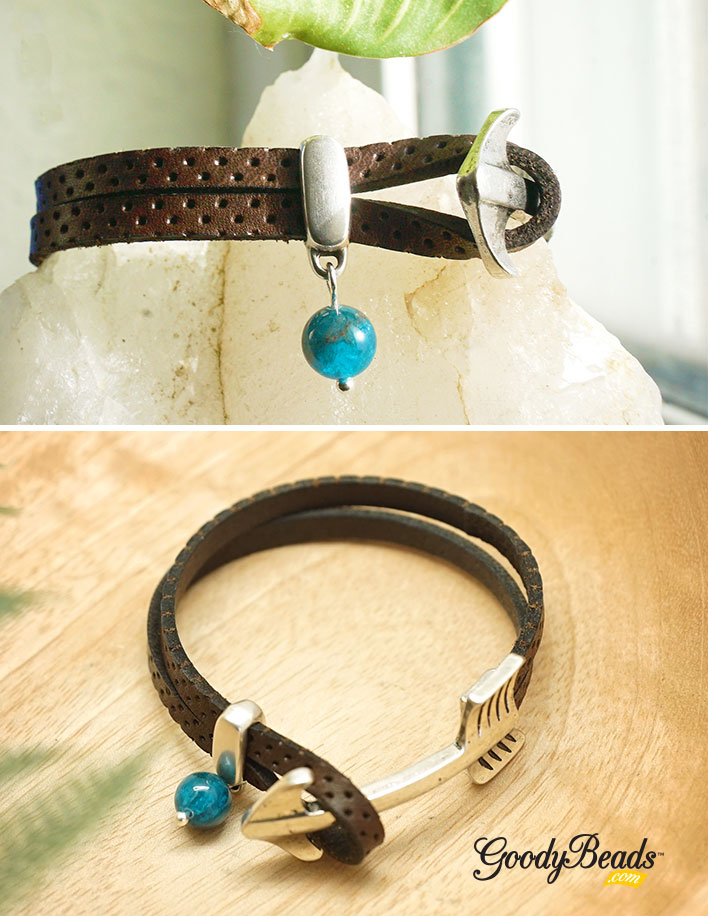
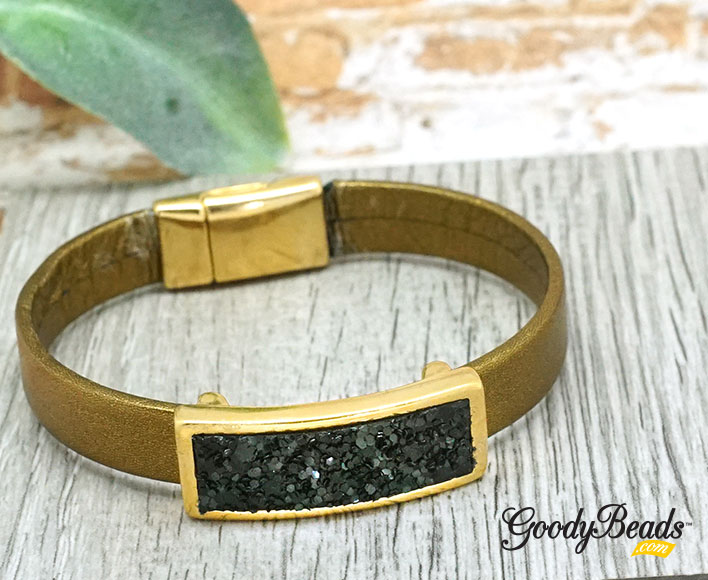
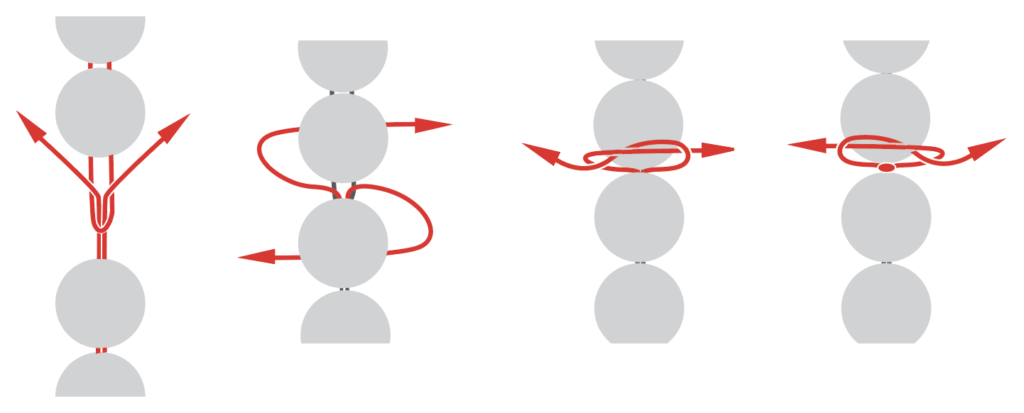
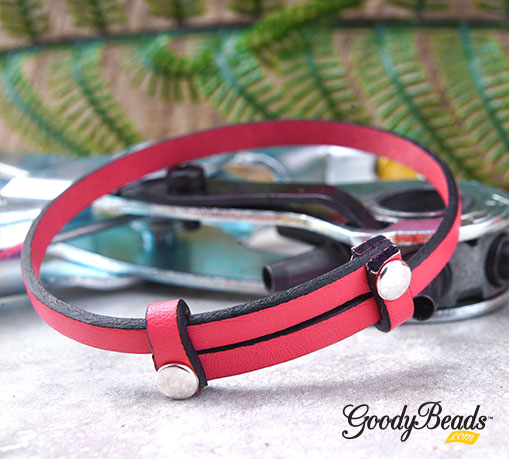
Design with NEW Leather Cuffs with snaps. Paint, rivet, or weave stringing materials between the strands. Or leave it as it since it’s a ready-to-wear cuffs that has two snaps to easily adjust between two size lengths.

Leather Cuffs

Our selection of leather cuffs comes in three different sizes. The similarities with all three sizes is their two snap option. You can adjust between the two snaps to lengthen or shorten the cuff.

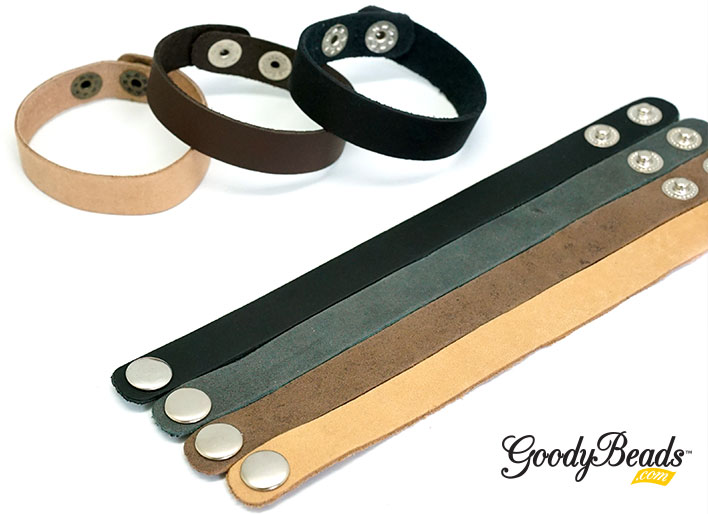
20.5cmx1.5cm Leather Cuff: These cuffs are 20.5cm in length, while it’s 1.5cm wide. They are made with genuine leather from LeatherCord USA. Get them in 7 colors:

21.5cmx3.2cmm Leather Cuff: These cuffs are 12.5cm in length and 3.2cm in width. They have a wide band that you can easily punch holes in them and embellish. They are made with genuine leather from LeatherCord USA. Get them in 4 colors:

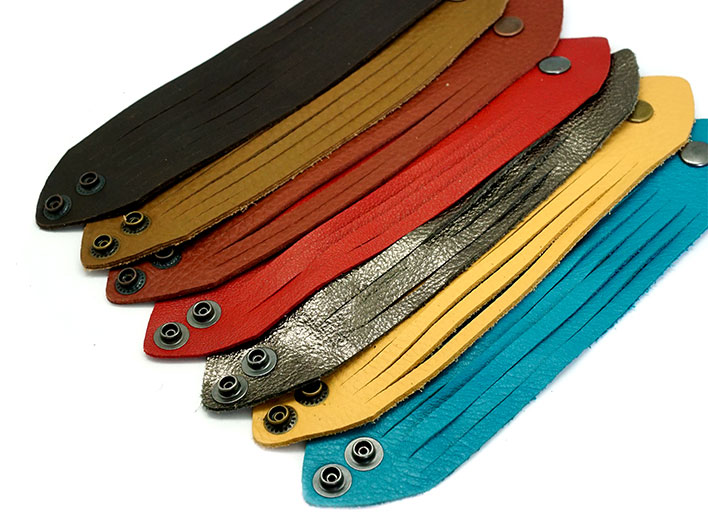
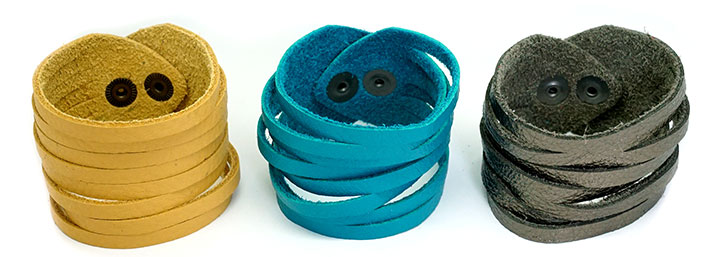
And lastly these Shredded Leather Cuffs looks really trendy! They are 9 inches long and 1.875 inches wide with 2 snap options for a 7 or 7.5 inches wrist length. Made from cow hide, they already have cuts in the leather to mimic a multi-strand look! Get them in 12 color ways:

DIY Leather Cuff with Vintaj Patinas

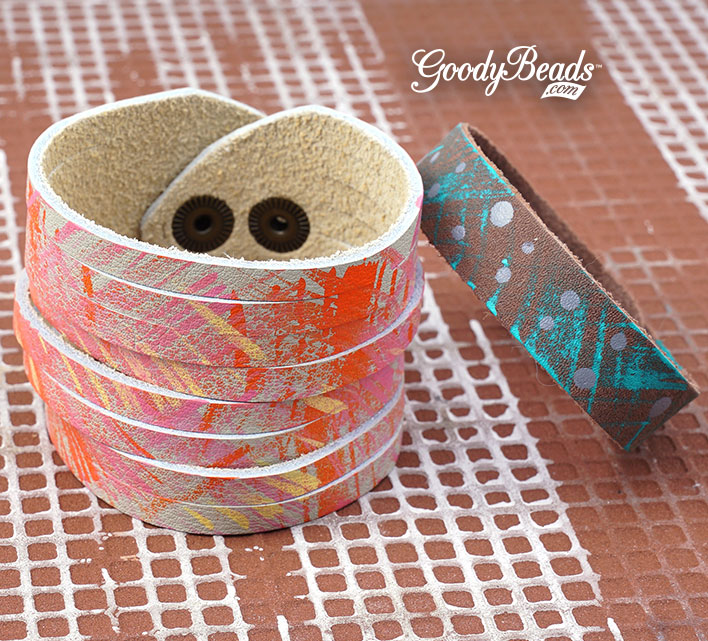
So with these bracelet cuffs, Tory was inspired to paint some Vintaj Patinas onto the cuff! She used different paints and made hash marks with brushes and also dots! How will you create with these leather cuffs? To paint with patinas, check out our video where our friend Candie Cooper joined us in painting leather with Patinas. CLICK HERE for video.

Items used in first bracelet: TL00347 and Z011785.

Items used in second bracelet: TL00297, TL00323 and Z011989.

Designed by Tory.

–Click HERE for more DIY projects from Goodybeads–


DIY Arrow Hook Bracelet with Flat Leather

Make this arrow hook bracelet with flat leather. Leather jewelry pairs well with men and women’s fashion style.

Items used in hook bracelet:

  • CH00962 (16) – 5mm Brown Perforated Leather
    Or get length to 2x the length of your wrist plus 1 inch.
  • Z014477 – Antique Silver Arrow Clasp for 5mm Flat Leather
  • A015699 – Antique Silver Bar with Loop Slider for Flat Leather
    or any other Slider for 10mm Flat Leather
  • BCL8RD-8 – 8mm Blue Crazy Lace Agate Round Gemstone Beads
  • Z010746 – 2 Inch Silver Plated Bali Style Headpin with 3mm Ball
  • A015821 – Super New Glue

GoodyBeads.com Blog | DIY Arrow Hook Bracelet with Flat Leather FREE Tutorial

Directions:

  1. Slide gemstone bead onto the headpin and make a simple loop. Open loop and slide through leather slider bead loop. Close loop.
  2. Fold leather piece in half. Slide the slider bead through both leather ends. Pull slider towards the middle to create a loop in the leather.
  3. Add a dot of glue in the channel of the arrow clasp and use a toothpick to coat in the inside. Insert both leather ends in the channel and hold it in place for few seconds to adhere. Let bracelet dry for up to 24 hours before wearing.


DIY Bling Leather Bracelet

Don’t you love sweater weather? The DIY Bling Leather Bracelet is flashy and subtle with fun metallic and bling flat leather. It’s the perfect leather bracelet to pair with your fall & winter style.

Items used in bracelet:

  • Z003873 – Shiny Gold Long Leather Setting Slider for 10mm Flat Leather
  • CH01110 (2″) – 10mm Flat Black Leather
  • CH00813 – (7″ or 8″) 10mm Bronze Pearl Metallic Flat Leather
  • Z018344 – 10mm Gold Rounded Magnetic Clasp
  • A015821 – Super New Glue

GoodyBeads.com Blog | DIY Bling Leather Bracelet FREE Tutorial

Directions:

  1. Put glue in the bezel part of the Setting Slider. Put the bling leather in the glued bezel, trim excess.
  2. Glue one end of the flat leather piece into one end of magnetic clasp.
  3. Slide Setting Slider onto the flat leather, making sure the slide is on the correct side of the flat leather.
  4. Glue the other end of the flat leather piece into the other end of the magnetic clasp.
  5. Let the bracelet dry for a few hours or overnight before wearing.

Here are MORE Flat Leather DIYs to try out!


DIY Men’s Bracelet Set with Leather and Silver Findings

Today’s tutorial features this men’s bracelet set. Ladies can even love them too! These three bracelets consists of leather, metal beads and even hematite beads.

GoodyBeads Blog | DIY Men's Leather Bracelet Set FREE Tutorial

Hematite Stretch Bracelet

GoodyBeads Blog | DIY Men's Leather Bracelet Set FREE Tutorial - Hematite Stretch Bracelet

Items used in bracelet: HEM6RD-F-8, A021474 & A021633.

Directions:

  1. Cut elastic to twice your wrist length or about 15 inches. Pull and pre-stretch your elastic to loosen the elasticity.
  2. Cut the tip of your needle. Fold your elastic in half and loop the needle at the mid point.
  3. Slide on the elastic the following beads: 4 hematite beads and silver tube. Repeat 4 more times.
  4. Wrap around your wrist to see if it enough to wrap around your wrist. If it is too much, remove a hematite bead. If it’s too tight, add another hematite bead.
  5. Follow illustrations below to make the Tricky Rick knot, to tie off your ends. Glue the knot if you would like. Cut excess elastic, leaving about a 1/4″ stub.

Rustic Round Leather Bracelet

GoodyBeads Blog | DIY Men's Leather Bracelet Set FREE Tutorial - Rustic Round Leather Bracelet

Items used in bracelet: CH00156 (7″), Z003438 (2), A015821, Z003436 & Z009583. NOTE: if 7″ is too short, order an inch or two more.

Directions:

  1. Glue the end of the leather cord and clasp end with super new glue. Let it dry for a minute.
  2. Slide on the leather the Stitch Bead, Plain Tube Bead and Stitch Bead. Slide to situate and centered on the leather.
  3. Glue the other leather end with other clasp end. Unclasp the clasp and let bracelet dry for a few minutes or hours.

Wide Leather Cross Bracelet

GoodyBeads Blog | DIY Men's Leather Bracelet Set FREE Tutorial - Wide Leather Cross Bracelet

Items used in bracelet: CH00040 (8), CH00769 (8), CH00861 (8), A015691 & A015821.

Directions:

  1. Cut all leather cord to 7.5″ or to your desired length.
  2. Glue all three leather cord ends to end clasp with super new glue, situating the 10mm to the bottom. (Make sure to face the fronts of your leather pieces to one side of the clasp.) Let glue dry for a few minutes.
  3. Cross the two 5mm leather and glue the other leather ends to the other side of the clasp. Hold leather in place for a minute or two to let the components bond. Let piece sit and dry for another few moments before wearing.

Check out other Leather Bracelet DIYs to inspired some fun men’s bracelets.


DIY Josephine Infinity Leather Knot Bracelet

One of our recent popular request is the leather knot bracelet using the Josephine infinity knot. We did a previous tutorial on a variation of this knot HERE. In our tutorial today, we’re using 5mm flat leather or as another option, two piece of round leather.

What you’ll need:

GoodyBeads Blog | DIY Josephine Infinity Knot bracelet with leather.

Items used in bracelet example: A015688, Z012736 (2) & CH00043 (24)

Knot Tutorial

  1. Start with 2 pieces of 5mm leather at 12″ each or four pieces of 2mm round leather at 15″ each.
  2. Follow illustrated diagram to make knot.
  3. At the end, after you gently pull your ends to create your knot, slide on your slider beads through both leather cinch the knot in the middle.
  4. Measure the bracelet to desired length, making sure to center your knot. Cut leather with sharp shears or Xuron Shears.
  5. Add a small dab of Super New Glue to clasp channel and slide one side of your leather ends through. Repeat to other clasp end.
  6. Let it fully dry for a few hours before wearing!

GoodyBeads Blog | DIY Josephine Infinity knot with leather Tutorial

You can also checkout this video tutorial clipped from our Facebook Live episode featuring Tory’s Birthday.

Tutorials starts at 10 minutes and 35 seconds.

https://www.facebook.com/GoodyBeads/videos/2426376794140741/


Colorful Straw Earrings

Complete your large statement earrings collection with these Woven Straw Earrings.


What you’ll need:


Marrakesh Straw Earrings

GoodyBeads | Blog - Colorful Straw Earrings with FREE Tutorial

Items using in earrings: Z016792, TC02714 (2),  TC02430, Z011500

Directions:

  1. Using the flat nose pliers, gently pry the crimp end wider so that the straw piece in between.
  2. Slide crimp end over the straw component.
  3. Using nylon pliers, crimp the crimp end over snug over the straw.
  4. Open jump ring and slide on crimp end loop and earring loop. Close jump ring.
  5. Repeat all steps for other earring.


Blues Straw Earrings

GoodyBeads | Blog - Colorful Straw Earrings with FREE Tutorial

Items using in earrings: Z016790, Z011158, Z002858, TC02360 (2)

Directions:

  1. Cut 4″ of leather.
  2. Make a lark’s head knot with the leather through the straw connector. (Make sure to keep ends flushed together when making the knot.)
  3. Slide crimp end over both ends of the leather and crimp it with nylon pliers.
  4. Open earwire loop and slide on crimp end loop. Close loop.
  5. Repeat all steps for other earring.


DIY Bracelet with Safari Leather and Leather Slider

We are in love with this tribal print leather from our Bold Leather Trend. Frame it with the Retro Frame Slider (Y006267) and you have an earthy and colorful bracelet!

What you’ll need for bracelet:

  • 5mm Tribal Print Flat Leather – CH00933 (6″ – 8″)
  • Retro Frame Slider – Y006267
  • Flat Leather Clasp – Z002302
  • Super New Glue – A015821

GoodyBeads | Blog - Safari Tribal Flat Leather Bracelet with FREE Tutorial

Directions:

  1. Cut leather at the length of your wrist, subtract half an inch. (You can also leave length as is, slide on clasp with out gluing. If you find the bracelet took big, cut a bit off leather off to adjust the length.)
  2. Slide slider frame onto the leather.
  3. Glue both of your leather ends into the clasp using super new glue.


Leather Bracelets with Half Circle Magnetic Clasp Leather

Learn how to make easy DIY bracelets using the Half-Circle Magnetic Clasp with round, flat and licorice leather.

The half-circle magnetic clasp really transforms the overall style of any bracelet because it circles around half of your wrist, it is a clasp but also a bold, statement look. The Half-Circle Magnetic Clasp comes in 4 specific styles and works only with a specific leather. It has an end bezel/opening that will only accommodate 5mm round leather, 5mm flat leather, 10mm flat leather or licorice leather. Let’s go through the 4 different clasps AND how to determine leather length for each of the Half-Circle Magnetic Clasp.

Determining Leather Length

Before we start on the different types of clasps, let’s determine the length of leather you want to approximately use. This will depend on your wrist length and the amount of wraps you want.  These are approximate measurements, so make sure when you order or cut your leather, to give yourself an inch or two to test out your leather clasp. Always test out your leather length and clasp by assembling them together and carefully put your bracelet on. Cut excess leather if you need adjusting before finalizing with glue. There will be a bit of math involved, but don’t worry we aren’t testing you.

  • Single-wrap bracelet: Take your wrist length and subtract 2.75 inches. (i.e. for a a 6.5″ wrist, subtract 2.75 for a length of 3.75″ piece of leather.)
  • Double-wrap bracelet: Take your wrist length, multiply by 2 and take that total and subtract by 1.75 inches. (i.e for a 7″ wrist, you will get a total of 12.25″ of leather)
  • Triple-wrap bracelet: Take your wrist length, multiply by 3 and take that total and subtract by 1.5 inches. (i.e for an 8″ wrist, you will get a total of 22.5″)
  • Quadruple-wrap bracelet: Take your wrist length, multiply by 4 and take that total and subtract by 1. (i.e for a 6.5″ wrist, you will get a total of 25″)

Quick Tip for Leather Bracelets

  • Make sure to check out our Cutter Tool and Adhesive blog for the right tools to cutting your leather
  • Make sure when you make multi-wrap bracelets to work with the natural curve of your leather. When you gluing in your leather pieces, keep your magnetic clasp closed. Glue one side of your leather in your clasp with Super New Glue. Then mimic the wraps with your leather and then glue in the other end into your clasp.

5mm Flat Leather

When using 5mm Flat Leather you will want to use these half-circle magnetic clasp options because they are made specifically for 5mm flat leather.

With our two examples, we created a two and four wrap bracelet.

GoodyBeads | Blog - Half Circle Magnetic Clasp with 5mm Flat Leather - Tutorial

Items used in 6.5″ wrist bracelet example: CH00834 (12″) & Z001004.

GoodyBeads | Blog - Half Circle Magnetic Clasp with 5mm Flat Leather - Tutorial

Instead of using leather, we are using this bright neon orange synthetic flat leather. Make sure to try out the Neon Yellow and Green!

Items used in 6.5″ wrist bracelet example: A019004 & Z001190.

10mm Flat Leather

There is only one option for the 10mm Flat Leather and it’s the popular silver half-circle magnetic clasp: A007209 You can make a single wrap bracelet or multiple one. In our example, we went with the 10mm Pale Turquoise Flat Cork Cord.

GoodyBeads | Blog - Half-Circle Magnetic Clasp with 10mm flat leather - Tutorial

Items used in 6.5″ wrist bracelet example: CH00438 (11″) & A007209

5mm Round Leather

When using 5mm Round Leather, you’ll want to use these half-circle clasp in four color options:

One thing to remember when using 5mm round leather on this clasp is the stiffness of the leather. It is rigid enough to hold its curve shape wonderfully but when making more than one wrap, the curves will be irregular. So when using the 5mm on this clasp, we suggest that you only make a single wrap bracelet.

GoodyBeads | Blog - Half-Circle Magnetic Clasp with 5mm Round Leather - Tutorial

Items used in this 6.5″ wrist bracelet: CH00605 (4″) & Z006715

In this example, because there wouldn’t be an issue with stiffness we made a double-wrap bracelet using 1.5mm leather. We’ve cut 5 strands of 1.5mm leather and insert the bulk ends to each end of your clasp.

GoodyBeads | Blog - Half-Circle Magnetic Clasp with 1.5mm Round Leather - Tutorial

Items used in bracelet example: Z006785 & Z019114

Licorice Leather

When using Licorice Leather, pair it with one of these Half-Circle Magnetic Clasp:

Just like 5mm round leather, Licorice Leather has a stiffness to it, so making a simple wrap bracelet with this clasp is highly suggested.

GoodyBeads | Blog - Half-Circle Magnetic Clasp with Regaliz Licorice Leather - Tutorial

Items used in bracelet example: A015302 & A019018


Adjustable Leather Bracelet with Rivets

Learn to use rivets on leather and make an easy adjustable leather bracelet.

Make sure to read our How to Rivet blog post to learn how to rivet leather. It also has a a quick summary about compression rivets, which are best to use with leather.

What you’ll need to make bracelets:

Video Tutorial

Leather Bracelets

GoodyBead Blog | FREE Video tutorial on how to rivet leather and make an adjustable leather bracelet.

Items used in bracelet: CH00232 (13), TC01677

GoodyBead Blog | FREE Video tutorial on how to rivet leather and make an adjustable leather bracelet.

Items used in bracelet: CH00694 (13), TC01677


Painted Leather Wrap Bracelet

Check out this bracelet Tory and Candie taught at the Spring 2019 Twin Cities Bead Bazaar, using Vintaj Patinas painted on leather.


If you were able to join us at the Twin Cities Bead Bazaar on March 2 & 3, you’ll know how much fun it was! We are sharing this super easy bracelet Candie Cooper and Tory taught at one of the hourly Make & Takes. It’s made with leather cord and TierraCast end caps on NEW Extra Heavy Duty Memory Wire. And then painted with Vintaj Patinas.


GoodyBeads | Blog - Memory Wire Leather with Vintaj Patinas

Instructions:

  1. Using Finishing Pliers, make a loop at one end of the memory wire.
  2. Slide on memory wire a bead cap, leather and a bead cap.
  3. Cut excess memory wire leaving about 1/2 inche to 3/4 inch end.
  4. Create a loop on other end of the memory wire.
  5. Paint Leather with Vintaj Patinas. Let it dry.


Components to Make Bracelet: TC01854 (2), CH00793 (10″), WR00132, Vintaj Patinas

Tools Used: TL00206, TLZ0207


Large Hole Gemstone Leather Knot Bracelet – Tutorial

Make this easy leather knotted bracelet with large hole gemstones from Dakota Stones.

Happy Friday. We’re having a fun time today since we’re all looking forward to the weekend. Why not try your hand at this easy leather bracelet tutorial with 1mm leather cord from LeatherCordUSA, large-hole gemstones from DakotaStones and a TierraCast button. You’ll make a simple overhand knot in between each large-hole gemstones. Don’t worry, you got it!

GoodyBeads | Blog Knotted Leather bracelet with large hole gemstones - Free Tutorial

Components you’ll need to make bracelet:

Tutorial

Items in bracelet tutorial: A022063, TC02349WAF8RDLH-M-8/APL8RDLH-8


Sizzix Edition: Leather Cuff Bracelet

Candie Cooper is back again with Tory for an easy project using the Sizzix Big Shot.

Make sure to check out how to Unbox your Sizzix Big Shot in our previous blog post.

GoodyBeads Sizzix Cuff Bracelet

An easy-to-wear piece of jewelry are cuff bracelets. We have this easy tutorial that will take less than 5 minutes to make and ready to wear. What you will need for this project are:


Video Tutorial

Items used in cuff example: Z020292, SZ00015, SZ00034, A015821


Sizzix Edition: Leatherette Earrings

Make trendy and fashionable leather earrings using the Sizzix Big Shot and the Teardrop Dies (SZ00025). Watch this video tutorial as Tory and Candie Cooper show you how easy it is to create some earring for yourself!

Check out our previous blog where you can learn how to Set Up your Sizzix Big Shot and even learn to make DIY Tassels. Theres a ton of ideas we can’t wait to show you!


GoodyBeads | Sizzix Leatherette Earrings

Today, Tory and Candie demonstrate how to make these Leatherette Earrings using the Teardrop Dies and Leather Punch Tool.


Here are leather and chain components that was used in this video tutorial: SZ00002, SZ00003, CH00659.

Hope you have fun making some earrings.  Add your choice of jump rings and earring findings to finish off your earrings. Or make them into a focal necklace pendant. So many possibilities!


Sizzix: Fringe Tassel Earrings & Necklace

Candie Cooper and Tory are back with two easy projects using the Sizzix Big Shot. Watch as they make a DIY tassel necklace and fringe earrings.

The Sizzix Big Shot (SZ00049) is a versatile machine for creating fun leather or fabric jewelry. To get started, watch how to setup your machine in our previous post and shop for Sizzix dies, leather and more!


Plus, for this video tutorial, Candie and Tory use Tassel Die (SZ00026) to roll a tassel and the Tag & Fringe Die (SZ00042) to make fringe earrings. Make sure to get them today!


Necklace components used: TC01831/TC01832CH00658A002814

Earring components used: A012441TCZ0077


Can we say we are excited to get these tassel and fringe dies in. Here are some examples we saw in Tuscon last Gem Show in January 2018 at the Sizzix booth. We adore all the fun ways to use the Sizzix machine and their multiple Dies!

TucsonSizzix_images


GoodyBeads EZ DIY Series: Adjustable Flat Leather Bracelet

Learn to make an adjustable flat leather bracelet using 10mm flat leather and loop bar end connectors.

The key component to making an adjustable flat leather bracelet is the end connector. The loop bar end connector has two channels. One channel is open to slide the leather through and the other channel is a closed channel where you glue and insert the leather end. Here is an easy tutorial on how to make the adjustable bracelet using two loop bar end connectors.


EZDIY_AdjustableFlatLeather_tut1

Items used: X003849, CH00759, A022105 (2), A015821