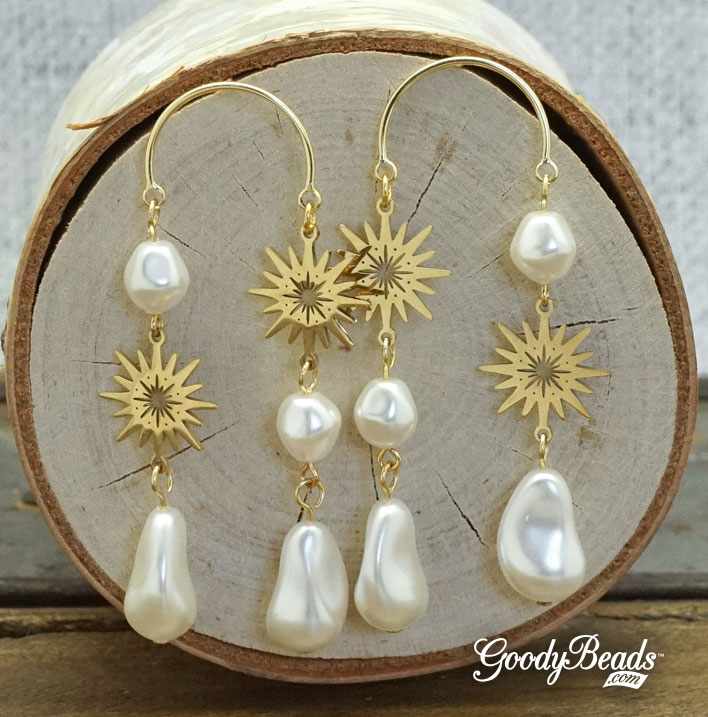
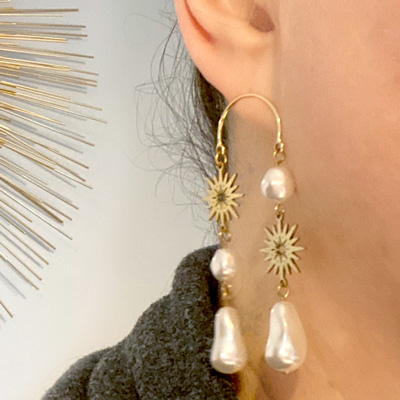
DIY Seed Bead and Gemstones Pointed Earrings with FREE Pattern Tutorial

We’re combining seed bead and gemstones together in this FREE bead-stitch Pointed Earrings pattern tutorial.. It involves peyote stitching around a 10mm round gemstone bead and adding bursts of bead around the bezel. This earring pattern uses: 10mm round gemstones, 4mm round gemstones, wire guardians, 11/0 Delica seed beads and 15/0 round seed beads. And earwires, beading thread and needle.

Items used in this example:

  • ONX10RD-8 – 10mm Round Onyx Gemstone
  • BGA4RD-8 – 4mm Round Black-Gold Amazonite Gemstone
  • SB00269 – 11/0 Galvanized Gold Delica Seed Beads
  • SB01136 – 15/0 Galvanized Yellow Gold Seed Beads
  • A006599 – White Superlon Beading Thread Bobbin
  • Z010382 – Gold Plated Wire Guardian
  • TCZ0148 – Gold Filled Hoop Earring Wires by Tierracast®
  • A006767 – #10 Long English Beading Needles

— CLICK for FREE Downloadable Pattern Tutorial —

–Click HERE for more DIY projects from Goody Beads–


Celebrate Summer with DIY Seed Bead Rainbow Earrings

Whether you’re celebrating summer or June’s Pride month, these rainbow earrings are what you need for summer fun! We have two rainbow earring designs, one using Delica seed beads with beadable components and another with round seed beads on a hoop! Check them out!

Rainbow Pendant Earrings Designed By So Vang

Be mesmerized with these pair of earrings using a using a rainbow of Delica seed beads! Items used in earrings:

GoodyBeads.com Blog | Celebrate Summer with DIY Seed Bead Rainbow Earrings

Directions:

  1. Add a 3 feet piece of thread to your needle.
  2. Add a stopper bead to your thread, leaving a 5 inch tail.
  3. Sew through top hole of the beadable channel. Pick up the 11 seed beads in the color sequence of the rainbow: SB00292, SB02337, SB02336, SB03777, SB00290, SB02311, SB00284, SB03545, SB00295, SB03388 & SB04034
  4. Sew through bottom hole of channel. Sew back through all seed beads. Tie both ends together to secure pattern, tie two times. Sew through top hole and sew through a few beads before cutting off excess. Add need to thread tail you left in step 2, sew down through all the beads, sew through bottom hole, sew through a few beads and cut off excess thread.
  5. Open ear wire and slide on beadable pendant.
  6. Repeat steps 2-5 for other earring; you should have enough of the thread on your needle to do the second earring.

Rainbow Hoop Earrings Designed by Heidi

Fall in love with these hoop earrings using a rainbow of seed beads. Items used in earrings:

GoodyBeads.com Blog | Celebrate Summer with DIY Seed Bead Rainbow Earrings

Directions:

  1. Open the hoop and slide on the following seed beads:
    1. 3 silver, 3 red, silver, 3 orange, silver, 3 yellow, silver, 3 green, silver, 3 blue, silver, 3 purple, 5 silver, 3 purple, silver, 3 blue, silver, 3 green, silver, 3 yellow, silver, 3 orange, silver, 3 red & 3 silver.
  2. Slide hoop end back into place and use pliers to gently crimp down the hoop end.
  3. Open earwire loop and slide on beaded hoop and close loop.
  4. Repeat all steps for other earring.

–Click Here for more DIY Projects from GoodyBeads–


DIY Succulent Earrings with Crazy Lace Agate Gemstones

Make these cute succulent earrings using TierraCast succulent findings from their Renewal Collection and Crazy Lace Agate gemstones from Dakota Stones.

Items used in earrings:

  • TC02874 – 10mm Antique Silver Succulent Earring Post by TierraCast®
  • TC02877 (2) – 12mm Antique Silver Succulent Charm by TierraCast
  • GCL8RD-M-8 – MATTE Green Crazy Lace Agate 8mm Round 8-Inch
  • TC01253 (2) – 2 Inch Silver 21 Gauge Eyepin by TierraCast
  • TC01208 (2) – Clear Comfort Earring Back by Tierracast

GoodyBeads.com Blog | DIY Succulent Earrings with Crazy Lace Agate Gemstones FREE Tutorial

Directions:

  1. Open eyepin loop, slide on succulent charm and close loop.
  2. Slide a gemstone onto the eyepin and make a simple loop.
  3. Open loop and slide onto loop of post earring. Close loop. Make sure loops on eyepin are parallel and facing the same direction. This will help the succulent dangle to face forward.
  4. Repeat all steps for other earring.

— Click HERE for more DIY Projects from GoodyBeads–


DIY Pearl Pavé Earrings with Rhinestone Pavé Beads

When I think about Mother’s Day, I think about pearls. They are what encompasses a mom; they’re precious, glowing and a treasure to have. Plus, these earrings are great to wear for any occasion! The rhinestones are laid around to frame the pearl. You can check out our other Rhinestone Pavé beads for more options!

Items used in earrings:

  • Z003029 (2) – 17mm Rhinestone Pavé Embellished Pearl Coin Bead
    Try out other Rhinestone Pavé beads.
  • Z009730 – 35mm Gunmetal Kidney with Clear Rhinestone Ear Wire
  • A019645 – 1.5 Inch Gunmetal Plated 22 Gauge Headpins

GoodyBeads.com Blog | DIY Pearl Pave Earrings FREE Tutorial

Directions:

  1. Slide a bead onto a headpin and make a simple loop.
  2. Open dangle loop and slide on the loop part of earring. Close dangle loop.
  3. The loop on the earring will need to be pinched to that the dangle doesn’t (run away) slide off of the earwire. Use round nose pliers to gently pinch it to make the opening smaller.
  4. Repeat all steps for other earring.


DIY Apoxie Earrings with Hashed Patina Paints

It’s National Crafting Month and we are diving into mixed media DIY jewelry. We’ve created a cool pair of earrings using Apoxie Sculpt and Vintaj Patina paints. Check out this step-by-step tutorial now!

Items used in earrings:

  • Z018271 – Black Apoxie Sculpt
  • TL00303 – Coral Patina
    Check out more Patina colors.
  • A001528 – 5mm Jump Ring
  • Z001660 – 3mm Jump Ring
  • TCZ0077 – TierraCast Silver Earwires
  • A002370 – Bead Reamer
  • Other Tools – gloves, silicon mat, acrylic rolling pin, oil, fan brush, small cookie cutters and skewer or awl. (items you can purchase at your crafting store.)

GoodyBeads.com Blog | DIY Apoxie Earrings with Hashed Patina Paints Free tutorial.

Directions:

1. Mix thoroughly part A and part B in equal parts. About a little over a thumb size of each part.

2. Add a small drop of oil to your acrylic rolling pin, enough just to gently coat it so that when you roll the apoxie, it doesn’t stick. (I add a small amount to the silicon mat too.) Roll out your apoxie on your silicon mat to aa 2-3mm thickness.

3. Using a fan brush, added a small amount of patina paint and lightly make hash marking on the apoxie. Paint a different pattern or you can also use stamps!

4. Use your small cookie cutters and cut out the apoxie.

5. Use the tip of your skewer or awl to punch a hole at the top, close to the edge.

6. Let your pieces dry for a full 24 hours. You can leave them on your silicon mat, it will not stick to the silicon.

7. Once dried, open a 5mm jump ring slide on your apoxie charm and close jump ring. Open small 3mm jump ring, slide on the 5mm jump ring and through earwire loop. Close jump ring. Repeat to other apoxie pieces.
Note: If the holes are small, use the bead reamer to ream out a good enough hole.

Are you NEW to Apoxie? Take a look at our Intro video with Erin from Aves Clay, maker of Apoxie Sculpt.


DIY Macrame Wheel Earrings with Chinese Knotting Cord

Macrame is still very trendy in 2021, so why not make these DIY Macrame Wheel Earrings! Try out today’s macrame tutorial, making square knots around an acetate ring with Chinese knotting cord.

Items used in earrings:

  • Z020493 – 24mm Multi Color Acetate Ring
  • A018869 – 1mm Ivory Chinese Knotting Cord
    Or try A018859 – 1mm White Knotting Cord
  • SB00106 – 8/0 Galvanized Silver Seed Beads
  • TCZ0077 – Sterling Silver Earring Wire by Tierracast®
  • Y018889 – 14mm Brushed Silver Plated Flat Ring Connector/Link

GoodyBeads.com Blog | DIY Macrame Wheel Earrings with Chinese Knotting Cord FREE Tutorial

Directions:

1.Cut a 24″ piece of knotting cord.

2. Fold 3 inches from the end of your cord and slide loop under the acetate ring and loop ends through to make a lark’s head knot.

3. Take the longer end of the cord, slide under the acetate, through the center and under the cord. Pull cord to tighten it in place.

4. Take longer end of cord, slide through the center of the acetate and over the cord. Pull cord to tighten.

5. Repeat steps 3 and 4 another 17 times.

6. Take both cord ends and make an overhand knot, close to the acetate. Slide on a seed bead on one cord end and make an overhand knot. Slide on 2 beads to the other cord and make an overhand knot. Make both cord ends different length.

7. Open a jump ring, slide through brush silver ring and loop of the knotting cord opposite of your cord dangles. Close jump ring.

8. Open earwire loop, slide on brush silver ring and close loop.

9. Repeat all steps for other earring.

Earring Designed by So Vang.


DIY Starburst Post Earrings with Beadable Pendant

Today’s DIY features a Beadable Pendant sewn with Miyuki Delica beads and hung on a hoop post earring. Think of all different color ways you can design with this earring.

Items used in post earrings:

GoodyBeads.com Blog | DIY Starburst Post Earrings with Beadable Pendant FREE Pattern Tutorial

Directions:

1.Start with 3 feet of beading thread. Add a bead stopper to your end, leaving a 5-6 inch tail.

2. Sew through the top hole/channel, pick up three beads and sew across the channel and down the hole. Ladder stitch around the pendant, following the illustrated pattern:

3. Repeat and sew through the pattern again. At the end, tie both your end together, sew through a bead or two and cut off excess.

4. Open jump ring, slide on beadable pendant and through hoop of earrings. Close jump ring.

5. Repeat all steps for other earring.

— CLICK for FREE Downloadable Pattern Tutorial —

Earring Designed by So Vang


DIY Half Circle Chain Earrings with Turquoise Seed Beads

We love a good pair of earrings with movement and these Half Circle Chain Earrings do just that! With a simple POP of turquoise color amidst the silver chain and findings, you’ll especially love how light they are.

Items used in chain earrings:

  • Z021697 – 33mm Rhodium Plated Arch Connector
  • TCZ0077 – Sterling Silver Earring Wire by Tierracast®
  • A008182 (2) – 2.5mm Silver Plated Steel Rollo Chain
  • Z007856 – 3mm Silver Plated 22 Gauge Round Jump Rings
  • A019647 – 1.5 Inch Silver Plated 22 Gauge Headpins
  • A019606 – 1.5 Inch Silver Plated 22 Gauge Eyepins
  • SB04011 – 8/0 Matte Opaque Turquoise Seed Bead
  • Z019080 – 1×2.5mm Flat Square Heishi Silver Plated Brass Beads

Get everything for this project here

GoodyBeads.com Blog | DIY Half Circle Chain Earrings FREE Tutorial

Directions:

  1. Slide the following on an eyepin and make simple loop: seed bead, metal bead and seed bead. Make a total of 6 links.
  2. Slide the following on a headpin and make a simple loop: seed bead, metal bead and seed bead.
  3. Cut 3 chain pieces to 3 inches, 2.5 inches and 2 inches. Make sure the first and last ring of each piece are the same directions.
  4. And 1 inch piece with rings opposite directions.
  5. Open bead link loop from step 1, slide onto first outer hole of Arch Connector and close loop. Open other loop of bead link, slide on the 3 inch chain, close loop.
  6. Open another bead link, slide onto next hole of connector and close loop. Open other loop of bead link, slide on the 2.5 inch chain and close loop.
  7. Open another bead link, slide onto third hole of connector and close loop. Open other loop of bead link, slide on the 2 inch chain and close loop.
  8. Attach the rest of the other bead links to the other end of the Arch Connector. Open other loop of each bead link and attach the mirrored chain to it.
  9. Open jump ring, slide on the 1 inch piece of chain and through the middle loop of Arch Connector. Close jump ring. Open loop of bead dangle, attach to the other end of the inch chain and close loop.
  10. Open ear wire loop, flip the Arch Connector so that the smooth backside it facing outwards, slide on connector and close loop.
  11. Repeat all steps for other earring.

Earrings Designed by Tory


DIY Golden Snowflake Earrings

Winter isn’t over yet. Let’s make these golden snowflake earrings with snowflake acetate pendants with gold findings.

Items used in snowflake earrings:

  • Z006136 – 35mm Pearl Acetate Cutout Snowflake Pendant
  • CH00998 – 15mm Matte Gold Donut Chain
  • A008801 – 5mm Oval Jump Rings
  • TC02298 – Gold Filled Front Loop Earring Wire by Tierracast®

GoodyBeads.com Blog | DIY Golden Snowflake Earrings FREE tutorial.

Directions:

  1. Take two donut links from the chain link.
  2. Open jump ring, slide through one hole of donut link and loop of snowflake pendant. Close jump ring
  3. Open earwire loop, slide on other hole of donut link and close loop.
  4. Repeat all steps for other earring.

Earrings Designed by Tory


DIY Beadable Fan Earrings with Diamond Drop

We’re combining two fun beadable accessories in these fan earrings. Beadable accessories are easy to use because all you need to do is bead-stitch size 11 delica beads inside the channels. The colors and ideas are endless with beadable accessories.

Items used in fan earrings:

——- CLICK for FREE Downloadable Pattern Tutorial ——-

GoodyBeads.com Blog | DIY Beadable Fan Earrings with Diamond Drop FREE Pattern Tutorial

Follow the FREE Pattern to create your own!

Fan Earrings Designed by So Vang


DIY Tiered Earrings with Swarovski® Baroque Pearl Beads

One of our fan favorites are the organic Baroque Pearl beads from Swarovski, especially used this tiered earrings from our Baroque Pearl Trend. Its freeform shape has a gorgeous shape at every angle you look at.

Items used in tiered earrings:

  • SW02594 (4) – 16mm Cream Crystal Baroque Drop Pearl
  • SW02569 (4) – 8mm Cream Crystal Baroque Round Pearl
  • Z005963 – 20mm Gold Plated Half Circle Post Earrings with 2 Loops
  • A019605 – 1.5 Inch Gold Plated 22 Gauge Eyepins
  • A019666 – 1.5 Inch Gold Plated 22 Gauge Headpins
  • A011517 – 4mm Gold Plated 20 Gauge Round Jump Ring
  • Z006004 (4) – 18mm Gold Plated Stainless Steel Sun Burst Connector

GoodyBeads.com Blog | DIY Tiered Earrings with Swarovski® Baroque Pearl Beads FREE Tutorial

Directions:

  1. Slide a baroque round pearl on an eyepin and make a simple loop. Make a total of 4 links.
  2. Slide a baroque drop pearl on a headpin and make a simple loop. Make a total of 4 dangles.
  3. Open loop of pearl dangle, slide on sunburst connector and close loop.
  4. Open loop from pearl link, slide on other end of sunburst connector and close loop.
  5. Open jump ring, slide on other end of pearl link, through left loop of earring and close jump ring.
  6. Open another pearl dangle loop, slide on another pearl link and close loop.
  7. Open loop of other pearl link, slide on another sunburst link and close loop.
  8. Open another jump ring, slide on other link of sunburst, through the right loop of earring and close jump ring.
  9. Repeat Steps 1-5 and link through right earring loop. Repeat 6-8 and link through left earring loop.

Earring Design by Tory


DIY Wire Wrapped Hoop Earrings with Microfacet Gemstones

Make a pair of Wire Wrapped Hoop Earrings using 26-gauge wire and 2mm faceted gemstones, all wrapped around a Nunn Design hoop. Though these may be dainty and minimalistic kind of earrings, they certainly don’t act like it. The large hoops and faceted sparkles from the gemstones will have everyone wanting one!

Items used in earrings:

  • Z008275 (2) – 50mm Bright .999 Fine Silver Plated Flat Grande Hoop
  • AW00215 – 26 Gauge Silver Plated Tarnish Resistant Silver Artistic Wire
    Or WR00035 – 26 Gauge German Bead Wire
  • TC02306 – Silver Filled Front Loop Earring Wire by Tierracast®
  • PGT2RD-F – 2mm Purple Garnet Diamond Cut Gemstone Faceted Round

Get all the components for this project here

GoodyBeads.com Blog | DIY Wire Wrapped Hoop Earrings with Microfacet Gemstones FREE Tutorial

GoodyBeads.com Blog | DIY Wire Wrapped Hoop Earrings with Microfacet Gemstones FREE Tutorial

Directions:

  1. Cut a 2 feet piece of wire.
  2. Wrap 4 coils around the hoop with the wire end. Pinch coils together to keep the coils tight. Slide on 31 beads or half of your gemstones onto the wire.
  3. Pick up a gemstone and wrap around the hoop once, making sure to situate the bead on the outer rim of the hoop. Repeat to the rest of the gemstones. Make sure to pinch your coils together to keep your wires tight.
  4. End your wire wrapping with 4 coils and cut off excess.
  5. Cut a 5″ piece of wire or use the rest of your excess wire. Find the midpoint of your hoop, where you haven’t wire wrapped; this is where you will make your wire loop. Make 3 coils and pinch them together to keep the coils tight. Use your round nose pliers and clamp it next to your coil. How far you clamp in will determine the size of your loop. Wrap your wire around the round nose and downwards. While holding the plier in place, wrap the rest of the wire 3 more times the opposite direction of the first set of coils. Keep coils tight. Cut off excess wire.
  6. Open earwire loop and slide on hoop dangle loop you made in step 5. Close loop.
  7. Repeat all steps for other earring.

GoodyBeads.com Blog | DIY Wire Wrapped Hoop Earrings with Microfacet Gemstones FREE Tutorial

Designed by Kayla Braun-Waletzke


DIY Playful Tassel Earrings

Spring will be here before we know, so why not include these DIY playful tassel earrings to your mix of colorful, spring jewelry. Made with our favorite fan tassels and gold findings, they’re so easy you’ll probably want to make more for all your girlfriends too!

Items used in tassel earrings:

  • Z017109 – 40mm Gold Plated Brass Hoop Frame
  • Z007737 – Turquoise Blue Flat Half Circle Fan Tassel with Gold
  • A011517 – 4mm Gold Plated 20 Gauge Round Jump Ring
  • TCZ0139 – Gold Filled Earring Wire by Tierracast®

GoodyBeads.com Blog | DIY Playful Tassel Earrings FREE Tutorial

Directions:

  1. One end of the hoops can slide out. Don’t slide it out but crimp down by using a needle nose pliers.
  2. Open jump ring, slide on tassel loop and through hoop. Close jump ring.
  3. Open earwire loop, slide on hoop dangle and close loop.
  4. Repeat all steps for other earrings.


DIY Golden Goddess Earrings with Lapis Gemstones

Our February Daily DIY project is all about layering! The DIY Golden Goddess Earrings with Lapis Gemstones are designed by Jacque, who made the amazing Macrame Planter Hanger with Large-Hole Beads last summer. She is showing off her jewelry skills with these post earring made with Lapis gemstones, enamel connector and gold findings.

Items used in Post Earrings:

  • Z016675 (2) – 43mm Satin Gold Etched Round Hoop
  • Z016258 (2) – 27mm White Enamel Gold Plated Ring Connector Pendant
  • Z006000 – 12mm Gold Plated Stainless Steel Sun Burst Post Earrings with Loop
  • LAP12DC-8 – 12mm Lapis Coin Gemstone Beads
  • A011525 – 9mm Gold Plated 20 Gauge Round Jump Ring
  • A011523 – 8mm Gold Plated 20 Gauge Round Jump Ring
  • A008801 – 5mm Gold Plated 21 Gauge Oval Jump Rings
  • A019662 – 1 Inch Gold Plated 22 Gauge Headpins

Directions:

  1. Slide a lapis gemstone onto a headpin and make a simple or wrapped loop.
  2. Open 8mm jump ring, slide on one hole of enamel link and through hoop of Gold Etched Round Hoop. Close jump ring.
  3. Open 9mm jump ring, slide through other hole of enamel link, lapis dangle and top loop of Gold Etched Round Hoop. You want to make sure the dangle is behind the enamel. Close jump ring.
  4. Open oval jump ring, through top loop of Gold Etched Round Hoop and post earring loop. Close jump ring. Make sure the white enamel is facing outwards.
  5. Repeat all steps for other earring.

Designed by Jacque


DIY Blue-Blue Straw Earrings with Deerskin Leather Lace

We’re ending the year with one of our favorites from 2020, straw earrings. We’ve paired our colored straw components with LeatherCord USA deerskin leather lace, a soft leather that can easily bend and shape.

Items used in earrings:

  • Z010962 – 3mm Saddle Deerskin Leather Lace
  • Z016790 – Turquoise Handmade Woven Rattan Straw
  • TC02360 – 11mm Brass Oxide Jardin Crimp End Cap by TierraCast®
  • Z002858 – Antique Brass Fishhook with 2mm Ball Earwires

GoodyBeads.com Blog | DIY Blue-Blue Straw Earrings with Deerskin Leather Lace FREE Tutorial

Directions:

  1. Cut two pieces of leather at 5 inches.
  2. Fold one piece of leather and make a lark’s head knot through the straw component. Make sure the leather is laid next to each other and the front of the leather is faced the same way. (Refer to our earrings tutorial to see step 1 and 2 on making a lark’s head knot with leather lace.)
  3. Repeat step 2 for other leather piece and straw.
  4. Determine the length you want your leather to be. You can cut a 1/4″ off the end of your leather. Make sure it is a flush cut.
  5. Cap your leather ends with the TierraCast end cap. Using nylon pliers, crimp the end cap to secure the leather ends. Repeat for other leather and end cap. (As an option, you can add a small dot of E-6000 inside the end cap. Use a toothpick to spread it around. Do not use Super New Glue, it may discolor the leather where it is inserted.)
  6. Open earwire loop, slide on end cap loop and close earwire loop. Repeat for other earring.