Beaded Multi-Strand Bracelet with Beadable Components and Delica Seed Beads

We have a fun DIY bracelet project today using Beadable Triangular Links and Miyuki Delica seed beads. With this FREE pattern, you’ll see how easy it is to make this multi-strand bracelet!

What you’ll need for project:

— CLICK for FREE Downloadable Pattern Tutorial —

GoodyBeads.com Blog | FREE Pattern Tutorial on Beaded Multi-Strand Bracelet with Beadable Components and Delica Seed Beads

Items used in bracelet above: SB00128, SB00223, SB00229, Z005132 (2), A006599, X003062, A006767, Z001442 & Z013680.

GoodyBeads.com Blog | FREE Pattern Tutorial on Beaded Multi-Strand Bracelet with Beadable Components and Delica Seed Beads

Items used in bracelet above: A006597, Z005132 (2), SB02349, SB00269, A007665, A008801, A006767, Z013678.

— CLICK for FREE Downloadable Pattern Tutorial —


DIY Starburst Post Earrings with Beadable Pendant

Today’s DIY features a Beadable Pendant sewn with Miyuki Delica beads and hung on a hoop post earring. Think of all different color ways you can design with this earring.

Items used in post earrings:

GoodyBeads.com Blog | DIY Starburst Post Earrings with Beadable Pendant FREE Pattern Tutorial

Directions:

1.Start with 3 feet of beading thread. Add a bead stopper to your end, leaving a 5-6 inch tail.

2. Sew through the top hole/channel, pick up three beads and sew across the channel and down the hole. Ladder stitch around the pendant, following the illustrated pattern:

3. Repeat and sew through the pattern again. At the end, tie both your end together, sew through a bead or two and cut off excess.

4. Open jump ring, slide on beadable pendant and through hoop of earrings. Close jump ring.

5. Repeat all steps for other earring.

— CLICK for FREE Downloadable Pattern Tutorial —

Earring Designed by So Vang


DIY Beadable Fan Earrings with Diamond Drop

We’re combining two fun beadable accessories in these fan earrings. Beadable accessories are easy to use because all you need to do is bead-stitch size 11 delica beads inside the channels. The colors and ideas are endless with beadable accessories.

Items used in fan earrings:

——- CLICK for FREE Downloadable Pattern Tutorial ——-

GoodyBeads.com Blog | DIY Beadable Fan Earrings with Diamond Drop FREE Pattern Tutorial

Follow the FREE Pattern to create your own!

Fan Earrings Designed by So Vang


DIY White Cowrie Shell Earrings

Can you hear this DIY calling to you? This pair of cowrie shell earrings is designed with enamel cowrie shells and our fun beadable links. Get this free tutorial today and be summer-ready!

Items used in earrings:

  • SB03778 – Sea Opal 11/0 Delica Seed Beads Tube
  • SB03818 – Precious Mix 11/0 Delica Seed Beads Tube
    Use gold beads in this mix or use SB00269.
  • Y005060 (2) – White Enamel with Gold Finish Cowrie Shell Component
  • Z001831 – 8mm Gold Plated Post Earrings
  • A006585 – 4lb Crystal Fireline Thread
  • AW00025/AW00002 – 20 or 22 Gauge Artistic Wire
  • Z005131 (2) – Beadable Link

GoodyBeads.com Blog | DIY White Cowrie Shell Earrings FREE Tutorial

Directions:

  1. Add a foot of beading thread to your needle and add a bead stopper to your thread end, leaving about a 5 inch tail.
  2. Sew through one hole of beadable link and pick up Sea Opal and Gold Delica seed beads, alternating between the colors. Pick up a total of 9 beads. Sew down through the other beadable link across the link channel. Sew back through all the beads. Pull off the bead stopper and tie both threads together, tie two times. Sew thread ends through a few beads before cutting off excess.
  3. Cut a 3 inch piece of wire. Insert a third of the wire through the shell and fold wire. Wrap the longer piece of wire on top and around the shorter piece of wire.
  4. Make a simple loop with the shorter wire.
  5. Open loop, slide in beadable link and close loop.
  6. Open earwire loop and slide on other end of beadable link.
  7. Repeat all steps for other earring.

Video Tutorial

Watch the video tutorial where Tory demonstrates how to make this pair of earrings. Watch it HERE on our facebook page.

Earring design by Tory


DIY Leaf Drop & Straw Necklace with Beadable Accessories

For today’s February Daily Project, our DIY Leaf Drop & Straw Necklace may look elaborate and hard to make, but don’t fret because it’s quite easy. With the help of beadable accessories, we’re pulling it together with a straw connector and chain for a stylish necklace! Plus a get the FREE pattern tutorial for this necklace and its beadable accessories.

Items used in necklace:

  • SB02336 – 11/0 Spruce Duracoat Opaque Dyed Delica Seed Beads
  • SB00269 – 11/0 Galvanized Gold Miyuki Delica Seed Beads
    OR try other 11/0 Delica Colors
  • Z001659 – Handmade Woven Rattan Straw Oval Ring Pendant/Connector
  • Z005131 (3) – Gold-Plated Stainless Steel Beadable Rectangular Link
  • Z018107 – 40mm Gold-Plated Stainless Steel Beadable Oval Pendant
  • CH00532 (2) – 2.2mm Gold Plated Soldered Cable Chain
  • A008801 – 5mm Gold Plated 21 Gauge Oval Jump Rings
  • A011523 – 8mm Gold Plated 20 Gauge Round Jump Ring
  • A011517 – 4mm Gold Plated 20 Gauge Round Jump Ring
  • A006587 – 6lb Crystal Fireline Thread
  • A006767 – Beading Needles

——- CLICK for FREE Downloadable Pattern Tutorial ——-

GoodyBeads.com Blog | DIY Leaf Drop & Straw Necklace with Beadable Accessories with FREE Pattern Tutorial

Designed by So Vang


Criss Cross Thread Beadable Cuff

We like to think outside the box with this Criss Cross Thread Cuff. With using a beadable cuff, we aren’t adding beads to it but colored thread in a criss cross pattern.

What you’ll need for projects:

  • Gold Beadable Cuff – Z001860
  • TOHO One-G Nylon Thread OR Size AA White Superlon Beading Thread
    Item used in example – Z017742
  • Super New Glue – A015821
  • Needle – A006767

Get all the components for this project here

GoodyBeads.com Blog | Criss Cross Thread Beadable Cuff FREE Pattern Tutorial

Love arm candy? We layered this Criss Cross Thread Cuff with our Bronze Legend Bracelet and Golden Rays Bracelet. How will you layer this cuff?

Designed by So Vang


DIY Snowflake Ornament with Lightbulb Glass Beads

The holidays are a fun time for decorating around the house. Why not make some snowflake ornaments using these snowflake forms and various beads you may have around the house. This project is also perfect for kids to design and adults finishing it off.

Wire Snowflake Ornament Forms

The Wire Snowflake forms comes in FOUR different sizes. Depending on the amount of beads you want on each peg will determine which ornament form to buy.

Ornament with Lampwork Beads

GoodyBeads.comg Blog | DIY Snowflake Ornament with Lightbulb Lampwork Glass Beads FREE tutorial

Items used in ornament: A006240, A022201, Z004872, Z004845, Z004885, SB00423 & Z013345.

Directions:

  1. On one spoke, slide on two seed beads, Czech bead, spacer bead, lightbulb bead, spacer bead, Czech bead and seed bead.
  2. Make a simple loop with a memory wire finishing plier. Then use a crimping plier or flat nose pliers to close the loop. (Check out previous blog post on a visual step-by-step look on making the loop.)
  3. Skip a spoke and repeat step 2 & 3 with a different lightbulb color bead.
  4. Skip another spoke repeat step 2 & 3 with a different lightbulb color bead.
  5. Then with the other spokes, repeat steps 2 & 3 with a lightbulb color bead that is different from the spoke on either sides of it.

You can also see Tory making this during a Facebook LIVE episode HERE.

Need more inspiration on making Snowflake Ornaments? Check out these designs on our Blog!


DIY Beadable Gifts for the Holiday Table

How will you dress your holiday table this year? Why not add some fun utensils like our selection of Beadable Gifts? Last year we visited a local lunch/catering business to show how to use these beadable gifts. We’re sad to say that the business is no longer there but we still dream about their delicious soups. Here are some ideas to reel in the festivities for the holidays.

Items you’ll need:

Toss and serve some fresh salads with a pair of Salad Serving Set. (A003251)

Get the Beadable Tongs (Z005787) for the mixed salads, fried chicken or as an extra pair of hands!

Help carve your turkey or ham with the Serving Fork (Z005605).

Cake Server Z007097 to serve up your favorite desserts!

Make it a memorable evening with a popping a bottle of bubbly and capping it off with a sweet Wine Stopper (A003264)

Check out our other beadable ideas to get you inspired:

Beadable Gifts Video

Check out our video HERE from 2019 on how to utilize these fun ideas!


John’s DIY Bottle Opener with Large-Hole Gemstones

Need a gift for the holidays? This easy gift-giving beadable DIY bottle opener is what you’ll want. It’s easy to make and great for a quick gift you can wrap right up. Pair it with some cool looking large-hole gemstones for a masculine vibe.

What you’ll need for DIY Bottle Opener:

GoodyBeads.com Blog | John's DIY Bottle Opener with Large-Hole Gemstones FREE Tutorial

Directions:

  1. Twist of the end of the bottle opener and slide on 4 gemstones.
  2. Twist the end back onto the bottle opener end.

Need more easy DIY gift-giving ideas? Check out these Beadable ideas!


DIY Red and Green Holiday Earrings with NEW Thread Bobbin Colors & Swarovski® Rouge Pearls

We’re getting ready for Christmas season with this Red and Green Holiday Earrings. Designed with our NEW Swarovski Rouge Pearls and Thread Bobbin colors, we’re using two colors to wrap with our Beadable Oval Pendants (Z011345 or Z011351) for a festive pair of earrings!

What you’ll need for these Holiday Earrings:

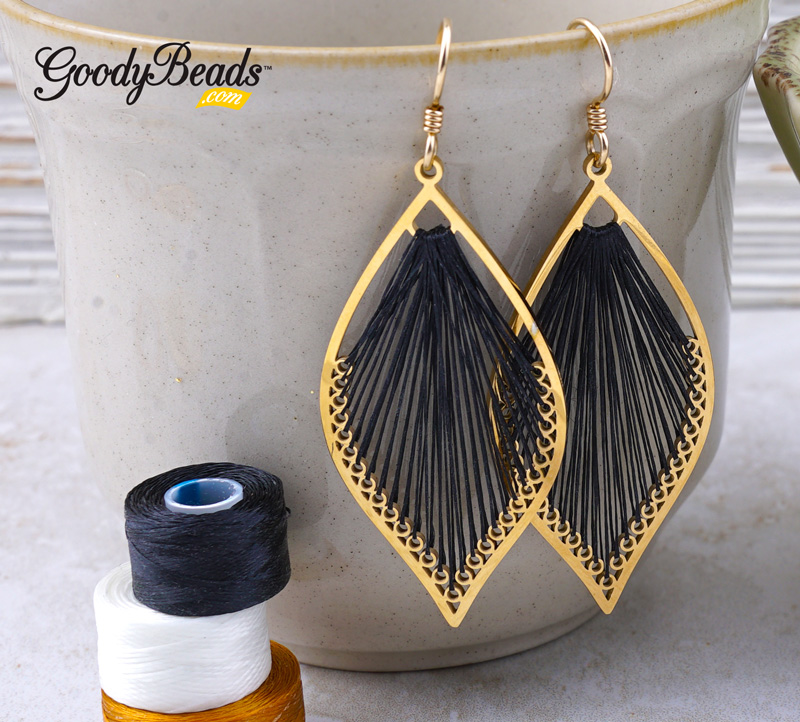
  • (2) Z011345 – Beadable Oval Pendant
  • (2) SW02560 – 8mm Swarovski Rouge Crystal Pearl
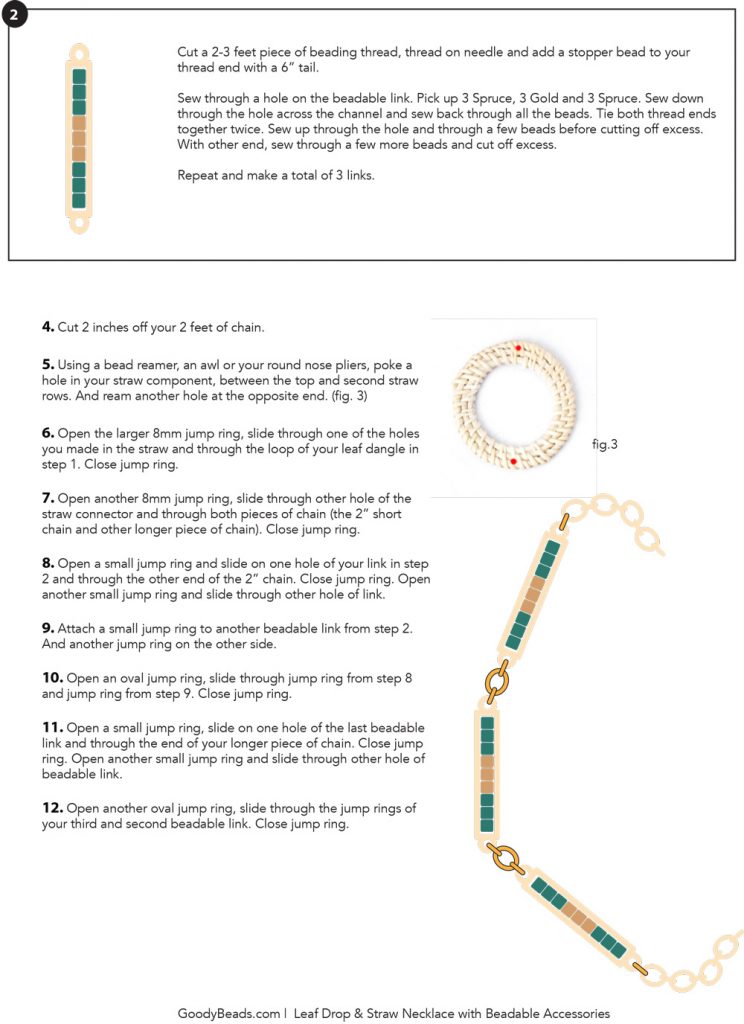
  • Z008003 – Seafoam Green Superlon Beading Thread Bobbin
  • Z008298 – Scarlet Superlon Beading Thread Bobbin
  • A019626 – 1.5 Inch Eyepin
  • TCZ0078 – Coil Earring Wire by TierraCast®
  • Needle

Directions:

1. Cut both threads to a length of about 8 feet. Feed both threads to your needle.

2. With your thread ends, anchor it to the inner loop of the beadable pendant with two knots. Cut tail to about 1/4 inch. Optional: You can use a small dot of glue to secure knot.

3. Sew down through middle hole and loop back through top loop. You will start from the inside towards the outside to one side. (You can refer to our previous blog post on sewing through this oval pendant, but these Red & Green Earrings will work from the middle outwards.)

4. Then sew other side starting from the middle and going outwards.

5. Sew through middle strands back and forth and cut off excess (Refer to video tutorial in previous beadable blog post). (Optional, you can use a small dot of glue for security, but not necessary. I’d suggest using a translucent glue that will not discolor the thread. Test out glue before use.)

6. Open eyepin loop, slide on top loop of pendant and close loop.

7. Slide on pearl and make a simple loop. Open earwire loop and slide on dangle.

8. Repeat all steps for other earring.


DIY Beadable Diamond Ring & Pendant with FREE Pattern Template

Some of our newer beadable products are in and we, meaning So Vang, is pretty excited to get designing! We have new Diamond Beadable Pendant and Diamond Beadable Ring, with example designs and templates so that you can get designing on your own!

For these projects you’ll need:

Diamond Beadable Ring

GoodyBeads Blog | Diamond Beadable Ring with FREE Pattern and Template

Items used in ring: Z018109, SB00269, SB00260 & SB03538

Download Pattern & Template PDF for Ring HERE.

Diamond Beadable Pendant

GoodyBeads Blog | Diamond Beadable Pendant with FREE Pattern and Template

Easily design two and make a cute pair of earrings or pair it with a tassel for a fun necklace pendant!

Items used in TOP pendant: Z018096, SB00269, SB00227, SB00223, SB02336 & SB00253

Items used in LEFT pendant: Z018099, SB00269, SB00260, SB00229 & SB02324.

Items used in RIGHT pendant: Z018096, SB00269 & SB00255.

Downloadable Pattern and Template PDF for Beadable Pendant HERE.

Video Tutorial

Check out our previous LIVE where So Vang demonstrates how to bead stitch the Beadable Pendant. Tutorial starts at 11 Minutes. Watch Video HERE!


Swarovski® Spike Cuff

We’re combining two of our favorites in today’s project: Swarovski crystals and beadable accessories. This punk-style jewelry will be your favorite for an edgy look!

What you’ll need:

Directions:

  1. Add a stopper bead to 3 feet of beading thread.
  2. You will be sewing a ladder stitch to complete your cuff. Sew up through first hole on the bottom left. Pick up a spike bead and sew down the hole across the channel from the hole you first sewn up from.
  3. Along the top, skip a hole and sew up through the next hole. Sew through the second hole of the spike bead and down the hole across the channel.
  4. Skip a hole and sew up through the next one. Pick up a spike bead and sew down the hole across the channel from that hole you’ve sewn up from.
  5. Skip a hole and sew up through the next one, sew through the second hole of the spike bead and down the hole, across the channel.
  6. Repeat this sequence until you’ve added 6 beads.
  7. Sew through the runs of beads again to secure the crystals in place.


DIY Beadable Wine Stopper with Large Swarovki Crystal

Kicking off a full month of DIY projects for the month of February, we start out with an easy beadable wine stopper. With a mandrel thickness of 2.5mm, mix up large-hole beads and select metal beads/spacers. Even Large-Hole Gemstones will work! You can also check out our Bead Pen & Large-Hole Beads HOT Category for a selection of beads you can use on the wine stopper. Here is how we designed our Wine Stopper.

Items used in Wine Stopper:

Directions:

  1. Unscrew the ball of the wine stopper (set aside).
  2. Slide onto the mandrel: Crystal, metal spacer, lampwork and metal bead.
  3. Screw back on the ball.


Holiday DIY Gift Ideas for the Boho Beauty

These Holiday DIY gift ideas are for the Boho Beauty in your life.She seeks a relaxing vibe and a moment of zen. She loves natural and earthy tone, so make sure you design with fibers like Ribbon, Tassels, Leather and Straw, as well as some Gemstone. Here are some great DIY projects for the Boho Beauty!

BohoBeauty_Gift_Tassel

  1. Straw & Leather Macrame
  2. Fishtail Cuff
  3. Fabric Tassel Jewelry
  4. Fan Tassels
  5. Macrame Leather Bracelet
  6. Boho Feather Earrings
  7. Silk Ribbon in Jewelry
  8. Long Tassels


Beadable Threaded Earrings with Video Tutorial

Fiber and minimalist jewelry is a must-have trend that we’ve been seeing everywhere. Here, we take one of our newest product and show how easy it is to loop thread through the beadable pendant in our video tutorial.

What you’ll need for earrings:

Video Tutorial

You can also go to the Facebook Page to see this tutorial HERE.

BlackGoldThreadEarrings

Items used in gold/black earrings: Z011351 (2), A006589 and TCZ0140.

  • Get the all-in-one Buy All Project with BAP0012


GoodyBeads | Blog - Black and Gold Beadable Earrings with FREE Video Tutorial

Items used in Golden/Silver Earrings: Z011352 (2), A006597 and TCZ0077.