DIY Gemstone, Ribbon & Leather Bracelet with Video Tutorial

We’ve got a special DIY for your summer outfits! Create a leather bracelet with large-hole gemstones and braided with silk ribbon. This tutorial is a revamp of our previous blog post: Criss Cross Leather Bracelet by Dakota Stones. Check out this blog post for written directions on how to make these bracelets. Plus, below is a previous LIVE episode where Tory demonstrates how to braid and make this leather bracelet!

GoodyBeads.com Blog | DIY Gemstone, Ribbon & Leather Bracelet with FREE Video Tutorial

Items used in bracelets:

  • TC02349 – 16.5mm Antique Pewter Amor Round Button by TierraCast®
  • A022076 – 2mm Natural Light Brown Round Leather Cord
  • A021777 – Tutti Frutti Hand Dyed Silk Ribbon
  • RHO8RDLH-8 – Rhodonite Large Hole 8mm Round

Bracelet Video Tutorial

CLICK HERE to Watch the Facebook Tutorial Video

CLICK HERE for more DIY projects from Goodybeads

Tutorial begins at 3:30 minutes.


Fringe Earrings with Gemstone Cube Beads – FREE Pattern Tutorial

So Vang made this pair of earrings during one of our Facebook Lives and it has quickly become a favorite among jewelry makers! Dakota Stones 2mm gemstone cube beads were bead stitched onto a Beadalon® Quick Link, you’ll see on the PDF just how easy this pair of earrings are to make. Plus, check out the live episode where So demonstrates how to make them.

Items used in fringe earrings:

— CLICK for FREE Downloadable Pattern Tutorial —

Goodybeads.com Blog | Fringe Earrings with Gemstone Cube Beads - FREE Pattern Tutorial

— CLICK for more DIY projects from GoodyBeads–

Video Tutorial

Check out the video tutorial on our Facebook Videos, to watch So demonstrate how to create these pair of earrings as well as a tip to using banded gemstone strands.


Project Inspiration: Macrame Planter Hanger with Large-Hole Beads

We love to be inspired by all crafty communities. Here is a simple DIY with the popular macrame trend, creating a planter hanger while incorporating our interchangeable large-hole beads. Designed by our friend Jacque from Dakota Stones, she has definitely inspired us!

What you’ll need:

Directions

  1. Measure your macrame cord to 64 inches + the width of your planter + 24 inches. Cut 4 pieces at that length.
  2. Fold all 4 pieces in half and make a looped knot at the fold.
  3. Anchor your loop.
  4. On each strand, slide on your large-hole beads. Pattern and amount is up to you.
  5. Take two cords and make an overhand knot. Repeat this to the other strands, making sure the knots are distanced the same.
  6. Take two adjacent knots and take two cords from each of those and make a knot. Do this all the way around. Make sure they are all the same level.
  7. Add your planter to see if your knots are situated to fit your pot.
  8. Take all strands at the end and make a full overhand knot. Cut excess if you prefer.

Video Tutorial

This tutorial is inspired from the DIY 5 Minute Macrame Planters video by WhatsUpMom on YouTube. You can see the video HERE.


DIY Sodalite and Straw Post Earrings with Gold Findings

One of our popular Facebook LIVEs we did previously was these pair of earrings using Sodalite gemstones, straw and Flat Artistic Wire. Get all the components to make this pair of unique earrings.

What you’ll need:

GoodyBeads Blog | DIY Sodalite and Straw Post Earrings with FREE Video Tutorial

Directions:

  1. Slide in through the middle and clamp down onto the wire end and piece.
  2. Wrap wire around and up. Take off pliers and clamp both sides of the wire and pendant piece.
  3. Bend wire to come across the top of the pendant.
  4. You can take your sharpie or some fine point marker to mark the top to indicate where you will hope punch for the headpin.
  5. Gently pull off wire. Take hole punch to the middle of that dot you made.
  6. Slide on headpin, coming under the hole you punched.
  7. Slide wire piece back on your pendant piece. Fold wire to the back.
  8. Cut wire so that it overlaps with the other wire end.
  9. Bend out the bottom end, fold in the top end and bend back the bottom end to overlap. Use nylon pliers or regular pliers to cinch them closed.
  10. On the headpin, slide on nugget bead, gemstone and Czech bead and make a simple loop. Open loop and slide on post earring hole. Close loop. (As an option here, you can make a wrapped loop.)
  11. Repeat all steps for other earring.

FB Live Video Tutorial

Check out the Video for a tutorial. Tutorial begins at around 8 Minutes.

(opens in a new tab)”>LINK TO VIDEO TUTORIAL HERE >


Beadalon® Spin-N-Bead – Video Tutorial

We have a fun video tutorial with Beadalon’s Spin-N-Bead, Senior and Junior versions, which will make stringing on beads easier and faster!


GoodyBeads | Blog: Beadalon Spin-N-Bead Video Tutorial


Beadalon Spin-N-Bead Senior

Spin-N-Bead Senior Bead Loader with One Curved Rigid Beading Needle (TL00333). String seed beads and other small beads quickly and easily with the Spin-N-Bead Senior. Because the bowl is bigger you can use larger beads, up to 6mm. The speed at which the beads will load diminishes as the beads get larger. This bead loader makes tedious bead stringing fast and easy. Fill the bowl about half-full of beads, then spin. Insert the curved needle into the spinning beads and watch them jump onto the needle. The beads nest all on their own! Rigid Curved Needle included. You can also buy extra curved needles separately with Z001463.


Beadalon Spin-N-Bead Junior

Beadalon Spin-N-Bead Junior (TL00341) is smaller than the Senior version and makes stringing seed beads, liquid silver beads, or other small beads quick and easy! Fill the bowl about half-full of beads, and then spin. Insert a Curved Big Eye Beading Needle into the spinning beads and watch them jump onto the needle! The beads nest all on their own – when ample beads are on the needle, then move them to the connected stringing material and dip the needle back into the spinning beads to load on another few inches. It’s fun to use and an excellent time saver. You can buy curved needles separately with Z001463.


Video Tutorial


Lariat Gemstones and Tassel Necklace – Video Tutorial

Our DIY lariat feature many of our most popular products: beading chain, tassels, slide clasp, gemstones and clamshell bead tips! Check out all you need to make one of your own along with our previous Facebook LIVE video!

We’ve combined many of our favorite products in this lovely necklace set. It’s adjustable with the sliding clasp, colorful with quality gemstones and simplistic with the popular beading chain. Plus, it’s tied together at the front with clamshell bead tips and tassels!

What you’ll need:

Video Tutorial

Blue Impression Jasper Necklace

Items used in necklace: CH00724 (3 feet), A004830Z010740Z008576Z019080IJR6RL and Z004964.

OR Buy All the Products you need to make this project with this one sku – BAP0013

69931608_10157709248573469_4714030635209981952_o

Purple Impression Jasper Necklace

We’ve used 4mm Purple Impression Jasper & Pyrite Round Beads by Dakota Stones (PPLPYR4RD) in this necklace. It’s definitely a stunning color!

Items used in necklace: CH00724 (3 feet), A004830Z010740Z008576Z019080PPLPYR4RD and Z006096.

69872703_10157709484638469_3921350723735912448_o

Blue is always one of the most popular color to design with. There’s no exception to how the earthy blues and browns are in this Impression Jasper Rondelle Beads (IJR6RL) look.


Straw and Leather Macrame Earrings – Tutorial

Learn how easy it is to macrame 3mm deerskin lace on a Woven Straw Ring for a cool and hip pair of earrings!


Macrame is making waves along side the fiber trend. Our Designer, Tory did a tutorial on how to make a single half hitch knot with 3mm deerskin lace around a woven straw ring. It revises our favorite woven straw component into fall fashion and even back to school wear!


What you’ll need:


Tutorial

  1. Cut two pieces of 1 meter of lace each.
  2. Fold lace in half and make a lark’s head knot on the straw ring. (Make sure to keep the smooth side sitting outwards.)
  3. With each strand of lace, make a single half hitch knot working outward around the ring to both sides of the lark’s head knot you made in step 2.
  4. Make 6-8 half hitch knots on both sides of the lark’s knot on the straw ring.
  5. Take the lace end and tuck it behind your third loop on the backside of your knotted straw ring. Do the same to other end.
  6. Add a small dab of glue to keep ends in place.
  7. Cut excess lace.
  8. Complete your earrings with making a hole in your woven opposite of lace/leather knots, with a bead reamer or awl. Add your earring finding to woven straw with a jump ring and through the hole you made.
  9. Repeat all steps for other earrings.


Video Tutorial

Tutorial starts at 4:20 minutes.


Examples

Strawleathermacrameearrings_1

Items used in examples using Deertan lace: Z001659Z015550Z015610

In this example, Deertan lace was used. The one the left is 3mm and the left is 5mm.


Strawleathermacrameearrings_image

Items used in earrings: Z001659, A010962, Z008989, A001529


Adjustable Leather Bracelet with Rivets

Learn to use rivets on leather and make an easy adjustable leather bracelet.

Make sure to read our How to Rivet blog post to learn how to rivet leather. It also has a a quick summary about compression rivets, which are best to use with leather.

What you’ll need to make bracelets:

Video Tutorial

Leather Bracelets

GoodyBead Blog | FREE Video tutorial on how to rivet leather and make an adjustable leather bracelet.

Items used in bracelet: CH00232 (13), TC01677

GoodyBead Blog | FREE Video tutorial on how to rivet leather and make an adjustable leather bracelet.

Items used in bracelet: CH00694 (13), TC01677


Flat Memory Wire and Gemstone Bracelet – Video Tutorial

Candie Cooper came by the GoodyBeads Mezzanine to show us how to make an easy DIY wrap bracelet with flat memory wire and gemstone beads. Watch the video today!


GoodyBeads Blog: Flat Memory Wire and Gemstone Bracelet Video Tutorial

After the Spring Twin Cities Bead Bazaar, Candie stopped by to demonstrate how to make a classy and chic bracelet using 4mm faceted coin gemstone beads, wire wrapped around flat memory wire.


What you’ll need:


Video Tutorial


Leather Wrap Bracelet with Matubo Beads – Video Tutorial

We’ll show you how to make a leather wrap bracelet by fishtail braiding leather with new 2/0 Czech Matubo Beads.


For this bracelet tutorial, you’ll need:


Determine Length of 1.5mm Leather needed for a wrap bracelet

Use this method to determine the leather cord length you may need for a multi-wrap bracelet.

Take your wrist length and double the length. Multiply that by the number of wraps you want and then add 12”. That will give you an approximate cord length you will need to start your bracelet. (The extra 12” factors in the beads and leather you’ll be adding along with loop end.)

Example:

2 wraps for an 8.5” bracelet: (8.5” x2) x 2 wraps = 34 + 12 = 46” needed.

Or

4 wraps for a 7.5” bracelet: (7.5” x2) x 4 wraps = 60 + 12 = 72” needed.

Keep in mind, these total numbers are approximate. You will want to test the wrap length while you’re making your bracelet. Having extra length is better than being short on your wrapped length goal.


Video Tutorial

Leather bracelet tutorial begins at 15:00 mark.


Apoxie® Sculpt 101

Check out this easy and simple tutorial with a video tutorial on Apoxie Sculpting clay.


We were lucky to have Erin Gerlach from Aves® Studio to join us in the GoodyBeads mezzanine to show one of our newest products: Apoxie Sculpt. ‘Apoxie® Sculpt combines the features and benefits of sculpting clay with the adhesive power of epoxy! Its smooth, putty-like consistency is easy to mix & use.’ (Aves) It self hardens and will adhere to any surface such as wood, glass, metal, plastic, etc.


Apoxie Colors

GoodyBeads sells all the colors that Aves has to offer in different sizes amounts. Being new to Apoxie Sculpt, we would recommend the small .10 lb product to test out the product. It’s a good amount to get started and even make a few beads!


Mixing Apoxie Sculpt and Curing

Apoxie Sculpt comes in a two part package. Part A will consist the color of your clay, while Part B is the hardener. When both parts are mixed at a 1:1 ratio, it will begin it’s curing and hardening process. You will have a limited amount of time to mold, adhere and design before it begins to thicken and harden, making it harder to shape and mold. Here is a step-by-step tutorial from Aves Studio on mixing Apoxie Sculpt:

  1. Wear disposable gloves to measure equal parts of A & B. Always retrieve parts A & B with different tools.
  2. Mix & knead together for 2 minutes until thoroughly combined and a uniform color is achieved. Note: incomplete mixing will give poor results. *Allow mixed product to rest up to 5 minutes for better handling.
  3. Apoxie® Sculpt is ready to use; working time is 1- 3 hours. Shape as desired. Smooth or texture with a wet finger, brush, Q-tip or sculpting tool. Self-hardens (NO BAKING); 24 hour full cure. 24 hr. full cure required for hard finishing purposes such as sanding, carving, drilling, machining, etc., without chipping, cracking or flaking.

One of the best surface to lay your designs on is a silicone mat. If you don’t have a silicone mat, a plastic sheet like a Ziplock bag will work. You want a pliable surface so that you can peal your piece off easily.

Make sure to check out Apoxie Color Chart blog post to see the many colors you can create.


Video: Product Feature and Tutorial


Additional Tools (Optional)

  • To keep your work surface clean, use a silicone mat.
  • Rubber fondant roller to roll out your clay
  • Cookie cutters
  • Silicone Molds
  • Mica Powder or Powder Pigments: add color to the surface of your clay.

Tips and Tricks

  • Wear gloves for easy cleanup.
  • If you are not wearing gloves, make sure to fully wash and clean hands and nails thoroughly.
  • Use a dab of Vaseline or olive oil, or a light spray of coconut oil on your gloved hands before mixing the clay. This will help to easier to mix the clay, lessen the stickiness on your fingers.
  • For cleanups, use Aves® Safety Solvent to clean up pigment/product residue. Put a drop of solvent on a paper towel for cleanups or on a Qtip for small detailed cleanups. Use solvent to also smooth clay or remove fingerprints.
  • Properly close unused containers to extend shelf life.
  • Put mixed Apoxie in the freezer to halt curing time.
  • Spray molds or rollers with coconut oil for easy


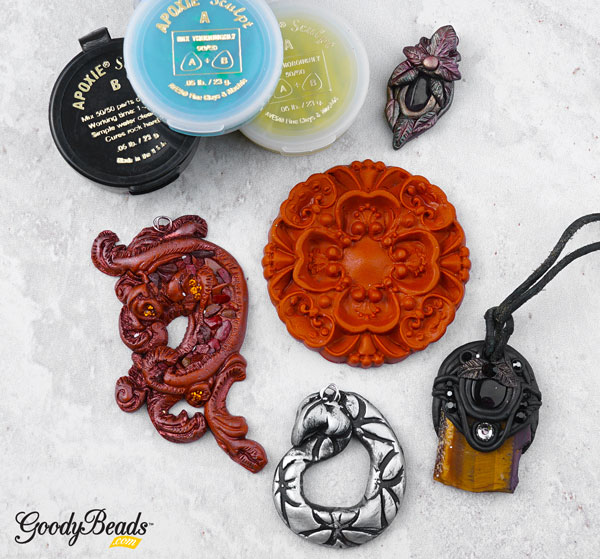
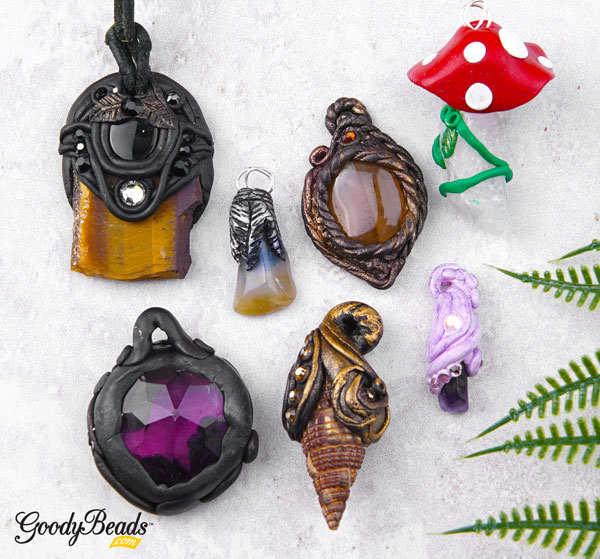
Apoxie Sculpt Samples

Here are samples of what you can make! Designs by Erin Gerlach.

GoodyBeads Blog - Apoxie Sculpt from Aves Studio Video Tutorial

GoodyBeads Blog - Apoxie Sculpt from Aves Studio Video Tutorial

GoodyBeads Blog - Apoxie Sculpt from Aves Studio Video Tutorial

How will you design with Apoxie Sculpt? We would love to see your creations!


Beadalon Knot-a-Bead Tool – Video Tutorial

Candie Cooper is back with Tory to show how easy it is to use the Beadalon Knot-A-Bead tool. Check out today’s video tutorial to knotting your own creating today!


GoodyBeads Blog | Beadalon Knot-a-Bead Tool Video Tutorial

Making knotted jewelry is a delicate skill that can be done with chain nose pliers, awl or tweezers. But with the Beadalon Knot-A-Bead tool, you can easily make quick and easy knots. Here is what you’ll need to get you started:


Video Tutorial


Instructions

  1. Make a loop with the end of your beading thread and make an over hand knot. This will create a loop for your necklace later.
  2. Slide on the silk cord, all the beads you’ll be knotting. It is helpful to layout your design ahead of time to determine your sequence.
  3. Slide a bead down to your first knot. Take thread and wrap it over the metal dowel/awl, and then under.
  4. Tie a knot and pull the silk cord upwards to cinch the knot together.
  5. Take the beaded portion and push it to the back to get it out of the way.
  6. Slide knot over to the right and hook thread under the yoke and pulling downwards and across to tighten the knot. There is a button lever on the left side. Push that to release the knot and thread.
  7. Slide over next bead and repeat.
  8. Once you’ve made a knot in between all your beads, repeat step 1 to other end of knotted beads to create a loop.
  9. Cut excess thread.
  10. Open a jump ring, slide through beading thread loop and a 6″-8″ chain end. Close jump ring.
  11. Repeat steps 10 to other end of knotted beads.
  12. Add your clasp to one end of your chain piece with a jump ring and your necklace is complete!


Along with the Beadalon Knot-a-Bead, you will get instructions on how to easily use the tool:

Beadalon Knot a Bead Tool Instructions


Easy Sizzix Cuff Bracelet – Video Tutorial

Continuing from our Vintaj painted on Sizzix Leather blog/video, learn how to take your painted leather and make an easy cuff bracelet using Sizzix Cuff Dies and TierraCast buttons.


GoodyBeads Blog: Patina Leather and Sizzix Cuff Video Tutorial

Candie Copper is Back! She has tips and tricks for making a super simple leather cuff bracelet using the Cuff Dies and Button Hole Dies.


What you’ll need to make your cuff:


Video Tutorial


GoodyBeads Sizzix Leather with Vintaj Patina Cuff Tutorial


Stretch Bracelets & the Tricky Ricky Knot

We have Ricky from DakotaStones to teach us how to make a Tricky Ricky Knot in this video tutorial. Make fun stretch bracelets using this knot for tying your elastics!


A few products and tools to get your started in making your own stretch bracelets:


Video Tutorial


Now that you have watched the video and found the perfect knot to making your stretch bracelet, you are sure to make an arm full of stretchy bracelets! A few important notes to keep in mind when making your knots:

  • Start with a 2.5′ elastic
  • Pre-stretch your elastic before stringing.
  • Cut one end of your Big Eye Needle to be able to easily slide your needle off the elastic. You can re-use needle for more stretch bracelets.
  • Optional: you can add a drop of glue to add strength to your knot.
  • A visual illustration of tying the elastic:

Screen Shot 2019-07-24 at 2.10.51 PM


DakotaStones Guru Beads with Tutorial

A trendy fashion statement piece for your wardrobe are Mala necklaces. And a Mala necklace isn’t complete without a Guru bead. Watch this informative video on how to thread on your Guru beads from DakotaStones.


Mala necklaces are an easy statement necklace that you can make with your favorite gemstone, wood or lava beads, strung on simple Griffin silk cord with a knot knotted between each bead. Check out our previous blog on Tassel Jewelry, which also tackles the ever-popular Mala necklaces.

Mala is a strand of counting beads used in Hindu or Buddhist practice for praying or reciting a mantra to aid concentration during meditation. Depending on the type of chant, counts of strung beads may vary.there are no knots between beads in a Hindu or Buddhist mala. Often, there is even empty space on the strand, so that the beads can more easily be slipped as they are “counted”. It is said that with each count, people recite a mantra to bless the beads. The strand is also accompanied with a larger bead named the “Guru” bead and a tassel.


Here is a video from our friends at DakotaStones on how to thread on a Guru bead with Griffin Silk Cord.