Sizzix Rose Gold Earrings

Break out your style with this cute pair of earrings with Sizzix cut leather and a glass connector.


GoodyBeads Blog: Rose Gold Leather Earrings with Sizzix leather and glass faceted connectors.


What you’ll need for earrings:


Directions

  1. Cut your leather with the Sizzix Big Shot, using the 30mm circle die. Cut Two circles.
  2. Use the smallest hole setting on the Leather Hole Punch Pliers to punch a hole on your leather circles.
  3. Open jump ring and slide through the hole on your leather circle and through loop of glass connector. Close jump ring.
  4. Repeat Step 3 with other leather circle.
  5. Open ear wire loop and slide other end of the glass connector and close loop.
  6. Repeat Step 5 with other ear wire and glass connector.

Specific items used in Rose Gold earrings: SZ00014, Y005020, A021759 (2), TC02303


Leather & Gemstone DIY Keychain

Father’s Day is coming up and we have this easy DIY Keychain, made with large-hole gemstones and 1mm leather cord.

Try out this easy DIY keychain project you can simply make in minutes! What you’ll need for this project are the following:

GoodyBeads Blog | Father's Day DIY Keychain with Large-hole Gemstones and 1mm leather cord.

Directions

  • Cut a foot of 1mm leather cord.
  • Make sure jump ring is full closed. Feed one end of your leather cord through the jump ring. Center the jump ring on the leather cord.
  • With both leather cord ends, slide on three large-hole gemstone beads.
  • Make an overhand knot with the leather cord ends to sit closely below the gemstone beads.
  • Cut leather cords, leaving 1 to 2 inch tail.
  • Slide jump ring on to your key ring and you are done!

Specific items used in keychain sample: MCKR0001, Z007449, A022071, BGA8RDLH-8


Amethyst Fringe Earrings

Design these DIY earrings with Amethyst Czech Fire Polish beads and chain fringe.

Fringe is very much here to stay. We pulled these pretty pair from our February Birthstone trend, to give you easy directions to make a pair of your own.

GoodyBeads Blog Amethyst Fringe Tassel Earrings - FREE Tutorial

What you’ll need:

Directions

  1. Cut THREE pieces of chain at 2.5″ inches long, each. Make sure the amount of links are the same.
  2. Open eyepin loop and slide on the middle link of a chain you cut in Step 1. Close eyepin loop.
  3. Slide on the eyepin a 4mm Czech bead and make a simple loop.
  4. Open Czech dangle loop and slide through a side hole of flower spacer. Close loop.
  5. Repeat steps 2-4 TWO more times, adjacent to the previous Czech dangle.
  6. Open earwire loop, slide through the opposite hole of the middle Czech dangle and close loop.
  7. Repeat all steps for other earring.

Items used in earrings:  CH01194,  A021468A007659, A003336, TCZ0078


Lampwork Necklace Drop with Bead Aligners

Learn how to use and design with bead aligners in today’s DIY Lampwork Drop Necklace.


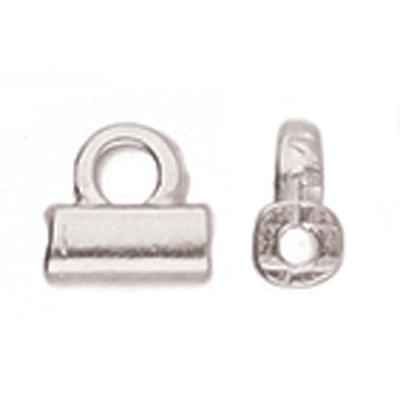
What stringing on beads on a beading wire or headpins, sometimes you’ll notice the extra wiggle room. That’s where bead aligners can help. Bead aligners helps centers, align and fills in the space inside the bead so that your overall strung on beads look straight and sturdy. Plus, bead aligns has a cap at the top to give your beads a finished look also.


Check out this Facebook Video with Tory explaining bead aligners and her quick DIY Project using bead aligners and Grace Lampwork beads. Bead aligner tutorial starts around 10min mark.


Check out these two projects using bead aligners.

GoodyBeads Blog| FREE Tutorial with Bead Aligners and Grace Lampwork Beads

Directions:

  1. On a headpin, slide on the following and make a wrapped or simple loop: bead aligner, large lampwork, bead aligner, small lampwork and bead aligner.
  2. Open small jump ring and slide on loop of lampwork dangle and a loop on silver connector. Close jump ring.
  3. Open another small jump ring and slide on other hole of silver connector. Close jump ring.
  4. Slide chain through jump ring and add your choice of clasp to your necklace ends.

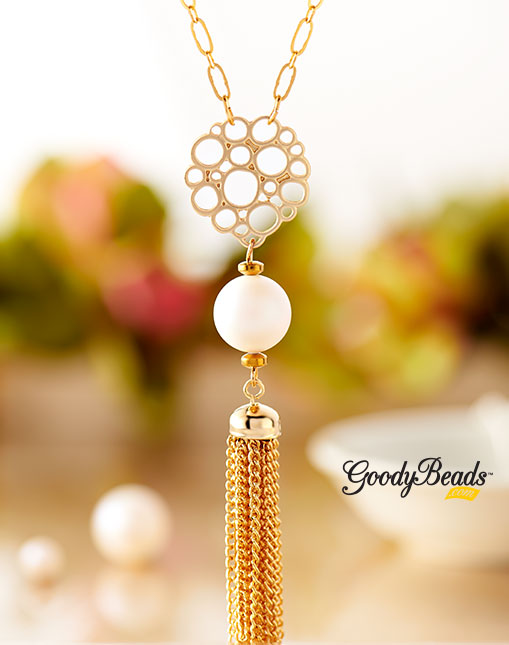
Items used in necklace: A019697, Z013932, Z013754, TC00357 (3), Z017184, CH01091 (2), TC02292 (2) and your choice of clasp.


GoodyBeads Blog| FREE Tutorial with Bead Aligners and Grace Lampwork Beads

Directions:

  1. On a headpin, slide on the following and make a wrapped or simple loop: bead aligner, large lampwork, bead aligner, small lampwork and bead aligner.
  2. Open small jump ring and slide on loop of lampwork dangle and a loop on gold connector. Close jump ring.
  3. Open another small jump ring and slide on other hole of gold connector. Close jump ring.
  4. Slide chain through jump ring and add your choice of clasp to your necklace ends.

Items used in necklace: A019696, TC00973 (3), TC02294 (2), Z013928Z013755, Z014009, CH01093 (2), and your choice of clasp.


Boho Pip Earrings with Gemstones

Channel your free spirited soul with these DIY Boho Pip Earrings with Gemstone beads.


Our focal piece to our DIY earrings are these magnificent chandelier earring findings! We went bold and added a pop blue Pip beads and an earthy brightness of Howlite Gemstones.


What you’ll need for earrings.


GoodyBeads Blog | FREE Tutorial Boho Chandelier Earrings with Pip Beads and Gemstones.

Directions:

  1. Open a jump ring and slide on a pip bead. Close jump ring. Repeat for a total of 12 ‘pip dangles.’
  2. On an eye pin, slide on a gemstone bead and make a simple loop. Repeat for a total of 12 ‘gemstone links.’
  3. Open a loop on one of the ‘gemstone links’ and slide on a ‘pip dangle’. Close loop. Repeat for a total of 10 ‘gemstone pip dangles.
  4. Open a jump ring, slide a pip dangle on and through the inner middle loop of chandelier finding. Close jump ring. Repeat to other chandelier finding.
  5. Open loop of a ‘gemstone pip dangle’ (from step 3). Slide loop through the third loop from the right of your chandelier bottom loops. Skip a loop and add another ‘gemstone pip dangle’. Repeat 3 more times. Repeat this step with other chandelier finding.
  6. Open a ‘gemstone link’ (from step 2) loop and slide onto the top loop of the chandelier. Close loop. Repeat this step with other chandelier finding.
  7. Open ear wire loop. and slide on top loop of gemstone link from Step 6. Close loop. Repeat this step with other chandelier finding.


Items used in earrings: WHT6RD-8, Z001892, A002413, A021158, A019606, TCZ0078


Acetate & Tassel Post Earrings

We have your summer project with trendy post earrings, designed with acetate and fan tassels! The summertime combo to DIY jewelry.


What you’ll need:


GoodyBead Blog | FREE Tutorial with DIY Post Earrings, Acetate Charms and Fan Tassels.

Post earrings are everywhere! So what better way to testing out DIY jewelry making than by making post earrings with an acetate focal.

Directions:

  1. Right across from hole of your acetate coin, add a small dot of Super New Glue.
  2. Place your post earrings over that dot, making sure the post is lined up with the hole of your acetate coin.
  3. Repeat Steps 1-2 with other acetate coin. Let dry for an hour.
  4. Open jump ring and slide through the hole of the acetate coin and fan tassel. Close jump ring.
  5. Repeat to other acetate coin.


Items used in earrings: Z007238, A002413, A014131, Z019335, A015821


Swarovski® Tangerine Jewelry Tutorials

We have three exciting projects using June’s Swarovski Psychology of Color: Tangerine. See how to freshen up your jewelry with these DIY projects!


Tangerine Cuff

GoodyBeads Blog | Free Tutorial - Beadable Cuff with 4mm Tangerine Bicone Swarovski Crystals and 8/0 round Miyuki seed beads.

See how easy it is to making your own sparkling bracelet with a beadable cuff and Swarovski bicone crystals.

What you’ll need:

SW_POC_TangerineProjects_CuffTut

Directions:

  1. Cut a 4 foot piece of beading thread.
  2. Add a Bead Stopper or sew through a small seed bead twice, leaving a 5 inch tail.
  3. Sew up through the the first hole and pick up a bicone crystal and seed bead.
  4. Sew across the channel to the hole opposite.
  5. Skip a hole and sew up through then next hole. Pick up a bicone crystal and seed bead.
  6. Sew across the channel to the hole opposite.
  7. Keep repeating these step sequence to add a total of 12 bicone crystals to cuff.
  8. Sew through the whole pattern again to secure the pattern.
  9. Tie off ends and cut off excess.


Tangerine Drop Earrings

GoodyBeads Blog | FREE Tutorial Earrings with Tangerine Swarovski crystals and silver findings.

Make this sweet tiered earrings with dangling crystals inside a Teardrop Hoop.

What you’ll need:


Directions:

  1. Slide a 8mm crystal on ball headpin and make a simple loop.
  2. Open eyepin loop, slide on loop from step 1 and close eyepin loop.
  3. Slide 6mm crystal on eyepin and make a simple loop.
  4. Open loop you just made and slide loop on inside loop of hoop component. Close loop.
  5. Open another eyepin loop and slide on top loop of hoop components. Close loop.
  6. Slide a 4mm crystal on eyepin and make a simple loop.
  7. Open loop you made from Step 6 and slide on earwire. Close loop.
  8. Repeat all steps for other earring.


Swarovski: Satsuma Suprise

GoodyBeads Blog| Swarovski Psychology of Color Tangerine

Our friends at Swarovski Create your Style, designed this colorful multi-strand bracelet.

What you’ll need:

Directions:

  1. Use alcohol wipes to clean all findings and set aside to dry.
  2. Using one jump ring attach to one ss39 chaton setting. Repeat five more times and set aside.
  3. Using one 1088 ss39 chaton stone glue into one ss39 chaton setting and set aside for 24 hours to dry. Repeat five more times and set aside.
  4. Using two and a half coils of memory wire, make a double loop at one end with Memory Wire Finishing Pliers.
  5. Slide on the following FOUR sections:
    1. TWO 4mm bicones, 6mm bicone, TWO 4mm bicones, Botanical bead, 4mm bicone, Tangerine chaton charm, Botanical bead, TWO 4mm bicones, 6mm bicone, TWO 4mm bicones , THREE metal seed beads,
    2. TWO 4mm bicones, 6mm bicone, TWO 4mm bicones, Botanical bead, 4mm bicone, Tangerine chaton charm, Botanical bead, TWO 4mm bicones, 6mm bicone, TWO 4mm bicones, THREE metal seed beads, Peach Delite chaton charm, THREE metal seed beads,
    3. TWO 4mm bicones, 6mm bicone, TWO 4mm bicones, Botanical bead, 4mm bicone, Botanical bead, TWO 4mm bicones, 6mm bicone, TWO 4mm bicones, THREE metal seed beads, Peach Delite chaton charm, THREE metal seed beads,
    4. TWO 4mm bicones, 6mm bicone, TWO 4mm bicones, Botanical bead, 4mm bicone, Botanical bead, TWO 4mm bicones, 6mm bicone, TWO 4mm bicones, THREE metal seed beads, TWO 4mm bicones, 6mm bicone, and TWO 4mm bicones.
  6. Trim the end of the wire and make a double loop at the end.
  7. Add one chaton setting at each end of the bracelet.


DIY Long Tassel Earrings

Designing DIY tassel earrings with Long Tassels and charming connecting pieces.


Our selection of long tassels are a statement itself when it comes to designing jewelry. Simply attach your tassel to an earring finding or use connecting pieces or charms to accent your designs.


What you’ll need:


Midnight Tassel Earrings

GoodyBeads Blog - Free Tutorial Long Tassel Earrings

Directions:

  1. Open jump ring and slide through tassel loop and one hole of silver connector. Close jump ring.
  2. Open Ear wire loop and slide other hole silver connector. Close loop.
  3. Repeat all steps for other earring.

Items used in earrings: Z013860, TC00201 (2), TCZ0077, Z004093


Wine Diamond Earrings

GoodyBeads Blog - Free Tutorial Long Tassel Earrings

Directions:

  1. Open oval jump ring and slide through bottom, middle portion of the diamond and through tassel loop. Close jump ring.
  2. Open another jump ring, slide through top middle portion of the diamond and close jump ring.
  3. Open round jump ring and slide through previous oval jump ring and through ear wire loop. Close jump ring.
  4. Repeat all steps for other earring.

Items used in earrings: TC02296, Z004093, A008799, Z013859, Z003213 (2)


Blue Lotus Earrings

GoodyBeads Blog - Free Tutorial Long Tassel Earrings

Directions:

  1. Open 5mm jump ring, slide through tassel loop and bottom loop of lotus charm. Close jump ring.
  2. Open 4mm jump ring and slide through top petal of lotus charm. Close jump ring.
  3. Open another 4mm jump ring and slide through previous 4mm jump ring and ear wire loop. Close jump ring.
  4. Repeat all steps for other earring.

Items used in earrings: Z013826, TC02442 (2), A002413, Z004093, Z001008


DIY Beadable Gifts

DIY Beadable Gifts are personal and easy to make. Here are three examples for a quick and easy gift idea for teachers, fathers and even for birthdays.


DIY Beadable Gifts are easy as 1-2-3.  After you’ve selected the Beadable Gift you want and large-hole Beads, Interchange beads or Large-Hole Gemstones, all you need to do is uncap your beadable, slide beads onto the mandrel and cap your end. Easy as that!


Nov18_NewBeadableGift02

Golf Club Stir Stick: Z005775, X004108 (2), BGA8RLLH-M-8 OR BGA8RDLH-8

Butter Knife: Z005786, Z006331 (2), A005426, Z006747 (2)

Cheese Slicer: Z005784, A004241, A001180, Z007050 (Make sure to ream the middle of this Flower Tube bead to fit mandrel.)


Pearly Gold Necklace with Swarovski® Pearl

Any outdoor music festivals for you this summer? Make sure to pack your flashy jewelry like this sassy gold necklace, made with Swarovski Pearl and chain tassel.


GoodyBeads Blog: Pearly Gold Necklace with Swarovski Pearl FREE DIY Tutorial

This cute necklace is a stunning piece for an outdoor music festival, summery date night or even a girl’s vacation getaway.

What you’ll need:


Directions

  1. Open eyepin loop and slide on chain tassel. Close loop.
  2. Slide a hematite bead, pearl and another hematite bead on the eyepin and make a simple loop.
  3. Open pearl dangle loop and slide through a hole on the Bubbles Connector. (See image for location)
  4. Open a jump ring and slide through one chain end and through a hole opposite from pearl dangle. Close jump ring. (See image for location).
  5. Open another jump ring and slide through other chain end and through a hole next to the one in Step 4. (See image for location).
  6. Optional: You can add a clasp to your necklace by cutting chain in half and adding your lobster or toggle clasp.


Summertime Acetate and Straw Earrings

Don’t start summer without this pair of DIY summertime earrings with acetate and straw!


Summer is about lounging in the sun and sipping on yummy ice tea. Take a few minutes to make this pair of lightweight earrings with acetate and straw components. All you need are a pair of pliers and know how to open and close a jump ring. An easy DIY project without a hiccup to your summer!


GoodyBeads Blog: Summertime Acetate and Straw Earrings with FREE Tutorial.

What you’ll need:


Directions

  1. Using an awl, bead reamer or a solid point like your round nose, pole a hole in between the outer two rings. This will be where you will add your jump ring.
  2. Open jump ring and slide through hole you make in Step 1 and through the hole of your acetate ring. Close jump ring.
  3. Take your flat nose pliers and grasp the loop of your earwire. Twist and turn your loop 90 degrees.
  4. Open two jump rings and slide through your earwire loop and acetate ring.
  5. Repeat all steps for other earring.


Czech Chevron Tassel Earrings – Pattern Tutorial

New easy earrings pattern using two-hole Czech Chevron beads. Get your free tutorial today.


We love love love these Czech Chevron shapes. They are a trendy geometric shape and this pair of earrings go perfectly with everything you wear.

Items you’ll need:

Items used in Earrings: TCZ0139, A011519, Z010318, Z010298, SB00107, Z013767, A006587, A015211

GoodyBeads Blog Czech Chevron Two-Hole Tassel Earrings with FREE Pattern Tutorial


Flat Memory Wire and Gemstone Bracelet – Video Tutorial

Candie Cooper came by the GoodyBeads Mezzanine to show us how to make an easy DIY wrap bracelet with flat memory wire and gemstone beads. Watch the video today!


GoodyBeads Blog: Flat Memory Wire and Gemstone Bracelet Video Tutorial

After the Spring Twin Cities Bead Bazaar, Candie stopped by to demonstrate how to make a classy and chic bracelet using 4mm faceted coin gemstone beads, wire wrapped around flat memory wire.


What you’ll need:


Video Tutorial


Bead Stitched Bracelets with Cymbal Soros – Pattern Tutorial

One the newest additions to GoodyBeads is the Cymbal Components. Here are three projects, with patterns; using the Cymbal Soros.


Z012249_1Z012250_1

Cymbal Components are bead endings, bead substitutes and side beads that give your bead stitched patterns a cleaner, finished ending. The Cymbal Soros Bead Ending, in Silver and Gold, is noted to use with Miyuki Tilas and 1/2 Tilas. But the wonderful thing about using the Soros is how versatile this bead ending is. In these three bracelets, you will notice how similar the bead stitching patterns/sequence. One pattern will show how to incorporate Tilas and 1/2 Tilas, while the other two mixes up different beads like SuperDuos, Tilas, seed beads and even two-hole Swarovski Spike Beads.


Playful Tila Bracelet

GoodyBeads Blog: Playful Tila Bracelet with Cymbal Components and Miyuki Tila Beads, Pattern Tutorial

What you’ll need for this bracelet:

Items used in bracelet below: SB00870, SB01934, Z012249, A006588, A015211, A011535, Z011500, X003062


Tila Stripe Bracelet

GoodyBeads Blog: Tila Stripe Bracelet with Cymbal Components and Miyuki Tila. FREE Tutorial

What you’ll need for this bracelet:

Items used in bracelet:SB00870, SB01406, SB00107, SB00402, Z012250A006588, Z007861, Z011522A015211


Elegant Spike Bracelet

GoodyBeads Blog: Elegant Spike Bracelet with Cymbal Components and Swarovski two-hole Spike Crystal Beads, Pattern tutorial

What you’ll need for this bracelet:

Items used in bracelet: SB01406SB00107SB00423A006588Z012250A015211, SW01715 (23), Z007861, Z001925


Deertan Lace and Gemstone Necklace – Tutorial

Create and design this urban necklace using one of our newest products: Deertan Lace leather.


Softer than Calf Craft, yet incredibly strong, Deertan Lace is expertly cut from only the finest hides. Deertan lace is full grain leather cut from the top 5 percent of hand selected Italian calf hides. Each hide is specially treated to be water resistant. Great for all your jewelry and beading projects or for garment lacing. Deertan Lace is the softest leather lace around. This product comes from our friends at Leather Cord USA, always producing high-quality leather for DIY jewelry and crafts.


Deertan Lace and Gemstone Necklace

An easy jewelry project using Deertan lace is this simple DIY necklace. We’ve paired this necklace using 3mm Deertan Lace with Dakota Stones large-hole gemstones, Beadalon Quick Links and TierraCast beads and components.

GoodyBeads Blog: DIY Necklace tutorial with Deertan Leather Lace and Large-hole gemstones.


Directions:

  1. Cut a 3 feet piece of deertan lace.
  2. Fold lace in half and make a lark’s head to both the 20mm and 25mm ring.
  3. Slide on flat barrel bead through both lace pieces from Step 2.
  4. Make an overhand knot at the ends of the deertan lace. Adjust knot to get desired length.
  5. Cut two piece of lace at 10 inches. And one piece at 12 inches.
  6. With a 10″ lace, fold in half and make a lark’s head knot on the 25mm ring link. Repeat with the 12″ next and then the 10″. Bunch them together.
  7. On a lace fringe end, slide on a nugget bead, large-hole gemstone and another nugget bead. Make an overhand knot. Repeat to the other 5 lace fringe ends.
    Note: To assist in sliding on beads and gemstones, make an angled cut to leather ends.

Items used in necklace: Z015547, ATQ8RDLH-8, TC01492 (12), Z010360, Z010362TC01750