Easy Sizzix Cuff Bracelet – Video Tutorial

Continuing from our Vintaj painted on Sizzix Leather blog/video, learn how to take your painted leather and make an easy cuff bracelet using Sizzix Cuff Dies and TierraCast buttons.


GoodyBeads Blog: Patina Leather and Sizzix Cuff Video Tutorial

Candie Copper is Back! She has tips and tricks for making a super simple leather cuff bracelet using the Cuff Dies and Button Hole Dies.


What you’ll need to make your cuff:


Video Tutorial


GoodyBeads Sizzix Leather with Vintaj Patina Cuff Tutorial


4mm Faceted Coin Gemstone Beads

New to GoodyBeads are these luxurious 4mm Faceted Coin Gemstone Beads from DakotaStones. Get an up close look at the facets! Plus, two projects using these shimmering faceted gemstones!


4mm-coin-close-up2

Each bead is diamond cut with a “checkerboard” pattern. With an up close look, ‘the puffed edge leads to a checkerboard faceted face. That’s a lot of surface to catch and move light in a multitude of directions.’


Bracelets with 4mm Faceted Coin Gemstones

4mmFacetedGems_image2

Who doesn’t love blue! Especially these Amazonite strand! We kept the simplicity of this bracelet by using Soft Flex Beading Wire and sliding on a gemstone and 11/0 Miyuki seed bead sequence. We made a sequence up to 7″ and used clamshell bead tips for the ends. Added a clasp and an inch of chain for an extender. (Adjust amount of beads to customize bracelet size.)

Items used in bracelet: AMZ4DC-F, FTBW0001, SB00422, CH00515, Z010740, A004830, Z005838


4mmFacetedGems_image1

We kept this bracelet as simple as we can. We use three different gemstones: Amazonite, Amethyst, and Crystal Quartz all onto a .7mm beading chain. We first cut a 7″. At one end, we used a clamshell bead tip. Then we slid onto the beading chain a 2mm crimp tube, three gemstones and another crimp tube. Position the beads to the middle of the chain and using the Magical Crimping Pliers, crimp the crimp tubes on both sides of the gemstones. Cap the other end of the beading chain with another clamshell bead tip. Add your clasp and chain and you have a dainty gem bracelet!

Items used in this bracelet: CH00724CH00515Z010740A004830, Z005838, AME4DC-FAMZ4DC-F, CRY4DC-F


How to Use Clamshell Bead Tips

Clamshell Bead Tips can be the perfect way to finish the ends of your stringing materials like chain, flex wire or beading thread. Here are two ways on how to use clamshell bead tips.


These versatile clamshell bead tips can be used with all types of stringing materials. You can use it to finish off Nylon Silk Cord, Chain, Soft Flex Beading Wire and more. There are two types of bead tips we carry.

Clamshell01

One opens and closes from the side like a book. And the other opens and closes at the base with a hole in between.


The process of how to use the clamshell bead tips are as followed:

1st Clamshell Bead Tip

Clam-Shell-Silk-Cord-End-Tutorial

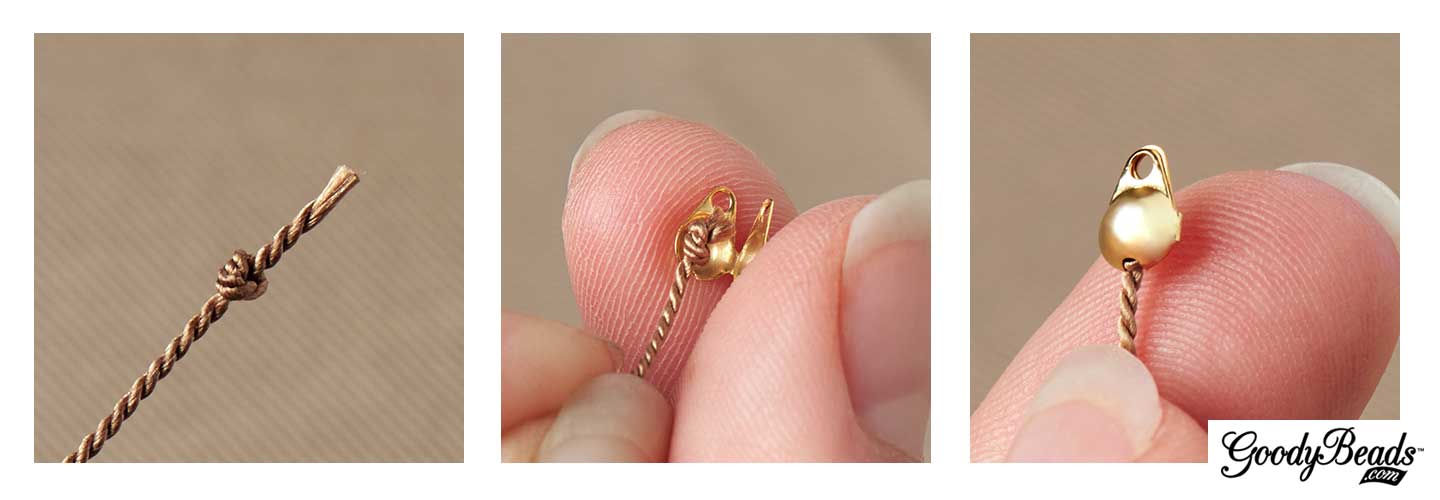
This clamshell will fold like a book. We have used here, Nylon silk cord. You will make a knot at the end of your thread and cut off the excess end. Cup the knot by sliding the bead tip to surround the knot. Bring both sides of the bead tip together by squeezing your finger together. You can also use a plier to gently close and enclose the knot within the bead tip.

You can find these bead tips in Silver, Gold, Antique Silver and Brass.

Plus, this clamshell bead tip has a loop at the top, which makes it easy to use a jump ring to attach your clasp, chain, etc.


2nd Clamshell Bead Tip

23


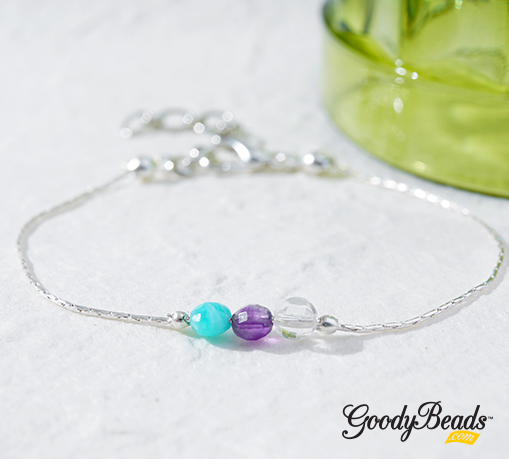
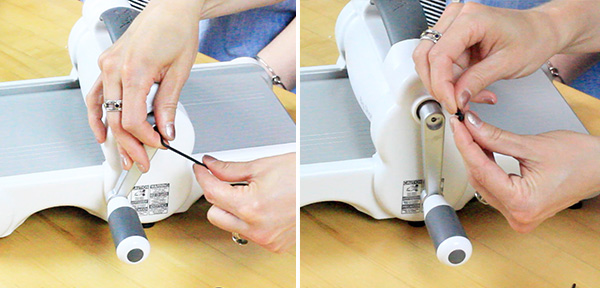
This clamshell (Z010740) folds upwards and has a hole in the middle of the hinge/folded part. We are using Soft Flex Beading Wire and a crimp tube with this clamshell bead tip. Slide end of flex wire through hole. Slide a 1mm or 2mm crimp tube on beading wire and flatten it with a flat nose pliers. Slide crimped tube inside the clamshell and close. This tutorial works well with .7mm beading chain (CH00724). 


This clamshell bead tip has an open loop, where you can slide on your clasp, chain, etc without the use of a jump ring. All you do is slide your clasp through and use a flat nose pliers to close the loop.

clamshellbeadtip_clasp

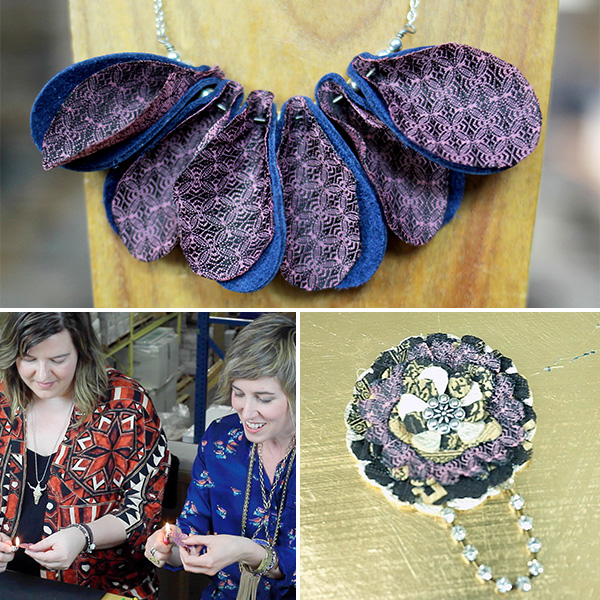
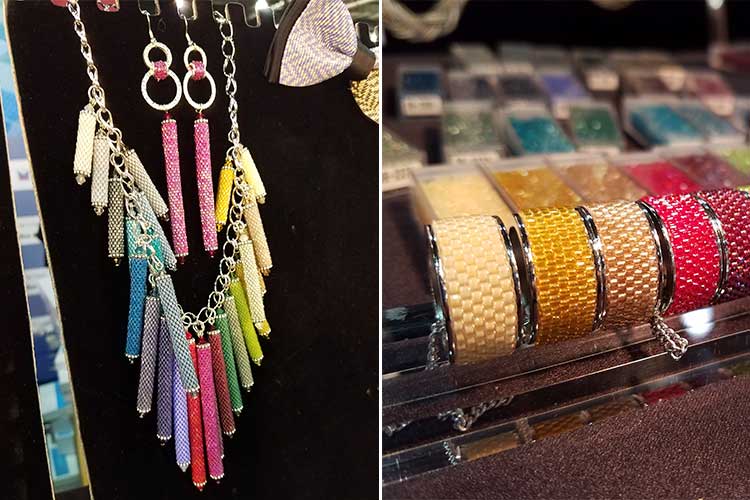
Here are samples of jewelry using this clamshell bead tip.


Memory Wire Leather Bracelets – Video Tutorial

Tory and Candie Cooper are back in this video to demonstrate how to make simple bracelets using memory wire, leather, end caps and beads!Making bracelets with memory wire is one of the easiest way to make jewelry! Make sure to stop over to our Memory Wire Hot Category page to shop for memory wire, end caps, tools and leather with an inner hole that can be used with memory wire. Don’t forget to get some of our favorite beads to accompany your leather memory wire bracelet like glass beads, gemstones, TierraCast beads, Swarovski crystals and more.

Because memory wire comes pre-coiled, it will sustain and keep its shape. We personally like the Beadalon® Heavy Duty Memory Wire (WR00120/WR00121), which Tory and Candie use in the video. And most importantly, having the correct tools will help create your bracelets: Memory Wire Shears and Memory Wire Finishing Pliers

These pliers will help with looping the memory wire because wire itself is a thick and sturdy wire.

Video Tutorial

https://www.youtube.com/embed/YmVVh5O5yLI

Bracelet Examples

VideoMemoryWire_01

Here are different variations of bracelets we’ve made using a combination of gemstones, metal beads, spacers, Czech beads, Swarovski crystals and more.

You can find other ways we’ve used memory wire in other blog posts: 

How do you design your memory bracelets? We would love to know!


Sizzix Edition: Sizzix Recycled Tie Flowers

Tory and Candie Cooper are back with another inspiring video, recycling ties into fiber jewelry using the Sizzix Big Shot. Don’t miss out on this trendy DIY.


GoodyBeads | Blog: Sizzix UpCycle Ties to Make Fiber Jewelry


Layering Sizzix leather and old ties, create trendy fiber jewelry for any casual outfit! How will you use the Sizzix Big Shot Machine.


ImpressArt Texture Stamper Hammer – Video Tutorial

Add texture to your metal stamping jewelry with this Texture Stamper Hammer from ImpressArt. Watch this vendor video and see how simple you can add dimension to your designs!


A perk to ordering the Texture Stamper Hammer (TL00266) is that it comes with the Sprinkle Design Stamp, so you can start using this tool right away when you get it. Plus, with the twist of the handle knob, you can easily switch out different stamps for different designs! The Texture Stamper Hammer is the perfect tool for all skill levels.  So start stamping right away!


Hammer Video Tutorial

Hammer Tool: TL00266


Sizzix Edition: Leather Cuff Bracelet

Candie Cooper is back again with Tory for an easy project using the Sizzix Big Shot.

Make sure to check out how to Unbox your Sizzix Big Shot in our previous blog post.

GoodyBeads Sizzix Cuff Bracelet

An easy-to-wear piece of jewelry are cuff bracelets. We have this easy tutorial that will take less than 5 minutes to make and ready to wear. What you will need for this project are:


Video Tutorial

Items used in cuff example: Z020292, SZ00015, SZ00034, A015821


Sizzix Edition: Leatherette Earrings

Make trendy and fashionable leather earrings using the Sizzix Big Shot and the Teardrop Dies (SZ00025). Watch this video tutorial as Tory and Candie Cooper show you how easy it is to create some earring for yourself!

Check out our previous blog where you can learn how to Set Up your Sizzix Big Shot and even learn to make DIY Tassels. Theres a ton of ideas we can’t wait to show you!


GoodyBeads | Sizzix Leatherette Earrings

Today, Tory and Candie demonstrate how to make these Leatherette Earrings using the Teardrop Dies and Leather Punch Tool.


Here are leather and chain components that was used in this video tutorial: SZ00002, SZ00003, CH00659.

Hope you have fun making some earrings.  Add your choice of jump rings and earring findings to finish off your earrings. Or make them into a focal necklace pendant. So many possibilities!


Sizzix: Fringe Tassel Earrings & Necklace

Candie Cooper and Tory are back with two easy projects using the Sizzix Big Shot. Watch as they make a DIY tassel necklace and fringe earrings.

The Sizzix Big Shot (SZ00049) is a versatile machine for creating fun leather or fabric jewelry. To get started, watch how to setup your machine in our previous post and shop for Sizzix dies, leather and more!


Plus, for this video tutorial, Candie and Tory use Tassel Die (SZ00026) to roll a tassel and the Tag & Fringe Die (SZ00042) to make fringe earrings. Make sure to get them today!


Necklace components used: TC01831/TC01832CH00658A002814

Earring components used: A012441TCZ0077


Can we say we are excited to get these tassel and fringe dies in. Here are some examples we saw in Tuscon last Gem Show in January 2018 at the Sizzix booth. We adore all the fun ways to use the Sizzix machine and their multiple Dies!

TucsonSizzix_images


2018 B&B Show: Swarovski Demos with So Vang

We were fortunate to do two demos at the Swarovski Create Your Style booth during Bead & Button. So Vang demos making beadable cuffs and rings using Swarovski two-hole spike crystal beads and creating hoop to dangle Swarovski Majestic Blue pendants with Beadalon Memory Wire. Check out our facebook videos and components to inspire your next creation.

Crystal Spike Cuff & Ring

If you’ve done fabric sewing and done a ladder stitch to close openings, this technique would be easy for you. Below is a illustrated look at what a ladder stitch looks like from this external website we found. So every time you come up, that’s when you will sew through your bead hole before sewing across and down.

ladder-stitch-diagram1

One of our popular demos was bead stitching Swarovski two-hole spike beads on Beadable Accessories like the cuff and rings. Download our components list HERE for this demo and watch our facebook video of how So Vang ladder stitches the spike beads on beadable rings and cuffs.

Cuff components: Z001859, A006585, SW01714 (6), A015211

Ring components: Z001454,A006585,SW01714 (3), A015211


Majestic Blue Drop Earrings with Memory Wire

Make simple drop earrings using Memory Wire and a few tools. Watch as So shows you how easy it is to create hoops and dangle crystal pendants off it. Download the pdf file HERE to get components and tools used for this super easy demo!

Tools: TLZ0207, TL00206, TL00236

Gold Majestic Blue Drop Earrings: WR00126, A019615, SW01725 (2), TCZ0140

Silver Majestic Blue Drop Earrings: WR00127, A001528, TCZ0078, SW01747


Beadable Findings: Fancy Fanned Earrings

One of our popular project request is our beadable fan earrings with 11/0 Miyuki Delicas and long tassels. Check our video to see how easy they are made.


Components used:

  1. Beadable Fan: Z001471 (2)
  2. Delicas: SB03543, SB02334, SB00269
  3. Pearl: SW00736 (2)
  4. Tassel: Z013818
  5. Findings: A002413, TCZ0078
  6. Beading Tools: A006587, A015211


Tutorial:

  1. Starting with 2.5′ to 3′ of beading thread, attach a stopper bead leaving a 6″ tail end.
  2. Start from one end of the fan, come up through the bottom hole.
  3. Add your three delicas and go across the beadable opening and down the hole.
  4. Sew up the next hole, add your three delicas, go across the beadable opening and down the hole.
  5. Repeat this until you’ve gone across the beadable fan pendant.
  6. You will now add your pearl bead by sewing up the hole closest to the round opening, add your pearl bead and go across the circle opening and down the hole.
  7. Sew through the pearl bead again and up the hole, through the pearl again and down the hole.
  8. Tie off your ends and cut excess off.
  9. Open small jump ring and slide on tassel and through the middle hole of your fan pendant. Close jump ring.
  10. Open earwire loop and attached top fan pendant loop to earwire. Close loop.
  11. Repeat all steps for other earring.


Sizzix Edition: Unbox & Setup Your Machine

Sizzix is new to GoodyBeads and we could not wait to show you videos of Candie Cooper and Tory using Sizzix to customize and design jewelry. Today, we have Tory and Candie demonstrating how to setup the Sizzix Big Shot Jewelry Studio Machine (SZ00049).


You’ll be so excited to just get it out of the box! Order the Sizziz Big Shot Jewelry Studio Machine today and see how easy it is to setup your machine. Plus, Candie will run through what is included in your machine, the platforms and their uses.


Once you have your machine ready to go, you are ready to cut out leather or fabric and make easy dangle earrings, tassels, pendants and so much more!


Sizzix Edition Video Tutorials:


2018 Bead & Button Show: Recap

Tory Vezina and So Vang just got back from the Bead & Button Show in Milwaukee this past weekend. Here are some photos to recap what happened!


BB_01

Caught up with some of our vendors.

BB_03

BB_02

Took a stroll to TierraCast to see what was brewing! Their recent launches of Botanical Birds and Caravan were stunning! Plus, their NEW Worlds Away collection has versatile hoop components and charms you just want to run away with, literally.

BB_04

The Swarovski Create Your Style booth had prize drawings for these show stopping piece. So Vang would’ve love the bag and Tory Vezina was eyeing the necklace.

BB_07

So Vang did two demos at the Swarovski Create Your Style booth using Swarovski two-hole spike beads with beadable cuffs and rings AND hoop links using Beadalon Memory Wire. You can see her demos on the Facebook page. Plus, Sara from Soft Flex Company was there while So was doing her first demo and we caught up with her and her demo.

BB_05

So Vang found some inspiring peyote stitch tubes at the Miyuki booth.

BB_08

Tory Vezina hung out with the ladies participating in Candie Cooper’s Coffee with Candie event on Saturday. Her Make & Take class was this a simple wrap bracelet with leather from LeatherCordUSA, memory wire from Beadalon and gemstones from Dakota Stones.

BB_06

And we assisted Candie Cooper with her Make & Take on the showroom floor, creating this leather and gemstone bracelet.


Thank you everyone who sponsored our demos and Make & Takes. We had so much fun and can’t wait to do it again!


Artistic Wire® Crimp Tool For Large Wire Crimp Connectors

Watch as Wyatt White from Artistic Wire teaches how to make a cold connection with the Artistic Wire Crimp Tool for Large Wire Crimp Connector and examples of different ways you can create cold connection bracelets/bangles.

Cold connect large gauges of wire to making bracelets/bangles by crimping Large Wire Crimp Connectors with Artistic Wire Crimp Tool (TL00310).

Before we get started on the video, here are few important products you will need:


Large Wire Crimp Connectors

These crimps are specially designed for making cold connections with 12, 14, and 16 gauge wires. There are three sizes of crimps with three finishes to choose from.

The 1.5 mm large crimps are used with 16 Gauge wires – Z009603, Z009606, Z009609

The 2.0 mm large crimps are used with 14 Gauge wires – Z009604, Z009607, Z009610

And the 2.2 mm large crimps are used with 12 Gauge wires – Z009605, Z009608, Z009611

Or you can purchase the variety set – Z009600, Z009601, Z009602


Wire

Using size 12, 14 and 16 are thicker gauge wires, best to use for these crimp connectors.


Crimp Tool

Artistic Wire Crimp Tool for Large Wire Crimp Connectors TL00310 is a heavier duty tool to crimp larger widths of crimp tubes and for larger gauges of wire. Compared to the original crimpers that has two notches: one to curve the crimp tube and the other to fold it, the Artistic Wire Crimp Tool has only one notch that makes an indent notch to squeeze the crimp tube onto the wire.


Video Tutorial


BeadSmith® Magical Crimping Pliers – Video Tutorial

Watch as BeadSmith demonstrates how the Magical Crimping Pliers (TL00288) is used. The end result is MAGICAL!

We love how easy it is to use the Magical Crimping Pliers and how the tool cinches the outer parts of the crimp tube, thus creating what looks like a small 2mm bead. Pick this tool up today! It’ll be your new favorite tool!
What you’ll need for this video tutorial: