Dakota Stones Microfacet Gemstones & DIY Memory Wire Bracelet with Cellini Spiral Pattern

Our large selection of micro facet gemstones, from our friends at Dakota Stones, are small diamond cut gemstones expertly cut into rounds, rondelles, bicones, cubes and coins. Learn about how these gemstones are cut and get designing with micro facet gemstones in a Cellini Spiral and adding it to a fun memory wire wrap bracelet.

Micro Faceted Gemstones

Dakota Stones’ faceted gemstones ‘are machine cut with industrial-grade diamonds. With the use of new technology, geometry and an understanding of light, which is extremely important for precious stones with strong dispersion, [Dakota Stones] can now make the facets on each stone cleaner, sharper, and more consistent with minimal or no need for polishing. This means…manufacturing mathematically precise cuts on extremely small surfaces while getting the same luster and shine as we would see on large surfaces.’

Now let’s get to designing with small faceted gemstones!

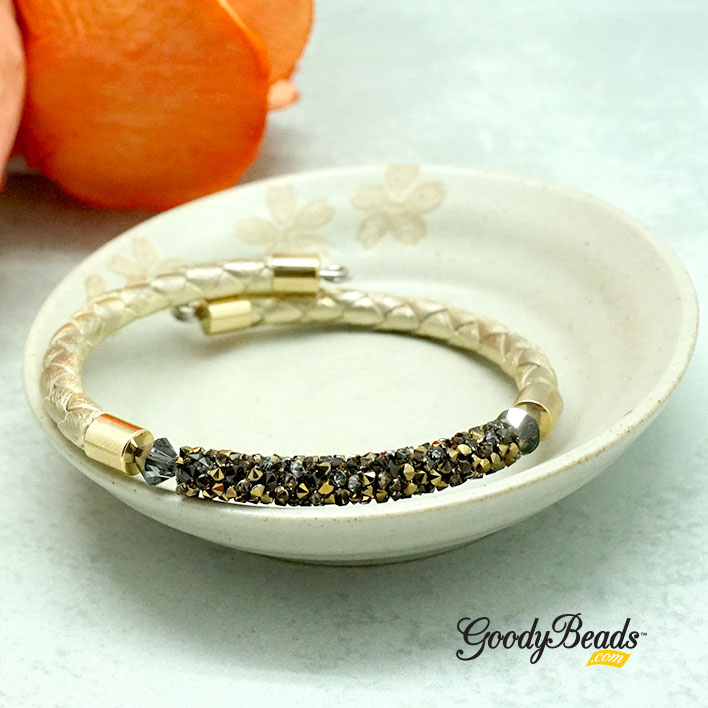
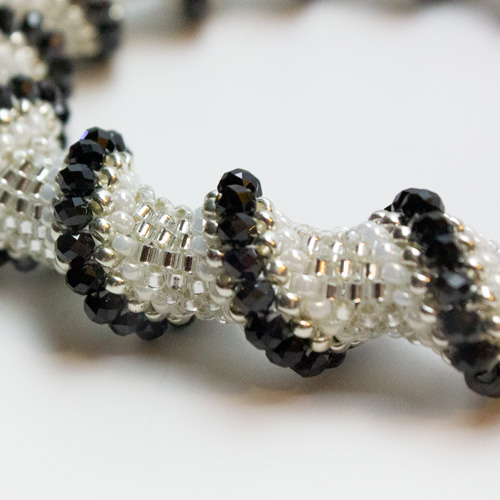
Black Spinel Cellini Spiral Memory Wire Bracelet

The basic design for the cellini spiral is using a 11/0 delica, 11/0 round Miyuki seed bead and 8/0 Miyuki seed bead. In this case, we’re subbing the 8/0 with some gorgeous 4mm rondelle Black Spinel gemstone bead.

Items used in Cellini Spiral pattern:

  • BSP4RL-F – 4mm Black Spinel Diamond Faceted Rondelle Beads
  • SB00145 – DB041 11/0 Transp. Silver Lined Crystal Delica Seed Beads
  • SB00416 – 11-9591 Pearl Ceylon Miyuki Seed Beads
  • SB00422 – 11-91051 Galvanized Silver Miyuki Seed Beads
  • A006587 – Crystal Fireline Thread 50 Yard Spool (6LB TEST)
  • A006767 – #10 Long English Beading Needles – 4 Pack

Items to complete memory wire bracelet:

  • WR00120 – Large Silver Heavy Duty Bracelet Memory Wire
  • A003566 – 10mm Silver Plated Bali Style Spacer
  • CH01105 (6) – 5mm Round Metallic Platinum Leather
  • Z006368 – 5mm Silver Brass Cord End Cap – 4 Pack
  • ONX10RD-8 – 10mm Onyx Gemstone Round Beads

Directions:

  1. Start with 4-5 feet of beading thread. (This is a starting piece, you’ll need to add more to complete the spiral.) Sew on 6 delica beads, 2 pearl beads, 2 silver beads, 2 black spinel beads, 2 silver beads and 2 pearl beads.

2. Tie threads together to create a loop of beads. Tie two knots, making sure to leave a 5-6 inch tail end. Sew through loop once around.

3. You are going to peyote stitch around the looped beads:
– Pick up a delica bead skip a delica on the loop beads, sew through next delica.
– Pick up another delica, skip a delica and sew through next delica.
– Pick up a delica skip first pearl seed bead and sew through next pearl seed bead.
– Pick up a pearl seed bead, skip silver bead and sew through next silver bead.
– Pick up a silver bead, skip first black spinel and sew through next black spinel.
– Pick up a black spinel, skip first silver bead and sew through next silver bead.
– Pick up a silver bead skip first pearl seed bead and sew through next peal seed bead.
– Pick up a pearl bead, skip first delica, sew through next delica and up through the next delica to start the next row.

NOTE: As a helpful tip while you sew around your spiral, when you are picking up a bead, you are picking up the bead corresponding to the bead you just sewn out of. So if you sewed out of a silver seed bead, you should pick up a silver seed bead in your pattern.

4. Repeat step 3 for the next row. By this time, your spiral will start to take shape. Use a 5mm wide dowel to help guide your bead in a spiral shape.

5. Repeat step 3 until you’ve used up all your Black Spinel beads.

NOTE: Between your spiral, you’ll run out of beading thread. To add more, sew your ends through your spiral, looping around a couple of beads before cutting off excess. Add another 4-5 feet of beading thread to your needle, loop around some beads of your spiral before guiding your needle back through the path of where you’ve left off to continue your spiral pattern.

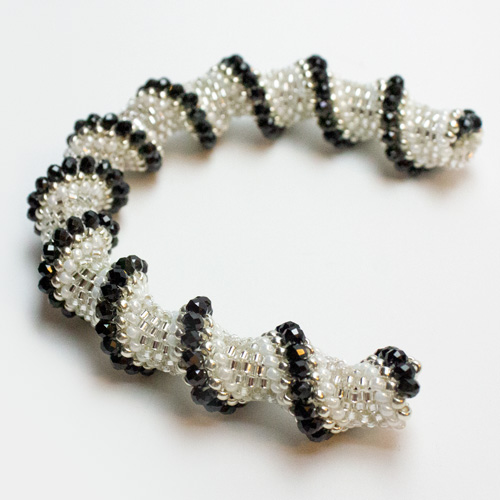
6. Your Cellini spiral is done.

7. To make your memory wire bracelet, make a simple loop to one end of your memory wire with Memory Wire Finishing Pliers.

8. Slide on an onyx bead, spacer, 3 onyx beads, spacer and another onyx bead. Slide end cap and 3 inches of leather and end cap. Slide on Cellini spiral, onyx bead, spacer, 3 onyx beads, spacer and another onyx bead. Slide on another end cap, 3 inches of leather and end cap.

9. Cut excess memory wire with Memory Wire Cutters, leaving about 1/4 to 1/2 inches. Make a simple loop with this end.


February: DIY Project A Day

We’re kicking off the new year with another month of DIY Project a day. For the entire month of February, every day we will give you a DIY project. We will have everything from simple hoop earrings to fun bead-stitching designs. We’ll incorporate a lot of our favorites like gemstones, crystals, tassels, leather and more! Plus, as a bonus for this month, we have special guest designers to help inspire your month!

Each blog post and project will include a high quality image with a full components list and a simple, easy-to-follow directions.

Here is a calendar and list of our daily DIY projects to get you inspired!

List of Daily Projects:

  1. Garnet Gemstone Wire Wrapped Cuff
  2. Golden Goddess Earrings with Lapis Gemstones
  3. Boho Babe Earrings
  4. White Heart-Day Leather Bracelet
  5. FLASHBACK Friday: Skipping Heartbeat Earrings
  6. Easy Threader Earrings with Pearls
  7. Leaf Drop and Straw Necklace with Beadable Accessories
  8. Fan Tassel Hoop Earrings
  9. Purple Garnet Hoop Earrings with Mircofacet Gemstones
  10. Paradise Beading Necklace with Swarovski Crystals
  11. Chunky Paperclip Chain Bracelet
  12. FLASHBACK Friday: Statement Bib Necklace with Chinese Crystals
  13. Cowrie Shell Earrings
  14. Carabiner Wrap Bracelet or Necklace
  15. Baroque Pearl Tiered Earrings
  16. Hanging Earrings with Purple Lace Agates
  17. Beadable Fan Earrings with Diamond Drop
  18. Large Snowflake Earrings (Winter’s not over yet…)
  19. FLASHBACK Friday: Easy Leather Hook Bracelet
  20. Half Circle Chain Earrings with Turquoise Seed Beads
  21. Hook Wrap Bracelet with Vegan Bolo Leather Cord
  22. Starburst Post Earrings with Beadable Pendant
  23. Arrow Leather Bracelet
  24. Macrame Wheel Earrings
  25. Tropical Statement Earrings
  26. FLASHBACK Friday: Stone Ripple Leather Bracelet
  27. Jacque Tassel Earrings
  28. Fringe Earrings with Triangle Link


DIY Midnight Silver Memory Wire Bracelet with Swarovski Fine Rocks Tube

Feel glamorous in the DIY Midnight Silver Memory Wire Bracelet handmade and designed with Swarovski Fine Rocks Tube, Swarovski® crystals and metal beads on Memory Wire.

Items used in Bracelet:

GoodyBeads.com Blog: DIY Midnight Silver Memory Wire Bracelet with Swarovski Fine Rocks Tube FREE Tutorial

Directions:

  1. Cut 3 ½ rings of memory wire.
  2. Make a simple loop at one end using a memory wire finishing pliers and add the following bead sequence:
    A. Square bead, fire polish, tube, fire polish, square beads, bicone, square bead, fire polish, tube, fire polish, square bead, end cap, 4 inches of leather, end cap, rondelle, disc, fine rocks, disc, rondelle, end cap, 4 inches of leather and end cap.
    B. 3 fire polish, square bead, bicone and square bead. Repeat 4 times and finish with 3 more fire polish beads.
  3. Trim excess memory wire with Memory Wire Cutters leaving about a half an inch and make a simple loop. Tighten each side till beads no longer have extra space to move.


Design Simple Layers with Memory Wire Wrap Bracelets

Memory Wire Wrap Bracelets are an easy beginner level to jewelry making. Of course, it’s an easy and fun DIY for all levels. We’ll show you how to make a wrap bracelet with three layers and designing each layer differently.

When designing each layer for your wrap bracelet, you want to give off the look as if you’re wearing multiple bracelets. Since layering is the trend these days, it’s fitting for memory wire bracelets.

For our beginner bracelet, we’re only using three beads:

With our sample below, you can see that with only three types of beads, you can switch up the layers with different bead combinations. While our main stars are the gemstone and wood beads, using seed beads are a good option for spacing and sectioning grouping of beads. Plus, if you’re concern with your beads rubbing such as glass beads or crystals, a seed bead will help alleviate the rubbing so your beads don’t get chipped while wearing your creation!

Our first layer is our main star, the 6mm gemstone bead. We’ve spaced them out with a seed bead in between to make them pop. The second layer is our second star: wood beads. Since it would be too similar to our first layer to added a seed bead in between, we’ve added a seed bead between each grouping of 5 wood beads. I always find that odd numbers of grouping is pleasing to the eye. And lastly, we’ve incorporated both of our stars and added groupings of wood beads to sandwich between the gemstone beads.

There are a bunch of bead combinations to try out, give it a try!

GoodyBeads.com Blog | Design Simple Layers with Memory Wire Wrap Bracelets FREE Tutorial

Items used in bracelet: WR00109, PDA6RD, WD-WH6RL & SB00106.

Instructions:

  1. Make a simple loop to one end of the memory wire with Memory Wire Finishing Pliers.
  2. Slide on a seed bead and gemstone bead. Repeat until you’ve added 25 gemstones beads. End this row with a seed bead.
  3. Slide on 5 wood beads and a seed bead. Repeat until you’ve added 10 groupings.
  4. Slide on a gemstone, seed bead, 3 wood beads and seed bead. Repeat 9 more times.
  5. Cut memory wire end with Memory Wire Cutters, leaving a 1/4″ or 3/8″ tail. Make a simple loop.

Check out our other Memory Wire Wrap Bracelet with different layer options:

Make these with your friends during your next virtual get-together and see all the combinations there are!


Spend the Holidays with Swarovski® – New Year

We’re celebrating the festive spirit with our friends at Swarovski: Create Your Style and celebrating with New Years Eve colors! Plus, we have a fun DIY project to get you hyped up for the new year.

Here are our selection of Swarovski crystals to embrace the festive and classic colors of New Years:

  • White/Clear – Crystal Clear, Crystal AB, Crystal 2XAB & Iridescent Dove Grey Pearl.
  • Gold/Bronze – Metallic Sunshine, Golden Shadow, Light Gold, Bright Gold, Crystal Light Silk, Metallic Light Gold, Light Topaz & Light Colorado Topaz
  • Silver/Grey – Light Grey, Dark Grey, Silver Night, Silver Shade, Greige, Light Grey Opal

Captivating Crystal Cuff

GoodyBeads.com Blog | Spend the Holidays with Swarovski® – New Year with FREE DIY and tutorial

GoodyBeads.com Blog | Spend the Holidays with Swarovski® – New Year with FREE DIY and tutorial

Items used in cuff: WR00127, SW02445, SW02444 (2), SW002442 (2), SW02437, SW02436 (2), SW02435 (2), Z008287 & SB00106.

Directions:

  1. Set the crystal in its setting and gently bend the prongs down to secure the crystal. (Check out Light Topaz blog post on how to press down the prongs.) Repeat to all 5 crystals and settings.
  2. Cut two pieces of memory wire at a coil and a quarter.
  3. Roll and make a simple loop to each end of the memory wire with memory wire finishing pliers.
  4. Slide on a seed bead on each memory wire. Slide each square bead hole through each memory wire. Repeat this process 7 more times. End this portion with a seed bead to each memory wire.
  5. Slide on small setting you made in Step 1, slide each memory wire through the two-hole setting. Slide on a seed bead to each memory. Repeat adding a medium setting, seed bead, large setting, seed bead, medium setting, seed bead and small setting.
  6. Repeat Step 4.
  7. Cut excess wire with memory wire cutters, leaving about a 3/4 inch end and make a simple loop.


DIY Bracelet Key Chains with Leather and Memory Wire

We have the perfect idea for your holiday gifts; DIY Bracelet Key Chains made with Heavy Duty Memory Wire. They are a fun DIY for every family member, friend and neighbor!

What you’ll need:

GoodyBeads Blog | DIY Bracelet Key Chains with Leather and Memory Wire FREE Tutorial

Directions:

  1. Cut a coil and a half of memory wire with Memory Wire Cutters.
  2. Make a simple, rolled loop to one end of your memory wire, with Memory Wire Finishing Pliers.
  3. Slide on the End Cap, Leather piece and End cap onto the memory wire.
  4. Cut memory wire end to about 3/4″ and make another rolled loop. Roll both ends to tighten up your bracelet keychain.
  5. Open jump ring, slide on tassel and one looped end of bracelet keychain. Close jump ring.
  6. Slide keyring through that end loop also.

More Examples in Video Tutorial

Make sure to swing over to our previous Facebook LIVE where we made some different keychain examples with leather and even LeatherCord USA channel bangles.

CLICK HERE to see Facebook LIVE episode.


DIY Golden Fine Rocks Bracelet

Are you getting your New Year’s jewelry ready? Why not make this fun bracelet to ring in the new year.

Items used in bracelet:

  • WR00120 – Large Silver Heavy Duty Memory Wire
  • CH00926 (6) – 5mm Braided Metallic Gold Round Leather Cord
  • SW02313 – Swarovski® Light Colorado Topaz Dorado Fine Rocks
  • Z006380 (4) – 5mm Gold Brass Cord End Cap
  • SW00398 (2) – Swarovski® 6mm bicone crystal beads silver night

GoodyBeads Blog | DIY Golden Fine Rocks Bracelet FREE Tutorial

GoodyBeads Blog | DIY Golden Fine Rocks Bracelet FREE Tutorial

Directions:

  1. Cut 2 coils of memory wire.
  2. Make a simple loop at one end of the memory wire with memory wire finishing pliers.
  3. Cut leather piece in half or two pieces at 3 inches.
  4. Slide on the following components on the wire:
    End cap, leather, end cap, bicone crystal, fine rocks tube, bicone crystal, end cap, leather and end cap.
  5. Cut wire end with 3/4″ wire left with memory wire cutters and make a simple loop with memory finishing pliers.


DIY Colorblock Memory Wire Bracelet Wrap with Vinyl Beads

Today’s DIY Colorblock project was featured in our previous Facebook LIVE episode, and uses bright Vinyl beads and memory wire. Create color blocking with separating chunks of color and wavy disc beads.

Items used in DIY colorblock bracelet project:

  • X002168 – 6mm Multi Color Vinyl Beads
  • X001538 – 6mm Black/Grey Vinyl Beads
  • WR00126 – Gold Memory Wire
    OR WR00139 Gold Assortment Memory Wire
  • Z018412 – 6mm Gold Wavy Disc

Directions:

  1. Make a simple loop on one end of memory wire.
  2. Without pulling all the beads off the multi-color strand, grab about an inch off and hold between your fingers while you feed the memory wire through them. Grab another chunk and slide on memory wire. Do this to add 30-50 vinyl beads.
  3. Add 5 wavy disc beads to memory wire, making sure to feed them in opposition directions to create the wavy look.
  4. Separate the whites from the Black/Grey strand and slide on 10-15 white vinyl beads on the memory wire.
  5. Add 5 wavy disc beads.
  6. Repeat Steps 2-5 another two or three more times, or to your desired length.
  7. Add another 2-3 inch length of multi-color vinyl.
  8. Cut off excess memory wire with memory wire cutters, leaving about 1/4 inch tail.
  9. Loop that end to finish your bracelet.

Video Tutorial

Check out the Facebook video on how to make this bracelet. Go to this VIDEO LINK and tutorial starts at 9:00 minutes.


DIY Summer Vinyl Bead Earrings with Gold Findings

We’re making summer last longer with fun, bright earrings using new colorful Vinyl beads.

What you’ll need:

Tools:

GoodyBeads Blog | DIY Summer Vinyl Bead Earrings FREE Tutorial and Video.

Directions

  1. Using the 2nd smallest memory wire in the pack (child’s wrist size), cut about one loop of wire.
  2. Using memory wire finishing pliers, loop one end outwards, into a simple loop.
  3. Slide about 46 vinyl beads onto your memory wire.
  4. Cut excess wire leaving a 1/2 inch tail. Using memory wire finishing pliers, roll and loop that end outwards, into a simple loop.
  5. Open one loop with flat pliers and slide on bar connector. Close loop. Repeat on other memory wire end with other bar connector.
  6. Open a jump ring, slide on both ends of bar connector and through ear wire loop. Close jump ring.
  7. Repeat all steps for other earring.

Video Tutorial

Watch our previous Facebook LIVE episode where we demonstrate creating these earrings! CLICK HERE > Start at 14:20 for tutorial.


DIY Swarovski Fine Rocks Hoop Earrings

Looking for an ultra cool statement earring? We’ve got the perfect DIY for you! Made with Swarovski Fine Rocks Tube and Memory Wire, you can create this glamorous hoop earrings today!

What you’ll need:

GoodyBeads Blog | DIY Hoop Earrings with Swarovski Fine Rocks Tube

Directions

  1. Cut two full rounds of memory wire with Memory Wire Cutters.
  2. Slide on a tube bead, curving it while you slide it through the memory wire. (Note, try using your pliers to help guide the memory wire through the fine rocks tube. Even twisting the fine rocks may help.)
  3. Slide post earring through your end cap, making sure the post end sticks out the end cap. Add a small dab of E-6000 with a toothpick. Cap one of the fine rocks with end cap.
  4. Add E-6000 to other end cap and cap other end of the Fine Rocks.
  5. Repeat all steps for other earring.
  6. Let pieces sit for a full 12-24 hours until it is completely dry before wearing.

Video Tutorial

Watch our previous Facebook LIVE where we show you how to make these pair of earrings HERE.


DIY Wrap Pearl & Denim Blue Bracelet

We’re starting June with one of our favorite style of DIY jewelry-making; memory wire wrap bracelets. Our DIY Wrap Pearl & Denim Blue Bracelet combines some of our favorite components; leather with hollow core, Swarovski pearls and tassels.

What you’ll need for bracelet:

GoodyBeads | DIY Wrap Pearl & Denim Blue Bracelet

Direction:

  1. Make a simple loop with Memory Wire Finishing Pliers.
  2. Slide the the following beads:
    1. 2 seed beads, 6mm pearl, seed bead, curve tube, 8mm pearl, seed bead, 8mm denim blue crystal, seed bead, 8mm pearl.
    2. end cap, 2.5″ of leather, bead cap
    3. 8mm pearl, seed bead, 8mm denim blue crystal, seed bead, 8mm pearl, curve tube, seed bead, 6mm pearl and 2 seed bead.
  3. Cut Memory Wire with a 1/2″ to 3/4″ end.
  4. Make a simple loop to that end with Memory Wire Finishing Pliers.


DIY Czech Flower Wrap Bracelet with Memory Wire

Spring into Spring with a flowery wrap bracelet with Czech flower beads. We’re featuring a variated design with Raven’s Journey Czech beads strung on memory wire.

What you’ll need:

GoodyBeads Blog | DIY Czech Flower, Memory Wire Wrap Bracelet.

Pick out a few of your Czech flower favorites.

GoodyBeads Blog | Raven's Journey Flower Czech Glass Beads

Make a simple loop to one end of your memory wire and slide on a few Czech beads. This sequence does not have to be planned and can be random. This is the natural beauty of this design. Then slide on one of your flower beads and repeat.


Delicate Delica Wrap Bracelets with Memory Wire

11/0 Miyuki Delica Mixes are some of our newer items here at GoodyBeads. And an interesting way of designing with them are some simple Memory Wire Bracelet. They are perfect for all ages and also the perfect bracelet to wear in warm summer months!

What you’ll need:

Items in bracelet: SB03806 and WR00126.

Directions:

  1. Make a simple loop to one end of your memory wire.
  2. Slide on Delica seed beads on memory wire. Make two wraps or more.
  3. Cut excess memory wire leaving a 1/4″ end. Make a simple loop.


DIY Fine Rocks Wire Earrings

Today’s tutorial features one of our newer products 55mm Swarovski® Ultra Fine Rocks Tube beads. These Ultra Fine Rocks are longer in length and thinner than our usual Fine Rocks Tube. Plus, they are also a little more pliable to wrap around memory wire, which is what we’ve done in our earrings tutorial!

What you’ll need for earrings:

GoodyBeads.com Blog | Fine Rocks Wire Earrings with Swarovski Ultra Fine Rocks tube beads and memory wire -FREE tutorial.

Directions: (Visual tutorial on Hoop Earrings Tutorial)

  1. Cut two coils of memory wire. While holding both coils of memory wire together, cut off an extra inch of memory wire end.
  2. Make a simple loop on one memory wire end by rolling memory wire finishing pliers and making a loop outwards and perpendicular away from the memory wire.
  3. Slide nugget spacers on the memory wire. Curl the fine rocks tube to create a curved piece while sliding it on the memory wire. And then slide on another nugget spacer.
  4. Slide the other memory wire end through loop you made in Step 2.
  5. Grasp that end with Memory Wire Finishing pliers.
  6. Roll loop towards you to make a simple loop. Use crimper to help close the loop tighter.
  7. Add your ear wire and repeat all steps for other earring.


DIY Golden Turquoise Wrap Bracelet

Design this fancy Golden Turquoise Wrap Bracelet with memory wire, Czech beads, Swarovski® crystals, cork cord and curve tube with loop.

What you’ll need to make bracelet:

  • 5mm Cork Cord – CH00881 (16 Inches)
  • 5mm Gold Cord End – Z006380 (8 pieces)
  • Gold Memory Wire – WR00126
  • 9x6mm Czech Rondelle – Item in bracelet Z011353
  • 8mm Swarovski Briolette Beads – Item in bracelet SW02236 (12 pieces)
  • 10mm Gold Wavy Disc – Z018416 (5 packs)
  • 6mm Gold Wavy Disc – Z018412
  • 50mm Curve Tube with Loop – Z011737 (2 pieces)
  • 5mm Gold Jump Ring – A011519
  • 11mm Antique Gold Ethnic Dart Drop Charm by TierraCast – TC02440
  • Tassel with Gold Cap – Item in bracelet Z013767

GoodyBeads Blog | DIY Golden Turquoise Wrap Bracelet with Memory Wire, Swarovski, Czech Beads and Leather. Free Tutorial

Directions

  1. Make a coiled loop at one end of the memory wire with Memory Wire Finishing Pliers.
  2. Cut cork cord into 4 pieces, measured at about 4 inches.
  3. Slide the following sections onto the memory wire:
    a. End cap, cork piece and end cap.
    b. Czech Bead, TWO 10mm wavy discs (one concave in and the other concave out). Repeat 5 more times (omitting the last 2 wavy discs).
    c. TWO 6mm wavy disc (one concave in and the other concave out), THREE crystals, TWO 6mm wavy disc, THREE crystals, TWO 6mm wavy disc.
    d. Repeat Step 3b.
    e. End cap, cork piece, end cap, curve tube with loop, end cap, cork piece and end cap.
    f. TWO 6mm wavy disc, THREE crystal beads and TWO 6mm wavy disc.
    g. Czech Bead, TWO 10mm wavy discs (one concave in and the other concave out). Repeat 11 more times (omitting the last 2 wavy discs).
    h. TWO 6mm wavy disc, THREE crystal beads and TWO 6mm wavy disc.
    i. Curve tube with loop, end cap, cork piece and end cap.
  4. Cut memory with Memory Wire Cutters leaving half an inch end. Coil and make a simple loop.