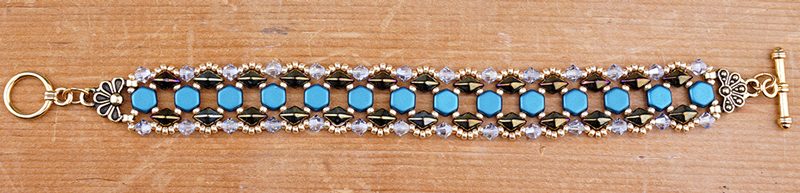
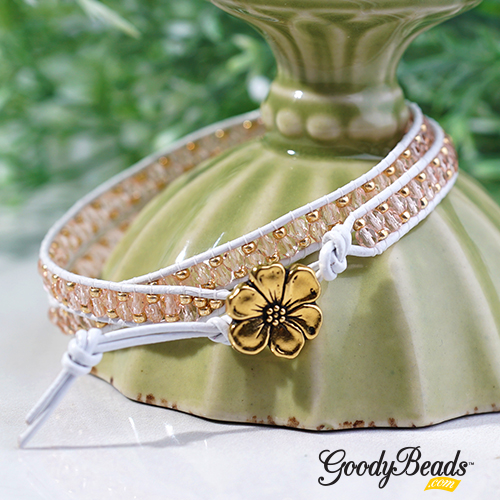
DIY Wrap Bracelet with Czech Fire Polish Beads

One of our favorite diy projects are making wrap bracelets. Using 1mm or 2mm leather cord, make wrap bracelets using all types of beads!

Today’s project is a version from our previous blog post on GoodyBeads Master Mixes with Swarovski® bicone crystals. Check out the blog post for a step-by-step look at how we sew on bicone crystals and seed beads. We will use this same method on this DIY wrap bracelet with Czech fire polish beads. Also, before you get started you will want to read the How to Make Leather Wrap Bracelets to help determine the length of leather cord you will need for your wrap bracelet.

Now that you’ve gotten those tips and tricks down, here is what you’ll need for this wrap bracelet:

  • TierraCast Button – item used in bracelet TC00900
  • 1.5mm Leather Cord – item used in bracelet Z019143
    Note: You can also use 1mm, 1.3mm and 2mm leather cord. The best use for small leather cord like 1mm-1.5mm is if you are using small beads like seed beads or sizes under 4 or 5mm in diameter. If you plan to use larger beads like 6mm or 8mm, using 2mm leather cord works best.
  • 11/0 Seed Beads – item used in bracelet SB00423
    Note: For smaller beads, use size 11/0 seed beads in the pattern. If using larger beads, you can use 8/0 or even size 6/0 seed beads.
  • 3mm Czech Fire Polish Beads – item used in bracelet A008815 (Qty 3 strands)
    Note: We used about 140 beads for our double wrap bracelet, which is a quantity of 3 Czech fire polish bead strands. You will need more for more wraps in your bracelet.
  • Beading NeedleA015211
  • Crystal Fireline (4lb)A006585

Goodybeads Blog - FREE tutorial for wrap leather bracelet with Czech fire polish beads.

Directions: (You can follow Master Mix Bracelet for tutorial visuals)

  1. Cut leather to length according to how many wraps you want. For a double wrap, we start out with 42 inches for a 7 inch bracelet.
  2. Slide leather through button hole, situating the button in the center, fold leather in half and make an overhand knot close enough to the button.
  3. With 4 feet of beading thread, tie the end of your beading thread to one piece of leather to harness your thread.
  4. Ladder stitch a seed bead in between the two leather cords.
  5. Ladder stitch two seed beads in between the two leather cords.
  6. Pick up a seed bead and Czech bead. Sew both in between both leather cords.
  7. Pick up a Czech bead and then a seed bead. Sew both between both leather cords.
  8. Repeat Steps 6 and 7 until you’ve reach a suitable length for wrist size.
  9. Tie off your beading thread and cut off excess.
  10. Take both ends of your leather cords and make an overhand knot, close enough to last beads you’ve stitched on.
  11. Make another overhand knot about 15mm to 20mm apart, or wide enough for your button to slide through.
    Optional: Make another overhand knot for an extended length if needed.
  12. Cut excess leather cord.


DIY Golden Lariat and Enamel Charm

2020 is all about necklaces and the trend of The Neck Mess. We have an easy DIY lariat necklace you can make and layer up it!

The Neck Mess is a new trend about layering a mix-match of necklaces. Mix up different chains and textures. Even mix up different metals like gold and rose gold; gold and silver; brass and gold. While keeping the necklaces itself dainty with a simple charm or link of chain, makes for easy layering and a whole lot of neck mess! Like our easy DIY Golden Lariat and Enamel Charm.

Here is what you’ll need to make DIY Lariat:

  • 2mm Gold Plated Petite Cable Chain with Soldered Links – CH00721 – 3 feet (Silver CH00720)
  • 15mm Black Enamel Gold Plated Drop Charm – Z015973 (Turquoise Z015952, White Z016957, Coral Z015955 – also available in silver)
  • 4x5mm Gold Plated Slide on Clasp with Hole for Jump Ring – Z010769 (Silver Z010759)
  • 4mm Gold Plated 24 Gauge Oval Jump Ring – Z001662 (Silver Z001661)

GoodyBeads blog - FREE Tutorial - DIY Gold Lariat with Enamel Charm

Directions:

  1. Open jump ring and slide jump ring through the hole on the side of the slide on clasp. Slide jump ring towards the top opening of the slide on clasp. Slide on one end of your chain and close jump ring.
  2. Using a thin piece of an inch wire, slide on other end of chain to the middle and fold needle in half to create a makeshift needle.
  3. Slide both ends of the ‘makeshift needle’ through the slide on clasp. Grasp the ‘needle once it pokes through the other side with your fingers or flat pliers.
  4. Open another jump ring, slide through loose chain end and enamel charm. Close jump ring.


DIY Leather Hoop and Silver Teardrop Earrings

In today’s DIY, make a leather hoop and silver teardrop earrings using leather cord and TierraCast’s new Hammertone collection. Here is what you’ll need:

  • 2mm leather cord – item used in earrings A022076
  • 1mm leather cord – item used in earrings Z015514/A022070
  • TierraCast earring post – TC02764
  • Clear Earring Back – TC01208 (2)
  • TierraCast End Cap – TC02800 (2)
  • TierraCast Teardrop – TC02777 (2)
  • 5mm Oval jump ring – Z004093
  • 5mm TierraCast Nugget Spacer – TC02639 (6)

Directions:

  1. Cut a 4 inch piece of 2mm round leather and a 1 inch piece of 1mm round leather.
  2. Add 3 nugget beads to the 2mm round leather.
  3. String the teardrop charm onto the 1mm leather.
  4. Insert one end of the 2mm leather, the 2 ends of the 1mm leather and the other end of the 2mm leather into the crimp end.
  5. Check the length of the tear drop charm and 2mm leather, trim to desired lengths if needed.
  6. Then use a flat nose pliers to crimp the crimp end. Squeeze both sides.
  7. Open 5mm oval jump ring, add earring post and loop on crimp end.
  8. Close jump ring.
  9. Repeat all steps for other earring


DIY Emerald Chandelier Earrings

Statement earrings are still hot as ever. So we’ve embraced that trend in this DIY chandelier earrings with emerald crystals from Swarovski®.

What you’ll need for earrings:

GoodyBeads Blog - FREE Tutorial for Chandelier Earrings with Emerald Bicone Crystals from Swarovski.

Directions:

  1. On a headpin, slide on a crystal and make a simple loop. Repeat for all crystals. You’ll have TWO 8mm, FOUR 6mm and SIX 4mm crystal dangle.
  2. Open 4mm dangle loop and slide on an outer loop of chandelier. Close loop.
  3. Open 6mm dangle loop, slide on next loop of chandelier and close loop.
  4. Open 8mm dangle loop, slide on middle loop chandelier and close loop.
  5. Add a 6mm dangle to the next loop and a 4mm dangle to the last loop.
  6. Open another 4mm dangle loop, slide through middle loop on the inner circle of the chandelier and close loop.
  7. Open earwire loop and slide on top loop of chandelier. Close earwire loop.
  8. Repeat steps 2-7 for other earring.


DIY Flower Patch Stretch Bracelet

Our Flower Patch Stretch Bracelet is fitting for Spring! It’s easy to make and easy to wear.

What you’ll need for bracelet:

Directions:

  1. Cut elastic to 8 inches. Pull and stretch the elastic to loosen its elasticity.
  2. Slide on a sequence of beads to your choosing, while adding a 2mm czech bead in between each larger bead to fit your wrist size. (We alternated each bead in the sequence). MAKE SURE that a brass bead in at one end of your elastic.
  3. Make a surgeon’s knot and cut off excess of elastic. Pull knot inside brass bead to hide knot.


Golden Oasis Bracelet – Pattern Tutorial

We have a NEW pattern for you using some of TierraCast’s Oasis Stitch-In Two-Sided Link in their recent Finishing Touches launch, Czech Honeycomb, Czech DiamonDuo, seed beads and 4mm crystals from Swarovski®.

What you’ll need for tutorial:

Here is a list of what we used in bracelet sample: TC02703 (2), TC00378, SB00423, SB03301, Z013596, SW00808 (28), Z011522, A006587, A015211 & A008658.


Cymbal Apple Jasper Necklace

Today’s design features Apple Jasper Gemstones and how versatile the Cymbal components can be used. We love the organic cuts of the Apple Jasper Flat Chips (APL5X15CHP-8) and used them to make a subtle statement necklace pendant.

What you’ll need for necklace:

Directions:

  1. On the headpin, slide one 4mm round gemstone and two seed beads. Make a simple loop.
  2. Open loop of eyepin and slide on dangle from step 1. Close loop.
  3. On eyepin slide on a seed bead, 5 chip gemstones and seed bead. Make a simple loop.
  4. Open dangle loop and slide on top loop of Cymbal component. Close loop.
  5. Slide chain through the other three hole of the Cymbal component. (For your own personlization, cut your chain shorter or have a longer piece of chain)
  6. Crimp end caps to the ends of your beading chain. (Refer to Blog Post)
  7. Add clasp to ends.


Dot & Dash Fringe Earrings

Today’s tutorial is a revision of popular DIY Golden Fringe Earrings we did a few weeks back. Our Dot & Dash Fringe Earrings is on another level of gorgeous!

What you’ll need for earrings: (Silver alternative available)

Directions:

  1. Cut chain at these lengths and alternate the dots and dashes
    7 inches – Dash at beginning and end
    6 ¼ inches – dot at beginning and end
    5 ¾ inches – dash at beginning and end
    5 inches – dot at beginning and end
    4 ½ inches – dash at beginning and end
    3 7/8 inches – dot at beginning and end
    1 ½ inches – dash at beginning and end
    1 ½ inches – dot at beginning and end
    1 ¾ inches – dash at beginning, dot at end
    1 ¾ inches – dot at beginning, dash at end
    1 ¾ inches – dash at beginning, dot at end
    1 ½ inches – dot at beginning and end
    1 ½ inches – dash at beginning and end
  2. Slide what you’ve cut in Step 1, in the same sequence through the slide end tube.
  3. Slide the end of 3 7/8 inches through end tube.
  4. Slide the end of 4 ½ inches through end tube.
  5. Slide the end of 5 inches through end tube.
  6. Slide the end of 5 ¾ inches through end tube.
  7. Slide the end of 6 ¼ inches through end tube.
  8. Slide the end of 7 inches through end tube.
  9. Close side tab of end tube with a flat edge, like pliers.
  10. Open jump ring and slide on loop of end tube and ear wire loop. Close jump ring.
  11. Repeat all steps for other earring.


Porcelain & Glass Necklace

Designing DIY necklace is easy with beading chain. Here is a quick tutorial on using crimp ends with beading chain and creating a Porcelain & Glass Necklace!

Crimp End Tutorial

What you’ll need for this crimp end tutorial are:

DIY Porcelain & Lampwork Necklace

What you’ll need for necklace:

Directions:

  1. On beading chain, slide on the following sequence of beads:
    A. hematite bead and Chinese crystal, repeat for a total of 5.
    B. hematite, lampwork, hematite and lampwork
    C. hematite, porcelain, hematite, porcelain, hematite, porcelain,
    D. Repeat Step 1B
    E. Repeat Step 1A
    F. Slide on hematite bead.
  2. Crimp both ends of your beading chain with crimp ends. (Refer to tutorial above).
  3. Using jump rings, attached your clasp of choice.

Porcelain and Glass Necklace

Items used in BLUE Porcelain necklace: Items used in BLUE Porcelain necklace: CH00725(2 feet or 21 inches), A021708 (2), A006247, HEMDG4RD, A008272, A013538, A011517 & Z011537.

Items used in BROWN Porcelain necklace: CH00725(2 feet or 21 inches), A021708 (2), A006247, HEMDG4RD, Z009101, A008277, A011517 & Z011537.

GoodyBeads | DIY Necklace with Porcelain Beads, Glass Beads, Chinese Crystals, Hematite. FREE Tutorial.


‘Believe in Love’ Expandable Bracelet

You’ll easily fall in love with this easy-to-make bracelet. Using an expandable bracelet, add fun charms and dangles to the tune of your own design!

Items used in bracelet:

Directions:

  1. Open jump ring, slide on a charm and around the end part of the bracelet. Close jump ring.
  2. Repeat for other two charms.


DIY Snowflake Acetate Earrings

It’s still a bit chilly here in Minnesota, so why not chill out with us! We have this cut pair of earrings using one of our newer acetate shape, a snowflake!

What you’ll need:

  • 20mm Pearl Acetate Cutout Snowflake Pendant – Z006135
  • 6mm Silver-plate Jump Ring – A001529
  • Nunn Oval Ear Wires – Z010212

Directions:

  1. Open jump ring, slide on acetate snowflake and through ear wire loop. Close jump ring.
  2. Repeat for other earring.


Heart Tassel Earrings

Post earrings are everywhere and we are just LOVING these heart post in this Heart Tassel Earrings!

What you’ll need:

Directions:

  1. Using a flat nose pliers, open loop of tassel.
  2. Slide on earring loop and close loop.
  3. Repeat for other earring.


Honeycomb Drop Earrings

Love Czech Honeycomb beads? Our Designer So Vang always has a plethora of miscellaneous Honeycombs around her area! Here’s a simple way to use them in this Honeycomb Drop Earrings.

What you’ll need:

Directions:

  1. Cut beading chain at 2 inches. Cut two pieces.
  2. Slide on crimp tube to one end of beading chain and make a flat crimp.
  3. Slide on beading chain 5 honeycomb beads.
  4. Cap the other end with the end cap. Crimp the middle part of the end cap.
  5. Open earwire loop and slide on dangle. Close loop.
  6. Repeat Steps 2 – 5 for other earring.


DIY Swarovski Crystal Heart Bracelet

Our friends from Swarovski Create Your Style has this gorgeous Swarovski Crystal Heart Bracelet, in time for Valentine’s (or Galentine’s) Day!

Items used in bracelet: SW01138 (21), SW02083 (22), FTBW0001, Z001702, Z005838, X003062, A008807, TC01897 (2) & TC01899 (2). Heart charm is substituted with Z011847.

Directions

  1. Slide onto a 9″ beading wire a sequence of bicone crystal and heart bead, alternating and ending with a bicone crystal.
  2. Slide crimp tube to one end and loop end through wire protectors and down through the crimp tube. Crimp the crimp tube.
  3. Repeat Step 2 to other end of beading wire.
  4. Slide a crimp cover over the crimp tube and close cover. Repeat to other end.
  5. Open 7mm jump ring, slide through one end, through wire protector and through heart charm. Close jump ring.
  6. Open 5mm jump ring, slide through other end, through wire protector and through lobster clasp loop. Close jump ring.


Fan Flare Hoop Earrings with Czech SuperDuos

Brush up on your bead stitching skills with this Fan Flare Hoop Earrings with Czech SuperDuos. Even if you have minimal bead-stitching knowledge, our illustrated tutorial on making this flashy pair of earrings will be easy to follow.

What you’ll need:

GoodyBeads Blog | FREE Tutorial on Fan Flare Hoop Earrings with Czech SuperDuos.

Items used in earrings: Z011593, Z013491, SB01406, SB00107, SB00423, A006587 & A015211.