Fancy Stripe Earrings with Cymbal Kolympos

We’re continuing our love for Cymbal components with these FANCY Stripe Earrings made with the Cymbal Kolympos bead ending. Check out this FREE pattern from our designer, So Vang.

If you haven’t yet seen the Cymbal components that just came out a few month ago, you’re missing out on some great components and findings for your bead stitching patterns. Here is a simple pair of earrings you can make using the Cymbal Kolympos bead ending.

Though this pattern was intended and can be used for a bracelet pattern, we’ve shorten the pattern to make some statement earrings instead!

What you’ll need for earrings:

Items used for earring example: Z013596, SB03303, SB00107, SB01916, Z004589, A006587, A015211 and TCZ0139

GoodyBeads | Blog - Fancy Stripe Earrings with Cymbal Kolympos Bead Endings FREE Pattern!


Leather Bracelets with Half Circle Magnetic Clasp Leather

Learn how to make easy DIY bracelets using the Half-Circle Magnetic Clasp with round, flat and licorice leather.

The half-circle magnetic clasp really transforms the overall style of any bracelet because it circles around half of your wrist, it is a clasp but also a bold, statement look. The Half-Circle Magnetic Clasp comes in 4 specific styles and works only with a specific leather. It has an end bezel/opening that will only accommodate 5mm round leather, 5mm flat leather, 10mm flat leather or licorice leather. Let’s go through the 4 different clasps AND how to determine leather length for each of the Half-Circle Magnetic Clasp.

Determining Leather Length

Before we start on the different types of clasps, let’s determine the length of leather you want to approximately use. This will depend on your wrist length and the amount of wraps you want.  These are approximate measurements, so make sure when you order or cut your leather, to give yourself an inch or two to test out your leather clasp. Always test out your leather length and clasp by assembling them together and carefully put your bracelet on. Cut excess leather if you need adjusting before finalizing with glue. There will be a bit of math involved, but don’t worry we aren’t testing you.

  • Single-wrap bracelet: Take your wrist length and subtract 2.75 inches. (i.e. for a a 6.5″ wrist, subtract 2.75 for a length of 3.75″ piece of leather.)
  • Double-wrap bracelet: Take your wrist length, multiply by 2 and take that total and subtract by 1.75 inches. (i.e for a 7″ wrist, you will get a total of 12.25″ of leather)
  • Triple-wrap bracelet: Take your wrist length, multiply by 3 and take that total and subtract by 1.5 inches. (i.e for an 8″ wrist, you will get a total of 22.5″)
  • Quadruple-wrap bracelet: Take your wrist length, multiply by 4 and take that total and subtract by 1. (i.e for a 6.5″ wrist, you will get a total of 25″)

Quick Tip for Leather Bracelets

  • Make sure to check out our Cutter Tool and Adhesive blog for the right tools to cutting your leather
  • Make sure when you make multi-wrap bracelets to work with the natural curve of your leather. When you gluing in your leather pieces, keep your magnetic clasp closed. Glue one side of your leather in your clasp with Super New Glue. Then mimic the wraps with your leather and then glue in the other end into your clasp.

5mm Flat Leather

When using 5mm Flat Leather you will want to use these half-circle magnetic clasp options because they are made specifically for 5mm flat leather.

With our two examples, we created a two and four wrap bracelet.

GoodyBeads | Blog - Half Circle Magnetic Clasp with 5mm Flat Leather - Tutorial

Items used in 6.5″ wrist bracelet example: CH00834 (12″) & Z001004.

GoodyBeads | Blog - Half Circle Magnetic Clasp with 5mm Flat Leather - Tutorial

Instead of using leather, we are using this bright neon orange synthetic flat leather. Make sure to try out the Neon Yellow and Green!

Items used in 6.5″ wrist bracelet example: A019004 & Z001190.

10mm Flat Leather

There is only one option for the 10mm Flat Leather and it’s the popular silver half-circle magnetic clasp: A007209 You can make a single wrap bracelet or multiple one. In our example, we went with the 10mm Pale Turquoise Flat Cork Cord.

GoodyBeads | Blog - Half-Circle Magnetic Clasp with 10mm flat leather - Tutorial

Items used in 6.5″ wrist bracelet example: CH00438 (11″) & A007209

5mm Round Leather

When using 5mm Round Leather, you’ll want to use these half-circle clasp in four color options:

One thing to remember when using 5mm round leather on this clasp is the stiffness of the leather. It is rigid enough to hold its curve shape wonderfully but when making more than one wrap, the curves will be irregular. So when using the 5mm on this clasp, we suggest that you only make a single wrap bracelet.

GoodyBeads | Blog - Half-Circle Magnetic Clasp with 5mm Round Leather - Tutorial

Items used in this 6.5″ wrist bracelet: CH00605 (4″) & Z006715

In this example, because there wouldn’t be an issue with stiffness we made a double-wrap bracelet using 1.5mm leather. We’ve cut 5 strands of 1.5mm leather and insert the bulk ends to each end of your clasp.

GoodyBeads | Blog - Half-Circle Magnetic Clasp with 1.5mm Round Leather - Tutorial

Items used in bracelet example: Z006785 & Z019114

Licorice Leather

When using Licorice Leather, pair it with one of these Half-Circle Magnetic Clasp:

Just like 5mm round leather, Licorice Leather has a stiffness to it, so making a simple wrap bracelet with this clasp is highly suggested.

GoodyBeads | Blog - Half-Circle Magnetic Clasp with Regaliz Licorice Leather - Tutorial

Items used in bracelet example: A015302 & A019018


Straw Earrings

Make this pair of earrings for your next beach vacation because it screams FUN! Designed with Acetate, Straw and a post earring, it’s so easy to make and is lightweight.


GoodyBeads | Blog - Straw Post Earrings with Acetate coins.

What you’ll need for earrings:


Directions:

  1. With your bead reamer or awl, make a hole at a corner of your straw component; likely between the outer and second layer of straw.
  2. Open 8mm jump ring and slide jump ring through Straw hole you made in Step 1 and through an acetate hole. Close jump ring,
  3. Open 5mm jump ring and slide through other hole of acetate coin and through post earring hole. Close jump ring.
  4. Repeat all steps for other earring.


Swarovski Triangle Earrings with Tassel

Design a modern and boho style earrings with Swarovski Triangle Shaped Sew-On Stone and tassels!

GoodyBeads | Blog: Swarovski Triangle Sew-On crystal stone and tassel earrings. FREE tutorial.

What you’ll need for earrings:

Instructions:

  1. Cut chain with 10 links. Cut 2 pieces total.
  2. Open 3mm jump ring, slide on tassel loop and close jump ring.
  3. Open 5mm jump ring, slide through 3mm from Step 2 and hole of Swarovski triangle (point end). Close jump ring.
  4. Open another 5mm jump ring, slide through other Triangle hole and through a piece of chain end. Close jump ring.
  5. Repeat Step 4 to other Triangle hole.
  6. Open another 5mm jump ring, slide through both chain ends and close jump ring.
  7. Open another 5mm jump ring, slide through 5mm from Step 6 and through post earring hole. Close jump ring.
  8. Repeat all steps for other earring.

Designed by Tory.


Rainbow Tassel Earrings

Brighten up your days with a DIY rainbow tassel earrings.

These pair of earrings use our popular cap tassels, all strung on hoop earrings! Flaunt this trendy and cheerful look.

GoodyBeads Blog: Rainbow Tassel Earrings

Directions

  1. Slide the following seed beads and tassels onto the hoop finding:
    Seed bead, purple, seed bead, blue, seed bead, green, seed bead, yellow, seed bead, orange, seed bead, red and seed bead.
  2. Slide hoop end through the hole of the other hoop end.
  3. Using your round nose pliers, roll a simple loop with the hoop end.
  4. Open ear wire loop and slide on loop of tassel hoop. Close ear wire loop.
  5. Repeat all steps for other earring.

Items used in earrings: SB00106, A013204, Z013686, Z013685, Z013684, Z013687, Z014017, Z013688, TCZ0078


DIY Jewelry with Beadable Components

Make easy DIY jewelry using Beadable Components and adding POPS of color with Miyuki Delica Seed Beads. Here are ways to bead and use the beadable components.

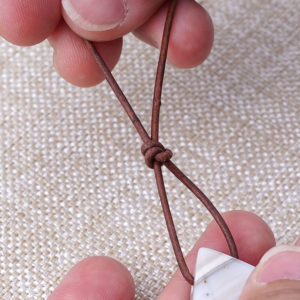
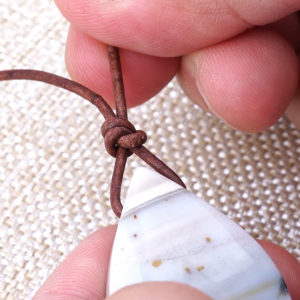
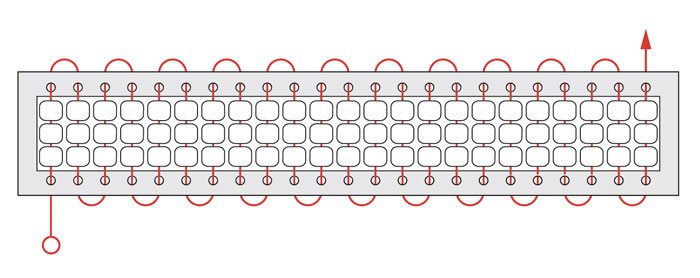
From our recent Trends We Love, our new Beadable Components are what you need for an easy bead-stitch project. These pairs well with our 11/0 Miyuki Delica Seed Beads or beads with a width of 1.5mm or thinner. Our projects uses the basic ladder stitch. Here is a look at how a ladder stitch is done to sew through the channels. Make sure when you’ve sewn through your pattern or channels, to sew through them again to strengthen the pattern.

ladderstitch

Here are some projects using these beadable components:

Beadable Ring Pendant

Beadable_11336_11337

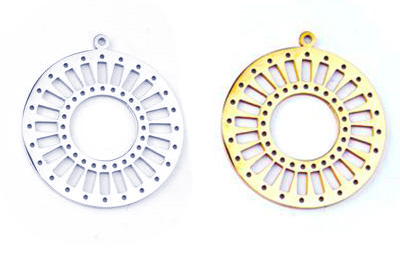
The Beadable Ring Pendant (Silver or Gold) has 24 channels and fun options to designing with this piece. Each channel holds 3 Delica beads. Here are a few ideas.

GoodyBeads | Blog - DIY Jewelry with Beadable Components and Miyuki Delica seed beads. Free tutorial

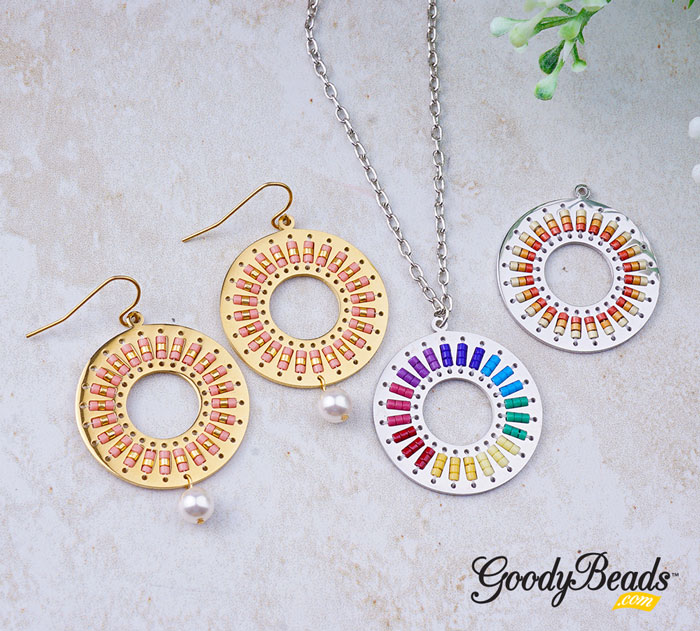
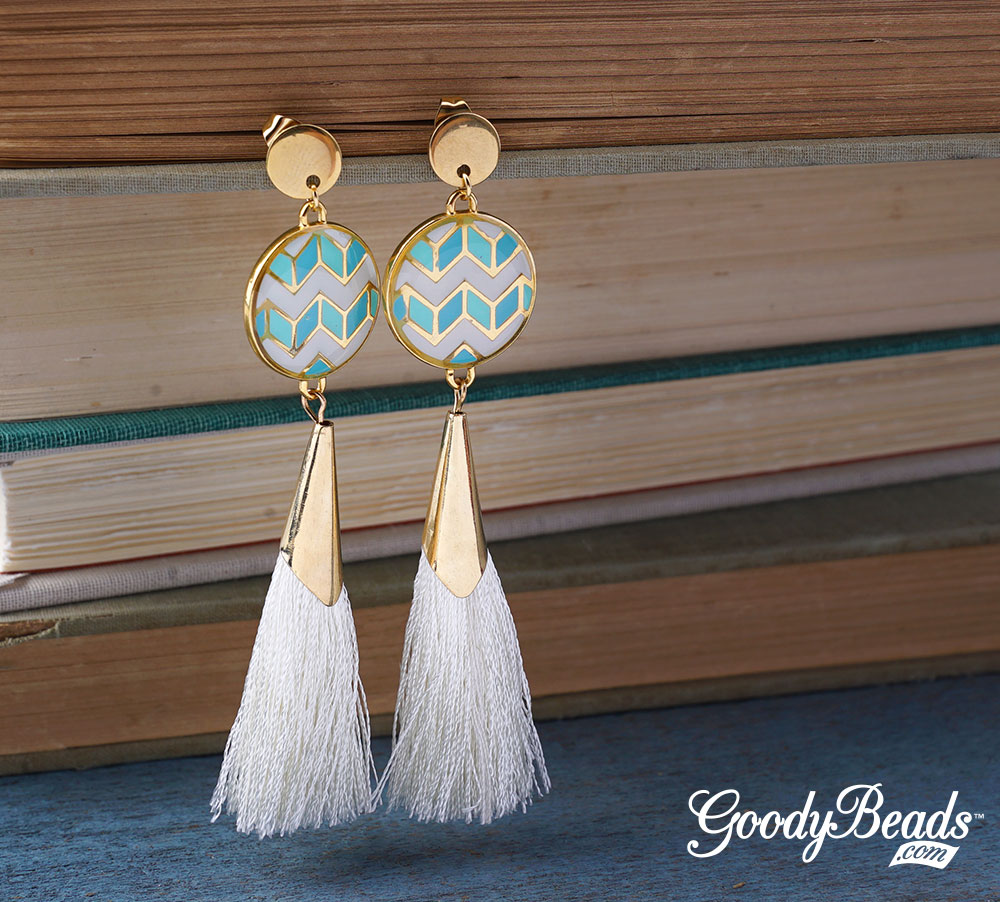
On the left is a pretty pair of pink and gold earrings. We even added a pearl dangle at the bottom! Make sure to use size 24-gauge headpins if adding dangles to beadable components.

Items used in earrings: Z011337 (2), A019635, SW00665 (2), TC02298, SB00269, SB02332 (A015211 & A006587)

In the middle, we’ve made a rainbow wheel with the beadable pendant. Attach it to your necklace chain for this easy DIY necklace!

Items used in rainbow pendant necklace: Z011336 (2), SB03546, SB02343, SB02336, SB02310, SB02311, SB03545, SB02327, SB02349, A001528, Z001033 (A015211 A006587)

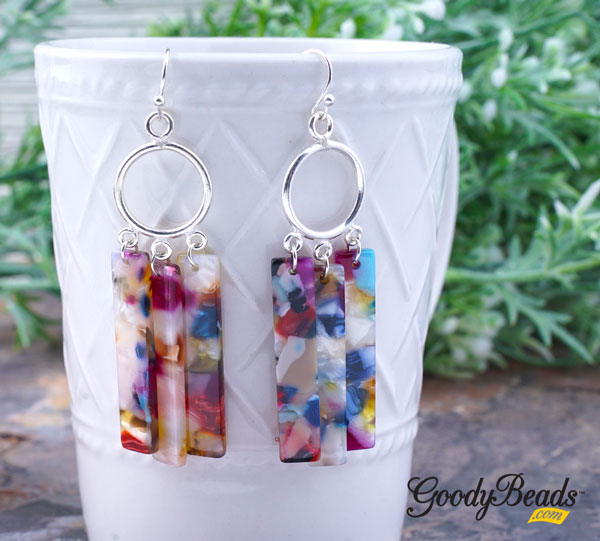
And lastly we created an ombré effect with the pendant on the right.

Items used in right pendant: Z011336 (2), SB01824, SB01822, SB01826 (A015211 A006587)

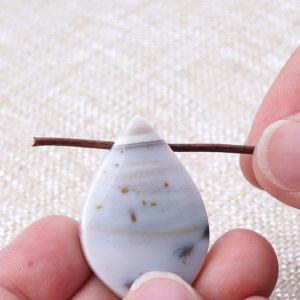
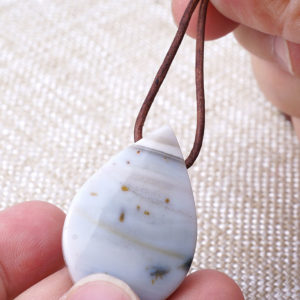
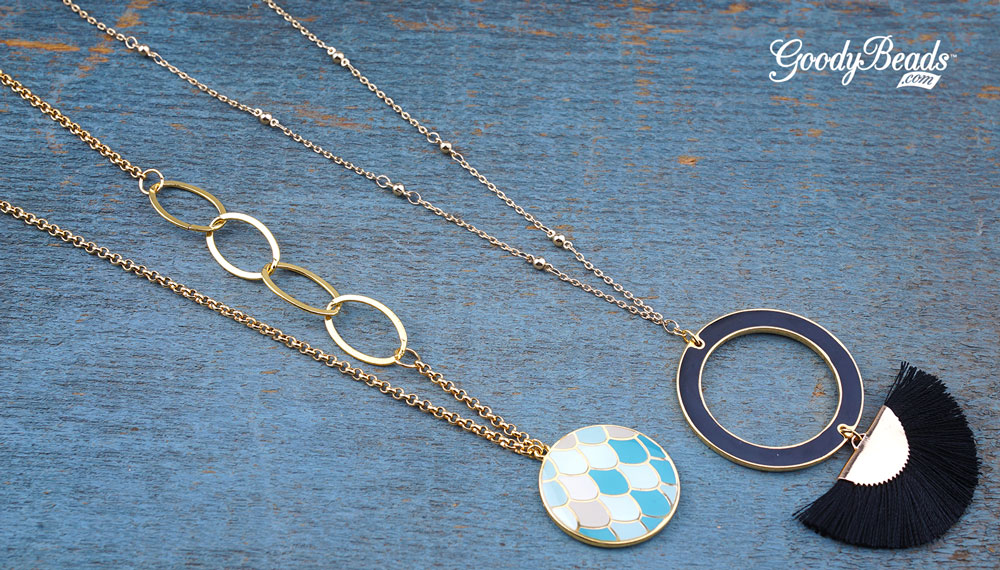
Beadable Teardrop Pendant

Beadable_11339_11342

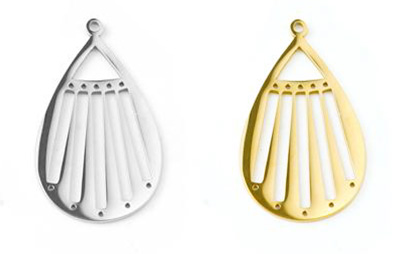
Love the shape of the classic teardrop! This beadable component is much easier to sew through since it only has 5 channels to work with. Each channel holds different amounts of Delica beads. The outer channel holds 13 Delicas, the inner two holds 15 Delicas and the middle holds 16. Here are two ways to using this beadable component.

GoodyBeads | Blog - DIY Jewelry with Beadable Components and Miyuki Delica seed beads. Free tutorial

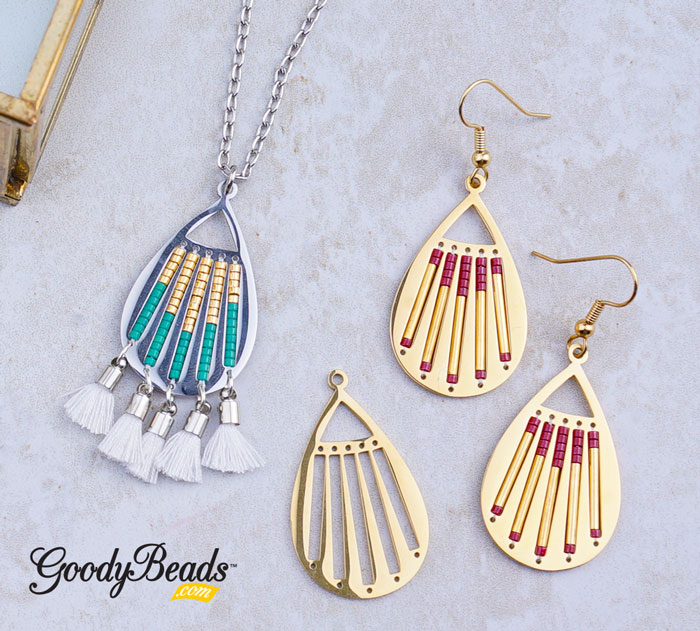
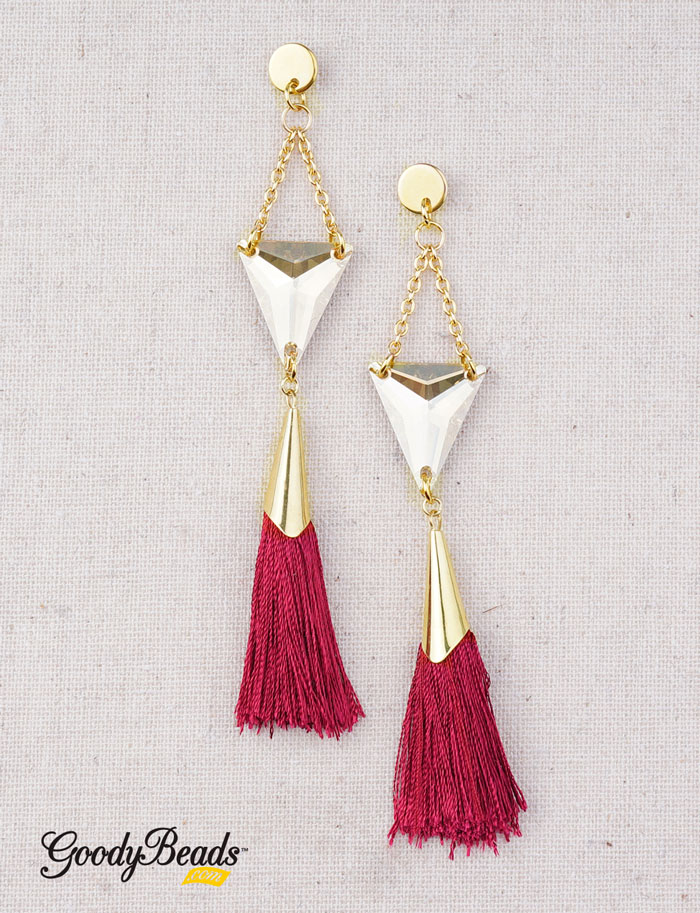
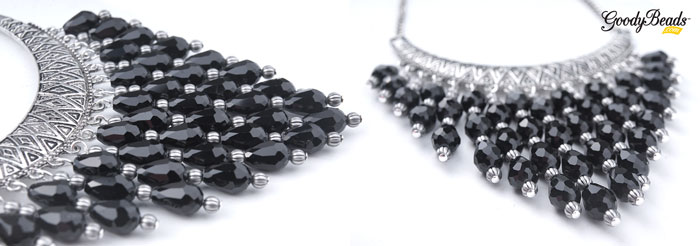
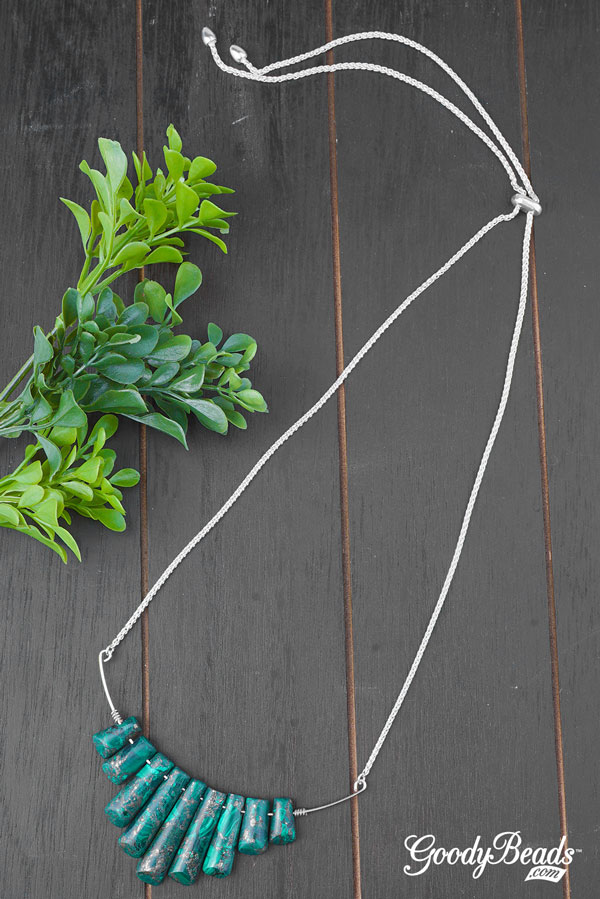
The necklace on the right uses the amount of correct amount of Delicas for each channel. We’ve also used two colors to add a design to its channels. Then, using 24-gauge jump rings, we’ve added small tassels to the bottom holes of the pendant before making a fun necklace with it!

Items used in necklace: Z011339, SB00269, SB02336, A002413, Z013681, Z001033 (A015211 & A006587)

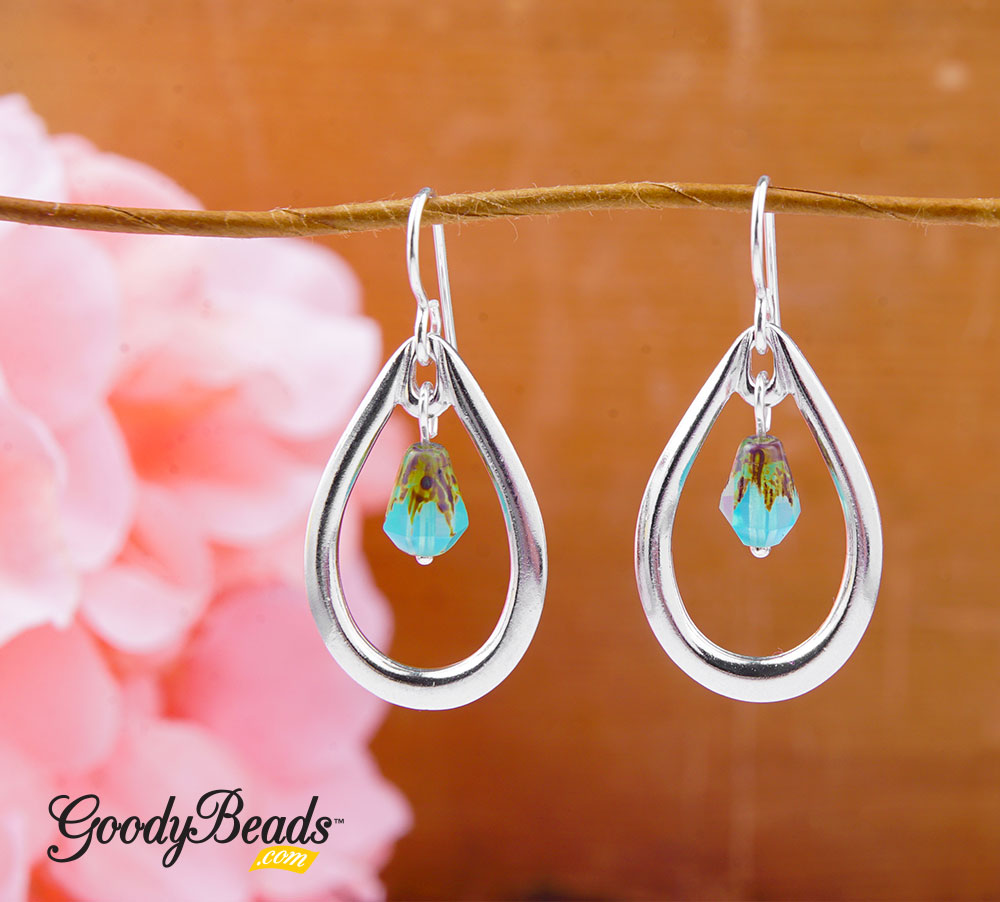
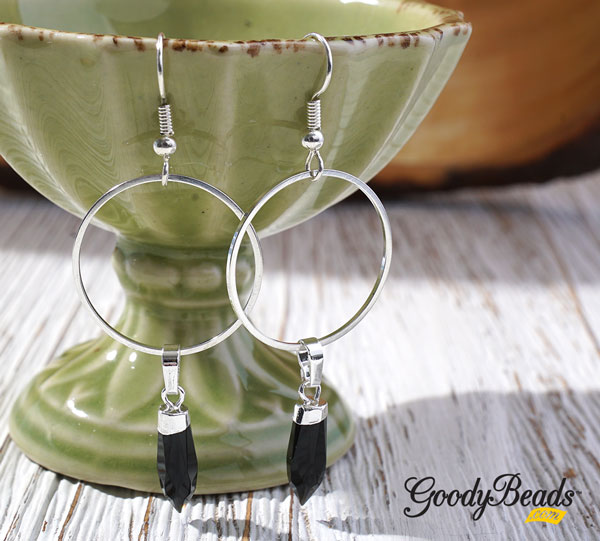
And who wouldn’t love a pair of earrings! On the right, we have a charming pair of gold earrings using Delica beads and metal tube beads. The tube beads has the small thickness as Delica seed beads and works perfectly for these beadable components.

Items used in earrings: Z011342 (2), Z009196, SB003545, A014108 (A015211 & A006587)


Statement Bib Necklace with Chinese Crystals

This DIY statement necklace will become your glamorous accessory of the season. Designed with our Bib connectors and Chinese crystals, all you need to know in order to make this necklace is the basics of making a simple loop and opening a jump ring!


What you’ll need to make this necklace:

GoodyBeads | Blog - Statement Bib Necklace with Chinese Crystals, FREE tutorial


Directions

  1. On a headpin, slide on a round bead and teardrop bead. Make a simple loop. Open loop and slide dangle to first hole of bib connector.
  2. On a headpin, slide on a round bead, teardrop bead and round bead. Make a simple loop. Open loop and slide dangle to next hole of bib connector.
  3. On a headpin, slide on a round bead, teardrop bead, round bead and teardrop. Make a simple loop. Open loop and slide dangle to next hole of bib connector.
  4. On a headpin, slide on a round bead, teardrop bead, round bead, teardrop and two round bead. Make a simple loop. Open loop and slide dangle to next hole of bib connector.
  5. On a headpin, slide on a round bead, teardrop bead, round bead, teardrop, round bead and teardrop. Make a simple loop. Open loop and slide dangle to next hole of bib connector.
  6. On a headpin, slide on a round bead, teardrop bead, round bead, teardrop, round bead, teardrop and two round bead. Make a simple loop. Open loop and slide dangle to next hole of bib connector.
  7. On a headpin, slide on a round bead, teardrop bead, round bead, teardrop, round bead, teardrop, round bead and teardrop. Make a simple loop. Open loop and slide dangle to next hole of bib connector.
  8. On a headpin, slide on a round bead, teardrop bead, round bead, teardrop, round bead, teardrop, round bead, teardrop and round bead. Make a simple loop. Open loop and slide dangle to next hole of bib connector.
  9. Repeat step 7 for next hole on bib connector.
  10. Repeat step 6 for next hole on bib connector.
  11. Repeat step 5 for next hole on bib connector.
  12. Repeat step 4 for next hole on bib connector.
  13. Repeat step 3 for next hole on bib connector.
  14. Repeat step 2 for next hole on bib connector.
  15. Repeat step 1 for next hole on bib connector.
  16. Cut two pieces of chain at 6″ to 8″ long.
  17. Open jump ring and slide on one end of chain and one end of bib connector. Close jump ring.
  18. Open another jump ring and slide on other chain and to other end of bib connector. Close jump ring.
  19. Open another jump ring and slide on one end of the chain and through ring of clasp.
  20. Repeat steps 9 with another jump ring and other clasp ring.

NecklaceChineseCrystal_image2


Gemstone Leather Necklace with Leather Knot Tutorial

Leather necklaces with a gemstone pendant are easy to make once you get the basic sliding/slip leather knot down. Check out our easy tutorial to tying a gemstone necklace of your own.

The functionality of the sliding knot is mainly what it states, it slides. When you make a sliding knot, you are making a knot over the other leather piece so that the other piece slides back and forth, which can make a necklace or bracelet adjustable. You can check out our previous blog post on making a sliding knot.

If you’ve watched the video, you will see that we’ve altered the first portion of the necklace video by creating a two, coiled sliding knot to pinch the leather together at the top of the pendant. This will create somewhat of a bail so that pendant swingings nicely back and forth.

What you’ll need for tutorial:

Tutorial

Sliding/Slip Knot Tutorial

Check out video/blog post on how to make a sliding knot in Step 8. Knot tutorial begins at 0:40.

Necklace with Gemstones

GoodyBeads | Blog - gemstone leather necklace with leather knot tutorial

Items used in necklaces: Z019148,  PEN-YJD28X32DP-FF, MRQ16-60NUG, PEN-PDC35-64FF


DIY Jewelry using Enamel Components

We have some NEW exclusive enamel components that we could not help but make some gorgeous DIY jewelry with! Here are 5 different DIY jewelry to inspire you!


Enamel Earrings

GoodyBeads | Blog - DIY jewelry using Enamel Components FREE tutorial


Items used in earrings: Z001831, (2) Z016108, Z004939, A011517

Directions:

  1. Open loop of tassel, slide on a loop on enamel link and close loop.
  2. Open jump ring, slide on other loop on enamel link and through hole of post earrings. Close jump ring.
  3. Repeat all steps for other earring.


GoodyBeads | Blog - DIY jewelry using Enamel Components FREE tutorial

Items used in earrings: (2) Z015957, Z016027, A011517

Directions: Open small jump ring and slide on enamel dangle and loop of post earrings. Close jump ring and repeat.


Enamel Bracelet


GoodyBeads | Blog - DIY jewelry using Enamel Components FREE tutorial

Items used in bracelet: Z016188, Z012152

Directions: Open jump rings on adjustable bracelet, slide on a loop from enamel link. Close jump ring. Repeat for other link loop.


Enamel Necklace

Enamel_image05


Items used in Necklace #1: A002735, (2)A008135, Z016017, A011517, A008808

Directions: 

  1. Cut large Oval Chain with 4 Links.
  2. Cut 2 inches off of the 2 feet of A008135, rollo chain.
  3. Open large jump ring and attach oval chain to the 2″ rollo chain. Close jump ring.
  4. Open another large jump ring and attach other end of oval chain and the remainder of the rollo chain. Close jump ring.
  5. Open small jump ring, slide on one end of chained piece and through enamel pendant loop. Close jump ring.
  6. Repeat step 5 with another small jump ring and other chain end.


Items used in Necklace #2: Z016327, Z007681, (2) CH00976, Z011514Z011397

Directions:

  1. Open large jump ring and slide through one hole of connector pendant and tassel loop. Close jump ring.
  2. Open another large jump ring and slide through other hole of connector pendant. Close jump ring.
  3. Open oval jump ring and slide on one end of your chain and through jump ring from Step 2. Close jump ring.
  4. Repeat Step 3 to other chain end another another oval jump ring.


Swingin’ Teardrop Earrings

Our simple and sweet tutorial today consists two of our favorite brands: TierraCast and Raven’s Journey. Create this easy pair of earrings today!

What you’ll need for earrings:

GoodyBeads Blog | Swingin' Teardrop Earrings with TierraCast findings and Raven's Journey Czech beads. FREE Tutorial.

Directions:

  1. Slide a teardrop bead onto the headpin and make a simple loop.
  2. Open loop you just made and slide through the under side of the hole loop on the TierraCast Teardrop Frame. Close loop.
  3. Open loop of earwire and slide through the top side of the TierraCast Teardrop Frame. Close loop.
  4. Repeat all steps for other earring.


Golden Halo Earrings with Swarovski® Crystals

Make this Golden Halo Earrings, tiered with TierraCast® components, acetate and Swarovski® crystals.


What you’ll need for these pair of earrings:


GoodyBeads Blog | FREE Tutorial: Gold Halo Earrings with Swarovski Princess Cut Crystal Pendants and Acetate components.

Directions:

  1. Open jump ring, slide on crystal pendant and bottom hole of acetate. Close jump ring.
  2. Open another jump ring, slide on top hole of acetate and hammertone ring. Close jump ring.
  3. Open earwire loop and slide on hammertone ring. Close loop.
  4. Repeat all steps for other earring.


Acetate Leaf Earrings

Palm trees are an iconic motif to summer or tropical paradise. Use acetate tropical leaf pendant with faceted gemstones for a natural and earthy vibe to summer.

What you’ll need to design Acetate Leaf Earrings:

GoodyBeads Blog | FREE Tutorial: Aceate Tropical Leaf Earrings with Onyx gemstone.

Directions:

  1. Open eyepin loop and slide on loop on earwire. Close loop.
  2. On the eyepin, slide on a gemstone bead and make a simple loop big enough to slide through Acetate.
  3. Open loop you make in Step 2 and slide on acetate leaf. Close loop.
  4. Repeat all steps for other earring.

Specific items used in earring image: Z019976, Z013968, ONX8RD-F-8, A019616


Acetate Fringe Earrings

Design these cute acetate fringe earrings for your next bar-b-que or picnic outing!

What you’ll need for these earrings:

GoodyBeads Blog | Acetate Fringe Earrings with FREE tutorial.

Directions:

  1. Open jump ring, slide on an acetate pendant and through one of the three loops of chandelier component. Close jump ring.
  2. Repeat Step 1, TWO more times for other chandelier loops.
  3. Open ear wire loop and slide on top loop of chandelier component. Close loop.
  4. Repeat all steps for other earring.


Gemstone Ripple Necklace

Get lost in this mesmerizing DIY necklace with DakotaStones Gemstone Ladder Pendant set and Adjustable Necklace Sliding Clasp.


What you’ll need to make Gemstone Ripple Necklace:


GoodyBeads Blog | Gemstone Ripple Adjustable Necklace with DakotaStones Ladder Pendant Set

Directions:

  1. Cut necklace memory wire at 1/3″ of a coil with Memory Wire Shears.
  2. With Memory Wire Finishing Pliers, curl one end of your memory wire inwards, towards curve of your memory wire to make a simple loop.
  3. Slide on the sequence of your gemstone ladder set.
  4. Make another simple loop to the other end of your memory wire.
  5. Center gemstone set in the middle of the memory wire.
  6. With the 20 Gauge Artistic Wire, wrap 4 coils around the memory wire, on each end of the pendant set. Cut excess wire.
  7. Use crimping pliers to crimp the coils in Step 6 to keep coils and pendant set in place.
  8. Open jump ring on necklace sliding clasp and slide through one loop of memory wire. Close jump ring. Repeat to other jump ring and other memory wire loop.


Design necklace with these other 11 Piece Gemstone Ladder Pendant Sets


GoodyBeads | Blog - 3 Ways to making DIY necklaces with Gemstone Pendant Sets

Pendant Set Item Numbers: LAPLGIM15-38-LAD-PENPPLBRZ15-38-LAD-PENRCJ15-38-LAD-PENORIM15-38-LAD-PENLAPBRZ15-38-LAD-PENTQSBRZ15-38-LAD-PENMLTPYR15-38-LAD-PENPKBL15-38-LAD-PENMGI-FAN-PEN-11


Gem Link Earrings

Minimalistic jewelry is a trendy summer staple. Make this easy DIY Gem Link Earrings with faceted point pendants.


What you’ll need for earrings:


GoodyBeads Blog | Gem Link Earrings with Beadalon Quick Link Rings and Gem Faceted Point Pendants. FREE Tutorial on the Blog.

Directions

  1. Push bail opening inward and slide ring link inside bail. Pull bail opening back.
  2. Open earwire loop and slide on ring link. Close loop.
  3. Repeat all steps for other earring.

Items used in earrings: A008998, Z020488 (2), Z010360