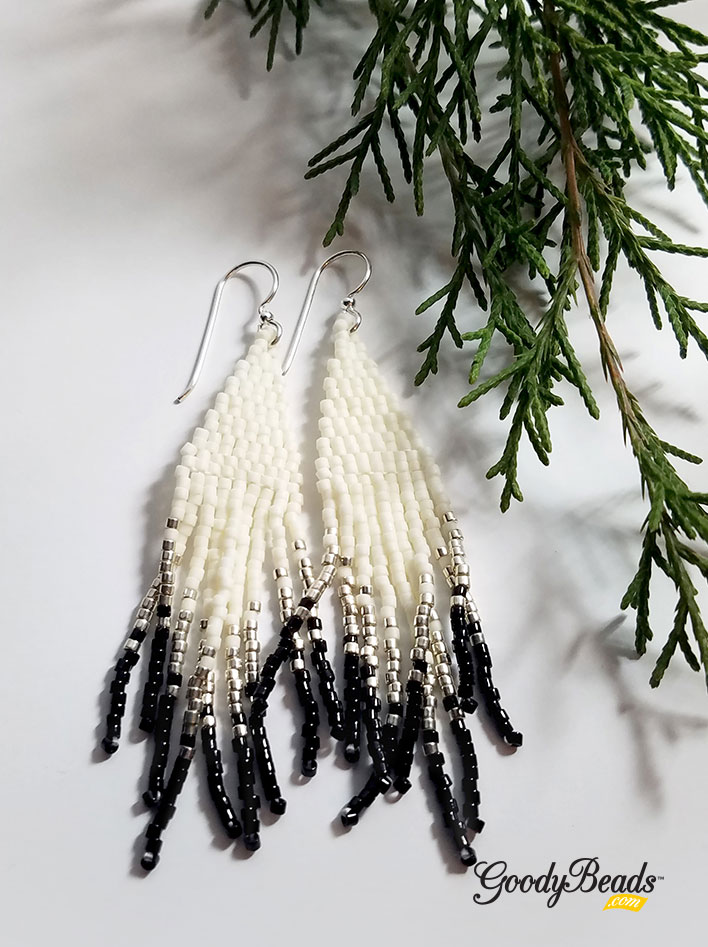
DIY Beaded Frilly Fringe Earrings with FREE Pattern Tutorial

Make today a pair of Beaded Frilly Fringe Earrings with size 11/0 seed beads or Delicas. Beaded earrings are everywhere! They are a fun piece for any occasion because of the many color combinations you can create with them. Our FREE DIY is this easy-to-follow pattern tutorial.

What you’ll need:

——- CLICK for FREE Downloadable Pattern Tutorial ——-

Beaded Frilly Fringe Earrings

Items used in earring sample: SB00444, SB00423, SB00447, TCZ0148, A006599 & A006767.

Items used in earrings: SB00260, SB00128, SB00141, TCZ0077, A006599 & A006767.

NOTE: in this pair of earrings (above), in Steps 3-5 where you are brick stitching each row, you’ll add a TWO delicas to create each row instead of one.

Need more Fringe? Check out these other ideas:


Black & White Gemstone Leather Necklace

This Gemstone Leather Necklace incorporates the classic black and white colors. It is a fun piece for a business pantsuit or a small dinner party. Made with large-hole gemstones and 1mm leather cord, you can make this in fun necklace in minutes!

What you’ll need for Gemstone Leather Necklace:

GoodyBeads.com Blog | Black & White Gemstone Leather Necklace with large-hole Gemstones.

GoodyBeads.com Blog | Black & White Gemstone Leather Necklace with large-hole Gemstones.

Directions:

  1. Open 4mm jump ring, slide through loop of clasp and close jump ring. Open another 4mm jump ring, slide through closed ring and close jump ring. Open lobster clasp and clasp onto the closed ring.
  2. Cut a piece of leather at 27 inches.
  3. Slide one end of the leather through a 4mm jump ring in step 1, about 1.5 inch of the way. Make a slip knot. Use pliers to tighten the slip knot before cutting off excess leather end.

4. Slide on the following onto the leather:
3 onyx beads, 5 flat brass beads and 3 onyx beads.
5. Repeat step 3 to other leather end and through other 4mm jump ring from Step 1.


Spend the Holidays with Swarovski® – Christmas Holiday

We’re celebrating festive spirit with our friends at Swarovski: Create Your Style and celebrating with Christmas Holiday colors. Plus, we have a fun DIY project to get hype up the holidays.

Here are our selection of Swarovski crystals to embrace the festive and classic colors of Christmas Holiday:

  • Reds – Siam, Light Siam, Scarlet, Rouge Pearl & Red Coral Pearl.
  • Green – Emerald, Luminous Green Mystic, Vitrail Medium, Olivine, Iridescent Tahitian Look and Eden Green Pearl.
  • Yellow/Gold/Bronze: Topaz, Light Topaz, Golden Shadow, Metallic Sunshine, Yellow Opal, Sunflower, Citrine, Copper & Metallic Light Gold,

Red Currant Road Bracelet

Items used in Bracelet: SW02559 (24), SW02635 (5), TC02648 (5), TC01870, TL00265, A011531, Z012973 & Z001065.

Directions:

  1. Using alcohol wipes clean all off the links and set aside to dry.
  2. Using one 10mm Scarlet fancy stone glue into matching finding. Repeat four more times and set aside to dry for 24 hours.
  3. Using one head pin slide on one 6mm Rouge Pearl and make a simple loop. Repeat 23 more times and set aside.
  4. Using two 5mm jump rings attach each jump ring separately to the same side of one frame made in Step 2 (double jump ringing). Use two more 5mm jump rings to attach to the opposite side. Repeat this step four more times and set aside.
  5. Using two 9mm jump rings, connect together two links made in Step 4 so that it is double jump ringed. Continue this process until all five stone set links are connected.
  6. Using three pearl drops, attach to one side of the double medium jump ring connection between stone set links. Repeat for opposite side of the two 9mm jump ring connection. Repeat this step until you have 4 complete sets of 6 pearls between all 5 stone set links.
  7. Using one end of the Maker’s toggle attach two small jump rings by attaching each jump ring separately to the same side of the toggle (double jump ringing). Repeat for other side of the toggle piece.
  8. To attach the toggles to the ends of the bracelet use two medium jump rings to attach the double jump rings from the bracelet to the toggle. Repeat for the other side.

Bracelet and tutorial courtesy of Swarovski: Create Your Style.


DIY Beadable Gifts for the Holiday Table

How will you dress your holiday table this year? Why not add some fun utensils like our selection of Beadable Gifts? Last year we visited a local lunch/catering business to show how to use these beadable gifts. We’re sad to say that the business is no longer there but we still dream about their delicious soups. Here are some ideas to reel in the festivities for the holidays.

Items you’ll need:

Toss and serve some fresh salads with a pair of Salad Serving Set. (A003251)

Get the Beadable Tongs (Z005787) for the mixed salads, fried chicken or as an extra pair of hands!

Help carve your turkey or ham with the Serving Fork (Z005605).

Cake Server Z007097 to serve up your favorite desserts!

Make it a memorable evening with a popping a bottle of bubbly and capping it off with a sweet Wine Stopper (A003264)

Check out our other beadable ideas to get you inspired:

Beadable Gifts Video

Check out our video HERE from 2019 on how to utilize these fun ideas!


5 DIY Jewelry Designs with Carabiner Lock Clasp

One of our newest products for 2020 is the Carabiner Lock Clasp. We have 5 examples for designing DIY jewelry with this clasp.

Chunky and Cool Bracelets

Items used in bracelets:

In our bracelet examples above, we’ve only used 2 components: chain and carabiner lock clasps. Because it opens by unscrewing its side, you can easily cut your chain to your bracelet length and slide your chain ends through the clasp. No jump rings required, just fun bracelets to pair with your arm candy collection. Plus, these bracelets are the perfect starter to add your charms or tassels to personalize it!

Neck Mess Love

Items used in necklace:

In our 3 necklaces, we’re making the clasp the focal/statement piece. Create a fun pendant drop with tassels, charms or baubles. Or design a modern, minimalistic lariat chain necklace.


GoodyBeads November Weekly DIY Challenge

Welcome to our first ever GoodyBeads Weekly DIY Challenge where YOU are the talented designer! Each week in November, we’ll dedicate a product category or theme to inspire and motivate you to design DIY jewelry and crafts. We are challenging you to be creative and innovative. Think inside the box. Think outside the box. Even, think on the edge of the box. Get those creative gears running and design with us today!

With this challenge, each week we’ll award a random participant with a Goody prize and your design may be featured in our GoodyBeads blog! (With your permission of course.)

How to Participate in DIY Challenge:

  1. Design must include featured product category or theme with at least one GoodyBeads item.
  2. Post your design on your Social Media page (Facebook or Instagram) and tag us @GoodyBeads
  3. Use DIY Challenge hashtag #GOODYBEADERS and the weekly hashtag theme:
    November 1 – 7: Acetate Week#GBACETATE
    November 8 – 14: Kit Week #GBDIYKITS
    November 15 -21: Wood & Resin Week#GBWOODRESIN
    November 22 – 30: Holiday Projects Week#GBHOLIDAYDIY
  4. You have until the last day of the week (Saturday) to submit that week’s challenge.
  5. Winners will be chosen at random four days after each week’s challenge and notified.

Remember to have fun. If you need some help, there are loads of projects on the Goody Beads Blog.

Happy Beading!