Holiday Gift Ideas: Trendsetter

Here are some great DIY jewelry gift ideas for our trendy friend. Our Trendsetter is always wearing the latest fashion and jewelry. She not only wears it, but also influences others to join in on the fad. So try out some of these DIY jewelry with some of our newest products like wood and resin pendant charms, Acetate, Enamel, post earrings, lariat necklaces, adjustable bracelets with sliding clasps and DIY kits are trendy. It will surely be a eyeopener for your Trendsetter friend!


  1. Wood and Resin Pendant Necklace
  2. Golden Halo Earrings with Swarovski Crystals
  3. DIY Jewelry using Enamel Component
  4. Tory’s Acetate & Silver Drop Earrings
  5. Acetate Fringe Earrings
  6. Lariat Gemstones and Tassel Necklace
  7. Diakonos Kits


Holiday Gift Ideas to Sparkle, Glam and Bling

Know someone who needs a fun holiday gift that brings sparkle, glam and bling to their outfit? These gift ideas uses the sparkle of Swarovski® crystals and pearls. Gift some exciting DIY jewelry that’ll make her shine! Here are some ideas to get you started:

GoodyBeads | Holiday DIY JewelryGift Ideas with Tutorials

  1. Swarovski Aquarmarine
  2. Swarovski Raindrop Pendant
  3. Memory Wire Wrap Bracelets with Swarovski Fine Rocks Beads
  4. Classic Crystal Hoop Earrings
  5. Adjustable Bracelets with Swarovski Crystals
  6. Rhinestone Chain Bracelet
  7. Pearl Jewelry, a Classic Trend
  8. How to Use Pinch Bails with Swarovski Pendants


Holiday DIY Gift Ideas for the Boho Beauty

These Holiday DIY gift ideas are for the Boho Beauty in your life.She seeks a relaxing vibe and a moment of zen. She loves natural and earthy tone, so make sure you design with fibers like Ribbon, Tassels, Leather and Straw, as well as some Gemstone. Here are some great DIY projects for the Boho Beauty!

BohoBeauty_Gift_Tassel

  1. Straw & Leather Macrame
  2. Fishtail Cuff
  3. Fabric Tassel Jewelry
  4. Fan Tassels
  5. Macrame Leather Bracelet
  6. Boho Feather Earrings
  7. Silk Ribbon in Jewelry
  8. Long Tassels


Holiday Gift Ideas: Modern Minimalist

These gift ideas are for the Modern Minimalistic stylist in your life. They love the simplistic, clean lines like a single chain necklace and dramatic shapes like a large pair of hoop earrings or a triangular pendant. They like the monochromatic of silver and the bold shine of gold or even feel gorgeous with the rose gold color! There’s minimal colors in their jewelry palette and LOVE the many ways they can layer up their pieces!

Here are some DIY projects to gift to your Modern Minimalistic friend:


Silver Jewelry

GoodyBeads | Holiday Gifts with Modern Minimalist and Silver Jewelry

  1. Heidi’s Geometric Jewelry
  2. Metal Fringe Earrings
  3. Lariat Beading Chain
  4. Chevron Chain Necklace


Gold Jewelry

GoodyBeads | Modern Minimalist Holiday Gifts with Gold

  1. Pearl Hoop Earrings
  2. Silk Cord Jewelry
  3. DIY Beadable
  4. Enamel Point Earrings


Beadable Holiday Wreath Earring with Tutorial

Who doesn’t LOVE a fun pair of festive, holiday wreath earrings? This pair is designed using our Beadable Ring Pendant (Z011336) and 11/0 Delica Seed Beads. Design with classic red and green colors or mix it up!

What you’ll need:

BeadableWreathEarrings_image

Directions:

  1. Using a 3 feet piece of beading thread, add a stopper bead to the end of your beading thread, leaving 4-5 inch tail. (To add a stopper bead, pick up a bead and slide towards to end of your thread end, leaving 4-5 inch tail. Sew through the bead, looping two times through the seed bead.)
    BeadableWreathEarrings_stopper
  2. Sew through an outer hole of your beadable pendant.
  3. Pick up 7 beads (do variation of reds and green, using more green than reds).
  4. Sew down the hole across the channel. (The beads wont be sitting in the channel.)
  5. Sew up through the next hole and repeat steps 3 and 4.
  6. You will repeat this process, zigzagging through the pendant until you have gone all the way around.
  7. While on the backside of your pendant, sew up the next hole and through the first seed bead. Pick up 4 seed beads, sew across the channel, down the last delica bead and through the hole.
  8. Repeat step 7 as you sew back through the beadable pendant again.
  9. Once you’ve finished, tie off your thread ends and cut off excess.
  10. Open your earring loop and slide your beadable wreath on.
  11. Repeat all steps for other earring.


Swarovski® Emerald Jewelry Tutorials

We’ve got FOUR easy projects using November’s Swarovski Psychology of Color: Emerald. Design lovely jewelry with this hue!

Emerald and Pearl Stretch Bracelet

GoodyBeads | Blog: Psychology of Color Emerald & Pearl stretch bracelet

Items used in bracelet: SW00062 (11), SW00665(11), Z001355 & A021634

Directions

  1. Cut 9 inches of stretch cord. Pull on elastic to loosen the elasticity.
  2. Slide on the stretch cord emerald crystal, gold disc, pearl and gold disc.
    1. Repeat sequence another ten more times.
  3. Make a surgeon’s knot with the elastic.
  4. Optional: Add a dot of glue.
  5. Cut off excess elastic.

Emerald & Pearl Drop Earrings

GoodyBeads | Blog: Psychology of Color Emerald & Pearl drop earrings, FREE Tutorial

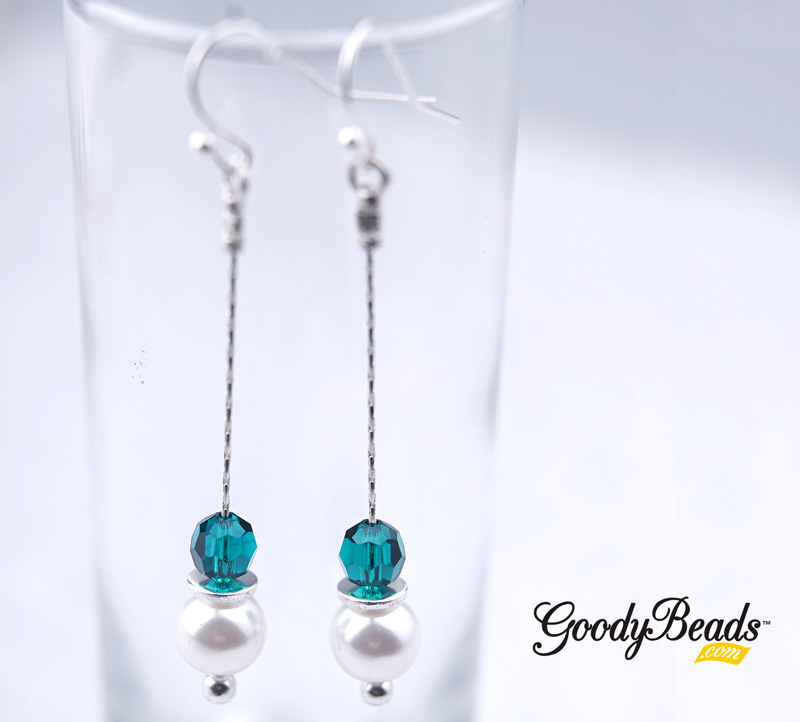
Items used in earrings: SW00061 (2), SW00666 (2), CH00724, X001505A021657, Z012031, A015821 & Z002570

Directions

  1. Cut two pieces of beading chain at 1 and 3/4 inches. (You can cut it shorter or longer for your length preference.)
  2. Glue a memory wire end to one end of the beading chain. Repeat again for other beading chain. Let it dry for a few minutes.
  3. Slide on the beading chain: pearl, silver disc and emerald crystal. Repeat again for other beading chain.
  4. Slide end cap on beading chain and using your fine nose pliers, crimp the end cap. Repeat again for other end cap and beading chain.
  5. Open earwire loop, slide on end cap loop and close loop. Repeat again for other dangle.

Emerald Teardrop Earrings

GoodyBeads | Blog: Psychology of Color Emerald Teardrop Earrings

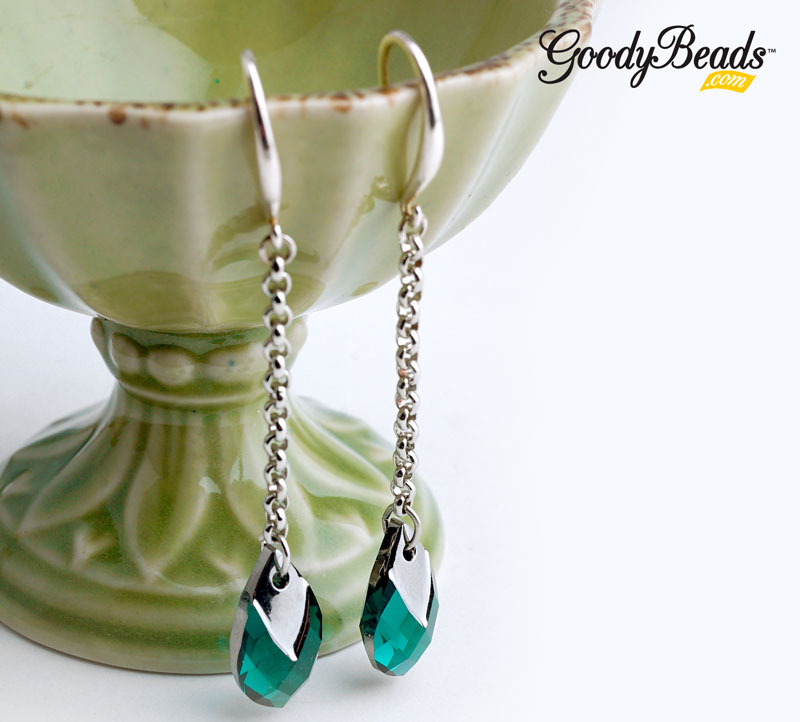
Items used in earrings: A008182 (or CH01090), SW01994 (2), A008799, Z07856 & Z003694.

Directions

  1. Cut two chain pieces at 1 inch. Make sure both chain has the same amount of links and has an even number.
  2. Open oval jump ring, slide through one end of your chain and emerald pendant
  3. Open small jump ring, slide through other end of chain and through earwire loop.
  4. Repeat Steps 2 & 3 for other earring.

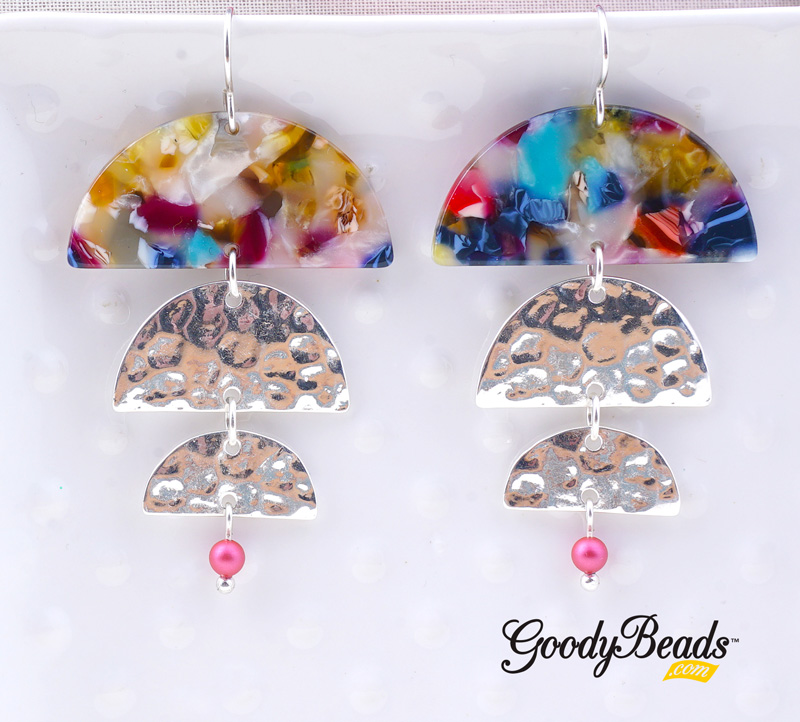
Emerald & Acetate Earrings

SW_POC_Emerald_AcetateEarrings

Items used in earrings: Z013607, Z010571, Z011522, A019600, SW00167 (2) & Z001831

Directions

  1. Open jump ring, slide through acetate hole and disc hole. Close jump ring.
  2. Open eyepin loop, slide through other hole of gold disc, close loop.
  3. Slide an emerald bicone crystal on the eyepin and make a simple loop.
  4. Open loop you just made, slide through ear wire loop and close loop.
  5. Repeat all steps for other earring.


Swarovski Psychology of Color: Emerald

For November, Swarovski’s Psychology of Colors is Emerald. Check out how powerful and grounding this hue is!

GoodyBeads | Blog: Swarovski Psychology of Color: Emerald
Embrace your own life balance with this month’s color, Emerald. When you design with Emerald, its elegant hue is refreshing. Emerald is a color loved by many through the ages. Here are some Swarovski colors to match this statement hue:

  • Emerald
  • Eden Green Pearls
  • Erinite
  • Crystal Iridescent Green
  • Crystal Iridescent Tahitian Look
  • Royal Green
  • Fern Green

Check out our other blog post with designs using Swarovski Emerald!
GoodyBeads | Blog: Psychology of Color Emerald with FREE DIY jewelry Projects.

Swarovski Psychology of Color: Emerald


Sparkling Beaded Holiday Wreath with Chinese Glass Beads

We have a show stopping DIY craft for you this holiday season. Make a stunning, sparkly beaded holiday wreath with beads!

Inspired by Martha Stewart, because she is the Queen of DIY, we followed the video instructions to her Holiday Druk Bead Wreath to create our own! For our version, we’re using different beads and findings, but using the same process.

What you’ll need for wreath:

  • 8 Inch foam wreath from your local craft store. (We got ours from Joann Fabric.)
  • Red Wide Satin Ribbon (Also got this from Joann Fabric)
  • 1 Inch Brass Headpins – 5 packs of A019663
  • 10mm Red Chinese Crystals – 6 packs of A016817
  • Super New Glue – A015821

As a note, you can use different color and size Chinese Crystals. You can also use other kinds of beads, such as Satin or Miracle beads,  Swarovski Crystals or Pearls,  Gemstone Beads or even some wood beads. The ideas are limitless. One thing to keep in mind is to make sure to have a similar ribbon color to match the beads you will be using. If you have a variation of colors, testing on white or black ribbon would work. You can also use a variation of sizes from 4mm to 12mm beads in your wreath.

GoodyBeads | Blog - Beaded Wreath with Chinese Crystals - FREE TUTORIAL

Directions:

  1. Wrap your wreath with ribbon all the way around. Secure the end with a pin. (You can use crafting glue to help secure your ribbon in place.)
  2. Cut all your headpin tips at an angle. This will help you push through the ribbon and foam. (Martha Stewart colored her pin tips with red nail polish or paint. You can if you want, we opted out of this option.)
  3. Slide a bead onto a headpin, dip the tip into your glue and push headpin into your wreath. You may need to twist the headpin sometime to punch through the ribbon.
  4. Repeat and stagger your beads throughout. (You only need to fill the front side of your wreath and not the back. However, you can if you would like to.)
  5. Finish it off with a ribbon bow and a loop of ribbon (pinned and glued to the back).

Have a Happy DIY Holiday!


Beadalon® Spin-N-Bead – Video Tutorial

We have a fun video tutorial with Beadalon’s Spin-N-Bead, Senior and Junior versions, which will make stringing on beads easier and faster!


GoodyBeads | Blog: Beadalon Spin-N-Bead Video Tutorial


Beadalon Spin-N-Bead Senior

Spin-N-Bead Senior Bead Loader with One Curved Rigid Beading Needle (TL00333). String seed beads and other small beads quickly and easily with the Spin-N-Bead Senior. Because the bowl is bigger you can use larger beads, up to 6mm. The speed at which the beads will load diminishes as the beads get larger. This bead loader makes tedious bead stringing fast and easy. Fill the bowl about half-full of beads, then spin. Insert the curved needle into the spinning beads and watch them jump onto the needle. The beads nest all on their own! Rigid Curved Needle included. You can also buy extra curved needles separately with Z001463.


Beadalon Spin-N-Bead Junior

Beadalon Spin-N-Bead Junior (TL00341) is smaller than the Senior version and makes stringing seed beads, liquid silver beads, or other small beads quick and easy! Fill the bowl about half-full of beads, and then spin. Insert a Curved Big Eye Beading Needle into the spinning beads and watch them jump onto the needle! The beads nest all on their own – when ample beads are on the needle, then move them to the connected stringing material and dip the needle back into the spinning beads to load on another few inches. It’s fun to use and an excellent time saver. You can buy curved needles separately with Z001463.


Video Tutorial


Tory’s Acetate & Silver Drop Earrings

Tory’s pair of earrings are bold and bright. They feature some of our newest products like acetate components, Textured Half Circle Connectors and Swarovski® pearls in a Mulberry color. We just LOVE the tiered look in these earrings and the vibrant colors from the Mulberry complementing the acetate half circle.

What you’ll need for earrings:

  • 37x18mm Multi with White Acetate Half Circle Pendant/Connector – Z012457
  • 27x15mm Silver Plated Textured Half Circle – Z014989 (2)
  • 20x10mm Silver Plated Textured Half Circle – Z016741 (2)
  • Sterling Silver Front Loop Earring Wire by Tierracast® – TC02297
  • 1 Inch Silver Plated 21 Gauge Headpins with Ball Top – A019691
  • Swarovski® 4mm Crystal Mulberry PinkPearl – SW02198 (2)
  • 6mm Round Jump Ring – A001529


GoodyBeads - Blog: Acetate and Silver drop Earrings with FREE Tutorial

Directions:

  1. On a headpin, slide on a pearl bead and make a simple loop.
  2. Open pearl dangle loop and slide on hole from the small half circle (flat side). Close loop.
  3. Open a jump ring, slide on other hole from small half circle and the hole from the larger half circle (flat side). Close jump ring.
  4. Open another jump ring, slid eon other hole from larger half circle and hole of acetate connecter (flat side). Close jump ring.
  5. Open earwire loop, slide on other hole of acetate connector and close loop.
  6. Repeat all steps for other earring.


Shanna’s Gemstone & Leather Layer Necklace

Let’s get to designing a leather layer necklace using 2mm leather cord and large-hole gemstones. This easy DIY will get you making more than one!


What you’ll need:


GoodyBeads | Shanna's Gemstone & Leather Layer Necklace with FREE Tutorial

GoodyBeads | Shanna's Gemstone & Leather Layer Necklace with FREE Tutorial


Directions:

  1. Start with 1 meter of leather or about 39 inches of leather.
  2. Fold leather in half and make an other hand knot at the folded part to create a 1/2 inch loop.
  3. On one leather cord, slide on FOUR 8mm gemstone.
    1. Make an overhand knot at the end of this leather cord.
    2. Slide one gemstone down to the knot and make another overhand knot after this gemstone bead, sandwiching the bead between two knots.
  4. On the other leather cord, slide on a 10mm gemstone and a 8mm gemstone.
    1. Make an overhand knot an inch shorter than the knot you made in step 3-1.
    2. Slide 8mm gemstone down to the knot and make another overhand knot after this gemstone bead, sandwiching the bead between two knots.
  5. Done! To wear, slide both gemstone knotted ends through the leather loop, one at a time.


Heidi’s Geometric Jewelry with Tutorials

Heidi’s jewelry style has a lot of geometric shapes and simplistic angles. Her use of connectors, dangles and findings are everything you’d love in minimalistic jewelry!


Tiered Crescent Earrings

GoodyBeads | Blog - Heidi's Holiday Jewelry with Geometric Shapes, Free Tutorials

Items used in earrings: A008799, Z016771 (2), Z016773 (2), Z016775 (2) & Z003942

Directions:

  1. Open jump ring, slide on small crescent charm and inner hole of medium crescent connector. Close jump ring.
  2. Open another jump ring, slide on other hole of medium crescent connector and through inner hole of large crescent connector. Close jump ring.
  3. Slide other hole of large crescent connector through kidney earrings to sit inside earring loop. Cinch the opening of the hole to close.
  4. Repeat all steps for other earring.


Black Diamond Earrings

GoodyBeads | Blog - Heidi's Holiday Jewelry with Geometric Shapes, Free Tutorials

Items used in earrings: Z010760, Z001829 & A008807

Directions:

  1. Open jump ring and slide on wood/resin charm and through hole of post earrings. Close jump ring.
  2. Repeat for other earring.


Double Diamond Bracelet

GoodyBeads | Blog - Heidi's Holiday Jewelry with Geometric Shapes, Free Tutorials

Items used in bracelet: SW02265 (2), Z011872 & A001529

Directions:

  1. Connect both Swarovski triangle sew-ons with two jump rings (A001529) at the bottom/base of the connector.
  2. Remove both jump rings on sliding clasp.
  3. Connect each end or points of the triangle to either ends of the sliding clasp with 6mm jump ring (A001529).


So Vang’s Teal Brown Impression Jasper Wrap Bracelet

The holidays are upon us and we’re starting off your DIY holiday gifts with So Vang’s wrap bracelet using her new favorite Teal Brown Impression Jasper beads. Wrap bracelets are easy to make and design with Beadalon Memory Wire and your favorite beads! Here’s what you need to design this Teal Brown Impression Jasper Wrap Bracelet:


GoodyBeads | Blog - Teal Brown Impression Jasper Wrap Bracelet with FREE Tutorial

Directions:

  1. Make a simple loop at one end of your memory wire with memory wire finishing pliers.
  2. Slide the following SECTIONS onto the memory wire:
    1. Seed bead, gemstone, seed bead, 3 gemstone, seed bead, gemstone, 3 seed bead, gemstone, seed bead, 3 gemstone, seed bead, gemstone, 3 seed bead, gemstone, seed bead, 3 gemstone, seed bead, gemstone, seed bead, and curved tube.
    2. Seed bead, gemstone, seed bead, 3 gemstone, seed bead, gemstone, 3 seed bead, gemstone, seed bead, 3 gemstone, seed bead, gemstone, seed bead and curved tube.
    3. Repeat SECTION 1.
    4. Repeat SECTION 2.
    5. Repeat SECTION 1.
    6. Repeat SECTION 2.
    7. Repeat SECTION 1.
    8. Seed bead, gemstone, seed bead, 3 gemstone, seed bead, gemstone, 3 seed bead, gemstone, seed bead, 3 gemstone, seed bead, gemstone and seed bead.
  3. Cut excess memory wire, leaving a 1/2″ end.
  4. Make a simple loop to memory wire end you just cut. (Option: Wrap simple loop into a coil to tighten your designs.)


DIY Lariat Necklace with Terra Agate Gemstone & Leather

We’re still seeing lariat necklaces everywhere and it certainly will trend for a while because of it’s organic look! You wear it long or short, depending on how you dress it. In our DIY project today, is a lariat necklace using 1mm leather cord, brass beads and some gorgeous Terra Agate gemstones!

What you’ll need for necklace:

GoodyBeads | Blog - Terra Agate and Leather Lariat Necklace with FREE Tutorial

Directions:

  1. Start with 2 meters of leather cord. Fold in half and at the loop, make a lark’s head knot through the Organic Hoop.
  2. On both leather cords, slide on a gold bead, Terra Agate bead and another gold bead.
  3. Make an overhand knot with both leather cords close to the last gold bead.
  4. Wrap your piece around your neck to determine where you would like the lariat gemstone dangle to hang from and the length of your necklace. Make an overhand knot there.
  5. Slide on both leather cords another gold bead, Terra Agate bead and gold bead. Make an overhand knot close to the last gold bead you added.
  6. On one leather cord end, slide on 3 gold beads and make an overhand knot about 2 inches below the Terra Agate bead. Cut off excess.
  7. On the other leather cord end, slide on 3 gold beads and make an overhand knot about 1.5 inches below the Terre Agate bead. Cut off excess.


Wood and Resin Pendant Necklace

New Wood and Resin Charms combines beautiful resin colors and natural wood for a show-stopping component to all your DIY jewelry. Here, we’ve taken this large focal pendant and made a simple necklace using pinch bails and our Adjustable Rollo Chain Necklace Double Slide Clasp.


What you’ll need:

  • Gold Adjustable Rollo Chain Necklace Double Slide Clasp – Z010757
  • Wood & Deep Red Resin Free Form Pendant – Z010703
  • Pinch Bail – TC02583
  • 9mm Gold Jump Ring – Z020041


ResinPendantNecklace_Main

Directions:

  1. Slide pinch bail over hole of wood/resin pendant and pinch it close.
  2. With two pliers, open jump ring, slide on bail and slide through both jump rings of adjustable rollo chain necklace. Close jump ring.
  3. You’re done!