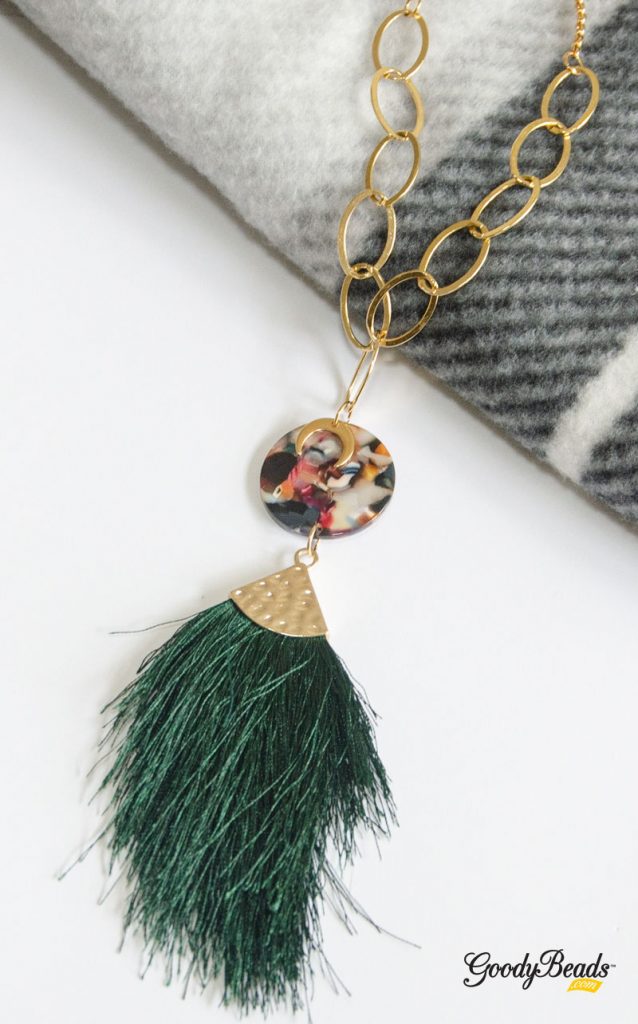
DIY Hexagon Rattan Straw Necklace with Gold Findings

Need a fun necklace to complement your summer? Why not try this DIY necklace with Hexagon Straw/Rattan component and thread bead!

Things you’ll need for necklace:

  • Hexagon Rattan Straw Component – Z017901
  • 3 Inch Gold Plated Headpin – A019680
  • Brown Thread Wrap Oval Bead – Z017910
  • 6mm Bead Aligner – TC00971 (2)
  • Shiny Gold Hammered Disc Connector Charm – Y008224
  • 8mm Gold Plated Jump Ring – A011523
  • 6mm Gold Plated Jump Ring – Z011522
  • Gold Plated Adjustable Rollo Chain Necklace Double Slide Clasp – Z010757

GoodyBeads Blog | DIY Hexagon Rattan Straw Necklace with Thread Wrap Oval Bead.

Directions:

  1. Slide on a headpin a bead aligner, thread bead and another bead aligner. Make a simple loop, but make it large to slide on straw connector. About 8-10mm around.
  2. Taking a Bead Reamer, one side of your round nose pliers or an awl, poke a hole on your rattan at one tip between the first and second outer layer. Repeat to opposite end of your rattan.
  3. Open bead thread dangle loop and slide through one hole you made in Step 2. Close loop.
  4. Open 8mm jump ring, slide on other hole on rattan connector and through one hole of disc connector. Close jump ring.
  5. Open 6mm jump ring, slide through other hole of disc connector and through both rings on adjustable necklace clasp. Close jump ring.


DIY Bubbly Earrings with Thread Beads and Gold Findings

Embrace summer boho jewelry with handmade thread beads. Today’s DIY would pair perfectly with a beachside cocktail!

What you’ll need for earrings:

  • Ivory Thread Beads – Z017904
  • 2 Inch Headpin with Ball – A019696
  • Matte Gold Circles Connectors – Z014013 (2)
  • TierraCast® Gold Earring Wire – TCZ0139
  • 4mm Bicone Crystal Luminous Green – SW00574 (4)

GoodyBeads Blog | DIY Thread Bead and Bubbly Earrings - FREE tutorial

Directions:

  1. Slide the following onto a headpin: bicone crystal, thread bead and bicone crystal.
  2. Make a wrapped loop, making sure to attach to a connector hole before completing wrapped loop. (You can also make a simple loop and attach to connector).
  3. Open earwire loop, slide through other connector hole and close loop.
  4. Repeat all steps for other earring.


DIY Jewelry with Swarovski® Around the World: India

This month’s trip is India. Find out how culturally rich and vibrant this country is from its colorful clothing to its exotic cuisine. Plus, bathe in the hues Swarovski suggests to inspire your India trip along with a DIY jewelry project for you to try.

India

One of the oldest civilizations in the world, India is a mosaic of multicultural experiences and rich heritage. Extending from the snow-covered Himalayan mountains to the tropical rain forests of the south, it is impossible to ignore India’s mesmeric conflation of the old and the new. Walking through the bustling city streets you are greeted by a diverse variety of cuisines, arts, crafts, faiths, and nature. Experiencing different textures, sounds and smells triggered the emotion that prompted these designs.

India – Swarovski Colors

  • Indicolite
  • Light Topaz (Note, we are using Light Colorado Topaz in DIY jewelry)
  • Fuchsia

India Inspired DIY Jewelry

GoodyBeads Blog | DIY Jewelry with Swarovski crystals. India Inspired DIY Jewelry.

GoodyBeads Blog | DIY Jewelry with Swarovski crystals. India Inspired DIY Jewelry.

What you’ll need for earrings:

  • 65mm Gold Plated Round Connector With Dot N Dash Tassel – Z017930
  • 9mm Light Colorado Topaz Pear Cut Pendant – SW02491 (2)
  • 8mm Indicolite Round Beads – SW02538 (2)
  • 4mm Bicone Crystal Fuchsia – SW00126 (2)
  • 11/0 Gold Seed Bead – SB00423
  • 2 Inch Gold Eyepin – A019611
  • Oval Jump Ring – A008801

Directions:

  1. Open jump ring, slide on crystal pendant and through inner loop of connector. Close jump ring.
  2. Open eyepin loop, slide through top loop of connector and close loop.
  3. Slide on the eyepin a seed bead, 8mm round crystal, seed bead, 4mm bicone crystal and seed bead.
  4. Open loop you made step 3, slide through earwire loop and close loop.
  5. Repeat all steps for other earring.


DIY Pearly Posh Earrings with Swarovski Pearls

Let’s continue our love of summertime jewelry with these cute Pearly Posh Earrings. With only 4 components, you can whip these up in no time!

What you’ll need:

GoodyBeads Blog |

Directions:

  1. Slide a pearl onto a headpin and make a simple loop.
  2. Open up pearl dangle loop and slide through inner loop of connector. Close loop.
  3. Open earwire loop and slide on top loop of connector. Close loop.
  4. Repeat all steps for other earring.


DIY Large Ring Earrings with White Enamel Link

You know it’s summer when jewelry gets bigger and bigger. These pair of earrings consists of large 50mm rings from Nunn Design and accented with white enamel connectors. It’s going to be a grand Summer with these earrings.

What you’ll need for earrings:

  • 50mm Grand Hoop from Nunn Design – Z008275 (2)
  • 12mm White Enamel Round Connector – Z008744 (2)
  • 5mm Oval Jump Rings – A008799
  • TierraCast Earwire – TCZ0078

Directions:

  1. Open jump ring, slide on ring and a loop on enamel connector. Close jump ring.
  2. Open another jump ring, slide on other hole of enamel connector and earwire loop. Close jump ring.
  3. Repeat all steps for other earring.


DIY Swarovski® Amethyst & Pearl Hoop Earrings

A fun new and old favorite, are these pair of summer-loving hoop earrings with Swarovski crystals and pearls.

What you’ll need:

  • 6mm Round White Swarovski Pearl – SW00665 (4)
  • 4mm Bicone Crystals, Light Amethyst – SW00195 (6)
  • 6mm Bicone Crystals, Light Amethyst – SW00196 (2)
  • 11/0 Silver Lined Amethyst Seed Bead – SB00339
  • 3mm Gold Round Beads – Z001310
  • Gold Plated Hoop – A013205
  • Earwires – TCZ0148
  • Gold Headpin – A019651
    Note: Directions are for making wrapped loops. If you prefer to make simple loops, we suggest using a harder gauge wire like A019658.

Directions:

  1. Slide on a headpin; 4mm bicone and seed bead. Make a simple or wrapped loop. Make a total of 4 dangles.
  2. Slide on a headpin; seed bead, 3mm round bead, pearl and seed bead. Make a simple or wrapped loop. Make a total of 4 dangles.
  3. Slide on a headpin; seed bead, 3mm round bead, 6mm bicone, 3mm round, seed bead, 3mm round, 4mm bicone and seed bead. Make a simple or wrapped loop. Make a total of 2 dangles.
  4. Cut the tab part of a hoop finding off.
  5. Make a simple loop to one end of your hoop perpendicular to the loop of the hoop. Refer to previous Memory Wire Hoop Tutorial blog post.
  6. Slide on the following to the hoop: 3mm round, step 1 dangle, 3mm round, step 2 dangle, 3mm round, step 3 dangle, 3mm round, step 2 dangle, 3mm round, step 1 dangle and 3mm round.
  7. Slide other hoop end through loop you make in step 5 and roll back a simple loop. (Again, refer to the Memory Wire Hoop Tutorial blog post.)
  8. Open ear wire loop and slide on hoop dangle. Close loop.
  9. Repeat Steps 4-8 for other earring.


DIY Follow Your Heart Metal Stamped Necklace

Have you tried metal stamping lately? It is a great time to start a new jewelry making adventure with metal stamping. Let’s start something easy with a heart blank and an adjustable chain necklace.

Items used in necklace:

GoodyBeads Blog | DIY Follow Your Heart Metal Stamped Necklace

Directions:

  1. Stamp your message on heart blank. Optional: Use bracelet guides to help center your message.
  2. Mark in your stamps with a sharpie and wipe excess with a paper towel.
  3. Determine the length of your necklace. wrap chain around the back of your neck and determine where you would want to situate your heart pendant. Cut length with cutters. And then cut chain piece in half.
  4. Connect one chain piece with a jump ring to one side of your heart blank. Repeat to other chain and heart blank hole.
  5. Add a jump ring to the left chain and close jump ring.
  6. Add a jump ring to the right chain, while attaching the lobster clasp. Close jump ring.
  7. Optional: you can also use an adjustable necklace sliding clasp instead of steps 3-6.


DIY Leather & Gemstone Bracelet with Large Rhinestone Clasp

One of our happiest combinations are leather and gemstone. Throw in a fantastic large rhinestone clasp and this bracelet is one you’ll wear all the time.

Items used in bracelet sample:

GoodyBeads Blog | DIY Leather & Gemstone Bracelet with Large Rhinestone Clasp

GoodyBeads Blog | DIY Leather & Gemstone Bracelet with Large Rhinestone Clasp

Directions

  1. Cut the 2 meter of leather in half. Take one and cut in half again.
  2. Take your two strands and slide both through rhinestone clasp loop and center. Make an overhand knot with all four strands, close to clasp loop.
  3. Flare out your ends and determine which are your middle two strands and your side strands. Take one gemstone and slide through the two middle cords.
  4. Decide your two left and right strands. Slide a gemstone through the two left strands and another gemstone to the two right strands.
  5. Slide another gemstone through the two middle strands.
  6. Take your two left strands and slide through one hole of oval bead. And take your two right strands and slide through other hole of oval bead.
  7. Repeat Steps 3-6 one more time.
  8. Repeat Steps 3-5 again.
  9. Rhinestone clasp comes with an end connector with a small loop. Open jump ring, slide through small loop and close.
  10. Make sure to wrap bracelet on your wrist to help determine where you want to situate your knot. Take your four ends and slide jump ring through all ends and do an overhand knot with the jump ring/ring connector within the knot.
  11. Try on the bracelet and adjust knot you made previously if you need to make length shorter or longer. Cut leather ends as an option.

Video Tutorial

You can check out our previous Facebook LIVE episode where we demonstrate how to make this bracelet HERE.


DIY Paperclip Tortoise Earrings

We are channeling our wild side with these earrings, which consist of paperclip chain and tortoise acetate components.

What you’ll need:

GoodyBeads Blog | DIY Paperclip Acetate Hoop Earrings - FREE Tutorial

GoodyBeads Blog | DIY Paperclip Acetate Hoop Earrings - FREE Tutorial

Directions:

  1. On the flat, rimmed side of hoop earring, add a E-6000 to the rim. Gently place the 15mm round acetate connector on the rim, making sure to align the acetate holes with the post vertically. Repeat to other post earring and acetate. Let both pieces dry for a few hours or until glue dries.
  2. Gently open paperclip chain to have a link consisting of two links. Before closing the link, slide on oval acetate pendant. Close link.
  3. Open jump ring, slide on other chain link and through bottom hole of acetate connector you glued in Step 1.
  4. Repeat Steps 2 & 3 for other earring.

GoodyBeads Blog | DIY Paperclip Acetate Hoop Earrings - FREE Tutorial


DIY Swarovski Fine Rocks Hoop Earrings

Looking for an ultra cool statement earring? We’ve got the perfect DIY for you! Made with Swarovski Fine Rocks Tube and Memory Wire, you can create this glamorous hoop earrings today!

What you’ll need:

GoodyBeads Blog | DIY Hoop Earrings with Swarovski Fine Rocks Tube

Directions

  1. Cut two full rounds of memory wire with Memory Wire Cutters.
  2. Slide on a tube bead, curving it while you slide it through the memory wire. (Note, try using your pliers to help guide the memory wire through the fine rocks tube. Even twisting the fine rocks may help.)
  3. Slide post earring through your end cap, making sure the post end sticks out the end cap. Add a small dab of E-6000 with a toothpick. Cap one of the fine rocks with end cap.
  4. Add E-6000 to other end cap and cap other end of the Fine Rocks.
  5. Repeat all steps for other earring.
  6. Let pieces sit for a full 12-24 hours until it is completely dry before wearing.

Video Tutorial

Watch our previous Facebook LIVE where we show you how to make these pair of earrings HERE.


DIY Blue ZigZig Tassel Earrings

Imagine the sight of clear blue skies with these Blue ZigZag Tassel Earrings. It incorporates silver enamel pieces and large fan tassels!

What you’ll need for earrings:

GoodyBeads Blog | DIY Blue ZigZag Tassel Post Earrings

Directions:

  1. Open jump ring, slide on tassel and loop on enamel connector. Close jump ring.
  2. Open another jump ring, slide on other loop of enamel connector and through post earring loop. Close jump ring.
  3. Repeat steps for other earring.


DIY Long Straw & Acetate Tassel Necklace

Your next summer DIY is easy to do when all you need are a few components to make this fabulous Long Straw & Acetate Tassel Necklace.

What you’ll need:

  • Woven Straw Ring Pendant/Connector – Z019259
  • 6mm Gold Jump Ring – Z011522
  • Pearl Acetate Half Circle Pendant/Connector – Z012461
  • 3.75 Inch Gold Plated Tassel – A013213
  • Gold Plated Adjustable Rollo Chain Necklace Double Slide Clasp – Z010757

Tools you may need:

  • Bead Reamer
  • Alternative Otion: pointy Round Nose pliers or Awl

Directions:

  1. Using the bead reamer or sharp awl, puncture a hole between the outer two rings of the woven straw component. Make another hole directly across the other side of the straw.
  2. Open a jump ring, slide on chain tassel loo and through a straw component hole you made in Step 2. Close jump ring.
  3. Open another jump ring, slide through other hole of the straw you made in Step 2 and through hole of the acetate (curved side). Close jump ring.
  4. Open another jump ring and slide on other hole on acetate and through both of the jump rings of the adjustable necklace chain. Close jump ring.


DIY Golden Bubbly Earrings

You’re going to feel giddy with these pair of earrings! It’s all gold on gold, well gold-plated.

What you’ll need:

GoodyBeads Blog | DIY Golden Bubbly Earrings

Directions:

  1. Open large jump ring, slide on teardrop hoop, round hoop and small jump ring. Close jump ring.
  2. Open earwire loop and slide on small jump ring you added in step 1. Make sure that the teardrop hoop is situated on the backside of earwire. Close loop.
  3. Repeat all steps for other earring.

You certainly make a silver version too with the following silver-plated components: Z007856, Z020042, Z016674 (2), Z016723 (2) & Z012031.


DIY Peacock Necklace with Acetate Component and Tassel

Today’s Peacock Tassel Necklace consists of some of our favorite products, acetate, chain, charms and tassels. Come make this lovely necklace today!

What you’ll need for necklace:

GoodyBeads Blog | DIY Gold Peacock Tassel Necklace

Directions:

  1. Cut large oval chain to consist of 11 links.
  2. Open 9mm jump ring, slide on tassel and through one hole of acetate connector. Close jump ring.
  3. Open another 9mm jump ring, slide through other hole of acetate, crescent charm and the middle link of large oval chain you cut in Step One. Close jump ring.
  4. Open 6mm jump ring, slide on one end of large oval chain and through one end of rollo chain. Close jump ring.
  5. Repeat step 4 to other chain ends. Note: you can chain the length of your necklace by shortening the rollo chain length.


DIY Angelic Crystal Dangle with TierraCast Findings

We’re making an angelic dangle today. You can make two and use them to dangle as earrings or add them to keychain, bookmarks or beadable gifts.

What you’ll need for an angelic dangle:

GoodyBeads Blog | DIY Angelic Dangle

Directions:

  1. Slide on 8mm crystal, bead cap, angel wings, 6mm crystal and rhinestone rondelle. Make a simple loop.
  2. Attach to an Beadable Gift or make two for some earring dangles.