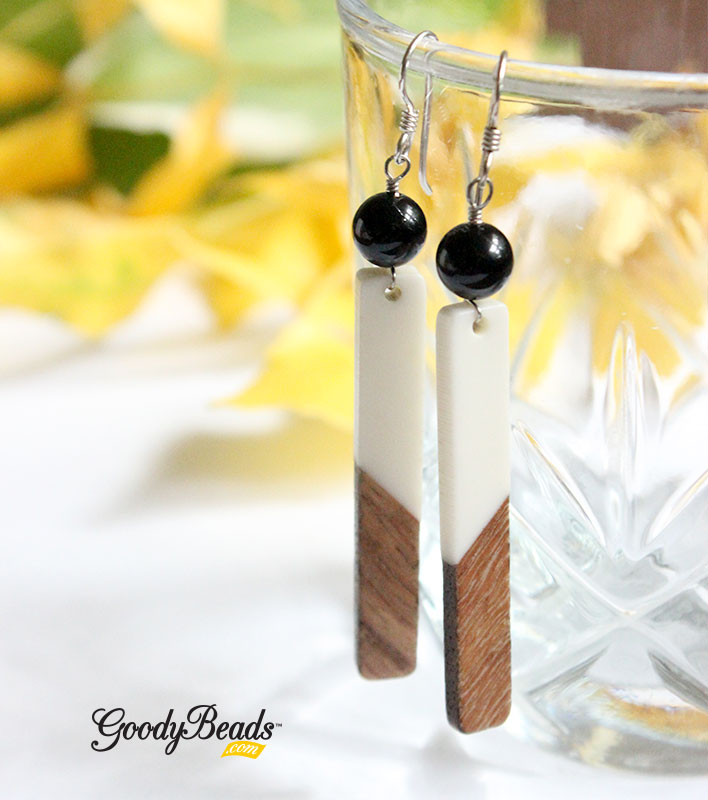
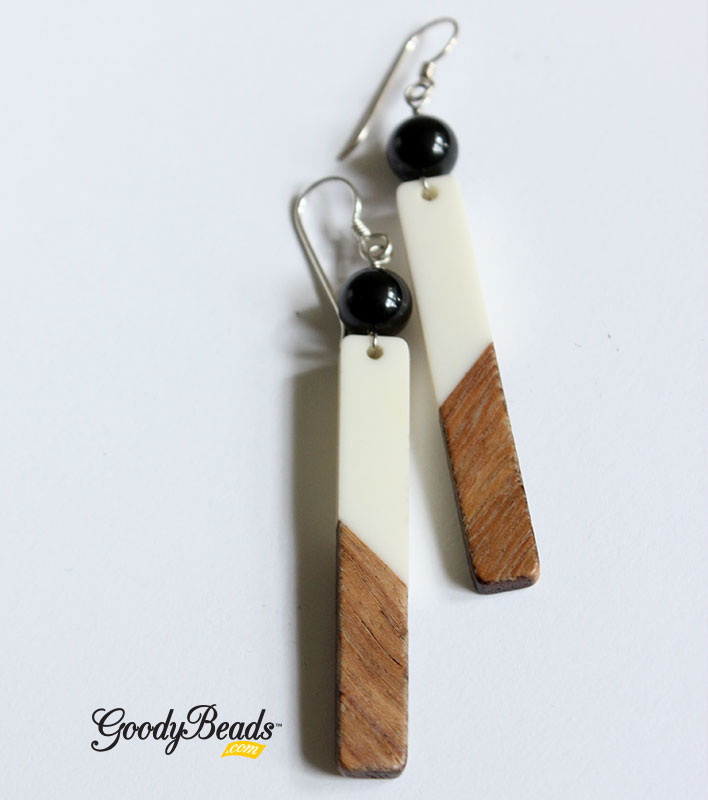
DIY Onyx Gemstone and Wood Resin Stick Earrings

We have the perfect fall earrings just for you! Made with some of our newest Wood & Resin pendants and Onyx gemstone beads! Plus, a full tutorial on wire wrapping your stick pendants.

What you’ll need:

GoodyBeads Blog | DIY Onyx and Resin Stick Earrings

GoodyBeads Blog | DIY Onyx and Resin Stick Earrings

Directions

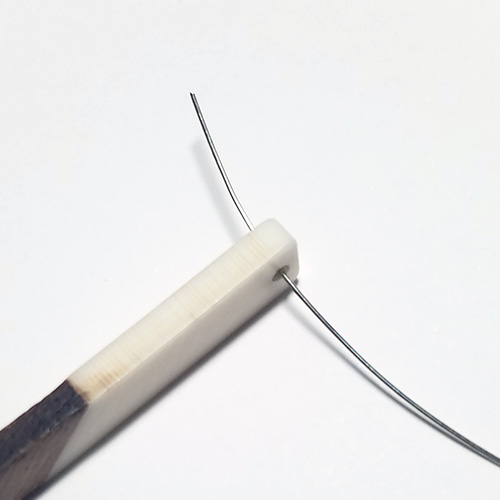
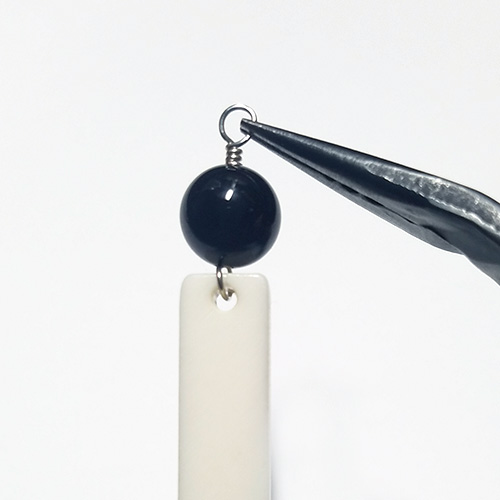
  1. Cut a 4 inch piece of wire. Slide wire through hole of the wood & resin pendant.

2. Twist wire to criss cross at the top.

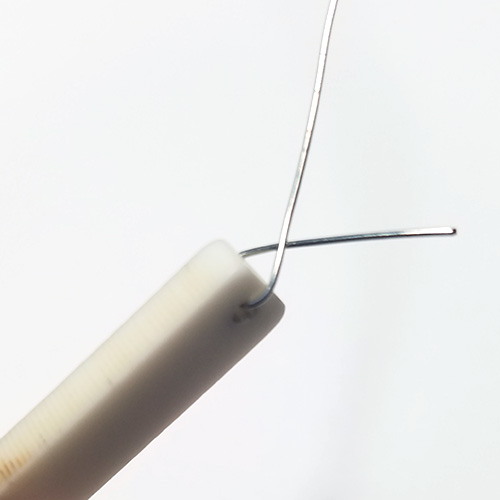
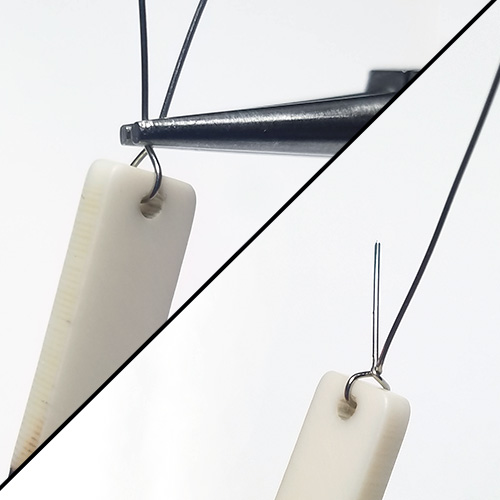
3. Use your round nose pliers to pinch the wires crossing and make a twist or two.

4. Cut shorter piece of wire and slide on gemstone bead. Make a wrapped or simple loop. Make sure loop is facing outwards.

5. Open ear wire loop and slide on dangle.

6. Repeat all steps for other earring.

Check out more Wood & Resin DIY Designs.


DIY Jagged Dagger Bracelet with Cymbal Alona Bead Ending

Today’s tutorial for the Jagged Dagger Bracelet happens to come with a FREE pattern tutorial. This bracelet consists of 6mm two-hole Czech bar beads, mini daggers and 11/0 round seed beads, stitched along with Cymbal Alona Bead Ending components!

Items used in bracelet example:

——- CLICK for FREE Downloadable Pattern Tutorial ——-


DIY Beadable Bezel Bangle with Miyuki Delica Seed Beads

Following our very popular Column Beads, a brand new item in the last two months, why not make a matching pair of beadable jewelry with this Beadable Bangle with Miyuki Delica Mix!

What you’ll need:

Items used in Robin’s Nest Bezel Bangle: SB03806, Z001459, A006587 & A015211.


DIY Delicate Delica Adjustable Bracelet

Looking for an easy weekend project? Why not get into a super simple peyote stitch pattern and make it into an adjustable bracelet! We’re using size 11/0 Delica seed beads, making an odd-stitch peyote stitch pattern. Make a simple wrap bracelet with one color delica or multiple, you choose! Get the FREE downloadable PDF tutorial for the Delicate Delica Adjustable Bracelet HERE!

If you’re not a fan of an adjustable bracelet, you can also alter it with a lobster clasp and jump ring. Or even make a multi-wrap bracelet

What you’ll need:

Items used in TOP bracelet sample: SB00269, SB03777, Z012178, A006587 & A006768.

Items used in BOTTOM bracelet sample: SB00269, SB00250, Z012178, A006587 & A006768.


DIY Leather Twist Necklace with Gemstone Donut

The days are getting cooler, so fall is surely coming soon. Why not try this leather necklace with a TWIST to accompany your fall weather fashion!

What you’ll need:

Directions:

1. Cut a 60”-70” piece of leather cord and fold in half. Slide the mid point through donut hole. **Note – it’s better to have too much leather starting out than not enough. You can always cut it before making the sliding knots in the final step.

2. Pull cord ends through to almost make a lark’s head knot.

3. Flip donut around.

4. Take the midpoint of the loop and make a twist. Pull cord ends through that loop.

5. Pull your cords to create a cross loop.

6. Make sliding knots to cord ends to make it adjustable. Check out previous blog on how to make a Sliding Knot.


Project Inspiration: Macrame Planter Hanger with Large-Hole Beads

We love to be inspired by all crafty communities. Here is a simple DIY with the popular macrame trend, creating a planter hanger while incorporating our interchangeable large-hole beads. Designed by our friend Jacque from Dakota Stones, she has definitely inspired us!

What you’ll need:

Directions

  1. Measure your macrame cord to 64 inches + the width of your planter + 24 inches. Cut 4 pieces at that length.
  2. Fold all 4 pieces in half and make a looped knot at the fold.
  3. Anchor your loop.
  4. On each strand, slide on your large-hole beads. Pattern and amount is up to you.
  5. Take two cords and make an overhand knot. Repeat this to the other strands, making sure the knots are distanced the same.
  6. Take two adjacent knots and take two cords from each of those and make a knot. Do this all the way around. Make sure they are all the same level.
  7. Add your planter to see if your knots are situated to fit your pot.
  8. Take all strands at the end and make a full overhand knot. Cut excess if you prefer.

Video Tutorial

This tutorial is inspired from the DIY 5 Minute Macrame Planters video by WhatsUpMom on YouTube. You can see the video HERE.


DIY Colorblock Memory Wire Bracelet Wrap with Vinyl Beads

Today’s DIY Colorblock project was featured in our previous Facebook LIVE episode, and uses bright Vinyl beads and memory wire. Create color blocking with separating chunks of color and wavy disc beads.

Items used in DIY colorblock bracelet project:

  • X002168 – 6mm Multi Color Vinyl Beads
  • X001538 – 6mm Black/Grey Vinyl Beads
  • WR00126 – Gold Memory Wire
    OR WR00139 Gold Assortment Memory Wire
  • Z018412 – 6mm Gold Wavy Disc

Directions:

  1. Make a simple loop on one end of memory wire.
  2. Without pulling all the beads off the multi-color strand, grab about an inch off and hold between your fingers while you feed the memory wire through them. Grab another chunk and slide on memory wire. Do this to add 30-50 vinyl beads.
  3. Add 5 wavy disc beads to memory wire, making sure to feed them in opposition directions to create the wavy look.
  4. Separate the whites from the Black/Grey strand and slide on 10-15 white vinyl beads on the memory wire.
  5. Add 5 wavy disc beads.
  6. Repeat Steps 2-5 another two or three more times, or to your desired length.
  7. Add another 2-3 inch length of multi-color vinyl.
  8. Cut off excess memory wire with memory wire cutters, leaving about 1/4 inch tail.
  9. Loop that end to finish your bracelet.

Video Tutorial

Check out the Facebook video on how to make this bracelet. Go to this VIDEO LINK and tutorial starts at 9:00 minutes.


DIY Porcelain Pineapple Necklace with Alphabet Charm

Summer is a HOT one and Summer means pineapples. Here is a simple DIY necklace with a porcelain pineapple bead and alphabet charms.

What you’ll need:

Directions:

  1. On a headpin, slide on the following and make a simple loop:
    8/0 seed bead, pineapple bead and 8/0 seed bead.
  2. Open a jump ring and slide on pineapple dangle and on chain necklace. Close jump ring.
  3. Open another jump ring, slide on alphabet charm and on chain necklace. Close jump ring.


DIY Natural Pearl Hair Pin

Hair accessories are very popular this year. From the comeback of scrunchies to oversized fabric headbands, today’s project features a DIY pearl hair pin. Natural pearls are wire wrapped on a Silver Plated Hair Pin with 2 Loops.

What you’ll need for Pearl Hair pin project:

Directions:

  1. Cut a 14 inch piece of wire.
  2. Loop one time through one end of the wire through a hole of the hair pin. Twist the shorter wire around the other wire twice and push coils close to hole of the hair pin.
  3. Slide on 5 beads or how ever many you need to fit between the two holes of the hair pin.
  4. Slide wire through other hair pin hole.
  5. Criss cross around pearls and back again.
  6. Cut off excess.

Video Tutorial

Check out our previous Facebook LIVE episode with this tutorial. Tutorial starts at 10 minutes.


DIY Jewelry with Swarovski® Around the World: Costa Rica

This month’s trip is Costa Rica. Find out how tranquil this destination is from its tropical vibe to its endless blue skies. Plus, check out the hues Swarovski suggests to inspire your Costa Rica trip along with a DIY jewelry project for you to try.

Costa Rica

Starting as underwater volcanoes which then surfaced over thousands and thousands of years, Costa Rica has evolved into one of the largest, lush ecosystems in the world. Imagine yourself rappelling down a waterfall, relaxing in hot springs, hiking along the rolling fog of the cloud forest or exploring the pink sandy beaches of the Guanacaste coastline. Theses adventures paired with rich tropical flora and fauna and soft sunsets over crystal blue water were the incredible inspiration for these pieces – and my version of ‘paradise’.

Costa Rica – Swarovski Crystal Colors

  • Peridot
  • Light Turquoise
  • Rose Peach

Costa Rica Inspired DIY Jewelry

GoodyBeads Blog | DIY Jewelry with Swarovski® Around the World: Costa Rica FREE tutorial.

GoodyBeads Blog | DIY Jewelry with Swarovski® Around the World: Costa Rica FREE tutorial.

Our pair of earrings is cool and bright! It has the simplicity for a warm beach stroll and an elegance for a beach-side patio dinner!

What you’ll need for earrings:

  • SW02553 (2) – Swarovski crystal 18mm Light Turquoise Meteor Pendant
  • SW00157 (2) – Swarovski crystal 4mm Peridot Bicone
  • SW02213 (2) – Swarovski crystal 4mm Rose Peach Shimmer Bicone
  • SW02552 (2) – Swarovski crystal 4mm Light Turquoise Bicone
  • SB00444 – 11/0 Matte Opaque Cream Seed Bead
    You can sub seed bead for 2mm Pearlescent Pearls SW01920 (8)
  • A001494 – 2 Inch Silver Plated Eyepin
  • TCZ0077 – Sterling Silver Earring Wire by TierraCast®

Directions:

  1. On eyepin, slide on the following:
    seed bead, peridot crystal, seed bead, light turquoise crystal, seed bead, rose peach crystal and seed bead.
  2. Make a simple loop about 4mm or large enough to slide on crystal pendant.
  3. Open the loop you made in step 2 and slide on crystal pendant. Close loop.
  4. Open earring wire loop and slide on on other eyepin loop. Close loop.
  5. Repeat all steps for other earring.


DIY Black and White Acetate Stripe Earrings

We love the classic black and white themed jewelry. It’s hip and gorgeously elegant all in one. Our pair consists of acetate connectors and enamel components, with of course gold findings! (Shop All Acetate Components)

What you’ll need for Kite Earrings:

GoodyBeads Blog | DIY Black and White Stripe Earrings FREE Tutorial

Directions:

  1. Open 6mm jump ring, slide on enamel charm and acetate connector. Close jump ring.
  2. Open 6mm jump ring and slide on other hole of acetate connector and close jump ring.
  3. Open 3mm jump ring slide on top 6mm jump ring and earring loop. Close jump ring.
  4. Repeat all steps for other earring. Note: You can flip flop the acetate for an asymmetrical look or keep it consistent.

Check out other Acetate DIY jewelry ideas.


DIY Summer Vinyl Bead Earrings with Gold Findings

We’re making summer last longer with fun, bright earrings using new colorful Vinyl beads.

What you’ll need:

Tools:

GoodyBeads Blog | DIY Summer Vinyl Bead Earrings FREE Tutorial and Video.

Directions

  1. Using the 2nd smallest memory wire in the pack (child’s wrist size), cut about one loop of wire.
  2. Using memory wire finishing pliers, loop one end outwards, into a simple loop.
  3. Slide about 46 vinyl beads onto your memory wire.
  4. Cut excess wire leaving a 1/2 inch tail. Using memory wire finishing pliers, roll and loop that end outwards, into a simple loop.
  5. Open one loop with flat pliers and slide on bar connector. Close loop. Repeat on other memory wire end with other bar connector.
  6. Open a jump ring, slide on both ends of bar connector and through ear wire loop. Close jump ring.
  7. Repeat all steps for other earring.

Video Tutorial

Watch our previous Facebook LIVE episode where we demonstrate creating these earrings! CLICK HERE > Start at 14:20 for tutorial.


DIY Delicate Delica Necklace or Wrap Around Bracelet

Today’s project is perfect for Summer because it’s delicate and minimalistic; the right kind of jewelry to not outshine your summer style! Made with only two products, Griffin silk cord (No. 4 cord) and Miyuki 11/0 Delica mix, this project is easy to make for a lazy summer day.

What you’ll need:

  • Griffin silk cord (No. 4 cord) – Item used in necklace A006569
  • Miyuki 11/0 Delica mix – Item used in necklace SB03797

Tools needed:

  • Thin tipped, needle nose pliers
  • OR you can use thin tweezers to make the knots.

Get all the components for this project here

GoodyBeads Blog | DIY Delicate Delica Necklace or Wrap Around Bracelet - FREE tutorial.

GoodyBeads Blog | DIY Delicate Delica Necklace or Wrap Around Bracelet - FREE tutorial.

Directions:

  1. Unravel your Griffin cord and straighten/smooth the strands to remove kink. (Refer to Silk Cord Blog)
  2. Make a knot at the end of your silk cord, leaving a 1/4 tail. Sew on 4 delica seed beads.
  3. Make a knot 4 inches from the first knot you made. Sew on 8 delicas and make another knot close to the end of your delicas.
  4. Make a knot about 1/2″ from the previous knot. Sew on 8 delicas and make another knot close to the end of your delicas.
  5. Repeat step 4 until you have about 5-6 inches left of your Griffin cord.
  6. Sew through the last delica that you added in the beginning (Step 2). this will act as your slider and create your necklace loop. Pick 3 more delicas and make a knot at the end of your Griffin cord, 1/4″ from to the needle. Cut off needle.

GoodyBeads Blog | DIY Delicate Delica Necklace or Wrap Around Bracelet - FREE tutorial.

You can wear this wrapped around your necklace two times or wear it as a wrap-around bracelet, using the slider piece to adjust.

You can also shorten the pattern to alter the length of your necklace.


DIY Sodalite and Straw Post Earrings with Gold Findings

One of our popular Facebook LIVEs we did previously was these pair of earrings using Sodalite gemstones, straw and Flat Artistic Wire. Get all the components to make this pair of unique earrings.

What you’ll need:

GoodyBeads Blog | DIY Sodalite and Straw Post Earrings with FREE Video Tutorial

Directions:

  1. Slide in through the middle and clamp down onto the wire end and piece.
  2. Wrap wire around and up. Take off pliers and clamp both sides of the wire and pendant piece.
  3. Bend wire to come across the top of the pendant.
  4. You can take your sharpie or some fine point marker to mark the top to indicate where you will hope punch for the headpin.
  5. Gently pull off wire. Take hole punch to the middle of that dot you made.
  6. Slide on headpin, coming under the hole you punched.
  7. Slide wire piece back on your pendant piece. Fold wire to the back.
  8. Cut wire so that it overlaps with the other wire end.
  9. Bend out the bottom end, fold in the top end and bend back the bottom end to overlap. Use nylon pliers or regular pliers to cinch them closed.
  10. On the headpin, slide on nugget bead, gemstone and Czech bead and make a simple loop. Open loop and slide on post earring hole. Close loop. (As an option here, you can make a wrapped loop.)
  11. Repeat all steps for other earring.

FB Live Video Tutorial

Check out the Video for a tutorial. Tutorial begins at around 8 Minutes.

(opens in a new tab)”>LINK TO VIDEO TUTORIAL HERE >


DIY Red and Green Holiday Earrings with NEW Thread Bobbin Colors & Swarovski® Rouge Pearls

We’re getting ready for Christmas season with this Red and Green Holiday Earrings. Designed with our NEW Swarovski Rouge Pearls and Thread Bobbin colors, we’re using two colors to wrap with our Beadable Oval Pendants (Z011345 or Z011351) for a festive pair of earrings!

What you’ll need for these Holiday Earrings:

  • (2) Z011345 – Beadable Oval Pendant
  • (2) SW02560 – 8mm Swarovski Rouge Crystal Pearl
  • Z008003 – Seafoam Green Superlon Beading Thread Bobbin
  • Z008298 – Scarlet Superlon Beading Thread Bobbin
  • A019626 – 1.5 Inch Eyepin
  • TCZ0078 – Coil Earring Wire by TierraCast®
  • Needle

Directions:

1. Cut both threads to a length of about 8 feet. Feed both threads to your needle.

2. With your thread ends, anchor it to the inner loop of the beadable pendant with two knots. Cut tail to about 1/4 inch. Optional: You can use a small dot of glue to secure knot.

3. Sew down through middle hole and loop back through top loop. You will start from the inside towards the outside to one side. (You can refer to our previous blog post on sewing through this oval pendant, but these Red & Green Earrings will work from the middle outwards.)

4. Then sew other side starting from the middle and going outwards.

5. Sew through middle strands back and forth and cut off excess (Refer to video tutorial in previous beadable blog post). (Optional, you can use a small dot of glue for security, but not necessary. I’d suggest using a translucent glue that will not discolor the thread. Test out glue before use.)

6. Open eyepin loop, slide on top loop of pendant and close loop.

7. Slide on pearl and make a simple loop. Open earwire loop and slide on dangle.

8. Repeat all steps for other earring.