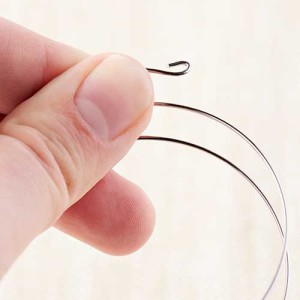
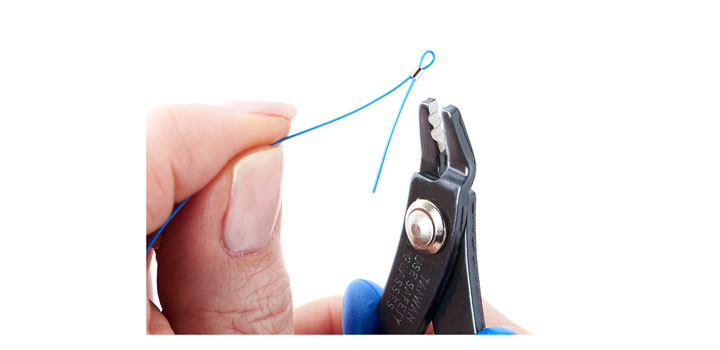
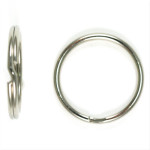
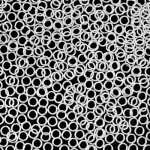
Jump rings are an essential product to have when making jewelry. Jump rings are used to make connections to clasps, chain links, charms, and many more. We will show how jump rings have been used in various jewelry projects, and also teach you how to open a jump ring correctly.
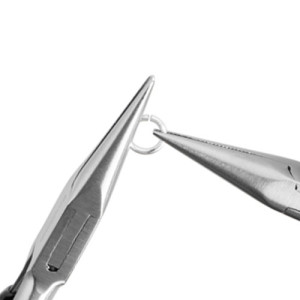
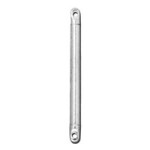
Step One: Hold one side of your jump ring with one of your pliers, clamping at the middle of the pliers.
Step Two: Take your second pair of pliers and grasp the other side of the jump ring almost perpendicular to your left pliers.
Step Three: Keeping the left pliers steady, rotate your right pliers towards you to open the jump ring.
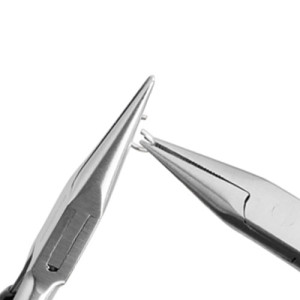
Step Four: To close the jump ring, rotate your right pliers away from you until the two ends meet.
Note: Jump rings should never be opened by pulling the sides of your jump rings apart.
Jump Ring Video Tutorial
Check out our video tutorial on how to open and close jump rings with Alisun and Kristal Wick.
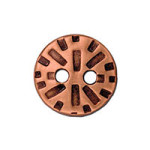
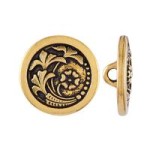
Sample Uses of Jump Rings
In our April 2016 Trend, we featured stampable charms and connectors. Here we used jump rings to connect to other connector links, as well as chain link. When using a similar size of jump rings, you won’t even notice that jump rings were used to connect these pieces together.
Adding charms to an expandable bracelet? Jump rings work great. Just make sure to use a large enough size to attach the charm to the bracelet like the example above.
Chain maille is a popular jewelry art. The combination of different sizes and colors of jump rings can make an intricate design that looks like a piece of art.
Even in our previous blog on How to Rivet, after we riveted a leather loop we used jump rings to connect the leather strands to a watch face or magnetic clasp. The brass jump rings were selected to match the color of the watch face and clasp, making the overall piece cohesive.
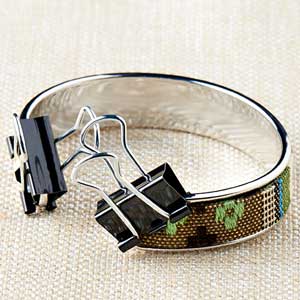
Czech Honeycomb Bracelet Tutorials
Czech Honeycomb beads are popular! We have two easy and free tutorials on how to use these popular honeycomb beads to make a bangle and cuff bracelet.
Honeycomb Bangle by Apollinariya Koprivnik
We followed BeadSmith’s Inspiration Squad Member, Apollinariya Koprivnik’s tutorial to make this stunning honeycomb bangle. We love its mesmerizing, 3D design. We dressed the bangle with the matte jet honeycomb and accented it with gold and silver seed beads and SuperDuos.
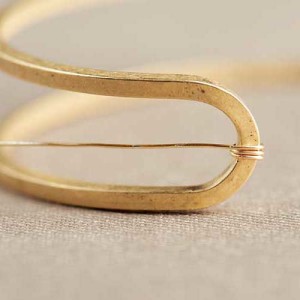
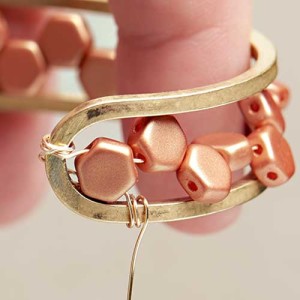
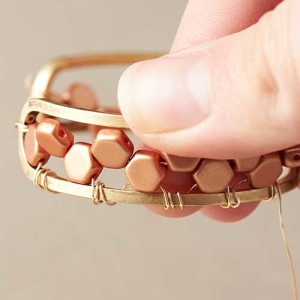
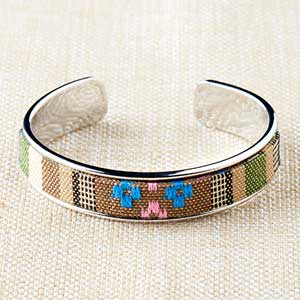
To create this wire-wrap cuff, we drew inspiration from Julie Romero’s honeycomb bangle bracelet. Follow our directions below to create this easy wire wrapped honeycomb cuff.
* Note: It is easier and quicker to work with shorter pieces of 26-gauge wire.
Step One: Start with 2 feet of 26-gauge wire. Wrap the end of the wire three times in the middle section of the cuff shown above.
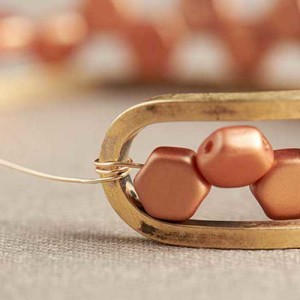
Step Two: String on 26 honeycomb beads and secure it around to the other end of the cuff by making a few wraps.
Step Three: Bring the wire back behind the cuff and thread it through the first honeycomb hole. Bring wire over the bottom cuff frame and make three coiled wraps.
Step Four: Repeat step 3 for every other honeycomb bead on the bottom row.
Step Five: When you have finished the bottom row, coil wraps around the frame to wire wrap the top row of the cuff. See finished cuff above.
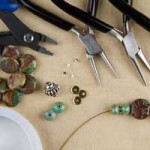
We talked about looping and cutter tools in our Beading Essential: Tool Edition Part 1 blog post. In this second part of our Beading Essential: Tool Edition, we’ve selected a few metal working and hammer tools as well as other tools to make your jewelry making easier.
Hammers
These are not your average hammers you have lying around your house to hammer nails. These special hammers are extra sturdy, like steel hammers, and have versatile uses for jewelry making.
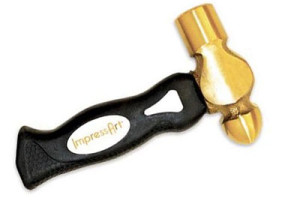
A010617 – Metal Stamping Hammer
TL00235 – Metal Stamping Hammer By ImpressArt
These two are metal stamping hammers that have sturdy brass heads ideal for striking metal stamps. Their short handles have comfortable grips to give the user a precise strike.
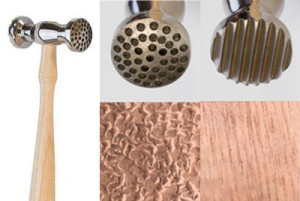
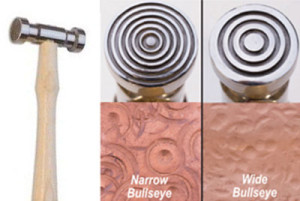
A012927 – Chasing Hammer
The Chasing Hammer is a great tool to use for metal working. The two-part hammer has a round side that is great for adding textures such as a hammered look (small dents) to metal. While the other side is flat and good for flattening wire and hammering rivets.
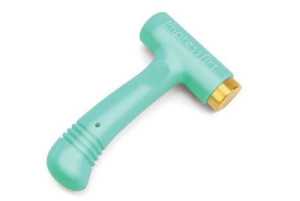
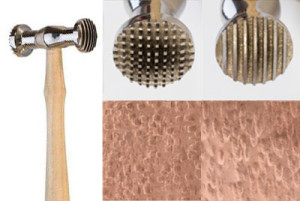
Texture hammers provide patterned texture on metal. Each hammer has a double head that has two different texture heads to create a different impression in your metal. Try turning your hammer when you strike, for a variation in your impression. Create unique impressions by changing up the angle and power of your strikes.
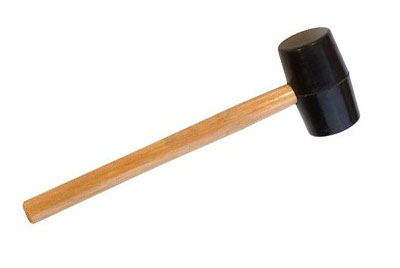
A011606 – Rubber Mallet
A rubber mallet will allow you to change a half-hard or dead-soft jewelry wire into hard wire. After you’ve shaped your own wire pendants, ear wires or clasps, for instance, you’ll want to use a rubber mallet to make them stronger, harder and to help them maintain their shape. Because of its soft head, it is also best to use a rubber mallet on color coated wire as each strike does not disturb the colored surface.
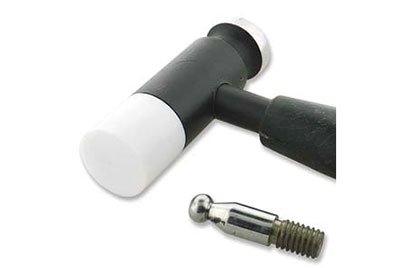
TL00146 – Whammer Wire Jewelry Hammer
With this tool, you get three tools in one. There is a convex steel head for flattening wire, an interchangeable nylon flat head for hardening wire or straightening colored wire, and a steel dapping head for creating dents or texture on metal.
First, stamp your designs onto the stamping blank and sand the edges of your blank to smooth out the edges with Sanding Sponge Grit. Then, take one end of the blank and insert into the loop of the bar. Bend the blank around the curve of the bending bar. Repeat to the other side of the blank. Use Nylon Jaw Bending Pliers if you need to create a more curved look.
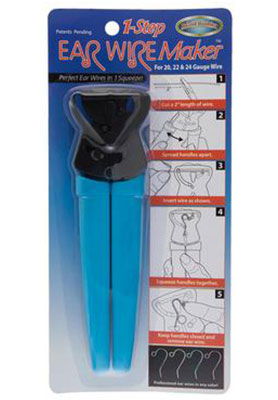
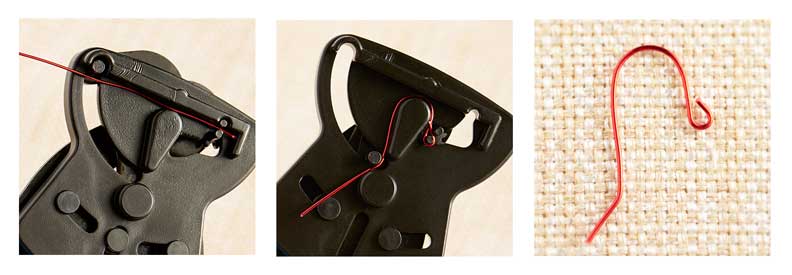
TL00199 – 1 Step Earwire Maker
Use the Earwire Maker to make ear wires with 20-, 22-, or 24-Gauge wire in one step. Also use the Bur Tool to smooth rough and sharp ends of the ear wire and/or harden the ear wire by hammering it with a rubber mallet or nylon whammer tool.
Note, after you have squeezed the pliers to make the ear wire, do not release the pliers. Remove ear wire while you have the pliers squeezed. Cut excess wire if you need to shorten the length of the end.
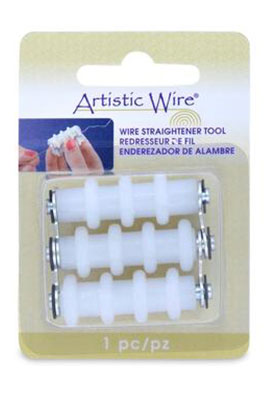
TL00208 – Straightener Tool
Wire is easier to use when it is flat. This wire straightener from Artistic Wire can help with straightening your curved, kinked, or bent wires.
Put your piece of wire in the middle of the three bars. Clasp the bars enclosing the wire on the inside. Pull your wire out and you should have a straighter wire. You may need to run the wire through a few times for more prominent kinks.
Beading Essentials: Tool Edition (Part 1 of 2)
When it comes to tools, everyone has their favorite set of pliers, cutters or hammers. But there are newer types of tools that can even help your jewelry-making be more consistent and efficient. In this Beading Essentials: Tool Edition, we hand-picked a few tools that can help you with your next beading project. Who knows, you might even find a new tool to add to your collection.
For this segment, we will discuss different types of looping tools and cutters to assist you in your jewelry making.
Looping Tools
In our previous blog, Jewelry Beading Essentials, we pointed out simple pliers that all jewelry makers should have on hand, like your round nose and cutters for making simple loops. Did you know there are looping tools that can help with the consistency of your loops? Or making wire loops in a shorter amount of time.
Wubbers® has looping pliers in various sizes that helps make simple loops easier.
A012264 – Bail Making Wubbers
This Bail Making Wubbersis great for making small 2-2.5mm loops or coils. Using this tool instead of your round nose pliers will give you a more consistent loop every time.
A012263 – Wubbers Wire Looping Pliers
This Wire Looping Wubbers comes with instructions on how to use this plier to make eyepins and wrapped loops. One side is concave so that it holds your loop in place while you make a loop on the other side of the plier. This tool is also perfect for beginning jewelry makers that are learning about making wire loops because the tool guides the user to make a round loop.
Tip: When you have finished your loop, bend the wire back slightly so that it centers the loop with the wire.
TL00155 – Large Wire Looping Pliers
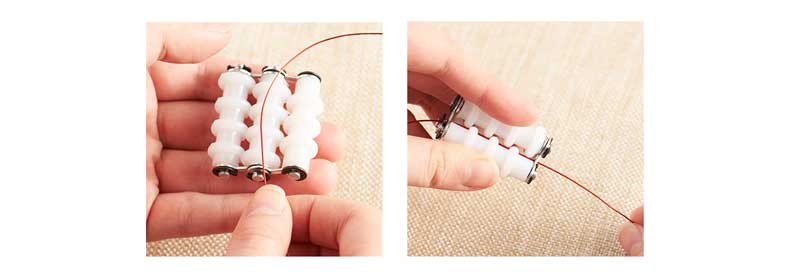
Large Wire Looping Pliers makes larger loops. This loop is great for making larger loops to attach to thicker chain pieces or making larger eyepin loops. One of our favorite ways to use this tool is making jump rings, especially for chainmail.
Make coils with your looping pliers. Cut off excess wire. Then cut in a straight line across the coils to make 7mm jump rings.
TLZ0207 – Memory Wire Finishing Pliers
These Memory Wire Finishing Pliers are best used to make loops on your round or flat memory wire. Because memory wire has a stronger gauge, these pliers will help make a simple loop end easy. Clamp the pliers at the tip of the wire and roll towards you until you’ve made a full loop.
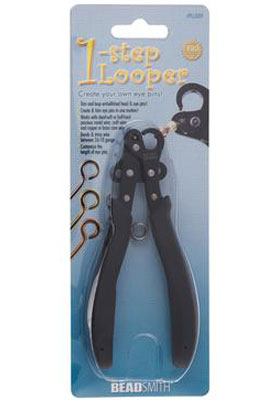
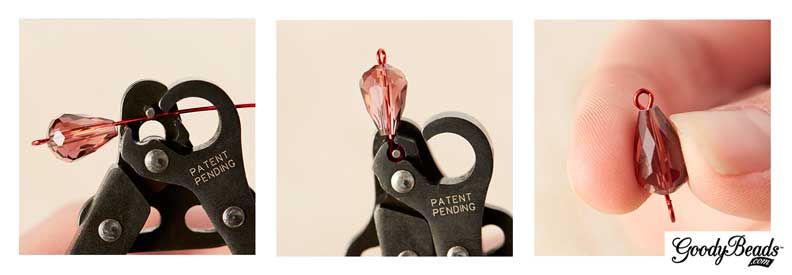
TL00019 – 1 Step Looper
An innovative tool we have is the 1 Step Looper. Designed to make loops in literally 1 STEP! It loops your wire and cuts it all, in one step.
This tool is perfect if you need to make a lot of eyepins. Feed your wire until it passes the middle lever. Squeeze your pliers and it will make a loop while cutting the excess wire end.
Tip: When you have finished your loop, bend the wire back slightly so that it centers the loop with the wire.
You can use this tool when you are making a lot of dangles. Feed your wire until the top of the beads are close to the pliers. There will be a hole at the other end if your wire is long. Squeeze your pliers to make a loop. Bend your dangle back slightly to center your loop.
Cutter Tools
Side cutters are one of the essential tools you will need for jewelry making. Whether you are cutting excess wire off of a headpin or cutting thin chain links, cutter tools are versatile. But not all cutters are the same. Certain cutters are used for certain projects.
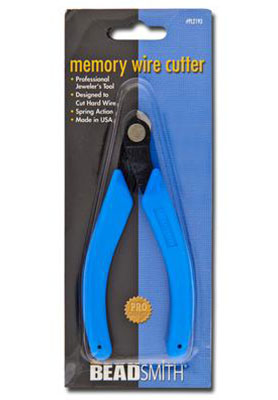
FTTL0005 – Memory Wire Cutter
Memory Wire cutters are used for the heavy duty cutting. Best to use on memory wire or larger gauge wire, but you can use them for cutting thick chain links without damaging your regular cutters.
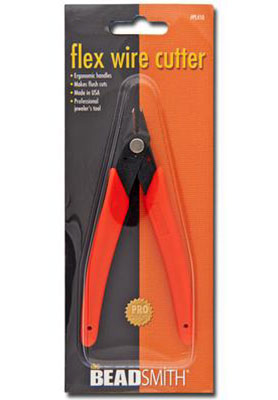
FTTL0001 – Flex Wire Cutter
Flex Wire Cutter is designed to cut flex wire. With this precision cutter, you don’t have to worry about your flex wire having frayed ends. We also use these for our Beading Wire or Elastic Cordfor a closer cut on a finished project, when scissors cannot.
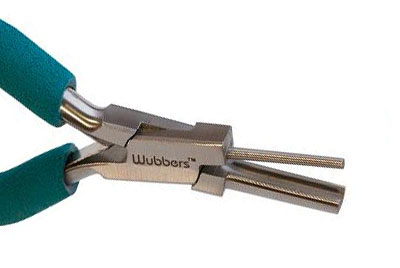
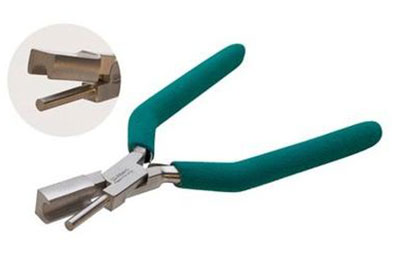
TL00017 – Xuron® Shear – Non-Serrated
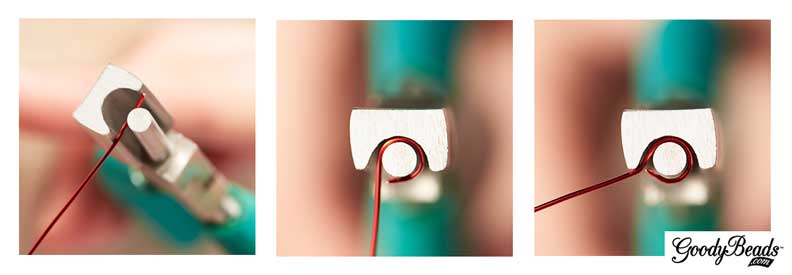
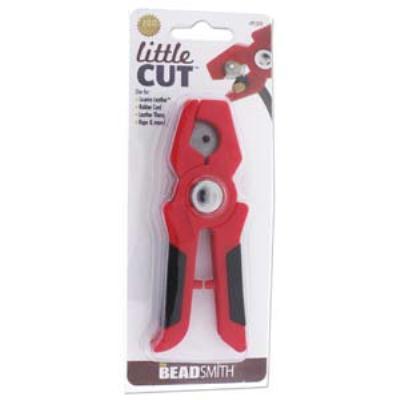
Xuron® Shears are manufactured for cutting high strength fibers, wire, metal sheets, leather cords, and even Beading Wire. They are perfect to cut wire coils to make jump rings because they create a clean, flat cut.
We recommend this tool if you are wanting a flat cut to your jump rings. Because when cutting the coils with your side cutters, you will find that your jump rings will have a sharp, pointed end. This is because side cutters are best for flushing the flat side of your side cutters for a close cut. While Xuron Shears cut clean and flat especially for making jump rings.
As you can see here, the left jump ring was cut with a side cutter, while the right jump ring was cut with the Xuron Shears.
TL00053 – Licorice Leather Cutter
With a comfortable grip, this Licorice Leather Cutter is perfect for cutting your licorice leather or all of your leather or rubber cords with a clean and accurate cut.
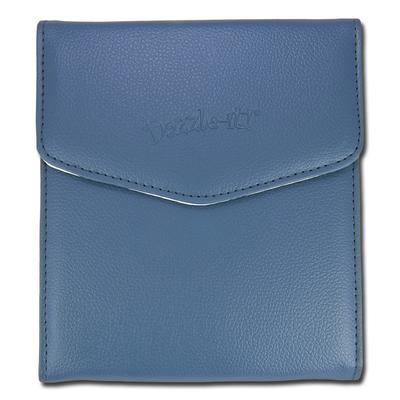
Feature: Tool Wallet
TL00064 – Dazzle-It Tool Wallet
For all your pliers and tools, get the Tool Wallet to keep your tools in one area! It has convenient elastic straps to organize up to six pliers. It is the perfect tool storage and slim enough to carry along with you when you cannot part from making jewelry on your vacation.
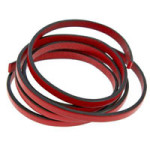
Rainy season is upon us. And what better way to a rainy day then making some leather cuffs. We have an easy leather cuff tutorial that will make you want to put away your rain boots and umbrellas, and “veg out” making these easy leather cuffs.
Instead of using a strand of 10mm flat leather, you can make two layers with two 5mm flat leather. We paired the mustard flat leather with this graphic neon splatter-printed leather on a gold-plated, glue-in-cuff.
(7) CH00047 – 5mm Mustard/Black Flat Leather (out of stock)
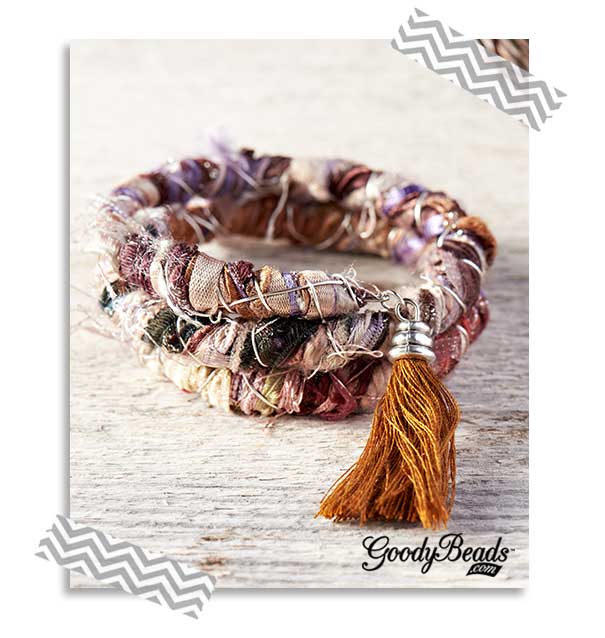
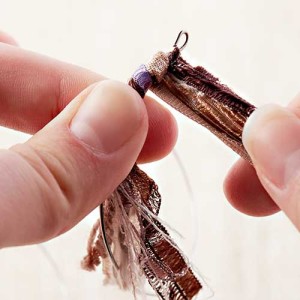
To encompass the trend of boho, we have pulled our wonderful stock of silk ribbon and ribbon mixes to show you how to use silk ribbon in jewelry. We will show you how to make an easy wrap memory wire bracelet with silk ribbon and silk ribbon tassel earrings.
Boho Silk Memory Wire Bracelet
Designed by So Vang
This bracelet is perfect to wear on a beautiful summer day. We used the Hand Dyed Ribbon Mix, which has eight 2 yards of ribbon, yarn and fabric mix. When wrapped around memory wire, the colors and various fibers has a boho charm. You can finish off your bracelet with a tassel attached at the memory wire loop end or add charms scattered around the bracelet with jump rings. This memory wire ribbon wrap bracelet is easy to make and to pair with your everyday outfit. Just follow our easy instructions or DOWNLOAD our pdf tutorial.
Step 1: Cut memory wire for 2-3 wraps. Make a simple loop at each end.
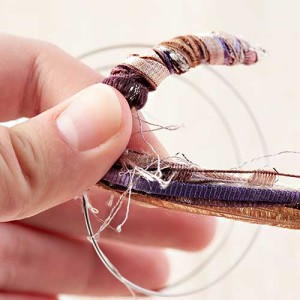
Step 2: Gather your strands of ribbon mix to one end. Hold about 3 inches of the ribbon strands with the memory wire. Start wrapping your ribbon around a few times close to the loop.
Step 3: Tightly coil the ribbon strands around the memory wire. Make sure to keep your strands flat and not twisted when coiling the strands. Take your time.
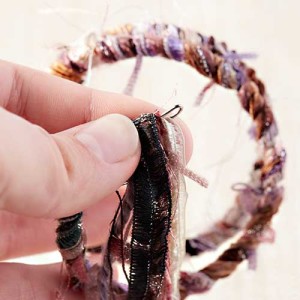
Step 4: At the end, glue to secure. Wrap strands back towards the beginning of memory wire to create a fuller looking bracelet. Once you run out of strands, dab a small amount of glue to hold ends down.
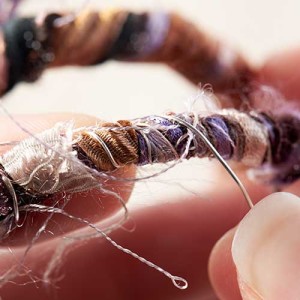
Step 5: Wrap 26 Gauge wire around ribbon strands to secure the strands.
Step 6: Embellish with charms, bead dangles, tassel, or wear as is. Your boho fiber bracelet is complete!
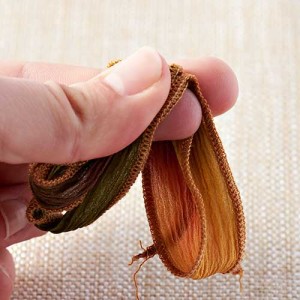
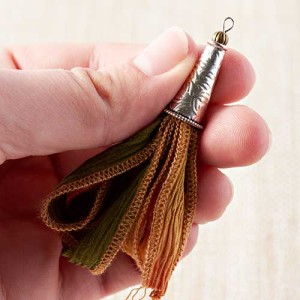
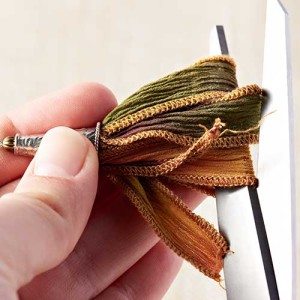
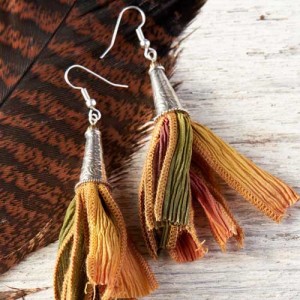
Use silk ribbon to make a trendy pair of tassel earrings. Make some fun pair of earrings like what we have made here. OR create a longer tassel to use in a statement necklace.
Step 1: Cut silk ribbon in half. Take one half and fold in half. Fold again and again for a total of three half folds.
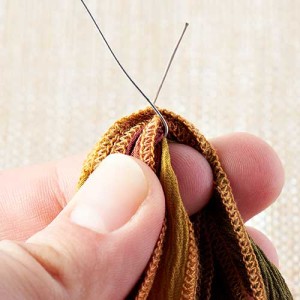
Step 2: Cut 4 inches of 22 Gauge wire. Insert under last ribbon fold a third of the way and cross the wire strands.
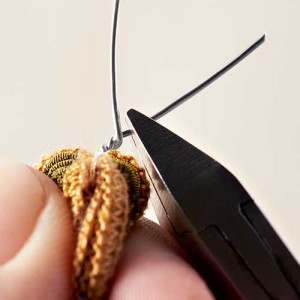
Step 3: Twist the two wire strands. Cut excess length of the shorter wire strand.
Step 4: Insert cone on wire and use flat nose pliers to pull tassel snuggly inside cone.
Step 5: Add a small bead and make a simple loop.
Step 6: Cut the ribbon loops.
Step 7: Attach ear wire and repeat for the other tassel earring.
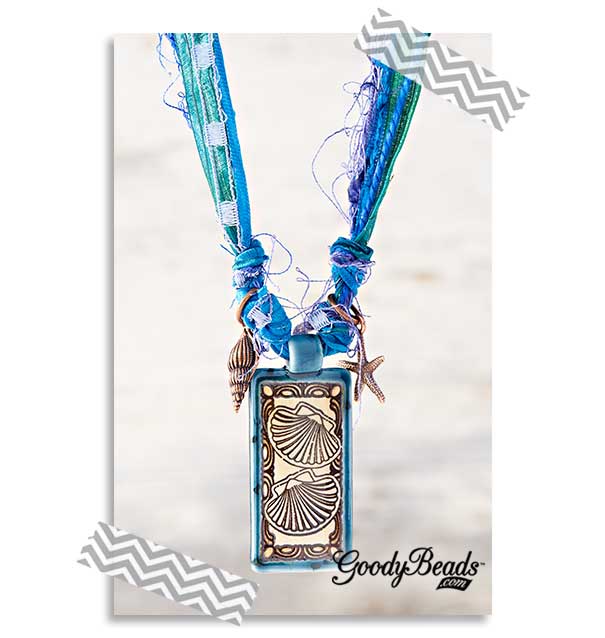
Center a porcelain pendant to these mix ribbon and make knots on both sides. Then make another knot next to those knots and added seashell and starfish charms with copper jump rings in between each knots. This necklace takes you to the beach without even being there!
It is official! Spring is just around the corner for 2016! Soon the snow will be melting and spring will be knocking at our doors. It’s the perfect time to rummage through your beads and do some spring cleaning: to make way for MORE beads, of course. Here are three different ways to use your leftover beads, findings and chains.
As a beader, you know that you always have extra beads from previous projects lying around. We, at GoodyBeads, are guilty about that! There is a whole shelf dedicated to leftover items of miscellaneous beads, findings, chains, cords, tools, crystals and the list goes on and on. It was hard to not open a fresh pack of new beads or a full length of cut chain or a string of gemstones. But with our wall of STUFF, there were enough items for this spring cleaning project!
An Array of Colorful Beads for a Wrap Bracelet
A perfect way to use your extra beads is to make a quick and easy wrap bracelet. Check out our previous blog, How to Make Wrap Bracelets, for a tutorial.
Designed by So Vang
For this particular bracelet, we gathered similar round 8mm of gemstones and Czech glass beads. Using our used roll of Waxed Cotton Cord and Superlon Brown Thread, we made a wrap bracelet that wraps 4 times. Even check out our button piece. Instead of grabbing a new button, we used a Bali spacer (A021466) and made knots to act as a button piece. Love this idea! What a way to think outside of the box, eh?
If you need supplies, head over to our Gemstone and Czech section. If you are looking for a particular size or shape, we have that option on the left hand navigation under “Size Range” or “Shape.” Or you can even check our selection of Bead Set and Mixes for a quick mix.
Chain Chain Chain
Do you have various length of chain bunched together waiting to be used for bracelet extenders pieces or necklace additions? Make CHAIN the main piece of your jewelry!
Designed by So Vang
What we made here is a multi-chain bracelet. Randomly select a few chain pieces, then measure each chain to your bracelet length. Using a 7mm jump ring to combine each piece of chain end. Do the same to the other end. Use another 7mm jump ring and attach to each end with a magnetic clasp. We have to be honest here and say that we cheated. We did have to get a magnetic clasp from GoodyBeads inventory. You can go ahead and cheat too. We won’t tell if you don’t either!
Another idea is to make a statement necklace with miscellaneous chain braided together. What’d you think?
Linking Bead Dangles
We love our selection of glass beads. The vibrant colors and designs are BEA-U-TIFUL! One way to weed through your stash of beads is to find a HERO bead and play off on the colors and shapes. Grab some eyepins and start making simple loop dangles of the beads you’ve chose. By linking them, you can make a bunch of different jewelry pieces.
Our hero bead was this blue and amber glass bead (A013249). We pulled beads with hues of blue, light blue, and amber as well as some bronze Czech fire polish beads. Using gold eyepins, make a simple loop with the glass and Czech beads. We made enough eyepin dangles until we ran out of the bronze Czech fire polish beads. Plus, we made a handful of Black Diamond Chinese crystal dangles.
Start linking them up to make a necklace, bracelet or earrings. Play with the sequence of the beaded dangles and add chain and different findings. Using up every last beaded dangle and with the help of gold plated findings and chain, we made two necklaces, earrings and a bracelet.
Designed by So Vang
Designed by So Vang
LOVE LOVE LOVE this idea because it gives you the chance to use up beads that you can’t find anymore. Even some of these beads we used are styles that we no longer have. It makes it more unique don’t you think?
Now that you’ve used your beads up, there’s room to buy more!
Make a Multi-Strand Necklace with Swarovski® Tahitian Pearls
by Kristal Wick
One of the easiest “go-to” designs I have found is a multi-strand necklace or bracelet. WHAT? You say these look soooooooo difficult? Not true! Once you master the multi-strand, you’ll be hooked! I like to start by making piles of my fave components; for example, sitting in my studio on a chilly (16 degrees below zero) January day in Minnesota, I CRAVED a splash of beach so I grabbed some TierraCast® dolphins and seashells, beautiful blue Swarovski Tahitian pearls and crystals and frosted seed beads to give the piece a sea glass effect. Use three different colors of beading wire with one exposed to add an additional dimension to the necklace. It’s trendy these days to mix metals so I threw in copper components to reflect the shades of glistening sand and a bit of silver to represent the crest of the waves breaking up on shore. Whether you’re physically on a beach or visiting one in your mind, I hope this seashore delight will help you get through this long winter! Use three colors of beading wire – one color exposed – to add an additional dimension to the necklace.
Cut five 16 inch pieces of beading wire (various colors).
Crimp one end of the wire leaving a small loop.
String the following onto strand #1:
Three Lined Light Seafoam AB Miyuki Seed Beads
Seven Matte Transparent Silver Lined Crystal Long Drop Miyuki Seed Beads
Antique Silver Diamond Bead Frame
Indicolite Round Mini Bead
Series: 20 Matte Transparent Silver Lined Crystal Long Drop Miyuki Seed Beads
Antique Silver Diamond Bead Frame
Indicolite Round Mini Bead
Repeat the series four more times and add the following:
Seven Matte Transparent Silver Lined Crystal Long Drop Miyuki Seed Beads
Three Lined Light Seafoam AB Miyuki Seed Beads
Crimp beading wire end leaving a small loop.
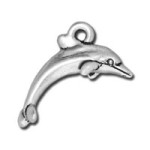
Add Copper Oval Jump Rings to the four dolphin charms
Crimp one end of the wire leaving a small loop and string the following onto strand #2:
Slide the following series onto the beading wire:
Series: Crimp tube
3mm Antique Silver Beaded Heishi Spacer
4mm Antique Silver Beaded Heishi Spacer
12mm Tahitian Swarovski Pearl
4mm Antique Silver Beaded Heishi Spacer
3mm Antique Silver Beaded Heishi Spacer
Crimp tube
Lay this strand down next to Strand # 1 and space the pearl series in the center of the first 20 Matte Transparent Silver Lined Crystal Long Drop Miyuki Seed Bead series and crimp on either side of the pearl series.
Gently squeeze the crimp covers over the crimps.
Add the series again and crimp about an inch down the beading wire. Repeat steps 8–10 for the remaining three pearl series.
NOTE: Before doing the final crimp on each strand, make sure they all end up the same length. Adjust the number of beads on each strand to ensure this.
Crimp beading wire end leaving a small loop.
Crimp one end of the wire leaving a small loop and string the following onto strand #3:
Three Silver Lined Capri Blue Miyuki Seed Beads
Series: Antique Copper Scalloped Bead Cap
Bicone Crystal Denim Blue AB2X
Antique Copper Scalloped Bead Cap
Silver Lined Capri Blue Miyuki Seed Bead
Antique Silver Small Spindle Shell Charm
Silver Lined Capri Blue Miyuki Seed Bead
Antique Copper Scalloped Bead Cap
Bicone Crystal Denim Blue AB2X
Antique Copper Scalloped Bead Cap
Silver Lined Capri Blue Miyuki Seed Bead
Antique Copper Small Shell Bead
Silver Lined Capri Blue Miyuki Seed Bead
Repeat the series seven more times alternating the Dolphin charms and Spindle Shell charms, then add two Silver Lined Capri Blue Miyuki Seed Beads.
Crimp beading wire end leaving a small loop.
Crimp one end of the wire leaving a small loop and string the following onto strand #4:
Two Matte Transparent Light Blue Miyuki Seed Beads
3mm Crystal Jade Swarovski Pearl
Series: Five Matte Dark Seafoam Delica Duracoat Galvanized Seed Beads
3mm Crystal Jade Swarovski Pearl
Matte Transparent Light Blue Miyuki Seed Bead
3mm Crystal Jade Swarovski Pearl
Five Matte Dark Seafoam Delica Duracoat Galvanized Seed Beads
3mm Crystal Jade Swarovski Pearl
Matte Transparent Light Blue Miyuki Seed Bead
3mm Crystal Jade Swarovski Pearl
Five Matte Dark Seafoam Delica Duracoat Galvanized Seed Beads
4mm Antique Copper Beaded Bead Cap by TierraCast
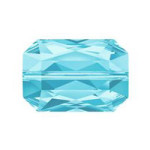
Swarovski® Crystal 14mm Aquamarine Emerald Cut Bead
4mm Antique Copper Beaded Bead Cap by TierraCast
Repeat the series four more times then add the following:
Five Matte Dark Seafoam Delica Duracoat Galvanized Seed Beads
3mm Crystal Jade Swarovski Pearl
Matte Transparent Light Blue Miyuki Seed Bead
3mm Crystal Jade Swarovski Pearl
Five Matte Dark Seafoam Delica Duracoat Galvanized Seed Beads
3mm Crystal Jade Swarovski Pearl
Matte Transparent Light Blue Miyuki Seed Bead
3mm Crystal Jade Swarovski Pearl
Five Matte Dark Seafoam Delica Duracoat Galvanized Seed Beads
3mm Crystal Jade Swarovski Pearl
Two Matte Transparent Light Blue Miyuki Seed Beads
Crimp beading wire end leaving a small loop as in Step #2.
Crimp one end of the wire leaving a small loop and string the following onto strand #5:
Transparent Aqua Miyuki Seed Bead
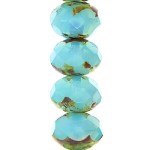
Series: 8mm Baby Blue Czech Faceted Rondelle Glass Bead
Transparent Aqua Miyuki Seed Bead
Sparkle Metallic Gold Lined Crystal Miyuki Seed Bead
Transparent Aqua Miyuki Seed Bead
Sparkle Metallic Gold Lined Crystal Miyuki Seed Bead
Transparent Aqua Miyuki Seed Bead
Repeat this series 17 more times. Add a Transparent Aqua Miyuki Seed Bead and then crimp beading wire end leaving a small loop.
Open eyepin, insert one end loop of all five strands and close the eye pin. Repeat for the other necklace end.
Slide on Antique Silver Spiral Cone Bead Cap, Swarovski® 6mm Indicolite Round Mini Bead, Antique Copper Beaded Bead Cap and make a simple loop on the end. Repeat for the other necklace end.
Add desired chain length (the sample shown uses 2-¼”) to simple loop.
Using a jump ring, add the toggle to the other end of the chain. Repeat steps 20-21 for the other necklace end.
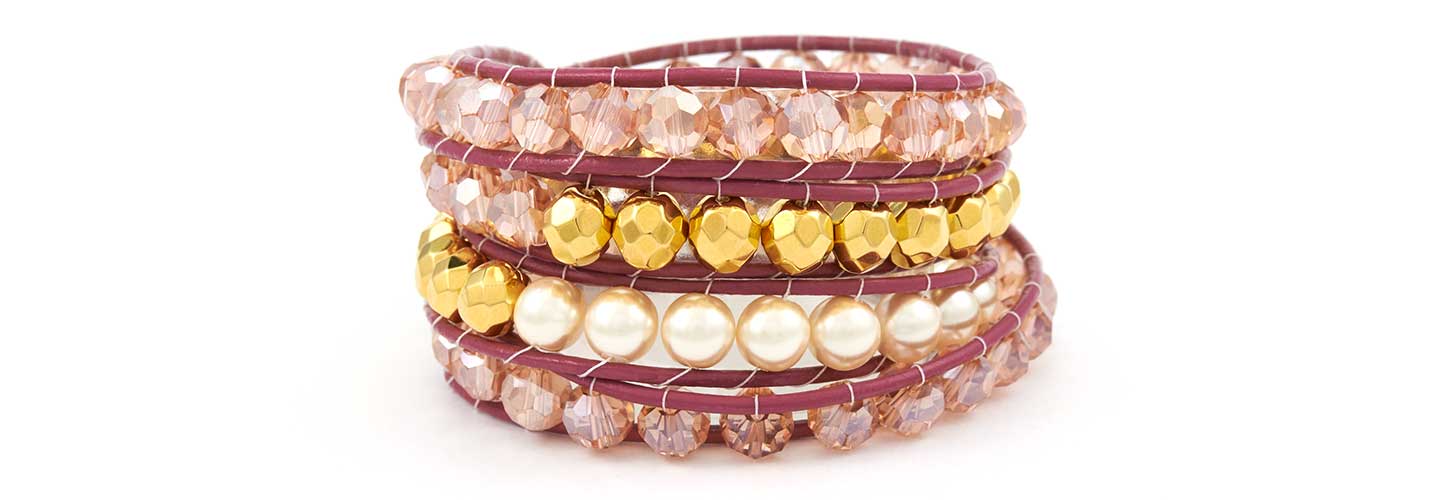
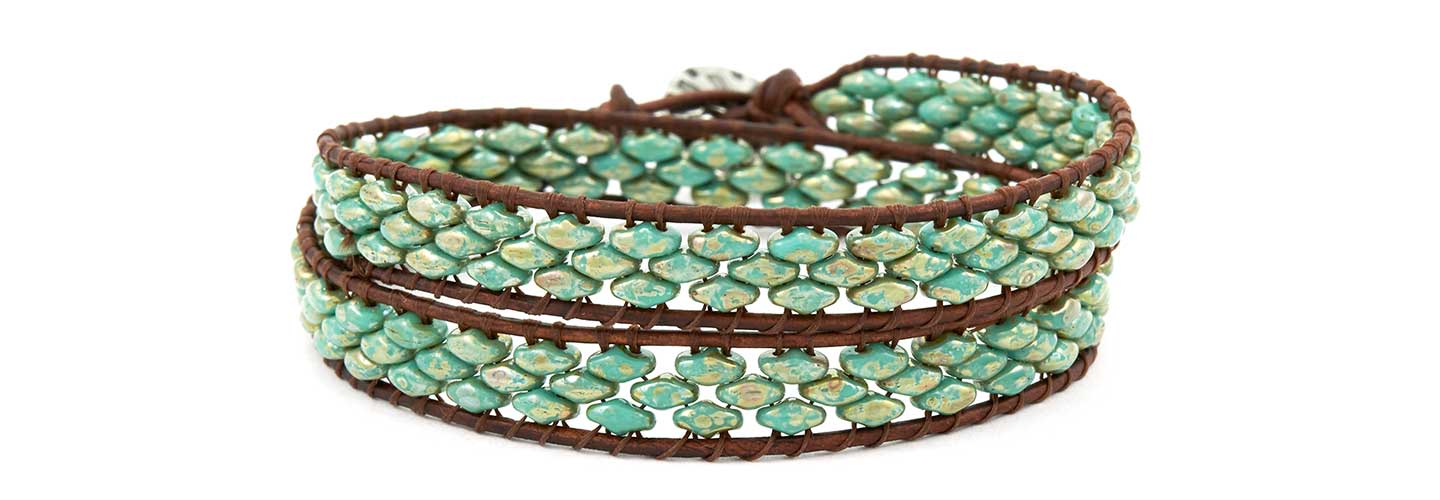
How to Make Leather Wrap Bracelets with Illustrated Tutorial
Leather wrap bracelets is a trending favorite to spice up a boho outfit or rock out to a head-banging concert or add to a casual outing with your girlfriends. Wrap bracelets are a must-have for 2016. We will show you how to make wrap bracelets with illustrated tutorial that you can download.
They may look difficult to make, but after a few attempts, they are honestly easy to make. We will show you a tutorial on how to make these bracelets using one-hole beads and super duo beads, as well as a few tips and tricks to help you make these wrap bracelets.
The basic components you need for these bracelets are:
Button findings: which will act as your clasp. Button Ends will work well, also.
Leather or cotton round cord: these could range from 1mm to 2mm or larger, depending your preference and on the size of beads you are going to use. The length of cord needed for your bracelet will be determined below.
Thread: you can match the thread to your leather cord to hide the look or to add color. Check out some Beading Thread options but keep in mind that you will need a thin enough thread to go through the hole of your beads twice.
Beading Needle: size will be according to your thread and bead’s hole size.
Adhesive: Hypo-Cement with precision tip, is a good choice to glue thread ends or any fast-drying glue will do.
Beads: use your preference of beads or seed beads. Have enough if you plan to have a multi-wrap bracelet.
Determine leather length needed for a wrap bracelet
Use this method to determine the leather cord length you may need for a multi-wrap bracelet.
Take your wrist length and double the length. Multiply that by the number of wraps you want and then add 12”. That will give you an approximate cord length you will need to start your bracelet. (The extra 12” factors in the button knot, end knot(s) and bead size.)
Example:
2 wraps for an 8.5” bracelet: (8.5” x2) x 2 wraps = 34 + 12 = 46” needed.
Or
4 wraps for a 7.5” bracelet: (7.5” x2) x 4 wraps = 60 + 12 = 72” needed.
Keep in mind, these total numbers are approximate. You will want to test the wrap length while you’re making your bracelet. Having extra length is better than being short on your wrapped length goal.
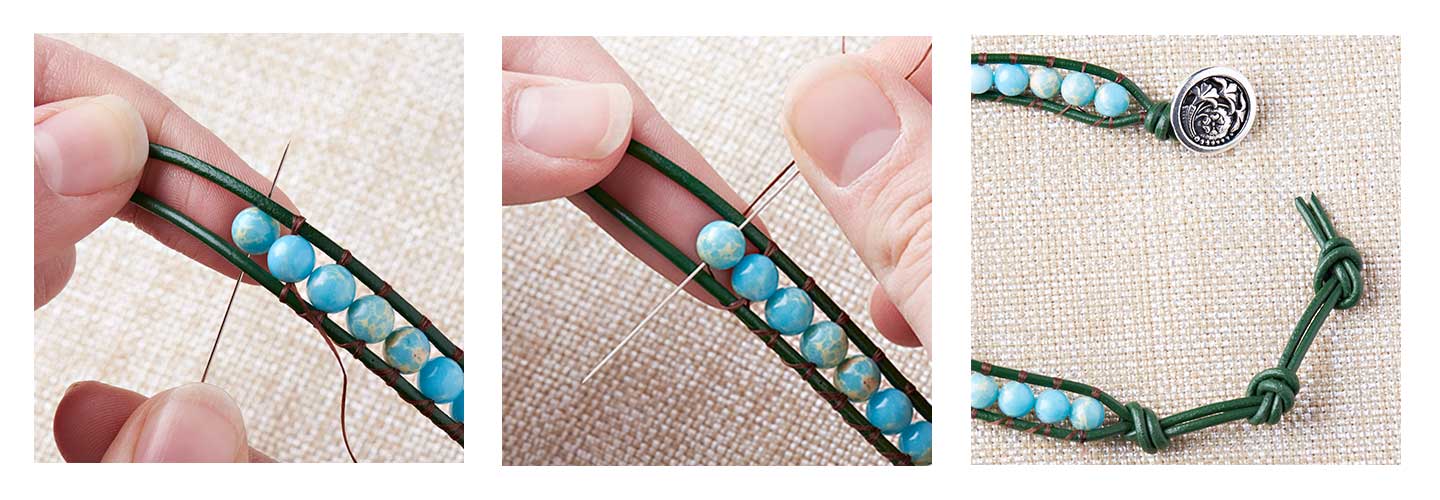
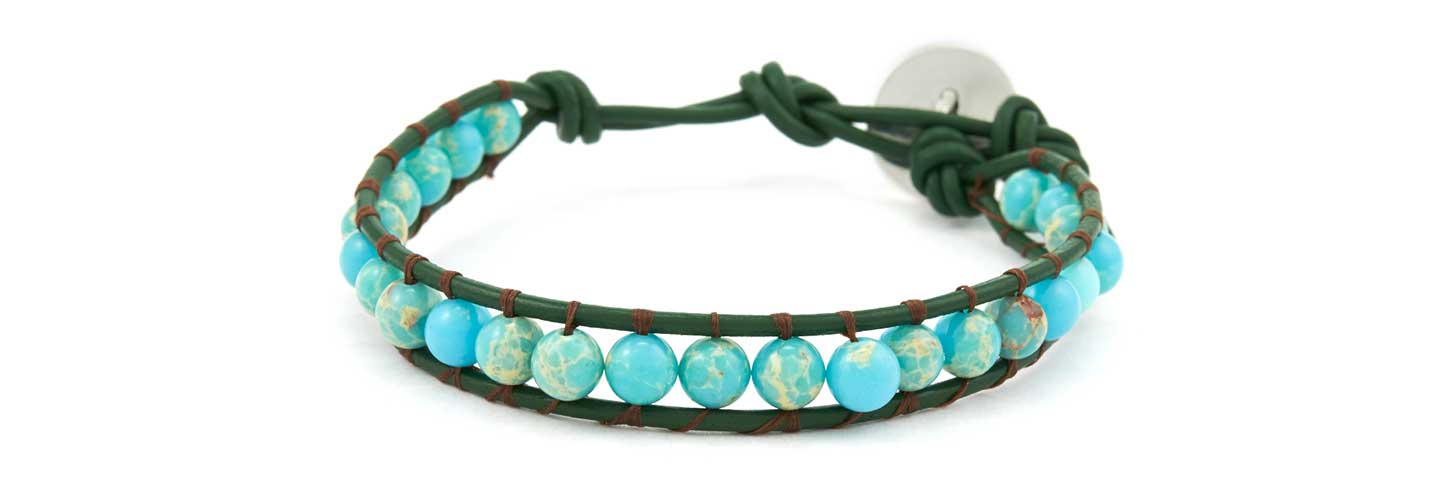
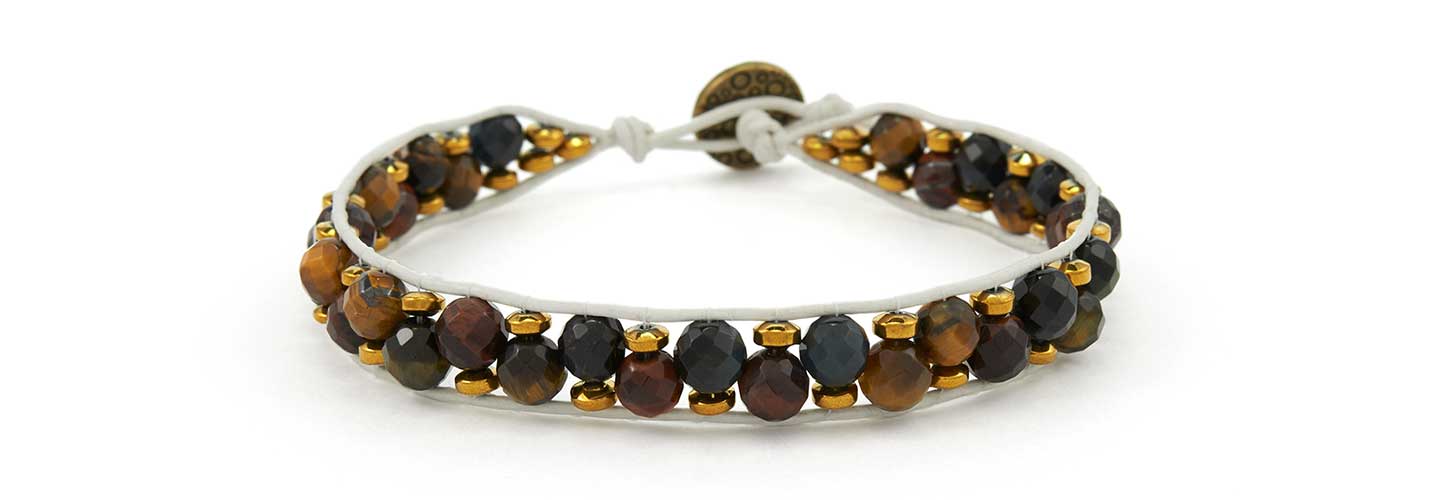
Basic Leather Wrap Bracelet Tutorial
The basic weaving of the thread will be going under the leather cords and then coming over leather cords.
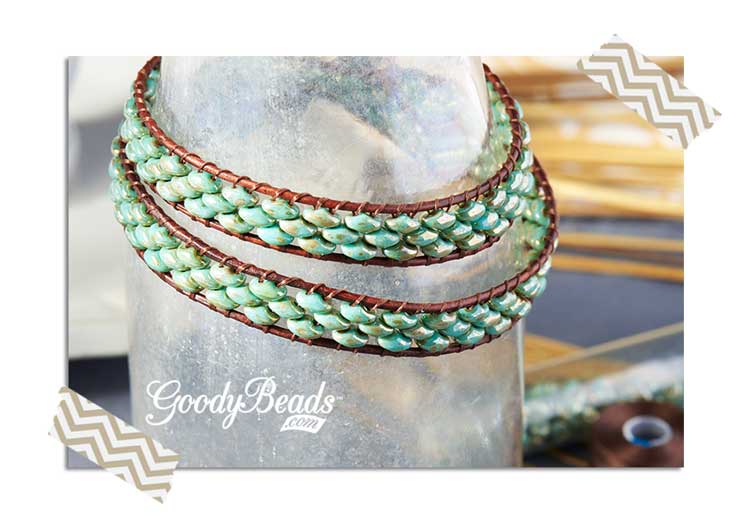
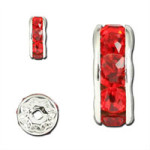
With Czech SuperDuo seed beads, you will be layering the bead holes to create a layer sequence. Below is a tutorial on how to make this SuperDuo wrap around bracelet.
This is a simple one-wrap bracelet. Think about using a different thread color than your leather cord color for a mix of colors.
Use more than one bead on each layer for more embellishment options.
Make a bracelet with multiple combinations of beads to create a fun layered look.
These SuperDuo beads look like tiny stone pebbles, don’t you think? Try a SuperDuo mix set for a colorful bracelet or create a zigzag pattern. What will you try?
Other Tips
How to add on additional thread: Tie thread to closest leather cord and glue with Hypo Cement or fast-drying glue. Cut off excess. Tie new thread to leather cord, glue knot and continue.
How to hold leather strands: An alternative to holding the leather strands, for stability when adding beads, is to clamp the button to a clipboard.
How to straighten leather cords: While you are stringing on beads, adjust previous beads with fingers to straighten out leather cords. Or when you have reached your desired bracelet length, lay the bracelet down and run your hand across your bracelet. This will help to smoothen and straighten your leather cords.
How to tighten threads/bead layers: If you find that your thread does not keep your bead(s) sandwiched in place or the bead sits loosely, sew up and under the cords and through the bead again. Over and down through the bead. Sewing through the bead twice on the leather cords will give your beads a tighter hold.
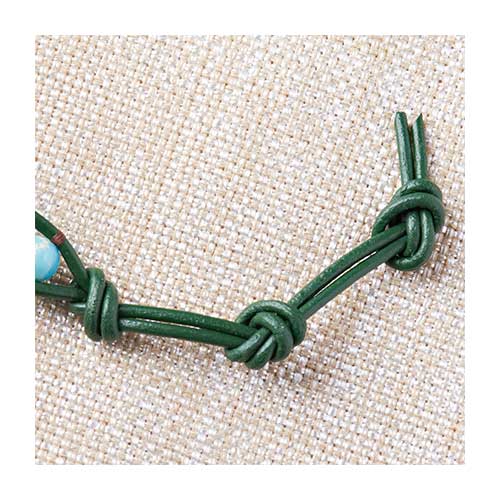
Tighten leather knots: If your leather cord knots are loosening, add a small dab of fast-drying glue or Hypo-Cement to knot(s) for tighter holds.
How to make an adjustable bracelet: Make additional knotted ends for an adjustable bracelet.
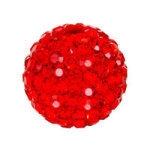
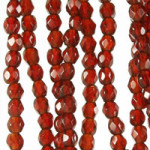
Happy January Birthdays! Being the first birthstone of the year, January’s garnet, also know as the “Gem of Faith,” derived its name from the Latin word Granatum or pomegranate, because it resembles a dark red fruit. While garnet is a rich red hue, it “signifies power, victory, truth, purity, faith, and protection,” (BirthstoneZodiac) as well as life, happiness and strength.
Swarovski® defines January birthstones with garnet and siam crystals. We have four simple jewelry projects to start your new year! Wear garnet or siam this year whether it is for showcasing your birthstone color or to showcase this vibrant red color.
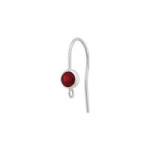
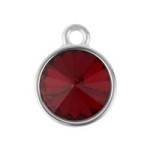
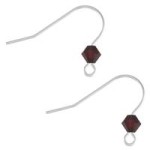
January Crystal Earrings
Designed by So Vang
This pair of earrings is made with TierraCast® bezel charm that uses Swarovski® crystals. Simply open up your sterling silver ear wire loop and slip these glimmering charms on. Because these charms are 18mm, they are the perfect statement earrings for January 2016!
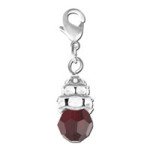
January Bangle Bracelet
Designed by So Vang
The fun thing about these expandable bracelets is that you can add any of your favorite charms. Add your garnet crystal charm and your favorite charms for this easy to do and wear popular expandable bracelet.
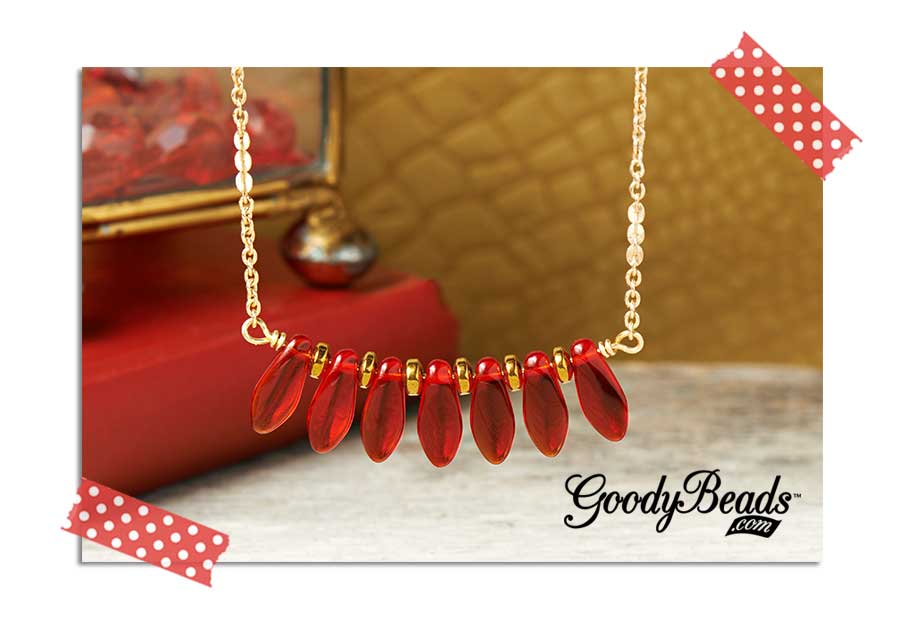
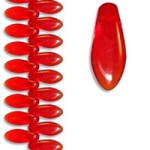
Red Golden Dagger Necklace
Designed by So Vang
For this necklace, we paired sharp red dagger Czech beads with copper/gold-tone beads. Take some 22 gauge artistic wire and make a full loop. Before you finish it with a coiled wrap, insert your gold chain. Finish your loop with a wrapped coil. Insert your beads alternating between the dagger beads and copper/gold beads. Make another wrap loop at the other end while adding another piece of your gold chain. Bend your beaded wire piece to create a slight curve. Add your lobster clasp to one end of your chain and a jump ring to the other.
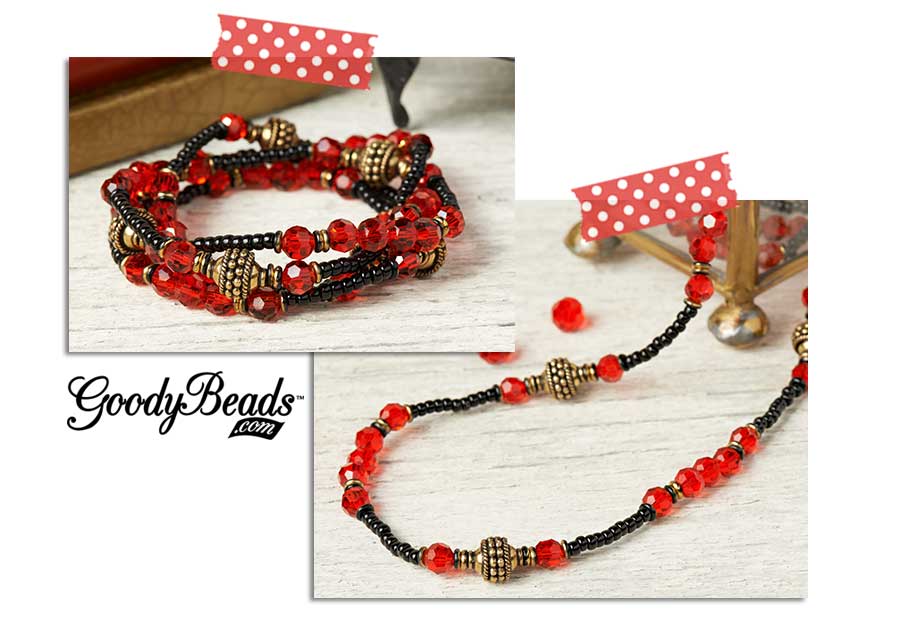
2-in-1 Necklace and Bracelet
Designed by So Vang
We used Chinese crystal beads, brass bali beads, seed beads and Czech O beads to create this simple elastic-strung jewelry piece that doubles as a wrap around bracelet or necklace. Create this fun sequential design as long as you want for an everlasting jewelry piece you can wear year round.
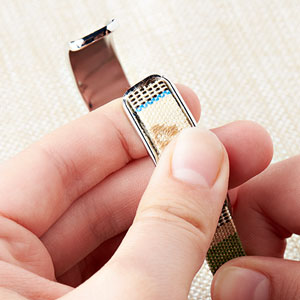
Using Cold Connection in Jewelry: How to Rivet Leather
Cold connection is a unique metal technique that connects metal components without the use of heat. While you can connect metal pieces by glue or other adhesive, we will demonstrate some basic steps on how to use rivets with leather.
You will find many cold connection and riveting techniques in steampunk jewelry and metalworking. Once you have the basic tools and components for metal working and rivets, you will find how easy this versatile skill can be used for jewelry making.
Designed by So Vang
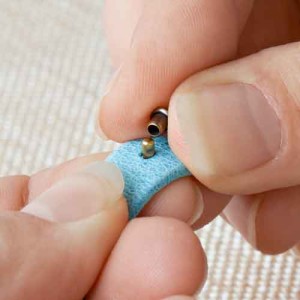
Rivet Leather (Part One)
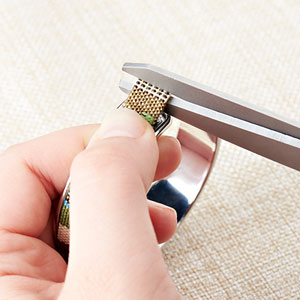
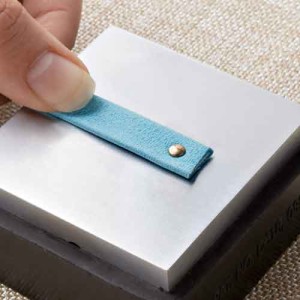
For this project, we are using TierraCast® Rivets to show how to rivet on leather. When riveting on leather, use a two-part compression rivet, which will have a bottom and cap piece. Two-part compression rivets are best for leather, as they will create a tighter hold if you are adding embellishments with the rivets.
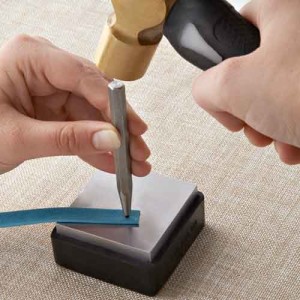
Punch leather through the backside using the Leather Hole Punch. Make sure to punch a hole that is large enough for the rivet to sit it, but not too big. If the hole is too big the rivet may not catch the leather, and may fall out. Tip: Punch with the smallest setting first. Increase hole size if the rivet does not go through.
Insert bottom rivet piece through the backside of the leather and put cap piece on top.
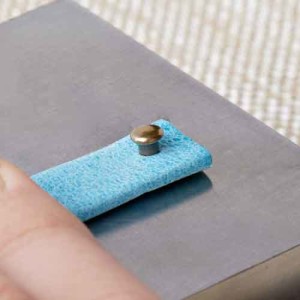
Press the two pieces together until it stops. Place on Bench Block.
Use the Rivet Setter that complies with the size of the rivets. i.e. 4mm rivets will need the 4mm TierraCast® rivet setter tool, while 6mm rivets will use the 6mm TierraCast® rivet setter. Use steel hammer to hit the rivet setter with 2-3 good strikes.
Your rivet is complete.
You can sandwich in TierraCast® Components for added embellishments. Or for our bracelet, we used TierraCast® Breathe Link. Use Bending Pliers to curve the link. Line up the leather behind the link and mark the holes of where the rivets will go. Punch the holes where you marked them and rivet the link to sandwich the leather and link together. Glue your clasp and you are done.
Rivet Leather (Part Two)
Designed by So Vang
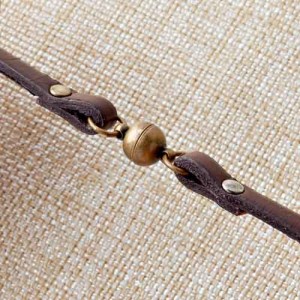
Make leather loop for jump rings, clasps, or joining components together. Create this wrap-around leather watch by using these two part compression rivets. Cut two 12” 5mm flat leather. Make leather loops on all four ends. Attach your clasps and watch face for a fun wrap-around leather watch.
Measure an inch distance between the holes. Punch with Leather hole punch pliers.
Fold and insert your top and cap pieces.
Hammer the rivets with your rivet setter and you are done.
Make loops to add jump rings and clasp as shown in this watch bracelet example.
New Year’s Eve Swarovski® Earrings, PLUS How to Wire Wrap Briolette Beads
Who doesn’t love ringing in the New Year? You may find yourself at a rooftop party, celebrating New Year’s Eve with cheerful faces, sparkling fireworks, glittering streamers, plastic party hats, bubbly beverages, and midnight kisses! Whether you are dancing the night away or making a toast, we have the perfect earrings, made with Swarovski® crystals, to help ring in the New Year! PLUS, learn how to wire wrap Briolette Beads!
Pendulum Posh
Designed by Tory Vezina
Make these fun statement earrings with GoodyBeads.com NEW stock of Swarovski® pendulum beads. Take an eyepin and thread on the 10mm and 8mm crystal beads and make a simple loop. Attach the TierraCast® bar link to each loop. Connect the two bar links with the 6mm jump ring. Add your favorite choice of ear wires. Can’t you see yourself at a FABULOUS party wearing these FABULOUS earrings?!
Swarovski® and Rhinestone Earrings
You can’t have enough sparkle when it comes to dressing up for New Year’s. You have to sparkle as much as the flashy New Year’s ball!
Designed by So Vang
We’ve given these Swarovski® an extra boost of bling with rhinestone rondelles. We made these earrings with an eyepin, 8mm round Swarovski® bead, 6mm rhinestone rondelle bead and a 4mm bicone Swarovski® crystal. Thread on beads and make a simple loop. Open the eyepin loop closest to the 4mm crystal and attach 1 inch of CH00412 – 5mm Filigree Leaves Chain. Open the other loop and attach 1 inch of CH00533 – 2.5mm Soldered Cable Chain. Attach the other end of CH00533 chain to your choice of ear wire. You are ready to rock the night away when the ball drops for 2016!
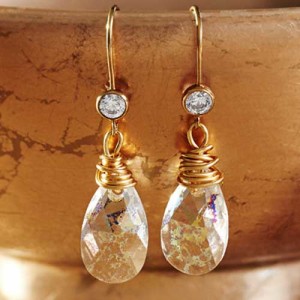
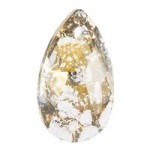
Wrapped Crystal Drop Earrings
Designed by So Vang
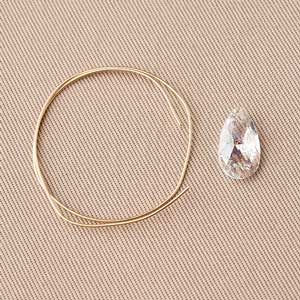
We love these pear-shaped Swarovski® earrings with patina sparkle that add a glittery shine. Paired with gold earring hooks and gold artistic wire, heads will turn to ask, “Where’d you get those?” Check out our tutorial below on how to wire wrap a briolette or top-drilled bead.
Tools Needed:
Round Nose Pliers, Flat Nose Pliers, and Side Cutter.
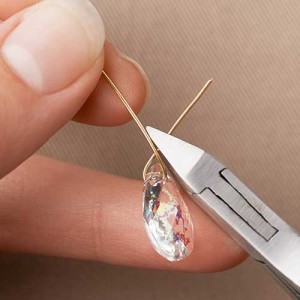
STEP 1: Start with 6 inches of 22 gauge artistic wire.
STEP 2: Feed an inch of wire through the briolette bead hole and bend both ends upwards and cross. Cut the shorter end where both wires cross.
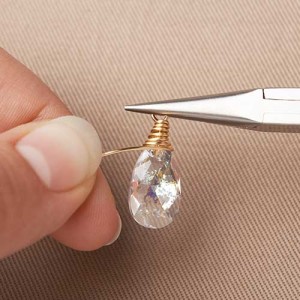
STEP 3: Take round nose pliers and grip the longer wire where the wires touch. Wrap wire back towards bead into a full round loop.
STEP 4: Use flat nose pliers to clamp onto loop. Wrap/coil the wire down and over the tip of the bead.
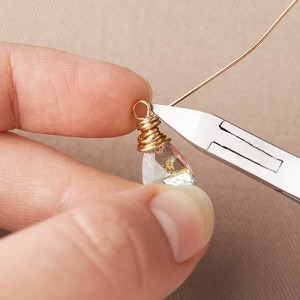
STEP 5: Next, hold the bead in one hand and the wire in the other. Twist the bead to coil the wire back up to the loop. It’s alright if your coils are not even, this creates a handmade look.
STEP 6: Cut excess wire with a side cutter and use flat nose pliers to tuck ends within coils.
STEP 7: For earrings, hook crystal loop to ear wires and you are done!
Jewelry Components List
Pendulum Posh
(1 pair) A012827 – Sterling Silver Filled French Wire Earrings
The holiday season is here and it’s the time of reconnecting with loved ones and gift giving. Looking for a quick holiday gift? We have some inspirational easy leather DIY projects. Jump on the trend of fashionable leather bracelets or try out an alternative use of flat leather for an easy DIY key chain.
Winter White Splendor Leather Bracelet
Designed by Tory Vezina
Simplify gift-giving with a stunning bracelet using 2mm leather cord. Cut the 2mm round cord at 8 inches. Fold the cord in half and slide the TierraCast® barrel bead (TC01538) through the cord ends to create a loop. Glue the cord ends to a hooked curved clasp (A019043) and you are done! You may want to make a few of these because you’ll want to keep one for yourself.
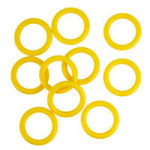
Licorice Leather Bracelet
Designed by Tory Vezina
Licorice leather bracelets are the perfect statement jewelry. Cut the licorice leather to the preferred wrist length. Add a combination of beads and spacers to add color and use O-rings to keep beads and spacers in place. Lastly, glue your choice of licorice clasp.
We’ve got a brilliant Black Friday gift with purchase for all you beady peeps! Since the gift-giving season is upon us and you’re creating like magical elves, we’re here to help you out with loads of FAB holiday beads you can mix and match! Use them to design an all-in-one beautiful jewelry piece for yourself or make dozens of earrings for your gal pals. Just add a few ear wires, headpins, chain and you’re good to go. I made seven different projects out of this Black Friday Free Gift and still had leftover beads! So there’s plenty to go around. You can also find all the beads included in our Black Friday Free Gift on our website. So what are you waiting for? Let’s get going!
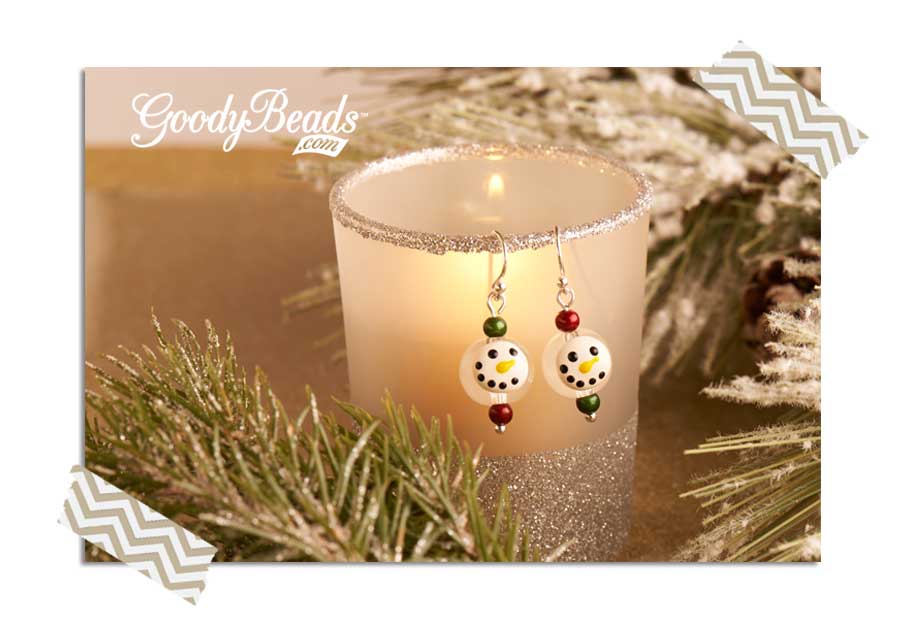
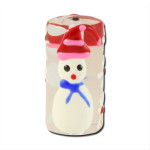
Snowman Earrings
Here are three easy designs in this DIY blog. They’re quick to make and highly addictive – once you start, it’s impossible to stop!
Snowman Earrings
(2) A012827 – Sterling Silver Filled French Wire Earrings
(2) A019688 – 2 Inch Silver Plated 20 Gauge Headpins with Ball Top
(2) A004285 – 12mm Clear Hand Painted Snowman Head Lampwork Beads
Slide your beads onto a headpin in the following order:
Red Miracle Bead
Snowman Bead
Green Miracle Bead
Make a simple loop at the top of your headpin.
Open the loop of the earwire. Slip the headpin dangle onto earwire loop and close loop.
Repeat for the other earring.
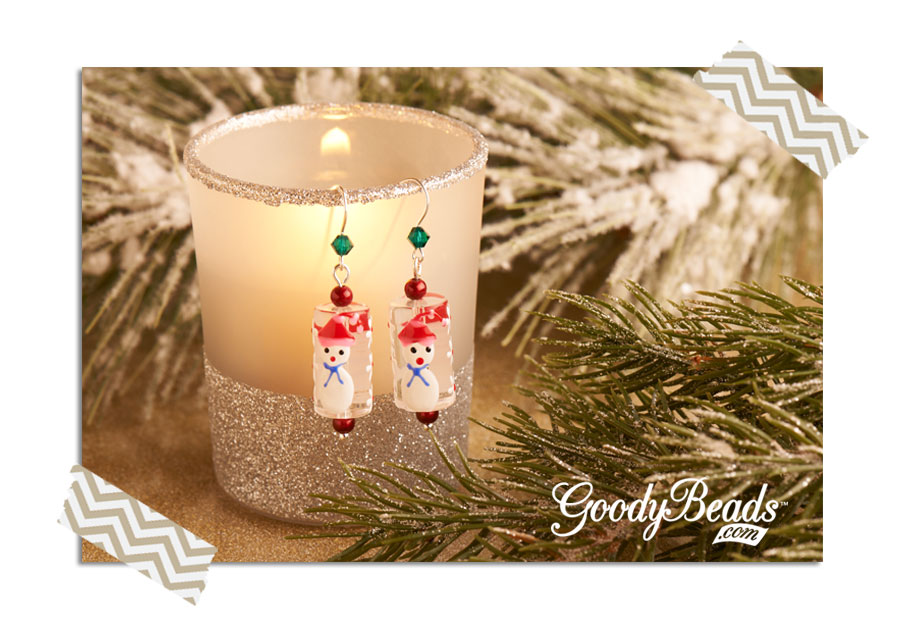
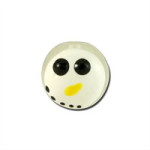
Snowman with Flowers Earrings
Who doesn’t like a darling snowman? Festive with a pair of jeans as well as with a fancy holiday party dress, these little guys are sure to bring many smiles this holiday season.
Snowman with Flowers Earrings
(2) A020541 – Sterling Silver Ear Wire with 4mm May Bi-Cone Crystal
(2) A019688 – 2 Inch Silver Plated 20 Gauge Headpins with Ball Top
(2) A004282 – 20mm Clear Hand Painted Snowman Lampwork Beads
Slide your beads onto a headpin in the following order:
Red Miracle Bead
Snowman Bead
Red Miracle Bead
Make a simple loop at the top of your headpin.
Open the loop of the earwire. Slip the headpin dangle onto earwire loop and close loop.
Repeat for the other earring.
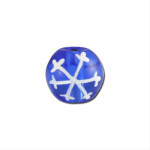
Snowflake Bracelet
Blue snowflakes and a splash of silver says winter in the warmest way, don’t you think? Customize this bracelet for any age and style. Oh, be sure to make one for yourself, too!
Slide your beads onto the eyepin in the following order:
Silver/White Miracle Bead
Silver Plated Bali Style Round Bead
Silver/White Miracle Bead
Snowflake Bead
Silver/White Miracle Bead
Silver Plated Bali Style Round Bead
Silver/White Miracle Bead
Make a simple loop at the top of your eyepin.
Open the eyepin loop, slip one chain link into the eyepin loop and close loop.
Repeat for the other side of the bracelet.
Add a toggle bar to one end of the chain using two jump rings.
Add the toggle to the other chain link using a jump ring.
Holiday Swarovski® Cha-Cha Bling
With the holiday season quickly approaching, it’s time to get serious about our bling and what better way than to adorn with red and green Holiday Swarovski® Cha-Cha jewelry? Expandable bracelets and rings are perfect for every shape and size of gal pal, and who can resist some blingy baubles for your lovely lobes.
Holiday Swarovski® Cha-Cha Bracelet
Why red and green for the holidays? This tradition dates back thousands of years when folks used holly, ivy and mistletoe to beautify and brighten up their homes during the long dark winter. This was also a vital reminder that winter would NOT last forever and spring would definitely come blooming around the corner! The Romans exchanged evergreen branches in January and the Egyptians used palm branches to symbolize good luck. Red represented the color of fire and keeping warm. White symbolized peace and purity in the western cultures.
Slide a bicone onto a headpin and make a simple loop. NOTE: Be sure the loop is large enough to freely swing from the bracelet loops.
Repeat Step #1 for all the bicones.
Open bicone dangle and hook it through a bracelet loop, close loop. Complete bottom row with the following pattern: clear bicone, red bicone, clear bicone, green bicone.
Complete top row using the same pattern and add another round of bicones around this row so you end up with two bicone dangles per bracelet loop.
Holiday Swarovski® Cha-Cha Earrings
When creating our DIY Holiday Cha-Cha projects, we suggest making all the bicone simple loop dangles first. Get comfy on the couch and watch your fave movie or TV series marathon while you’re cranking these babies out. Practice makes perfect in the world of simple loop making! So why not perfect your talents while you’re on a roll and make them all at once?
Whether you believe the deeper meaning of these colors or simply just like how they look, nothing feels quite as festive as sparkly Swarovski® crystal holiday jewelry for your parties, the office or gifts. Of course put yourself first on that gift list, and while you’re beading away remember: one for you, one for your BFF, mom, sister, etc. Well, you get the picture. Now, get going and happy beading!