Vendor Video: Elastic Cord Needle from Beadalon®

Elastic Cord Needle (TL00281) is quite an innovative tool to pre-string your beads and to easily slide them onto an elastic cord; ready to be tied off and be worn! Check out this informative video from Beadalon on how to use the Elastic Cord Needle.


What you will first need are the following for this video tutorial:


Elastic Cord Needle Tutorial

Images and video by Beadalon.


Leather & Tube Bead Necklace with Tutorial

Check out how we created leather tube links with our popular curved tube beads and round braided leather cord.


Featured in our Totally Tube(ular) Bead trend, we looped round leather through our popular curve tube beads and linked them to create this modern and trendy necklace. You can certainly use the same link to create earrings.


Necklace Tutorial

Items used: Z004572, CH00943, TC01216, CH00314, A015821 


Other Tube Examples

Here are some examples of different tube beads and corresponding round leather sizes to can create these various tubular shapes.

Tube-Loops

  • 30x5mm (Z004572 & Z004570) – 3.5 Inches of 4mm Round Leather cord – This is the one used above.
  • 23x5mm (Z004569 & Z004571) – 3 inches of 4mm round leather cord
  • 50x3mm ( A014101 & A014097 & A014105) – 5 Inches of 2mm round leather
  • 26x3mm (A014099 & A007346 & A014103) – 3 inches of 2mm round leather
  • 10x2mm (Z004304) – 1 1/8 Inches of 1mm round leather – a bit more difficult due to it’s small size.


Fishtail Braided Cuff Video Tutorial with Candie Cooper

Learn today how fun and easy it is to make this fishtail braided cuff, using hand-dyed silk ribbon. With special guest, Candie Cooper, watch this video tutorial as Tory and Candie walk you through how to make this bracelet cuff.


GoodyBeads | Blog: Fishtail Braided Cuff Video Tutorial

While this beadable cuff is usually used for bead-stitching projects, as seen in our Delica Trend, we’ve utilized the open middle space to create a criss-cross braid. Plus, we love the ombré coloration in these ribbons and they are the perfect stringing material to create these braids.


Components You’ll Need


Video Tutorial

Candie Cooper was able to grace us with her special appearance in this video to assist Tory as she gives a step-by-step tutorial on how to braid hand-dyed ribbon on a beadable cuff.


Other stringing materials you can use to braid are fairy ribbon, 1mm – 2mm leather cord and deerskin leather because they are pliable. Create with us today!


GoodyBeads Inspiration: Seed Beads

Spring is here and we have some lovely seed bead ideas. If you have a stash of random seed beads, these are great ideas to combine and create with seed beads.


GoodyBeads | Blog: Seed Inspirations 1

  1. Tassel Jewelry – Blog
  2. Vendor Spotlight: Miyuki – Trend
  3. Beaded Holiday Ornament – Trend
  4. Ricks Bead Loom – Blog
  5. Fringe Earrings – Trend
  6. Beaded Tassel Tutorial – Blog


GoodyBeads | Blog: Seed Inspirations 2

  1. Vendor Spotlight: Miyuki – Trend
  2. Nautical Kumihimo – Trend
  3. Twist Seed Bead Necklace and Bracelet with Tutorial – Blog
  4. Stitch with Delicas – Trend
  5. How to Use Silk Cord in Jewelry Making – Blog
  6. Stitch with Delicas – Trend
  7. Ricks Bead Loom – Blog


GoodyBeads | Blog: Seed Inspirations 3

  1. Falling Waters Seed Beaded Necklace – Blog
  2. Beaded Teardrop Earrings with Tutorial – Blog
  3. Stitch with Delicas – Trend
  4. Boho-Inspired Bib Necklaces with FREE Tutorial – Blog


Leather Coil Bracelet with Tutorial

We love leather and GoodyBeads has a large selection of leather and leather findings to choose from. Our inspiration for today’s tutorial is creating a casual leather bracelet for anyone to wear. We love its masculine, simplicity, and rawness of the licorice leather with leather cord coils. Check out this tutorial and make one today!


Components

The components you will need for this bracelet are simple:

  • Licorice Leather
  • 2mm Leather Cord
  • Licorice Clasp
  • Super New Glue
  • Tool: Flat-Nose Pliers


Tutorial

Items used: A015821, A022052, A022076/Z028648, A015313


Silk Ribbon Tassel Earrings – Video Tutorial

Featured from the trend 2018 Pantone Color of the Year: Ultra Violet, these silk ribbon tassel earrings are fun and flirty to wear. Learn to make these pair of earrings with a video tutorial.


Vergata ribbon is typically used for Kumihimo braiding, but we are using them as tassels because they create lovely thick tassels that are great for earrings or even a necklace tassel. Below is a video tutorial making tassels with vergata ribbon as well as other examples of using this technique.


Video Tutorial

Start by cutting a 5 feet long vergata ribbon. Tie the two ends together to create a loop. Using your four fingers, start wrapping the ribbon loop loosely around them, creating a width of 3″ of ribbon. Watch and follow as we use a 6″ piece of wire to make the tassel and adding a cap and beads to finish the earring dangle.

Items used: Z019287, A010156, Z001286, A002225, TCZ0078AW00031SB00422


Small Ribbon Tassel Earrings

APRIL2017TRENDS_Tassels1

In our Ribbon Tassel Earrings trend, these tassels are smaller and dainty. Use 3 feet of vergata ribbon and after you’ve tied the two ends together, wrap the ribbon loops around two fingers loosely. Follow the rest of the video to add a cap and beads.

Items used:


Easy Teardrop Earrings with Miracle Beads

Miracle beads with a teardrop shape is the perfect bead to use for easy DIY earrings. Here are five examples of earrings using the teardrop miracle  bead with various spacers and small accent beads.

GoodyBeads | Easy Teardrop Miracle Bead Earrings

Starting from the top and moving left to right here are different ways to embellish the bottoms of your teardrop earrings:

What is your favorite? What will you create with these lovely Miracle Beads? We would love to see what you create!


Ombré Earrings with Chinese Crystals

An assortment of Chinese crystal colors has arrived. We love the opaque and milky hues so we made some stunning earrings with Nunn Design® earwires. Check out these earrings and tutorial.


Wrapping wire can be a fun technique used to add beads to frame a hoop or link finding. Here, we used four Chinese crystal colors to wrap around these oval hoop earrings (A014374 & Z014371), creating an ombré look.


Components


Tutorial

  1. Cut a foot of wire.
  2. Coil 2-3 times around the top part of the earring hoop. (Use nylon pliers or non-serrated pliers to smooth the coil around the earring.) Pinch coil together to keep wires close.
  3. Pick up a Chinese crystal bead and hold it perpendicular to the earring hoop. Wrap the wire the same direction as you’ve done in step two. Wrap around two time.
  4. Repeat 11 more times.
    Note: If you want to create an ombré coloration, use four gradation of Chinese crystal colors. Wrap three beads of the same color individually then add the next color three more times, etc.
  5. Make sure at the end you wrap your wire around the earring hoop three time. Cut excess wire. Use pliers to smooth the coil around the earring hoop.

GoodyBeads | Chinese Crystal Ombre Earrings Tutorial

Items used: WR00039, Z014371, Z007392, Z007450, Z007027, Z006915


Tory’s TierraCast and Gemstone Leather Necklace

Tory’s Make and Take class was a HIT at the Twin Cities Bead Bazaar! It consists of Dakota Stones® faceted large-hole gemstones and TierraCast® new collection: Vida Más Dulce. We are happy to share with you this necklace and a tutorial you can make!


ToryNecklace_Image

Items Used:


Tools:

Tutorial

  1. Start by cutting the leather for your tassel. For a long tassel cut 4 pcs of leather at 5”, 4.5”, 4” and 3.5”. For a short Tassel start with 3.5” and cut the others at 3.25”, 3 and 2.75”.
  2. Put the 4 ends of your cut leather into the cord end and crimp the cord end on both sides with a non-serrated or nylon Pliers. Make sure to squeeze both sides or you may loose a piece of leather on either end.
  3. Add a spacer bead, gemstone and spacer bead to each piece of leather cord in your tassel and tie a overhand knot at the end. Pull tight so they do not come undone. Make any adjusts you need to the tassel length at this time.
  4. Measure how long you want your necklace to be around your neck. Take this length and double it and cut. Then cut a second piece the same length.
  5. String your leather thru the top holes of the TierraCast connector piece. Then trim the ends of your leather to a point, to make it easier to slide on your beads. On each side string both pieces of leather thru the spacer bead, gemstone bead and another spacer bead.
  6. Pick one side to add your button to and put one piece of leather cord from that side thru each of your button holes and do an overhand knot with both cords. Then do a second over hand knot under the button and pull it up so it is flush with the button.
  7. On the other side do an overhand knot at the top and then about a half an inch down, add a second overhand knot and this will become your button hole to act as a clasp for your necklace.
  8. Open your jump ring and add your tassel and the bottom hole of the TierraCast Connector. Close your jump ring.


Honeycomb Tassel Drop Earrings Tutorial

Were you able to make it to the Twin Cities Bead Bazaar this past weekend? We had so much fun! We’re sharing this fun tutorial that So Vang taught as a Make & Take class. Made with honeycomb beads, 8/0 Miyuki seed beads and silver findings, this easy pair of earrings are easy to wear and to make for your girlfriends!


These are items you will need to make these lovely pair of earrings:


Blog_HoneycombTasselEarrings_Image

Items used in image: Z013596, Z014010, A002413, A008998, A006585, SB00106,


Wire Hoop Swarovski® Spike Earrings – Video Tutorial

Ever since these Swarovski spike beads came out not too long ago, we still LOVE the shape and it’s two-hole properties. Plus, the spikes reminds us of a more rebellious time in our lives, like our teenage years full of adventure and seeking our individuality. Pick up some spike beads today and watch our video tutorial as we wire wrap these hoop earrings.


From our Swarovski Spike trend, these pair of earrings is created with: 24-gauge wire, Swarovski square spike 2-hole beads, 11/0 metal beads and ear wires. Watch as Designer So Vang easily create these hoop earrings.


Products used: SW01714 (10), AW00050, SB00632, A014108


How to Make a Simple Slip Knot – Video Tutorial

Making slip knots is an easy technique to use when making adjustable necklaces or bracelets with leather cord, hemp cord or any thicker stringing cords. Check out our quick and easy video to creating simple slip knots.


Jan18_PantoneUltraViolet_1

From our Pantone Color: Ultra Violet, we demonstrate how to create slip knots while making this Leather Agate Slice Necklace. The great thing about slip knots, is that you adjust the length of your necklace or bracelet by sliding the knots.

Products used for necklace: A021688 and A022079

Products used for bracelet: GAV8RDLH-8 and A022079


Video Tutorial


GoodyBeads EZ DIY Series: Tassel Drop Earrings

It’ll be another year of eye-catching tassels. So to retain its popularity, we are rolling out this easy DIY tassel drop earrings.


Tutorial

Made with only four components, these tutorial can be altered with assorted colors of tassels with caps from the online store. Learn how to open and close jump rings and make yourself some easy pair of earrings.

GoodyBeads | Blog: Easy DIY Tassel Drop Earrings


Items used: Z014020, TC01395, TCZ0078, A002413


Vendor Video: ImpressArt Bracelet & Ring Bending Pliers

Brand New to GoodyBeads are the Ring Bending Pliers from ImpressArt®. Watch this instructional video from ImpressArt and learn how to create your very own DIY rings and bracelets with the Bracelet Bending Pliers and Ring Bending Pliers.


Ring Bending Pliers and Blanks

Custom-make rings by using these new Ring Bending Pliers (TL00282) from ImpressArt. Along with the pliers, all you need to make custom rings are Ring Blank and some metal stamps.


Ring Blanks you can get are the following:

thinring_01


Z021562_1


Z021573_1


Bracelet Bending Pliers and Blanks

Make sure to get a pair of Nylon Bracelet Bending Pliers (Z005839) to custom-make stamped bracelets. Here are some examples of bracelet blanks and what you can make with them:

  • Z021577 5/8 x 6 Inches Tapered Bracelet Aluminum Stamping Blank

Z021577_1


  • Z021579 7/8 x 6 Inches Tapered Bracelet Aluminum Stamping Blank

Z021579_1


  • Z018033 Mini 1/4 x 6 Inch Aluminum Stamping Bracelet BlanksZ018033_1

Other Bracelet Blanks:

  • A021496 3/8×6 Inch Bracelet Strip Soft Strike Aluminum Stamping Blank
  • A021497 5/8×6 Inch Bracelet Strip Soft Strike Aluminum Stamping Blank
  • Z005837 1/4×6 Inch Rectangle Copper Stamping Blank
  • A021460 1/4×6 Inch Rectangle Nickel Silver Stamping Blank
  • A020459 1/4×6 Inch Rectangle Brass Stamping Blank
  • A020461 1×6 Inch Rectangle Brass Stamping Blank
  • A020462 1×6 Inch Rectangle Copper Stamping Blank


Ring Bending Pliers Video Tutorial


Video and images by ImpressArt.


NEW Swarovski® 2-Hole Spike Beads

We are in love with these new Swarovski spike beads with 2-holes. Check out how we use these punk-rock inspired spike beads!


These Spike beads comes in three different shapes: hexagon, square and round. While they do come in a one-hole version, we stocked our inventory with the 2-hole version. We find more versatility and stability in its design and shape. Plus these five metallic colors are stunning!

Spike_Shapes

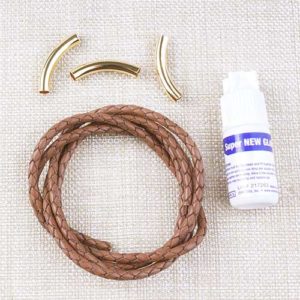
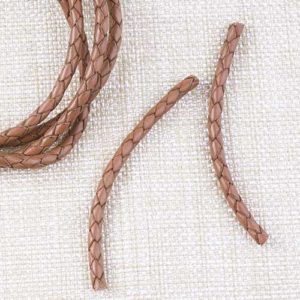
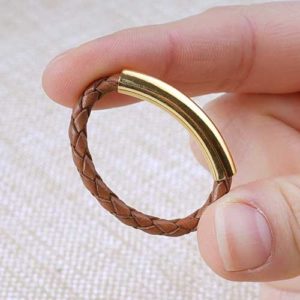
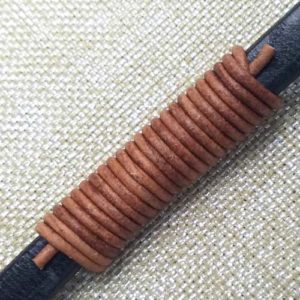
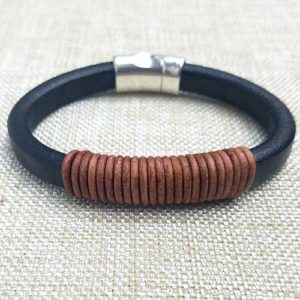
Rose Gold Stud Leather Bracelet

GoodyBeads | Blog: Swarovski Spike 2-Hole Beads

One of our favorite DIY jewelry is the Chan Luu-inspired leather wrap bracelets. You can find our tutorial here to learn how to bead stitch and apply it to make this DIY jewelry.

Items used: Z018651, TC02036, SW01716(22), A015211, A006588.


Blue Stud Earrings

GoodyBeads | Blog: Swarovski Spike 2-Hole Beads

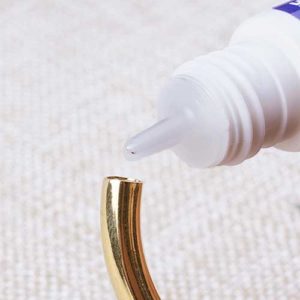
Here’s an easy DIY using the round spike beads. Using post earrings, we use a small dot of super new glue and placed the round spike beads on. Let glue dry before wearing them!

Items used: SW01719(2), A015178, A015821.


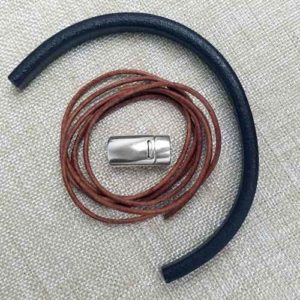
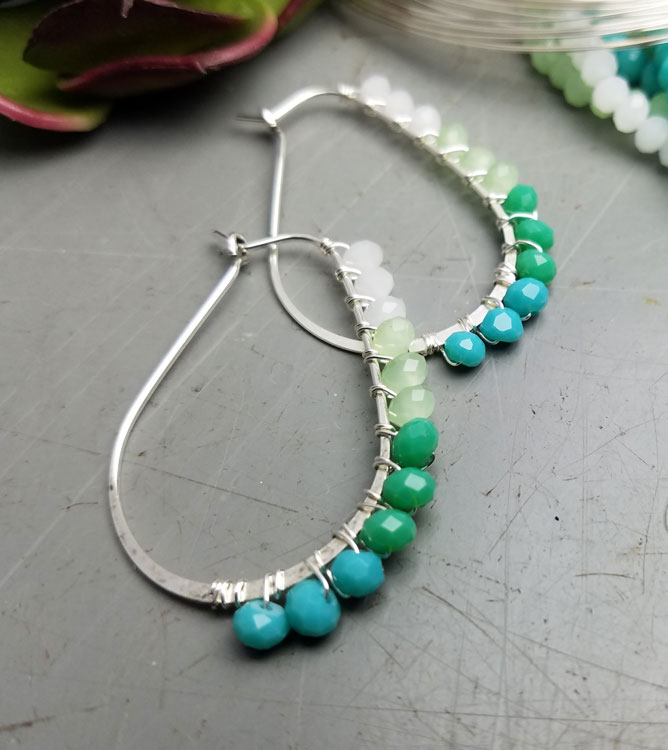
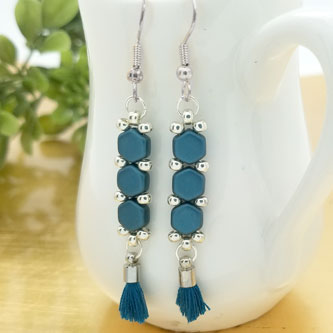
Wire Hoop Spike Earrings

GoodyBeads | Blog: Swarovski Spike 2-Hole Beads

This pair of earrings is made using two 8″ 24-gauge wire and stringing an 11/0 metal bead between each of the spike beads. Slide all the beads to the middle of your two wire and bring all four ends together to create a loop. With all four wire ends, make a wrapped loop and coil once around the base of the loop. Take your earwires and you will grasp the loop of the earwire with your flat nose pliers and twist the loop 90 degrees so that the loop of the earwire faces you. Open the earwire loop, slide on the hoop spike beads and close loop.

Items used: SB00632, SW01714 (10), A009402, AW00050.