Large Hole Gemstone Leather Knot Bracelet – Tutorial

Make this easy leather knotted bracelet with large hole gemstones from Dakota Stones.

Happy Friday. We’re having a fun time today since we’re all looking forward to the weekend. Why not try your hand at this easy leather bracelet tutorial with 1mm leather cord from LeatherCordUSA, large-hole gemstones from DakotaStones and a TierraCast button. You’ll make a simple overhand knot in between each large-hole gemstones. Don’t worry, you got it!

GoodyBeads | Blog Knotted Leather bracelet with large hole gemstones - Free Tutorial

Components you’ll need to make bracelet:

Tutorial

Items in bracelet tutorial: A022063, TC02349WAF8RDLH-M-8/APL8RDLH-8


Flower Burst Earrings with Czech Bellflowers – Tutorial

Dreaming about warmer weather? Let’s get a kickstart to spring weather with a pair of flower burst earrings designed with Czech Bellflower glass beads from Raven’s Journey® and white pearls from Swarovski®.

We’re experiencing some cold and snowy weather in Minnesota. Our piles of snow keep going up and we cross our fingers that our drive into work is a safe and uneventful one. So we are dreaming of spring weather and flowers! Here is a fun and simple pair of earrings donned with colorful Bellflowers from Raven’s Journey.

GoodyBeads Blog | Flower Burst Earrings with Czech BellFlowers from Raven's Journey and Pearl from Swarovski

What you will need:

Flower Burst Earrings Tutorial

Item used in A021813, SW00663 (12), SW00666 (2), A019694A001495, TCZ0077


Beaded Chain Links – Tutorial

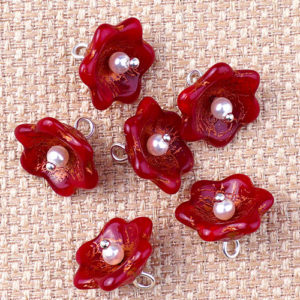
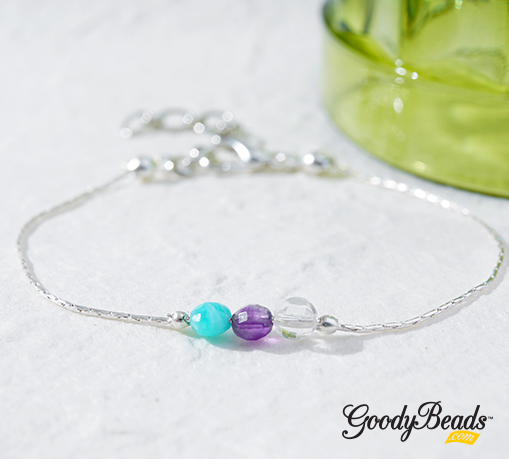
An easy tip to using various beads is linking them to make a beaded chain. Here are two easy necklaces linking up Chinese Crystal beads, metal beads and inch long chain.


Preparing Bead Links

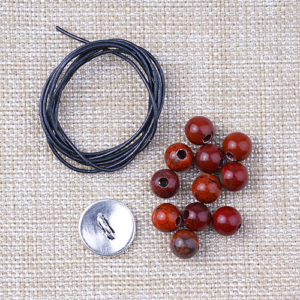
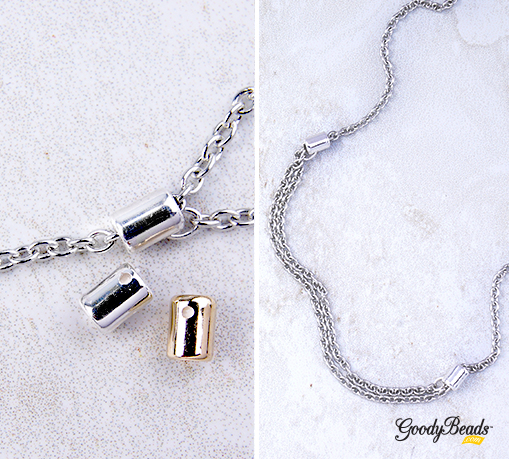
With the help of eyepins, make a fun amount of links by sliding a bead unto the eyepin and making a simple loop.  And then cut chain into inch long pieces. These chain links will be the connectors between each beaded link.

beadedlinks01

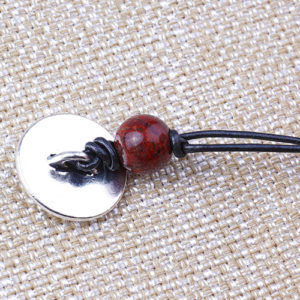
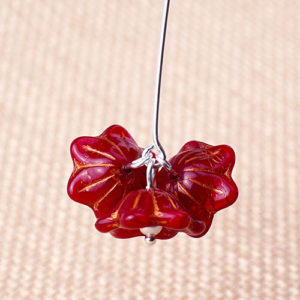
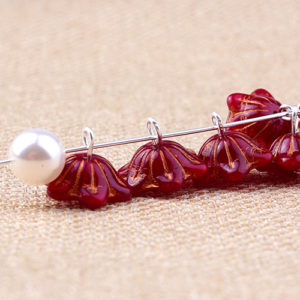
See how versatile these beaded links are. Link up a sequence of a bead and chain or mix up the sequence for an organic look.

beadedlinks02

Make sure to try out different beads, sizes and shapes for a full beaded chain link.

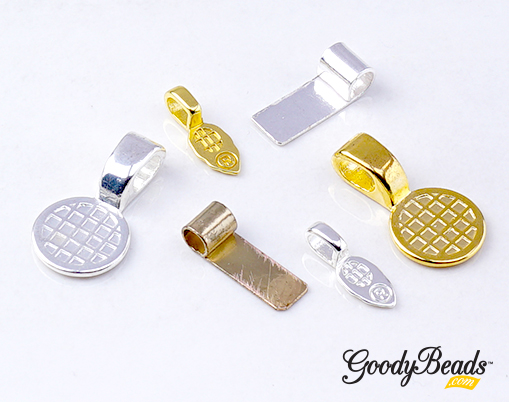
Items used in images and tutorial: A019612, A016467, A002937, Z009196, CH00533


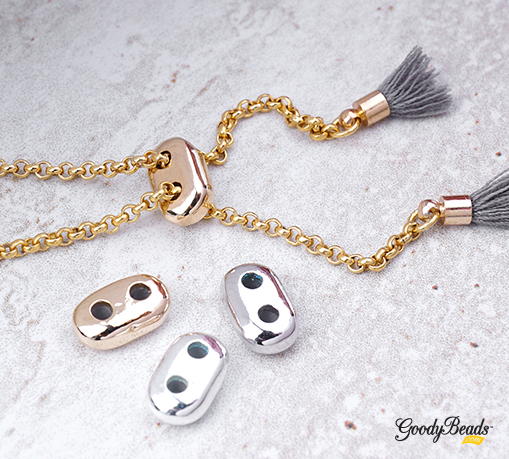
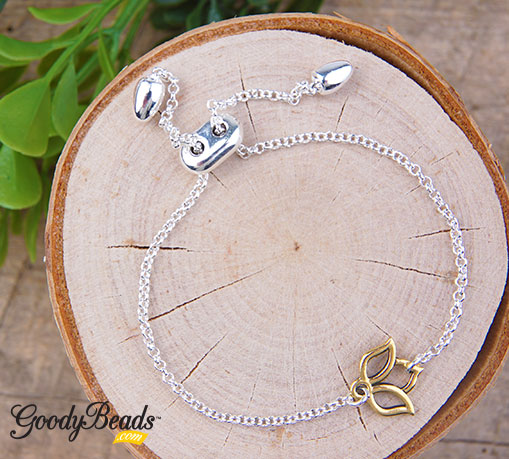
Gold and Silver Tiered Necklace

GoodyBeads Beaded Chain Links Tutorial

We linked three different sequence of beaded chain to make a three-tiered necklace on an adjustable necklace chain.

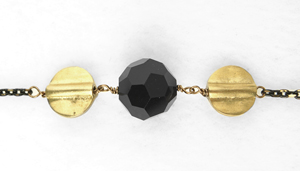
  1. First link includes the following beaded link: gold tube, silver oval, gold tube, cube crystal, gold tube, silver, oval, gold tube, cube crystal, gold tube, silver, oval, gold tube, cube crystal, gold tube, silver, oval, gold tube.
  2. Second link includes the following beaded link: chain, gold tube, cube crystal, gold tube, cube crystal, gold tube – Repeat TWO more times. And add a chain link at the end.
  3. Third link includes the following beaded link: chain, cube crystal, silver oval – Repeat FIVE more times. And add a chain link at the end.
  4. Open one jump ring from adjustable necklace chain and slide on all three beaded chain links. Close jump ring.
  5. Repeat to other jump ring on adjustable necklace chain.

Items used in necklace: A019612A016467A002937 (3), Z009196CH00533 (2)


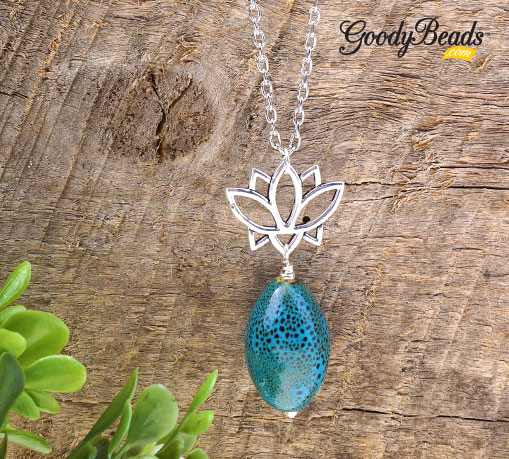
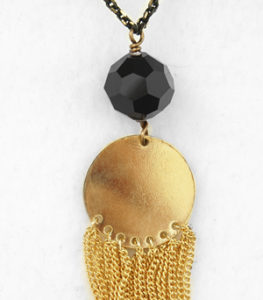
Black and Gold Tassel Necklace

GoodyBeads Beaded Chain Links tutorial - Black Gold

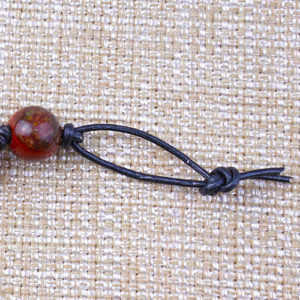
Instead of using eyepins, we made wrapped loops to connect each bead and chain. Check out previous blog on wrapped loops and linking them.

  1. Cut 6 link at an inch long. Cut one link at 12 inches long.
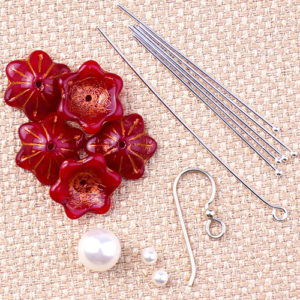
  2. Chain link a flat brass bead, 14mm Chinese Crystal bead and flat brass bead with chain link.
    beadedlinks05
  3. Sequence of beaded chain link: chain, flat brass, crystal, flat brass, chain, flat brass, crystal, flat brass, chain, flat brass, crystal, flat brass and 12 inch chain
  4. Next sequence will link to the other side of 12 inch chain: flat brass, crystal, flat brass, chain, flat brass, crystal, flat brass, chain, flat brass, crystal, flat brass, chain.
  5. Make a wrapped loop and slide on both chain ends before completing wrapped loop. Slide on crystal bead and make another loop, while sliding on Tassel Pendant (Z001347).
    beadedlinks06

Items used in necklace tutorial: Z001347, CHZ0093 (2),  A022212, A016851, AW00026,


GoodyBeads EZ DIY Series: Green Gold Tassel Earrings

Enjoy another EZ DIY tutorial with these Green Gold Tassel Earrings with suede tassels and disc connectors.


We adore these suede tassels. We also love how versatile these tassels are. You can keep the long length and use them for a boho necklace pendant. Or cut the length for a short tassel easily used for a charming pair of earrings.


Tutorial

GoodyBeads Green Gold Tassel Earrings Tutorial with Suede Tassels

Items used in tutorial: Z010751, A019712 (2) , A014108, Z011522


New Slide Clasps & Compatible Chain for Easy Adjustable Jewelry

Adjustable jewelry really gives a new meaning to One Size Fits All. Our NEW slide clasps will give you the ability to customize your own adjustable jewelry.

This blog will cover the two types of clasps and compatible chain, perfect for making adjustable jewelry. Plus, a tip on how to get your chain through the slide clasps.

Slider Clasp and Slide on Clasp

We have two types of slider clasps.

  1. Two Hole Slider Clasp: This will allow chain to run through the holes parallel to each other.
    (Item#: Z011948, Z011951, Z011952)GoodyBeads Blog | Slider clasps makes for easy adjustable jewelry!

      2. Slide on Clasp with Hole for Jump Ring: This clasp has a hole on the side that you can attach a jump ring and chain. You will typically use two Slide on Clasp, two pieces of chain and two jump rings. The chain will run parallel and in opposite directions.

(Item#: Z010758, Z010759, Z010769)

It’s best to use size 4mm oval or round jump ring: A002413, A011517, Z001661, Z001662.

GoodyBeads Blog | Slider clasps makes for easy adjustable jewelry!

Compatible Chain

The best chain to use with these slider clasps are small dainty chains between 1.8mm and 2.2mm in size. The following chains will work with the slider clasps:

However, we would recommend using the Two Hole Sider Clasps with 2mm Rollo Chain and 2.2mm Soldered Cable Chain. And all chain recommendations can be used with the Slide on Clasp with Hole for Jump Ring.

Chain and Clasp Tip

There is a silicone ring inside each hole of the slider clasp. This allows the chain to slide and make your jewelry adjustable. To get your chain through, we have two suggestions for you:

  • Use a 2 inch piece of wire and make a small loop at one end and attach your chain to the loop. Use this makeshift needle to sew through hole clasp, and pull your chain through.
  • Or if you are using a very thin wire, fold your 2 inch piece of wire in half, slide your chain end through to the middle section of the wire and use both end of the wire to sew through hole clasp.


Lotus Inspired Jewelry

The Lotus is iconic and symbolic in many cultures. Learn its significance and check out our DIY lotus jewelry, inspired by the lotus motif.

Lotus: A Religious Symbolism

  • Through Egyptian art, “(t)he Lotus is used as a symbol in ancient Egyptian art representing the sun, of creation, rebirth and was a symbol of Upper Egypt. As a symbol of the sun it is closely associated with Atum-Ra, the Sun god and later with Nefertum, lotus god of perfume. Lotus flowers, also called water lilies, open in the morning and close again at night symbolizing rebirth and regeneration. ” (LandofPyramids)
  • In Buddahism, the Lotus symbolize not only rebirth, but also purity and spiritual enlightenment. (LotusFlowerMeaning)
  • And in Hinduism, the Lotus motif is a strong symbol associated with “beauty, fertility, prosperity, spirituality, and eternity.” (LotusFlowerMeaning)

Check out our jewelry using the strong and symbolic meaning of Lotus.

Lotus Porcelain Necklace

GoodyBeads Blog Lotus and Porcelain Necklace - Free Tutorial

We paired a stunning TierraCast Lotus link with an organic-looking porcelain oval bead. Take a headpin, slide on a small silver seed bead, porcelain bead and another seed bead. Make a wrapped loop by hooking on the lotus link before wrapping the headpin. Open a jump ring, slide on the top part of the lotus and onto the necklace chain and close jump ring. STUNNING, don’t you think?

Items used in necklace: TC02466, A019656A008273, SB00106, A001528, Z001033

Lotus Chain Earrings

GoodBeads Blog Czech Lotus Drop Bead - Free Tutorial

We can’t get enough of the beading chain here at GoodyBeads. We used the same tutorial and concept from our previous blog to make this pair of earrings with Czech Lotus Coin Beads.

Items used in earrings: Z018245, CH00724, X001505, TC01897 (2), TCZ0077

Lotus Link Bracelet

LotusJewelry_Bracelet

Who doesn’t love a simple adjustable bracelet! We certainly do. We used the Silver Plated Adjustable Rollo Chain Bracelet Sliding Clasp (Z012151) with a gold lotus charm. The contrasting metal really makes the lotus charm pop!


Necklace Pendant Tutorial with Gemstone Cabochon & Glue On Bails

One of the most easy way to design with these DakotaStones Gemstone Cabochon is using Glue On Bails. They make easy necklace pendants. Check out this easy tutorial.


What you’ll need for making a cabochon pendant:


Preparing Gemstone Cabochon

GoodyBeads Blog | Remove and rub off sticky residue on the back of gemstones cabochons with goo gone. Do not use acetone.

The first thing to do when you receive your gemstone cabochons is to clean the flat, back-side. Some of these cabochons may have been applied to a paper backing for shipping purpose. Remove and rub as much of the paper and adhesive as you can. You can also use Goo Gone to help with getting removing the adhesive. DO NOT USE nail polish remover, rubbing alcohol or any liquid with acetone. It can discolor the gemstone


Glue on Bail

When determining the size Glue on Bail you want to us, first determine the size and shape of your cabochon. You want to have enough surface on the bail to hold the cab.

GoodyBeads Blog - Glue on Bails and Gemstone Cabochon


Cabochon Pendant Tutorial


GoodyBeads Blog | Easy DIY pendants with Glue on Bails and Gemstones Cabochons.

Gemstone Cabochons in image: CAB-CRN30X22REC, CAB-LAP25DCCAB-BAZ35X20OV-AAA, Pink Quartz, CAB-CHR10X8OVCAB-NCT10DC


Layered Beadable Cuff with Pattern Tutorial

We love these beadable accessories, especially the beadable cuffs. So Vang has designed a layered beadable cuff and we could not be MORE excited to show you how to make one with this illustrated tutorial.

What you will need:

This pattern is great for making a three layered bracelet. You can also layer on top of that, creating a pyramid shape. You can stitch on one layer, two layers or mix-up some two-hole Honeycomb and DiamonDuo/GemDuos beads.

Items used in image: Z001860, A006586, Z013809, Z013595, SB03303/SB04160, A015211, SB00402

GoodyBeads Blog: Layered Beadable Cuff with FREE tutorial. Download tutorial today!


How to Stamp with Mandala Stamps

Make an impression with Mandala Stamp Packs and creating Mandala designs.

Mandala is an abstract and geometric pattern, usually in a circular form. Here are some tips, tools, and techniques to help you create your mandala designs!

Stamping Tools

Tools you will need:

A helpful supply to have when creating your circular shape is getting the ImpressArt Stamp Guides. These guides are stickers that you peel off and lay over your stamping blank. Once your design is stamped these stickers are easily removable! They also have markers to help you evenly space out your stamping, especially if you are using letter stamps.

But for Mandala there is a circular, see-through sticker guide with diagonal lines to help space out your stamps.

Mandala_image01

A tip when stamping is to stamp from the center out. And when stamping from the center out, stamp closer to you and rotate to keep the stamping even. Once your design is complete peel off the guide. There will be small patches still stuck within the stamped areas, so make sure to remove it all before adding your enamel or brushing it over with a Sharpie to make your designs stand out. Rub your polishing cloth of the surface to remove excess enamel or markings.

Mandala Stamp Samples

Each set ImpressArt Mandala Stamp Pack are sold at GoodyBeads with four different stamps. When combined can create an endless mandala design. See how ImpressArt using these stamp sets. Each set can be bought at GoodyBeads. (Images courtesy of ImpressArt)

mandala1

A018004 – Mandala Design Stamp Pack

mandala4

Z009934 – Southwestern Mandala Design Stamp Pack

mandala2

Z018002 – Mandala Design Stamp Pack

mandala3

A009935 – Henna Mandala Design Stamp Pack


Druzy Pendant Necklaces – Tutorial

Druzy Pendant Necklaces are easy to make! With only 5 components needed to complete one, you’ll want to make more!


What you’ll need:

DruzyNecklace_01

Items used in the two necklace above:

Tutorial

See how easy it is to make these two pair of necklace in this video tutorial

  1. Open 5mm jump ring and slide on both ends of your chain link. (Chain can be to your length. We used a 2 feet link so that it can easily draped over your head.) Close jump ring.
  2. Open 4mm jump ring and slide through one end of the Druzy connector and through jump ring from Step One. Close jump ring.
  3. Open 5mm another jump ring, slide through tassel or charm and through other end of the Druzy connector. Close jump ring.


EZDIY Series: Bead & Tassel Charm Dangle

Accessorize your accessories with this easy DIY using large hole beads and an interchangeable dangle. With a clasp you can easily dangle it on your handbag, clutch, keys, backpack and more!


Items you will need for bead and tassel dangle:


Tutorial

4x4-TasselBagCharm

Items used in tutorial: A007523, Y011044, Z011039, Z006772, A001528, A019705

Mix up different large-hole beads to make your very own!


BeadSmith® Endless Loom with Downloadable Tutorials

The Endless Loom from BeadSmith, designed by Deb Moffett-Hall, is a versatile tool to help create elastic band bracelets and even leather wrap bracelets. Read through to download step-by-step instructions to help you get started!


Check out our previous Endless Loom blog post to watch an introductory video.

Groovy 6 Stretch or Clasp Style Bracelet

Elastic_EndlessLoom

Download Stretch Bracelet Tutorial HERE.

This first tutorial uses 0.5mm Elastic to wrap around the Endless Loom. You can also have the option to add a Tube Magnetic Clasp (Y004709/Y003008/Y004707) to your bracelet.


Leather Wrap Bracelet

LeatherWrap_EndlessLoom

Download Leather Wrap Bracelet Tutorial HERE.

Even try out making a leather wrap bracelet using the Endless Loom. Coiling leather strands around the Endless Loom will help tame your cords and help you stitch even and straight rows. Check out the tutorial for easy tip and tricks to get your leather wrap bracelets started!


(Tutorial courtesy of BeadSmith and Deb Moffett-Hall)


GoodyBeads EZ DIY Series: Patina Drop Earrings

You’ll want to wear these gorgeous earrings everyday after seeing how easy they can be made with Vintaj Patina.


GoodyBeads Easy DIY Patina Earrings Tutorial

Components in tutorial: Z015971, TCZ0139, TL00297, TL00287


Vintaj Patinas are opaque inks specially formulated by Ranger to adhere to metal. They can be used on a variety of surfaces like metal, leather, wood, etc. Check out our previous blogs on painting them on various metal components and Sizzix leather.


Easy Sizzix Cuff Bracelet – Video Tutorial

Continuing from our Vintaj painted on Sizzix Leather blog/video, learn how to take your painted leather and make an easy cuff bracelet using Sizzix Cuff Dies and TierraCast buttons.


GoodyBeads Blog: Patina Leather and Sizzix Cuff Video Tutorial

Candie Copper is Back! She has tips and tricks for making a super simple leather cuff bracelet using the Cuff Dies and Button Hole Dies.


What you’ll need to make your cuff:


Video Tutorial


GoodyBeads Sizzix Leather with Vintaj Patina Cuff Tutorial


4mm Faceted Coin Gemstone Beads

New to GoodyBeads are these luxurious 4mm Faceted Coin Gemstone Beads from DakotaStones. Get an up close look at the facets! Plus, two projects using these shimmering faceted gemstones!


4mm-coin-close-up2

Each bead is diamond cut with a “checkerboard” pattern. With an up close look, ‘the puffed edge leads to a checkerboard faceted face. That’s a lot of surface to catch and move light in a multitude of directions.’


Bracelets with 4mm Faceted Coin Gemstones

4mmFacetedGems_image2

Who doesn’t love blue! Especially these Amazonite strand! We kept the simplicity of this bracelet by using Soft Flex Beading Wire and sliding on a gemstone and 11/0 Miyuki seed bead sequence. We made a sequence up to 7″ and used clamshell bead tips for the ends. Added a clasp and an inch of chain for an extender. (Adjust amount of beads to customize bracelet size.)

Items used in bracelet: AMZ4DC-F, FTBW0001, SB00422, CH00515, Z010740, A004830, Z005838


4mmFacetedGems_image1

We kept this bracelet as simple as we can. We use three different gemstones: Amazonite, Amethyst, and Crystal Quartz all onto a .7mm beading chain. We first cut a 7″. At one end, we used a clamshell bead tip. Then we slid onto the beading chain a 2mm crimp tube, three gemstones and another crimp tube. Position the beads to the middle of the chain and using the Magical Crimping Pliers, crimp the crimp tubes on both sides of the gemstones. Cap the other end of the beading chain with another clamshell bead tip. Add your clasp and chain and you have a dainty gem bracelet!

Items used in this bracelet: CH00724CH00515Z010740A004830, Z005838, AME4DC-FAMZ4DC-F, CRY4DC-F