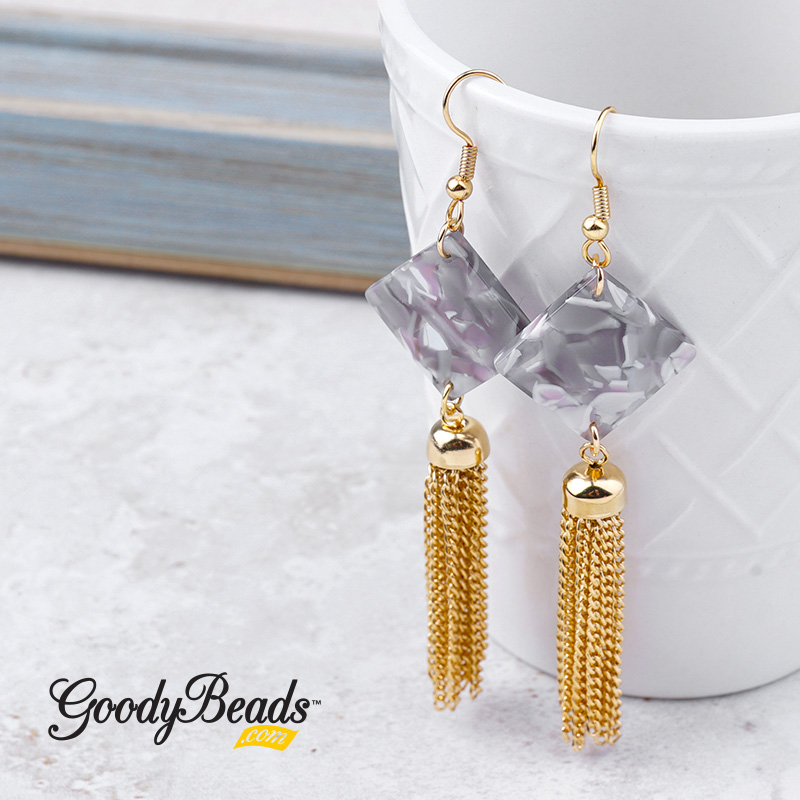
DIY Acetate and Chain Tassel Earrings with Gold Findings

Featured in our Trends We Love on Acetate Components, make this pair of Acetate and Chain Tassel Earrings today!

What you’ll need:

  • 18mm Grey Acetate Small Diamond Shape Pendant – Z020413
  • 6mm Gold Jump Ring – Z011522
  • 1.7 Inch Gold Plated Tassel – A013211
  • Gold Plated French Wire Earrings – A014108

Directions:

  1. Open jump ring, slide on tassel loop and through one hole of acetate connector. Close jump ring.
  2. Open another jump ring, slide on other hole of acetate connector and through ear wire loop. Close jump ring.
  3. Repeat all steps for other earring.


Swarovski® Amethyst Jewelry Tutorials

We’ve got TWO easy projects using March’s Swarovski Psychology of Color: Amethyst. Design jewelry with this passionate hue!

Amethyst Wrap Bracelet

Items used in bracelet: SB00422, SW02206 (30), SW00084 (20), SW00081 (20), WR00127 & A014097

Directions:

  1. Make a simple loop to the end of your memory wire with Memory Wire Finishing Pliers.
  2. Slide on the following bead sections onto the memory wire:
    Seed bead, silver curve tube, seed bead, light amethyst crystal, seed bead, amethyst crystal, seed bead, 3 amethyst shimmer crystals, seed bead, amethyst crystal, seed bead and light amethyst crystal.
  3. Repeat this sequence 9 more times. Then end with a seed bead.
  4. Cut memory wire end leaving a 1/4″ end and make a simple loop.

Ombré Amethyst Earrings

Items used in earrings: SW00198 (4), SW00195 (4), SW00105 (4), SB00422, A019656 & TCZ0077

Directions:

  1. On a headpin, slide on the following and make a simple or wrapped loop:
    Amethyst bicone, seed bead, amethyst bicone, seed bead, light amethyst, seed bead, light amethyst, seed bead, clear crystal, seed bead, clear crystal and seed bead.
  2. Open earwire loop and slide on crystal dangle. Close loop.
  3. Repeat all steps for other earring.


Tassel Earrings with TierraCast® Findings and Miyuki Seed Beads

Our tutorial today features some trendy tassel earrings made with seed beads. You may recall our previous blog post on Beaded Tassel Tutorial. Today’s project will use that tutorial along with multiple colors of seed beads and beautiful TierraCast pieces.

What you’ll need:

  • Size 11/0 seed beads. We used 3 different colors in our sample:
    • SB00423, which will pair with the gold TierraCast finding. You can also use SB00422 and silver TierraCast finding.
    • Cream color: SB00444
    • Color seed bead: SB00447 You can also swap this color!

GoodyBeads.com Blog | Tassel Earrings with TierraCast® Findings and Miyuki Seed Beads with FREE Pattern Tutorial

Directions (Refer to Beaded Tassel Tutorial for example visuals):

  1. Make a wrapped loop to a 3 inch piece of wire. OR if you’re using an eyepin, coil the eyepin loop.
  2. Starting with 4 feet of thread, create a stopper bead on your thread leaving a 4-6 inch tail.
  3. Sew through the wire loop.
  4. Pick up the following bead sequence
    1. 20 cream seed bead
    2. Wine bead, cream bead, 2 wine bead, cream bead, 3 wine bead, cream bead
    3. 10 wine bead
    4. gold bead, wine bead, 2 gold bead, wine bead, 3 gold bead, wine bead
    5. 8 gold bead.
  5. Skip the last bead and sew back up through all the beads you’ve sewn and through wire loop. Don’t pull to hard, you want your fringe to hang loose.
  6. Repeat step 4 and 5 another 7 more times for a total of 8 tassel fringes.
  7. Tie thread ends together, securing it with a small dot of Super New Glue.
  8. Slide wire through cone and pick up 4mm round bead (pearl) and cream seed bead. Make a simple or wrapped loop.
  9. Open earwire and add tassel dangle.
  10. Repeat all steps for other earring.


2 DIY Jewelry Using Cymbals Components & Ginko Duo Beads

Czech Ginko Duos and Cymbal components are fairly new in the beading market; they’re less than a year old. And we’ve got two amazing bead-stitching project using Ginko beads and NEW Cymbal components for Ginkos.

Ginko Waves Bracelet

Items used in bracelet: Z012556, Z012665, SB00402, SB00107, SB03688, SB03698, Z009471, Z006124, A006587 & A015211.

Make sure to download the FREE PDF tutorial for the Ginko Waves Bracelet.

We’ve use two different Ginko colors for this bracelet. You can certainly make one color or even multiple colors!

Ginko Dagger Earrings

Items used in earrings: Z011731, SB00423, Z011869, A006587 & A015211.

Make sure to download the FREE PDF tutorial for the Ginko Dagger Earrings.


Cymbal Koutalas DIY Chevron Jewelry

Some of our newest products are Cymbal Components, which pairs with Chevron Duo and Ginko beads. We have two awesome patterns using Czech Chevron Duos and the Cymbal Koutalas.

Chevron Spike Bracelet

Items used in bracelet: Z013806, SB00422, Z010306, SW01711 (3), Z011500, X003062, A021633, Z001124, TC01897 (4).

Make sure to follow our LINK to download the FREE tutorial for this bracelet.

This bracelet used stretch cord, which makes it to easy make and wear. It also uses some blingy Swarovski Hexagon, two-hole spike crystal beads, which breaks up the chevrons and adds a focal section!

Chevron Spike Earrings

Items used in earrings: Z013812, SB00423, Z010306, TC02816 (2), A014108, A006585 & A015211.

Still using the same Cymbal ending, we’ve made a this pair of earrings with Chevron beads and TierraCast dagger bead from the Hammertone Collection, all using gold findings.

Get FREE PDF tutorial HERE to make your own pair of earrings!


DIY Tassel Droplet Earrings

Tassels are an all year round kind of component for jewelry-making. Here’s how we make these pair of earrings combined with fancy large oval chain.

Items needed in earrings:

GoodyBeads Blog | FREE tutorial - Tassel Droplet Earrings

Directions

  1. Cut oval chain to consist of 3 links.
  2. Open jump ring, slide on last link and a tassel. Close jump ring.
  3. Open another jump ring, slide on middle link and a tassel. Close jump ring.
  4. Open another jump ring, slide on last link and a tassel. Close jump ring.
  5. Open another jump ring, slide on a tassel and close jump ring.
  6. Open another jump ring, slide through post earring hole, through jump ring in Step 5, and one end of chain link. Close jump ring.
  7. Repeat all steps for other earring.


DIY Spike Drop Earrings

We’re showing you how easy bead-stitching can be with these Spike Drop Earrings. It uses two-hole Swarovski® spike crystal beads, Cymbal components, seed beads and TierraCast® Hammertone Dagger Bead.

What you’ll need for earrings:

GoodyBeads Blog | FREE Tutorial - DIY Spike Drop Earrings with free pattern tutorial.

Directions: (Similar to Honeycomb Tassel Drop Earrings Tutorial)

  1. With 2 feet of thread, pick up a seed bead, cymbal, seed bead, 1st spike bead, seed bead, 2nd spike bead, seed bead, 3rd spike bead, seed bead, dagger bead, seed bead. (Make sure to be sewing through the correct hole of spike beads)
  2. Sew up through the second hole of the 3rd spike bead, pick up a seed bead, through the second hole of the 2nd spike bead, pick up a seed bead and through the second hole of the 1st spike bead.
  3. Tie both ends together to bring your looped pattern together. (You can see something similar to the Honeycomb Tassel Drop PDF tutorial, as you’re substituting a few beads in the pattern.)
  4. Sew through a few beads before cutting thread ends off.
  5. Open earwire loop and slide on cymbal component. Close loop.
  6. Repeat all steps for other earring.


DIY Charmed Necklace with Paper Clip Chain

We’re channeling our simplicity in this DIY Charmed Necklace. Along with the trend of dainty and minimalistic jewelry, we’ve upped the size of our chain with paperclip chain and added a large clasp. Then tying it together with a gorgeous Nunn Design charm!

What you’ll need for necklace:

  • 11.9mm Gold Plated Paper Clip Cable Chain – CH01151 (2)
  • 16mm Gold Plated Spring Ring Clasp – Z003190
  • 16x13mm Small Disk Metal Charm by Nunn Design – Z021685
  • 9mm Matte Gold Jump Ring – Z011398

Directions

  1. Cut chain to 18 inches (or desired length).
  2. Gently open loop of clasp with chain nose pliers. Slide chain end through loop and close.
  3. Open jump ring, slide on charm and close jump ring.
  4. Open clasp and slide charm through.


DIY Mint Mosaic Cuff

One our newer products are the Thin Square Flat Cuff Bracelet from Nunn Design. They’re so easy to use. Wear them as is or add some beads like our large selection of Large-Hole Interchangeable beads.

What you’ll need for cuff:

Directions

  1. Slide onto the cuff stopper bead, large-hole bead and stopper bead.
  2. Situate and center the beads on the cuff.

Mosaic Trio Cuff

Items used in Cuff: Z016185, Z009424 (2), Z006779, A006781 & A006780.

Directions

  1. Slide onto the cuff stopper bead, THREE large-hole bead and stopper bead.
  2. Situate and center the beads on the cuff.


DIY Enamel and Faceted Glass Earrings

One thing we love about making jewelry is creating length and layers by linking connectors and dangles. When it comes to our Enamel Chevron and Faceted Glass Earrings, designed by Heidi, she did just that! She used enamel and faceted connectors with gold findings!

Here is what you’ll need for earrings:

  • 18mm White Mix Enamel Gold Plated Round Zigzag Connector – Z016108 (2)
  • 16mm Round Gold Plated Aqua Faceted Glass Connector – A021761 (2)
  • 10mm Round Clear Faceted Glass Charm with Gold Plating – A021745 (2)
  • 9mm Bright Gold Round Hammertone Post by Tierracast – TC02765
  • 3mm Gold Jump Rings – Z007861

Directions:

  1. Open jump ring with two pliers, slide on glass dangle and one loop of faceted glass connector. Close jump ring.
  2. Open another jump ring, slide on other loop of faceted glass connector and one loop of enamel connector. Close jump ring.
  3. Open another jump ring, slide on other loop of enamel connector and post ear wire loop. Close jump ring.
  4. Repeat all steps for other earring.


DIY Turquoise Enamel Necklace

With our popular enamel component in gold, our newest selection of enamel components now come in a silver. We have this sweet necklace using these new components.

Here is what you’ll need:

  • 27mm Turquoise Enamel Silver Plated Ring Connector Pendant – Y009614
  • 20mm Turquoise Enamel Silver Plated Triangle Charm – Y009585
  • 18 Inch Silver Plated Chain Link Necklace – Z001747
  • 5mm Jump Ring – Z011515

GoodyBeads.com Blog | FREE Tutorial - DIY Turquoise Enamel Necklace

Directions:

  1. Open jump ring, slide on triangle charm and through one hole of link. Close jump ring.
  2. Open another jump ring, slide through other hole of link and through the last link on the chain necklace. Close jump ring.


Geometric Triangle Earrings

Today’s easy tutorial is designed by Heidi! She has an eye for large, geometric and statement jewelry. So these pair of Geometric Triangle Earrings is definitely the pair for her!

What you’ll need:

GoodyBeads.com Blog | FREE tutorial : Easy DIY Geometric Triangle Earrings

Directions:

  1. Open jump ring, slide on triangle charm and triangle link (hole on flat side) and close jump ring.
  2. Open ear wire loop, slide on triangle link (hole at the point) and close loop.
  3. Repeat all steps for other earring.


DIY Red Bali Drop Earrings

We love to take our products and use it in different ways. In our Red Bali Drop Earrings, we’ve taken an S-Hoop Clasp and transformed it into a connector piece.

Here is what you’ll need to make the drop earrings:

GoodyBeads.com Blog | FREE Tutorial - DIY Red Bali Style Drop Earrings

Directions:

  1. Slide a miracle bead onto the headpin and make a simple or wrapped loop.
  2. Gently pry the hook clasp ends outwards.
  3. Slide the drop bead you made in Step 1 onto one clasp end and close or pinch the clasp end inward to close.
  4. Slide earwire hoop through other clasp end and close or pinch the clasp end inward to close.
  5. Repeat all steps for other earring.


DIY Fine Rocks Wire Earrings

Today’s tutorial features one of our newer products 55mm Swarovski® Ultra Fine Rocks Tube beads. These Ultra Fine Rocks are longer in length and thinner than our usual Fine Rocks Tube. Plus, they are also a little more pliable to wrap around memory wire, which is what we’ve done in our earrings tutorial!

What you’ll need for earrings:

GoodyBeads.com Blog | Fine Rocks Wire Earrings with Swarovski Ultra Fine Rocks tube beads and memory wire -FREE tutorial.

Directions: (Visual tutorial on Hoop Earrings Tutorial)

  1. Cut two coils of memory wire. While holding both coils of memory wire together, cut off an extra inch of memory wire end.
  2. Make a simple loop on one memory wire end by rolling memory wire finishing pliers and making a loop outwards and perpendicular away from the memory wire.
  3. Slide nugget spacers on the memory wire. Curl the fine rocks tube to create a curved piece while sliding it on the memory wire. And then slide on another nugget spacer.
  4. Slide the other memory wire end through loop you made in Step 2.
  5. Grasp that end with Memory Wire Finishing pliers.
  6. Roll loop towards you to make a simple loop. Use crimper to help close the loop tighter.
  7. Add your ear wire and repeat all steps for other earring.


DIY Silver Bali Ring Earrings

Today’s easy tutorial features a pair of Silver Bali Ring Earrings our Designer Tory designed during one of our Facebook LIVEs in 2019. Here is what you’ll need:

Directions:

  1. Open jump ring and slide through 12mm and 15mm bead. Close jump ring. Open another jump ring, slide through the same beads again and close jump ring.
  2. Open a jump ring, slide through 15mm bead and another 12mm bead. Close jump ring. Open another jump ring, slide through the same beads again and close jump ring.
  3. Open another jump ring, slide through one of the 12mm bead and through loop of ear wire. Close jump ring.
  4. Repeat all steps for other earring.