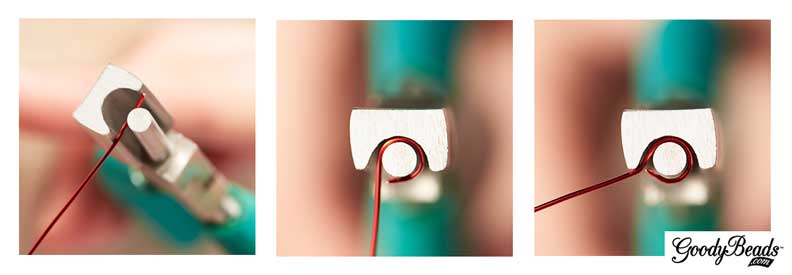
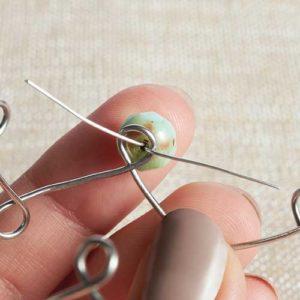
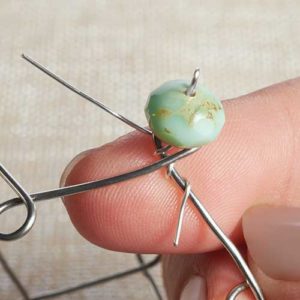
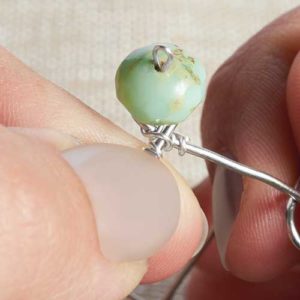
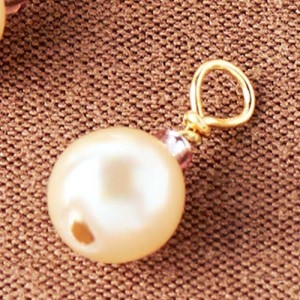
Check out our photos below and be sure to watch the Wubbers’ video tutorial on how to use the Wubbers Wire Looping Pliers to make simple loops and wrapped loops.
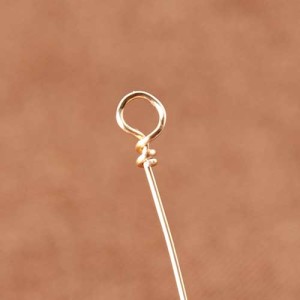
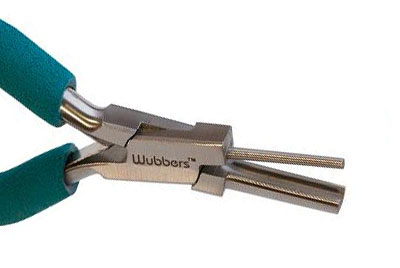
The Wubbers Looping Pliers comes with instructions on how to make simple and wrapped loops. As you can see below, the tool has one round jaw and one curved jaw, so that it can grip and hold tightly without marring your wire. This unique design allows you to make easy, uniform round loops. Perfect for beginning jewelry makers who are just learning how to make loops, and for seasoned designers alike!
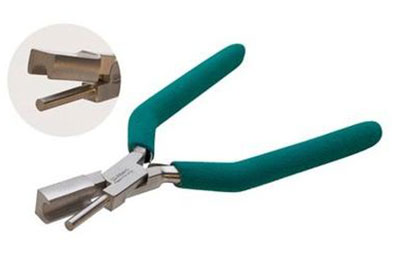
Here is a visual look at how loops can be made with the Wubbers Looping Pliers:
Wubbers Video Tutorial
Wubbers’ creator, Patty Bullard, shows how to use the looping pliers to create simple loops, eyepin loops and even wrapped loops.
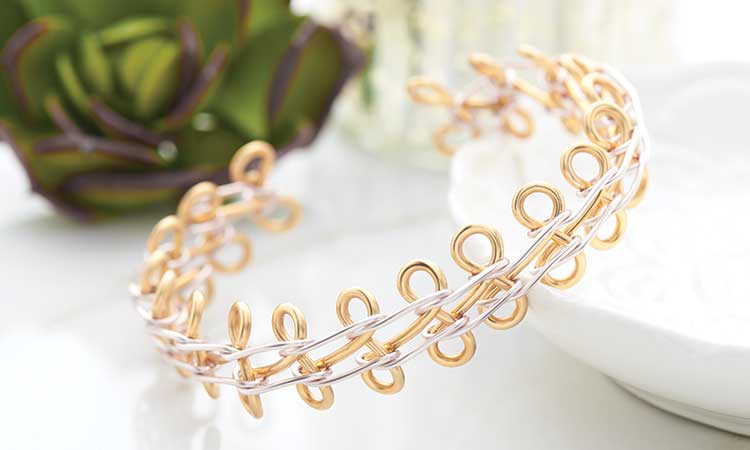
Beadalon® Artistic Wire® 3D Bracelet Jig and Tutorial
From Beadalon® Artistic Wire® is the 3D Bracelet Jig. You can create bangle bracelets, cuff bracelets, and curved components. We have a great informational video from Artistic Wire to get you started on creating your own custom-made bracelet.
Video Tutorial
This video, provided by Beadalon/Artistic Wire, gives you a tutorial on how to use the 3D Bracelet Jig and creating a simple wire bangle bracelet.
Bangle with Czech Beads Tutorial
Now that you have learned how to create a 3D bangle from the video above, it is a great base to add beads to. Here is a tutorial on how to create the bracelet above using 8mm rondelle beads. You can choose from Czech, Millefiori, Gemstones, Chinese crystals or Swarovski®.
What you will need:
3D Bangle made with 3D Bracelet Jig and 18 Gauge Wire (from video above)
Step 2. Cut 3” of 24-Gauge Artistic Wire and bend in half. Pinch the fold.
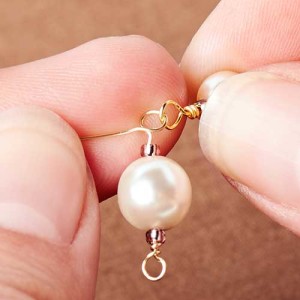
Step 3. Slide on rondelle bead. Tip: If loop is too long, clamp loop with flat nose pliers to create a smaller loop.
Step 4. Insert wire ends through one loop of the bangle bracelet. Separate the wire ends and spread them apart.
Step 5. Turn bracelet around and wrap wire end around three times on the bangle wire.
Step 6. Repeat to other wire end.
Step 7. With your fingers or finger nails, push the wrapped coils towards the middle.
Step 8. Cut excess wire and repeat all steps for remaining bangle loops.
3D Bracelet Examples
Here are other examples of what you can make with the 3D Bracelet Jig.
Make Easy Knots with the EasyKnotter® Tool
Invented by Maureen “Reenie” Oliveto, the EasyKnotter® tool was created to help beaders make perfect knots in their beaded jewelry designs. Whether you plan to stagger knotted sections throughout your jewelry piece or want knots to sit closely next to beads, this easy-to-use tool allows you to make evenly-spaced, clean knots wherever you want. Learning how to use this fantastic tool is easy too and we’re here to show you how. Let’s get started!
Beading Thread
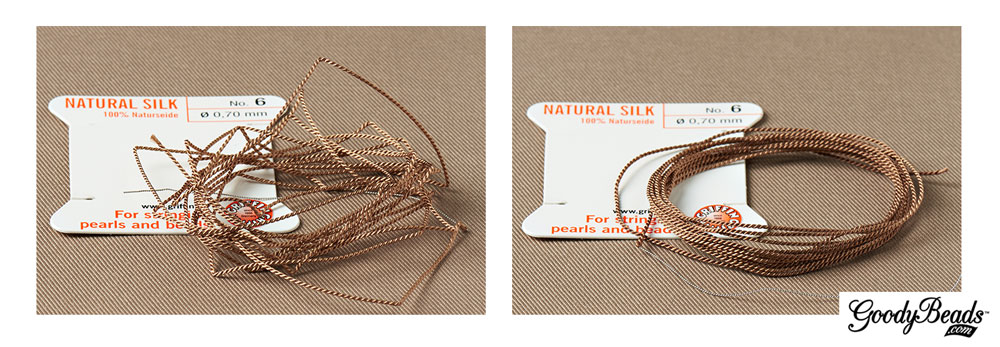
We will be using Griffin bead cord in our tutorial. We love the Griffin cord because of its 100% silk quality, the flexibility of the cord and it comes twisted with an attached needle. Silk cords come in many different sizes to accommodate the bead’s hole size. Size is very important when making knots. You want beads to fit snugly on the cord so that they don’t glide over the knot.
As the cord comes spooled around a card, you will need to prepare the silk for use by stretching and smoothing out dents and kinks. Check out this blog post we did on how to smooth out silk cords.
EasyKnotter® Tutorial
Now that you know how to use The EasyKnotter®, see this cool technique in action. Check out this previous blog post featuring knotted jewelry designs.
Every EasyKnotter® tool comes with complete instructions for reference.
When making knots, pull the silk cord upwards after you’ve looped the knot on the peg of the tool. When you pull the cord in a perpendicular angle, it will create a closer knot when you lift it off the peg.
When you lift the knot up, use flat nose pliers to pull the knot closer to your bead clusters. Open your pliers slightly and wedge the cord closest to the knot. Do not clamp on the cord. Pull the knot towards you slowly to tighten the knot and help it sit close to your bead clusters.
Maureen Oliveto has a neat way to create a tighter and closer knot. Check out her video on how to.
To make evenly-spaced knots between your bead clusters, use the measurement lines on the tool. Proceed with making your loop knot and placing it on the metal peg. Hold the last knot you’ve made at your preferred measurement line. Pull on the cord end until tight and lift off. Pull on the cord to tighten and secure the knot. Proceed with adding beads and making your closed off knot.
How to Use Silk Cord in Jewelry Making
Silk cord has been used as a stringing material in jewelry-making for centuries. No other beading cord offers the softness that natural silk provides. Jewelry designs made with 100% silk bead cord drape beautifully and the cord itself can become a feature with knotting techniques. Whether you’re looking to create a simple strand of beads or incorporate knotted bead clusters into your designs, GoodyBeads.com is here to show you how easy and versatile this timeless stringing material can be.
One of our favorite silk bead cord brands is Griffin. Griffin bead cords are made of 100% natural silk and come in a rainbow of colors and a variety of thread sizes.
Griffin bead cords are sold 2-meters per card. Two strands of twisted silk are wrapped around a cardboard backer. Each cord comes with its own needle for easy threading.
Choosing Silk Cord
Thread thickness is very important, especially if you plan on incorporating knots into your designs. Beads can slide over a knot if the cord is too thin for the bead hole you are working with. Griffin bead cords has its own numeric system for categorizing thread cord sizes: No. 0 – No. 12.
Each thread number has an associated millimeter size. Below is a quick reference guide for each number:
No. 0 = 0.30mm
No. 2 = 0.45mm
No. 4 = 0.60mm
No. 6 = 0.70mm
No. 8 = 0.80mm
No. 12 = 0.98mm
Smooth Out Silk Cord
Since silk bead cords come spooled on a card, you must prepare your new cord for use by smoothing out the kinks first.
To smooth out your cord, unravel the whole cord from the card. Starting from one end, dip your fingers in water and run your damp fingers through a section of the cord. Run your fingers over the section a few times to help straighten them out. Once that section is straight, continue on down to the next section of the cord with damp fingers until you’ve straightened the whole piece. Next, run a paper towel over the entire cord and gently squeeze to remove any residual water from the cord. That’s all you need to do. The cord will still be a bit damp but you can certainly use it right away. You can also wait a few minutes until it’s fully dried.
NOTE: You can use the same cord for multiple projects if you plan to keep using the needle that is attached to the cord. String bead(s) through the needle and utilize the end section of the cord.
Using Clamshell Bead Tip with Silk Cord
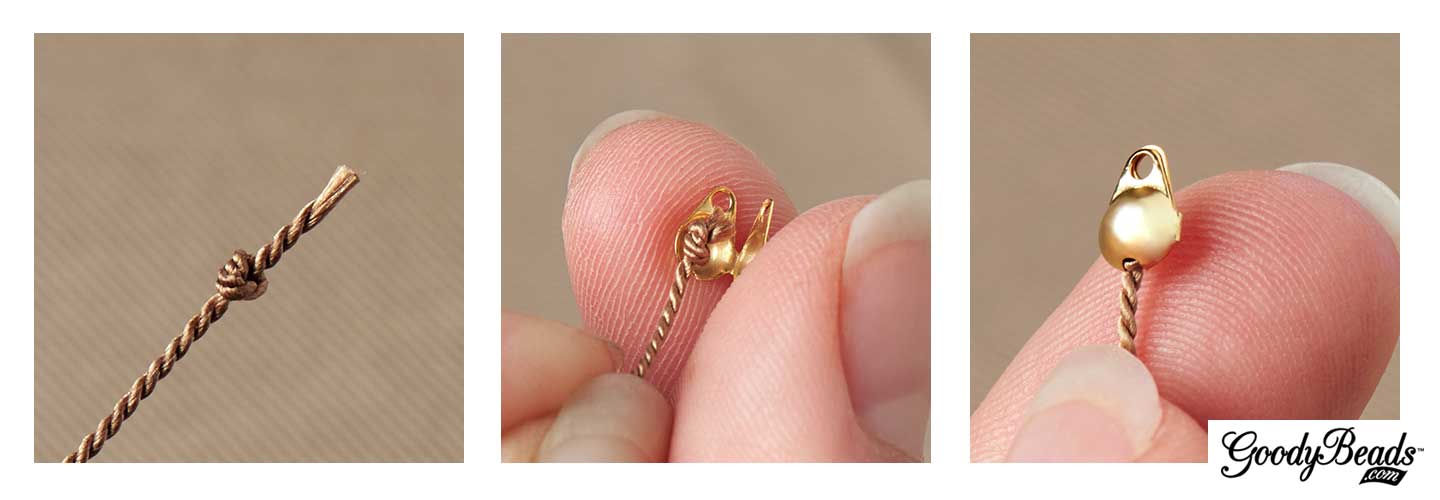
A way to attach your silk cord to jump rings or clasps is to attach clamshell bead tips.
Start by making a knot at the end of your prepared silk cord. Cut any excess cord close to the knot. Add a dab of Super New Glue or fast-drying glue to the knot. Place the knot inside the clamshell center and fold the clamshell over the knot. The glue will keep the knot from unraveling and to adhere the silk cord to the inside of the clamshell bead tip. Once the glue is dry, it’s ready to use.
Need a little inspiration? Here are some ways we used Griffin silk bead cord in our jewelry designs. Plus, quick tips on how you can create these designs yourself!
Crystal Cluster Knotted Silk Cord Necklace
Designed by So Vang
Make a necklace with knotting in-between clusters of beads. Choose from Swarovski® crystals, Chinese crystals, seed beads or your favorite gemstones. For our necklace, we used the entire 2-meter cord and strung on clusters of one gold seed bead, three dainty round Chinese crystals and one gold seed bead, that were knotted with an inch gap between clusters. This version makes a 60” necklace that you can wrap around two or three times.
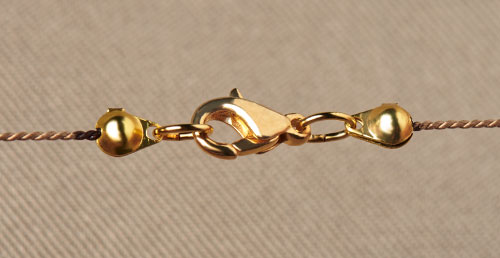
Here you can see how the clamshell bead tips are used in conjunction with jump rings and a lobster clasp.
Pearl beads and silk cord are a match made in heaven. Not only do they look great together, the silk cord also helps prolong the life of your pearl jewelry by preventing the beads from rubbing up against each other, which can breakdown the bead’s finish. Making this elegant necklace is super easy.
First, make a knot and clamp a clamshell over the knot. Make another knot close to the clamshell. String on a pearl. Make a knot close to that pearl. Repeat until a preferred length. Make two knots at the end and clamp a clamshell over the last knot. Finish with a lobster clasp and you’re done!
If you have a worn-out pearl necklace, you can undo all the pearls and restring on silk cord to extend its jewelry life.
Minimalist jewelry is a huge fashion trend right now. Dainty jewelry components shine alone or together in multiple strands like our layered silk cord necklace. For this necklace, we focused on the sleek simplicity of gold tube beads and the lightness of silk cord.
Step 1: String on 25 gold tube beads on white silk cord. With the beads strung on, cut 20” off the end of the silk cord. Make 2.
Step 2: String on 25 gold tube beads on white silk cord. With the beads strung on, cut 22” off the end of the silk cord. Make 2.
Step 3: Gather the four cord strands and make a knot. Repeat to the other end.
Step 4: Dab some Super New Glue to both knots. Clamp a clamshell over the knots.
Step 5: Add a jump ring to one of the clamshell tip ends.
Step 6: Add a jump ring and a lobster clasp to the other clamshell tip ends. Done.
This style of necklace is perfect for small dainty beads or seed beads or even some NEW 3mm or 2mm Czech round beads.
For this bracelet, we twisted groups of silk cord with size 11/0 Miyuki seed beads and gold plated chain.
Step 1: String on seed bead to 8” and cut 10” silk cord strands with seed bead on. Make twelve strands. Tip: You can use the Bead Spinner to help to string on seed beads.
Step 2: Gather three seed bead strands and knot all three strands at both ends as close as you can to the seed beads. Clamp a clamshell over the knots. Make four group of seed bead strands.
Step 3: Cut two chain links at 8” and attach oval jump rings to each end of the chains.
Step 4: Also cut a few links of chain for your bracelet chain extender.
Step 5: Open an oval jump ring and slide on your lobster clasp.
Step 6: Open a larger jump ring and slide on these:
chain extender piece, two seed bead groups, chain extender piece, two seed bead groups.
Step 7: Close Jump ring.
Step 8: Leaving the chain extender along, separate the strands into two sections of chain and two seed bead grouped strands. Make a “flemish twist” with the two sections.
Step 9: Open a large jump ring and slide on the other ends of the chain and grouped seed beads and lobster clasp jump ring.
Step 9: Close jump ring and you are done.
(Close-up shot of jump ring with grouped seed beads and chain links.)
We hope enjoyed these tips and tutorials. Check our next blog post where we show you how to create evenly spaced knots in your jewelry designs using The EasyKnotter® tool. Happy Beading!
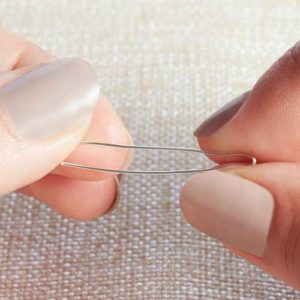
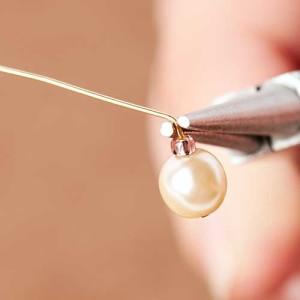
A simple embellishment you can add to your head pins and wire, is making a wire wrap loop. A wrapped loop adds a decorative and elegant look to your jewelry piece. Here, we’ll explain how to make a wrapped loop, how to connect two wrapped loops together and show you previous projects using wrapped loops.
While we covered the basic of a simple loop in a previous blog post, you can take that knowledge of simple loops and amp it up a notch with wire-wrapped loops. Like, our previous advice; practice, practice, practice.
First, let’s talk about wire gauge. While we recommend your head pins, eyepins or wire to be a 21 – 24 gauge, you can surely use other thickness. Do keep in mind that when wire wrapping a thick gauge, like 20 or lower; it will be more difficult to create a tighter coil. While a thinner gauge above 26 will be more delicate. But when it comes down to beading and jewelry, it’s personal preference.
Wire Wrap Loop Tutorial
Tools you will need:
Round Nose Pliers
Flat Nose Pliers
Serrated Pliers
Side Cutter
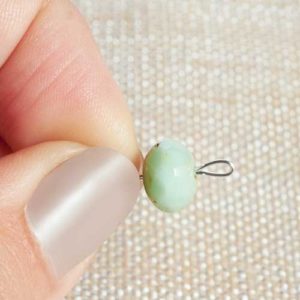
Step One: Add bead(s) to head pin or eyepin. Grasp the tip of the round nose pliers on the wire close to the top bead.
Step Two. Bend wire to a 45-degree angle over the pliers’ round nose with fingers.
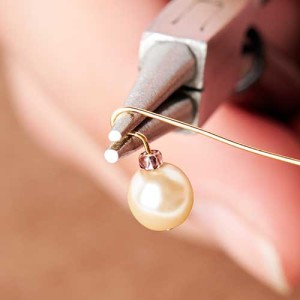
Step Three: Slide the round nose pliers in 1/4” and grasp the bent 45-degree angle tail. Bring wire over the pliers’ round nose to make a backwards question mark. Note: You can slide the pliers in more for a larger loop.
Step Four: Switch the pliers’ nose so that the bottom nose is in the loop that’s been made. Wrap the wire end under the round nose and over the bead(s). The wire should cross over the bent 45-degree angle section leaving a gap below the loop.
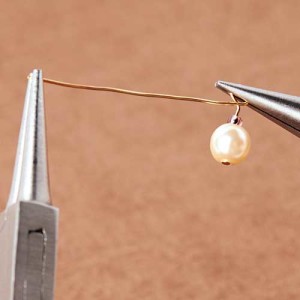
Step Five: Clamp the loop with a flat nose plier and grasp the wire tail with the tip of the round nose pliers.
Step Six: In a clockwise rotation, coil the wire with your round nose pliers around the gap and down. You should get 2-3 coils.
Step Seven: Clip the excess wire with a side cutter. Use a serrated or flat nose pliers to catch the end of the wire tail and tuck it under the coils.
Step Eight: Straighten loop as needed. You are done!
Linking Wire Wrapped Loops
Unlike simple loops, with wire wrap loops you are unable to open the loops up and link them. You will need to add the two parts in the middle of the wrapping process, while using Artistic Wire to make a double wrapped, loop links.
Step One: Make a wrapped loop on 22 Gauge Artistic Wire.
Step Two: Make a 45-degree bent angle and full loop. After the full loop, link finished wire wrapped piece into loop.
Step Three: Finish the rest of the wire wrapping process and you should have a wire-wrap linked piece.
There are many variations of how to form a wrapped loop. Many jewelry-makers create coils while holding the wire end with their fingers. Or others wire wrap an irregular coil. Whichever the look you are achieving, one way to make a wrapped loop.
Sample Jewelry with Wire-Wrapped Loops
Here, we will explore inspirational jewelry from past trends and blog postings that have used wrapped loops.
We linked up wire-wrapped loops to make this waterfall-inspired pearl necklace.
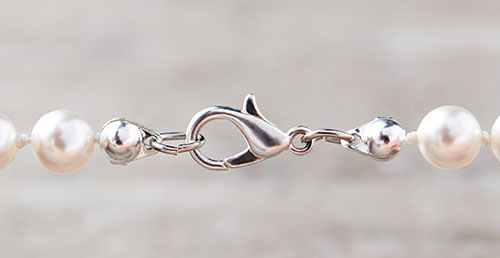
Jump rings are an essential product to have when making jewelry. Jump rings are used to make connections to clasps, chain links, charms, and many more. We will show how jump rings have been used in various jewelry projects, and also teach you how to open a jump ring correctly.
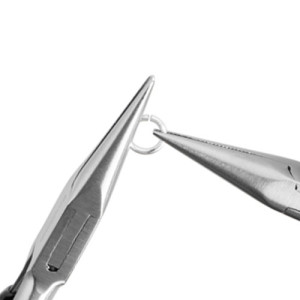
Step One: Hold one side of your jump ring with one of your pliers, clamping at the middle of the pliers.
Step Two: Take your second pair of pliers and grasp the other side of the jump ring almost perpendicular to your left pliers.
Step Three: Keeping the left pliers steady, rotate your right pliers towards you to open the jump ring.
Step Four: To close the jump ring, rotate your right pliers away from you until the two ends meet.
Note: Jump rings should never be opened by pulling the sides of your jump rings apart.
Jump Ring Video Tutorial
Check out our video tutorial on how to open and close jump rings with Alisun and Kristal Wick.
Sample Uses of Jump Rings
In our April 2016 Trend, we featured stampable charms and connectors. Here we used jump rings to connect to other connector links, as well as chain link. When using a similar size of jump rings, you won’t even notice that jump rings were used to connect these pieces together.
Adding charms to an expandable bracelet? Jump rings work great. Just make sure to use a large enough size to attach the charm to the bracelet like the example above.
Chain maille is a popular jewelry art. The combination of different sizes and colors of jump rings can make an intricate design that looks like a piece of art.
Even in our previous blog on How to Rivet, after we riveted a leather loop we used jump rings to connect the leather strands to a watch face or magnetic clasp. The brass jump rings were selected to match the color of the watch face and clasp, making the overall piece cohesive.
Beading Essential: Tool Edition (Part 2 of 2)
We talked about looping and cutter tools in our Beading Essential: Tool Edition Part 1 blog post. In this second part of our Beading Essential: Tool Edition, we’ve selected a few metal working and hammer tools as well as other tools to make your jewelry making easier.
Hammers
These are not your average hammers you have lying around your house to hammer nails. These special hammers are extra sturdy, like steel hammers, and have versatile uses for jewelry making.
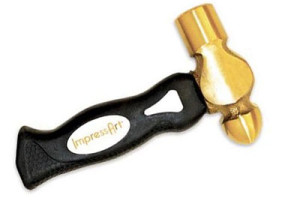
A010617 – Metal Stamping Hammer
TL00235 – Metal Stamping Hammer By ImpressArt
These two are metal stamping hammers that have sturdy brass heads ideal for striking metal stamps. Their short handles have comfortable grips to give the user a precise strike.
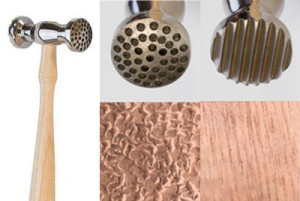
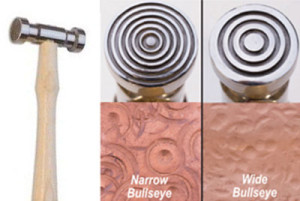
A012927 – Chasing Hammer
The Chasing Hammer is a great tool to use for metal working. The two-part hammer has a round side that is great for adding textures such as a hammered look (small dents) to metal. While the other side is flat and good for flattening wire and hammering rivets.
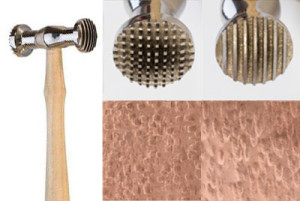
Texture hammers provide patterned texture on metal. Each hammer has a double head that has two different texture heads to create a different impression in your metal. Try turning your hammer when you strike, for a variation in your impression. Create unique impressions by changing up the angle and power of your strikes.
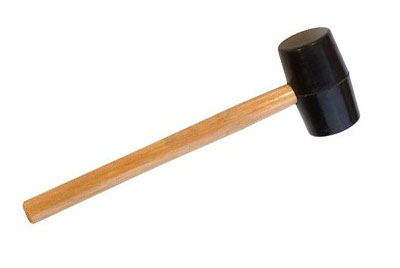
A011606 – Rubber Mallet
A rubber mallet will allow you to change a half-hard or dead-soft jewelry wire into hard wire. After you’ve shaped your own wire pendants, ear wires or clasps, for instance, you’ll want to use a rubber mallet to make them stronger, harder and to help them maintain their shape. Because of its soft head, it is also best to use a rubber mallet on color coated wire as each strike does not disturb the colored surface.
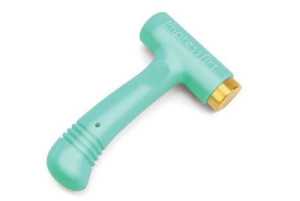
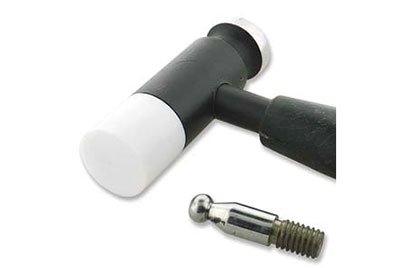
TL00146 – Whammer Wire Jewelry Hammer
With this tool, you get three tools in one. There is a convex steel head for flattening wire, an interchangeable nylon flat head for hardening wire or straightening colored wire, and a steel dapping head for creating dents or texture on metal.
First, stamp your designs onto the stamping blank and sand the edges of your blank to smooth out the edges with Sanding Sponge Grit. Then, take one end of the blank and insert into the loop of the bar. Bend the blank around the curve of the bending bar. Repeat to the other side of the blank. Use Nylon Jaw Bending Pliers if you need to create a more curved look.
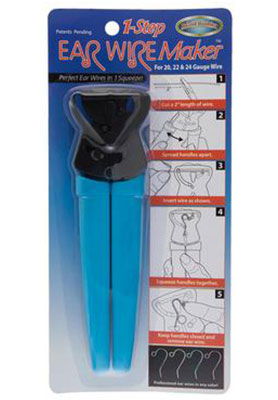
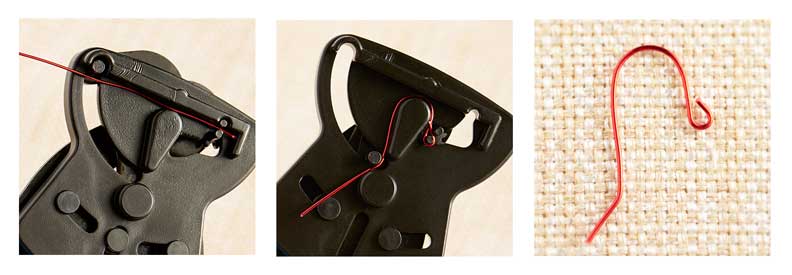
TL00199 – 1 Step Earwire Maker
Use the Earwire Maker to make ear wires with 20-, 22-, or 24-Gauge wire in one step. Also use the Bur Tool to smooth rough and sharp ends of the ear wire and/or harden the ear wire by hammering it with a rubber mallet or nylon whammer tool.
Note, after you have squeezed the pliers to make the ear wire, do not release the pliers. Remove ear wire while you have the pliers squeezed. Cut excess wire if you need to shorten the length of the end.
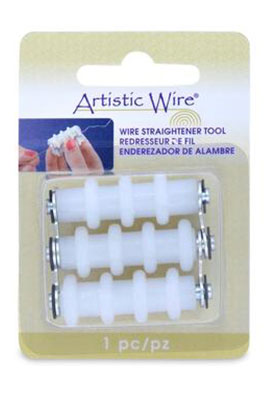
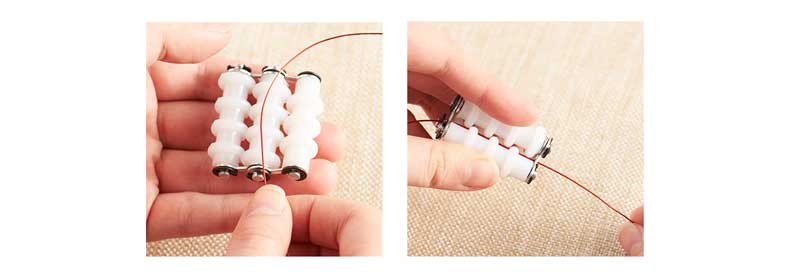
TL00208 – Straightener Tool
Wire is easier to use when it is flat. This wire straightener from Artistic Wire can help with straightening your curved, kinked, or bent wires.
Put your piece of wire in the middle of the three bars. Clasp the bars enclosing the wire on the inside. Pull your wire out and you should have a straighter wire. You may need to run the wire through a few times for more prominent kinks.
Beading Essentials: Tool Edition (Part 1 of 2)
When it comes to tools, everyone has their favorite set of pliers, cutters or hammers. But there are newer types of tools that can even help your jewelry-making be more consistent and efficient. In this Beading Essentials: Tool Edition, we hand-picked a few tools that can help you with your next beading project. Who knows, you might even find a new tool to add to your collection.
For this segment, we will discuss different types of looping tools and cutters to assist you in your jewelry making.
Looping Tools
In our previous blog, Jewelry Beading Essentials, we pointed out simple pliers that all jewelry makers should have on hand, like your round nose and cutters for making simple loops. Did you know there are looping tools that can help with the consistency of your loops? Or making wire loops in a shorter amount of time.
Wubbers® has looping pliers in various sizes that helps make simple loops easier.
A012264 – Bail Making Wubbers
This Bail Making Wubbersis great for making small 2-2.5mm loops or coils. Using this tool instead of your round nose pliers will give you a more consistent loop every time.
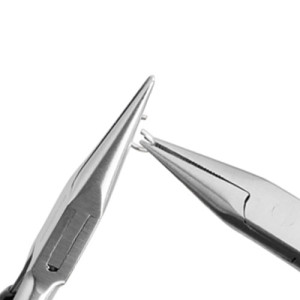
A012263 – Wubbers Wire Looping Pliers
This Wire Looping Wubbers comes with instructions on how to use this plier to make eyepins and wrapped loops. One side is concave so that it holds your loop in place while you make a loop on the other side of the plier. This tool is also perfect for beginning jewelry makers that are learning about making wire loops because the tool guides the user to make a round loop.
Tip: When you have finished your loop, bend the wire back slightly so that it centers the loop with the wire.
TL00155 – Large Wire Looping Pliers
Large Wire Looping Pliers makes larger loops. This loop is great for making larger loops to attach to thicker chain pieces or making larger eyepin loops. One of our favorite ways to use this tool is making jump rings, especially for chainmail.
Make coils with your looping pliers. Cut off excess wire. Then cut in a straight line across the coils to make 7mm jump rings.
TLZ0207 – Memory Wire Finishing Pliers
These Memory Wire Finishing Pliers are best used to make loops on your round or flat memory wire. Because memory wire has a stronger gauge, these pliers will help make a simple loop end easy. Clamp the pliers at the tip of the wire and roll towards you until you’ve made a full loop.
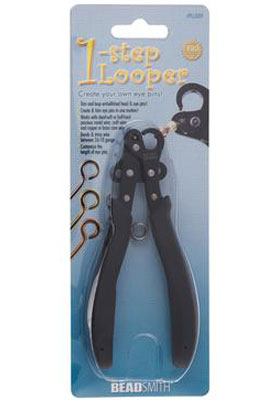
TL00019 – 1 Step Looper
An innovative tool we have is the 1 Step Looper. Designed to make loops in literally 1 STEP! It loops your wire and cuts it all, in one step.
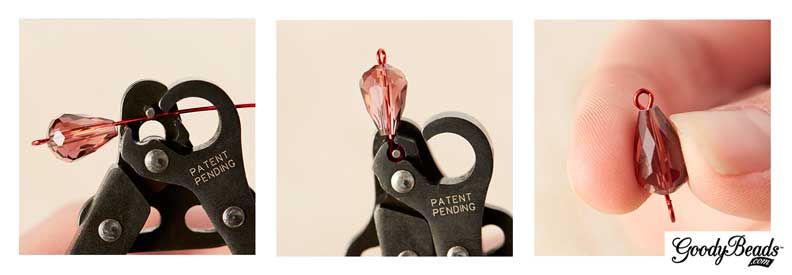
This tool is perfect if you need to make a lot of eyepins. Feed your wire until it passes the middle lever. Squeeze your pliers and it will make a loop while cutting the excess wire end.
Tip: When you have finished your loop, bend the wire back slightly so that it centers the loop with the wire.
You can use this tool when you are making a lot of dangles. Feed your wire until the top of the beads are close to the pliers. There will be a hole at the other end if your wire is long. Squeeze your pliers to make a loop. Bend your dangle back slightly to center your loop.
Cutter Tools
Side cutters are one of the essential tools you will need for jewelry making. Whether you are cutting excess wire off of a headpin or cutting thin chain links, cutter tools are versatile. But not all cutters are the same. Certain cutters are used for certain projects.
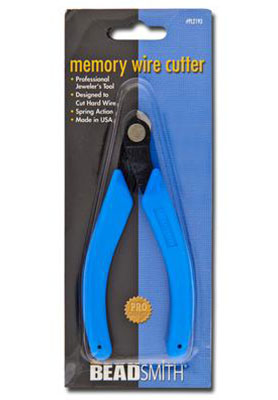
FTTL0005 – Memory Wire Cutter
Memory Wire cutters are used for the heavy duty cutting. Best to use on memory wire or larger gauge wire, but you can use them for cutting thick chain links without damaging your regular cutters.
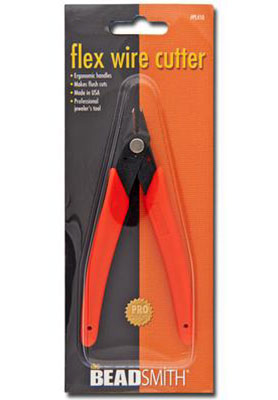
FTTL0001 – Flex Wire Cutter
Flex Wire Cutter is designed to cut flex wire. With this precision cutter, you don’t have to worry about your flex wire having frayed ends. We also use these for our Beading Wire or Elastic Cordfor a closer cut on a finished project, when scissors cannot.
TL00017 – Xuron® Shear – Non-Serrated
Xuron® Shears are manufactured for cutting high strength fibers, wire, metal sheets, leather cords, and even Beading Wire. They are perfect to cut wire coils to make jump rings because they create a clean, flat cut.
We recommend this tool if you are wanting a flat cut to your jump rings. Because when cutting the coils with your side cutters, you will find that your jump rings will have a sharp, pointed end. This is because side cutters are best for flushing the flat side of your side cutters for a close cut. While Xuron Shears cut clean and flat especially for making jump rings.
As you can see here, the left jump ring was cut with a side cutter, while the right jump ring was cut with the Xuron Shears.
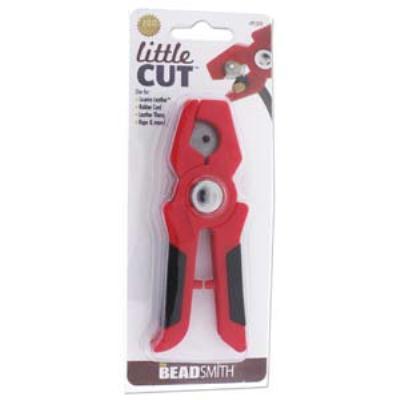
TL00053 – Licorice Leather Cutter
With a comfortable grip, this Licorice Leather Cutter is perfect for cutting your licorice leather or all of your leather or rubber cords with a clean and accurate cut.
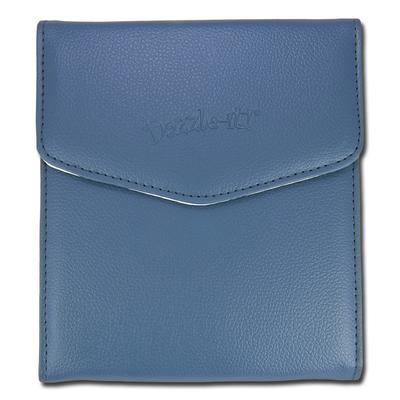
Feature: Tool Wallet
TL00064 – Dazzle-It Tool Wallet
For all your pliers and tools, get the Tool Wallet to keep your tools in one area! It has convenient elastic straps to organize up to six pliers. It is the perfect tool storage and slim enough to carry along with you when you cannot part from making jewelry on your vacation.