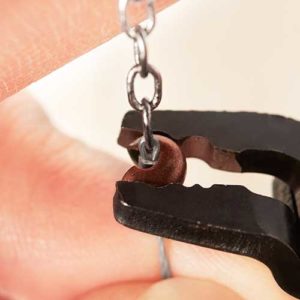
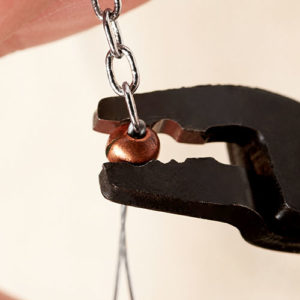
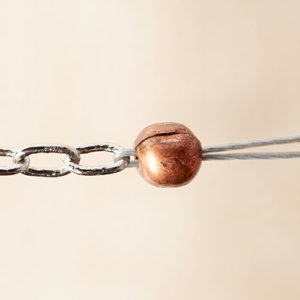
Elastic Cord Needle (TL00281) is quite an innovative tool to pre-string your beads and to easily slide them onto an elastic cord; ready to be tied off and be worn! Check out this informative video from Beadalon on how to use the Elastic Cord Needle.
What you will first need are the following for this video tutorial:
Beads – You want to make sure these beads slide one and off the needle.
0.50 mm or 0.80 mm Elastic Cord – Anything bigger will be harder to latch on the hook and to slide beads off the needle easily.
Elastic Cord Needle Tutorial
Images and video by Beadalon.
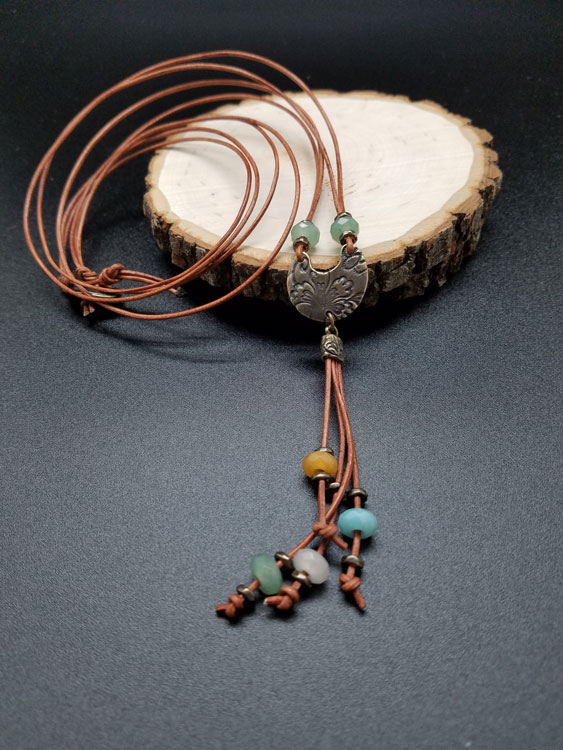
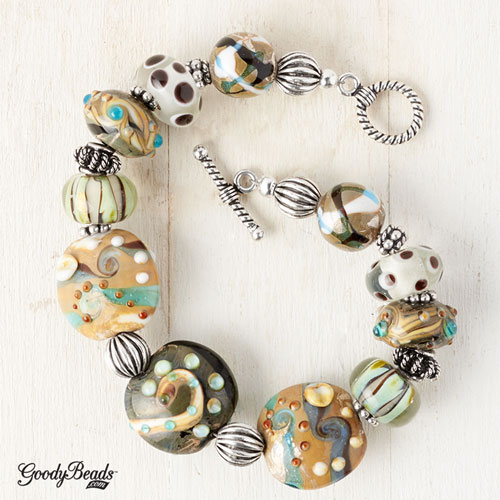
Tory’s TierraCast and Gemstone Leather Necklace
Tory’s Make and Take class was a HIT at the Twin Cities Bead Bazaar! It consists of Dakota Stones® faceted large-hole gemstones and TierraCast® new collection: Vida Más Dulce. We are happy to share with you this necklace and a tutorial you can make!
Start by cutting the leather for your tassel. For a long tassel cut 4 pcs of leather at 5”, 4.5”, 4” and 3.5”. For a short Tassel start with 3.5” and cut the others at 3.25”, 3 and 2.75”.
Put the 4 ends of your cut leather into the cord end and crimp the cord end on both sides with a non-serrated or nylon Pliers. Make sure to squeeze both sides or you may loose a piece of leather on either end.
Add a spacer bead, gemstone and spacer bead to each piece of leather cord in your tassel and tie a overhand knot at the end. Pull tight so they do not come undone. Make any adjusts you need to the tassel length at this time.
Measure how long you want your necklace to be around your neck. Take this length and double it and cut. Then cut a second piece the same length.
String your leather thru the top holes of the TierraCast connector piece. Then trim the ends of your leather to a point, to make it easier to slide on your beads. On each side string both pieces of leather thru the spacer bead, gemstone bead and another spacer bead.
Pick one side to add your button to and put one piece of leather cord from that side thru each of your button holes and do an overhand knot with both cords. Then do a second over hand knot under the button and pull it up so it is flush with the button.
On the other side do an overhand knot at the top and then about a half an inch down, add a second overhand knot and this will become your button hole to act as a clasp for your necklace.
Open your jump ring and add your tassel and the bottom hole of the TierraCast Connector. Close your jump ring.
Vendor Video: Artistic Wire 3D Jig Expandable Bangle Bracelets
Wyatt White, from Beadalon, demonstrates how easy it is to make an expandable bangle using the Artistic Wire 3D Jig! Check out this video and learn to customize one for yourself!
The holidays are coming up and we’ve got a fun tutorial with tips and tricks to creating snowflake ornaments with wire snowflake ornament forms.
Wire Snowflake Ornament Forms
The Wire Snowflake forms comes in FOUR different sizes. Depending on the amount of beads you want on each peg will determine which ornament form to buy.
Tools are important when completing your ornament. Because the snowflake form has thicker gauge wire, it is best to cut the wire with a Memory Wire Cutter (FTTL0005). You will create a simple loop at the tip of your pegs, for this you can use round nose pliers and roll a loop. However, we love to use the Memory Wire Finishing Pliers (TLZ0207), which creates less stress on looping the pegs. And Serrated Pliers (A001682) to close your loops because it helps grip the peg wires without slipping.
Tutorial
Step One: Slide beads onto a peg. Keep a 1/4″ peg end. Cut with memory wire cutters, if neccessary.
Step Two: Use your round nose pliers or memory wire finishing pliers to roll a simple loop as close as you can.
Step Three: Use a serrated nose pliers and squeeze the loop together.
Step Four: Squeezed loop.
Step Five: Fill the rest of your ornament by skipping one peg and repeat steps 1-3. Skip another peg and repeat until you’ve completed your ornament.
Inspirational Ornaments
Here are some inspiring ornaments you can create with lampwork beads, Swarovski® crystals, Chinese crystals, bead caps and more!
Each peg consists of: seed bead, bicone crystal, bead cap, lampwork, bead cap, bicone crystal and seed bead. Open jump ring, slide through one peg loop, through loop of tassel and close jump ring. Open another jump ring, slide on peg loop opposite of previous peg loop, through an ornament hook and close loop.
Looking to add a new tool and beading technique? BeadSmith introduces the Endless Loom by Deb Moffet-Hall. Learn what this purposeful tool can do and help with your bead-stitching skills.
The Endless Loom (TL00275) comes with components to customize your loom and colorful illustrated instructions on how to assemble your loom. It has sizing rods to customize the bracelet let you desire, end bars, tension rods and elastic bands. Watch the video to learn how to assemble the Endless Loom and what kinds of bracelets you can create!
Introduction to Kumihimo with BeadSmith® Instructional Video
Learn a new beading technique with Kumihimo. These instructional videos from BeadSmith gives an introduction to Kumihimo, how to braid fibers and how to incorporate seed beads. Get your Kumihimo supplies and learn how to braid one today!
Kumihimo Introduction by BeadSmith
Kumihimo Braiding with Beads by BeadSmith
Check out our previous GoodyBeads Kumihimo trends for inspiration.
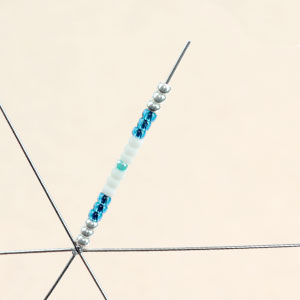
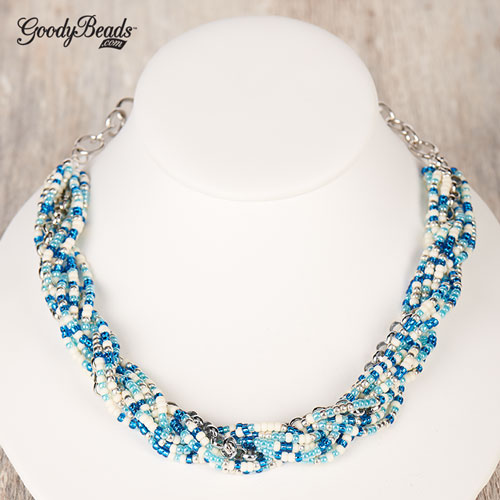
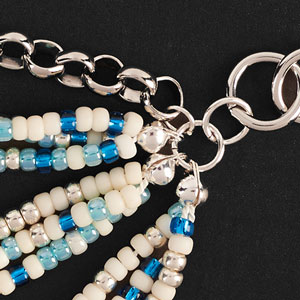
We created a mix of side 8/0 seed beads to make this necklace just in time for a dreamy, coastal vacation!
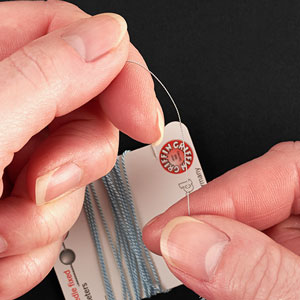
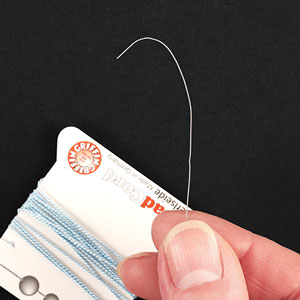
Instead of using the bead spinner needle, we utilized the needle that comes with the Griffin bead cord. Please refer to Silk Bead Cord blog post on how to straighten silk cord and learn about clamshell bead tips.
Step One: Unravel your bead cord and straighten silk cord and straighten needle that is attached.
Step Two: Use fingers to bend the needle into a curve.
Step Three: NOTE – You may need to readjust the curve in your needle in-between stringing.
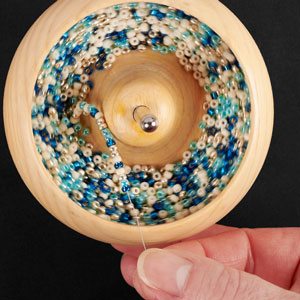
Step Four: Add your seed beads into the Spin and String’s cup, until the cup is about a ½ full. Make a knot at the end of your silk cord. Give the cup a counterclockwise spin and insert your needle with curve/hook pointed up, near the inside wall (not touching it). Watch as this tool’s spinning motion feeds the beads right onto the needle.
Step Five: Advance the beads from the needle onto the silk cord and repeat this process until you have a foot-long strand of strung beads. Cut string at 16”. Repeat steps 4 and 5 to make a total of 9 strands.
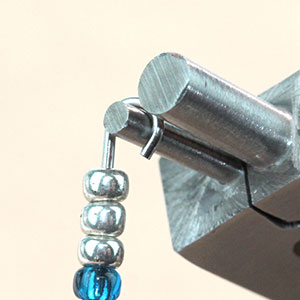
Step six: Tie three strands of seed beads together combining all ends into a tight and close knot against seed beads.
Step Seven: Clamp clamshell bead tip onto both knot ends. Repeat to make a total of three clustered, seed bead strands.
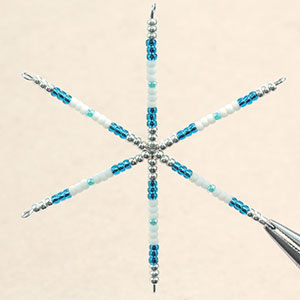
Step Eight: Open a jump ring and slide on one end of each of your three clustered strands and a foot of rollo chain. Close jump ring. Open another jump ring and slide on the first jump ring and 6” of larger cable chain.
Step Nine: Take top cluster strands and chain together and twist away from you in a tight enough twist. Twist bottom two cluster strands also in the same direction. Make sure to hold down your jump ring and 6” chain to keep everything straight.
Step ten: Hold other ends together and twist towards you to create a lasting twist. Open a jump ring and slide the other ends of your clustered strands and chain together. Open another jump ring and slide through first jump ring and another 6” larger cable chain.
Add to your jewelry tools with the BeadSmith Spin & String, Bead Stringing Tool. Stringing on seed beads will get easier with this essential tool. Watch an information tutorial video on how to set up and use the bead stringing tool below.
Having the right tools and adhesive for leather projects will make it easier to create stylish accessories. We will show you the basic tools for cutting leather and the types of adhesive to use when adding clasp ends to leather.
Leather Cutter Tools
When cutting leather, you want a precise and straight cut. This will help with adding clasps and keeping your measurements accurate.
Flat and small round leather (i.e. 1mm, 2mm, or 3mm) needs a pair of scissors. Before making your cut, measure your piece of leather and mark with a pencil lightly.
Licorice and round leather are thicker and need a heavy-duty cutter. Below, we have a two cutter tools you can use to cut thicker side leather.
The Little Cut (TL0053) has a sharp angle blade that cuts leather by squeezing the handles together.
Pinch the handles to open the cutter. Slide the leather under the cutter, lining it up with the middle groove. Bring your blade down to wedge the leather in place. Grasp the cutter towards the front and squeeze down.
NOTE: Make sure to always have your angle blade facing down.
Leather Adhesive
We have two adhesive options to use when adding clasp ends.
Precut your leather. Put 1-2 drops of super new glue inside your clasp ends and swirl the glue inside to cover the edges and corners. Insert your leather and let it dry lying down on a flat surface. Dry time should take a few seconds to a minute or two.
E-6000
E-6000 (A011455) is used on heavy-duty beading and crafting projects. While it has a slower drying time, E6000 is a good filler especially when filling excess space or gaps around your leather when inserted into the clasp.
Precut your leather. Scoop up some E-6000 with a toothpick. Swab the inside of your clasp end. Repeat if necessary. You want to apply enough to coat the inside of the clasp. Insert leather ends and let it dry for 12-24 hours lying on a flat surface. Wipe excess glue cleanly if it flows out after leather is inserted.
Extra Note: You can use rubber bands to keep licorice leather in a round shape as the glue dries. And always use E6000 in a well ventilated area.
Important Notes:
Make sure the inside of your clasp end is clean and dry. This helps ensure that your leather end sits flushed inside the clasp. You can swab the inside with a toothpick or cotton swabs to clean any dust or moisture.
If you find your leather cords have extra space in the clasp end, you can coil thin wire or beading thread like SuperLon thread at the ends before insert clasps.
Leather is stored in spools, which in time will create a natural curve. Use the natural curve of your leather to wrap around your wrist. Licorice leather will have a slight curve which you will need to bend to create a round curve.
Having more length of leather is better than not having enough. This is because the inner size of the bracelet may decrease depending if you are adding beads, charms or other embellishments to the leather. First, plan out your design. Next, without using glue, slide on clasp and test it on your wrist. Measure and cut your leather to the desired length. Glue other side of clasp and let dry.
And always, always don’t glue your clasps until you’re sure you’ve added your design elements and your measurements are correct.
Beadalon® Tassel Maker and Video
With thisBeadalon tassel maker, you can a make tassel in no time! Check out how to set up and use this tool. Embellish your next project with customized tassels.
Grab some of your favorite thread or pick up some Beadalon cotton thread and check out the tutorial video below, provided by Beadalon.
Tassel Maker Video
GoodyBeads EZ DIY Series: Swarovski® Crystal Flat Memory Wire Bracelet
We are in love with bracelets that wrap around and bling, of course! We have an EZ DIY tutorial on how to create this sparkling wrap bracelet with flat memory, Swarovski emerald-cut crystals and 24-gauge wire.
Tutorial
Items used:
WR00119 – Large Silver Flat Bracelet Remembrance Memory Wire
If you make crimps, this handy Xuron 4 in 1 Crimper with Chain Nose Pliers is a must for your jewelry-making tool box. Watch a video demo from Xuron and learn how to use it with your next beading project.
The 4 in 1 Crimper with Chain Nose Pliers has a crimping notch at the end that creates a perfectly formed v-shape. As you can see from the image above, the crimping pliers also has three different notches to precisely fold a 1, 2 and 3mm size crimping tube after you’ve crimped a v-shape. On top of that, this pliers also multi-functions as a chain nose pliers at the tip of this pliers; perfect for opening and closing a jump rings without putting your tool down.
Crimp covers are used to conceal the crimp tubes you use in treasured jewelry designs. They not only hide the tubes, but they also prevent your jewelry piece from snagging on clothing and create an overall professional look. See our easy-to-follow instructions below to learn how to place crimp covers.
When you crimp to finish your jewelry piece, using crimp covers to hide your crimps will create an overall professional look. Check out our video below on how to first crimp your crimp tubes.
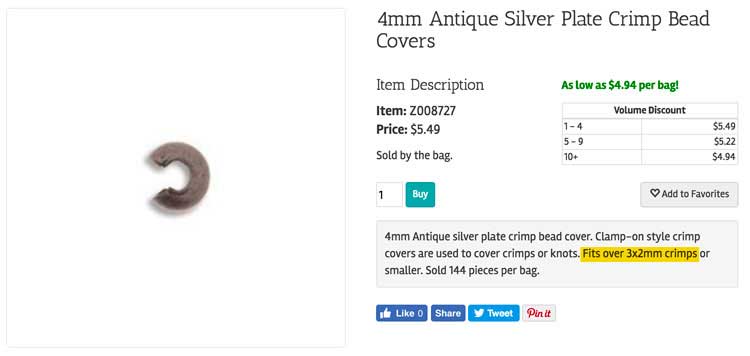
Crimp Covers
Crimp covers come in many different sizes, as well as crimp tubes. Depending on the size of your crimp tube, you will need a crimp cover large enough to encase the crimp tube. For instance, if you used a 3mm crimp tube, you will need a 4mm crimp cover. There is helpful information in the description of the crimp covers to help determine the best crimp tube size to use with. Note the highlighted information below.
Crimp Cover Tutorial
Once you have crimped your crimp tubes, you are ready to add your crimp covers. Here’s how to use crimp covers.
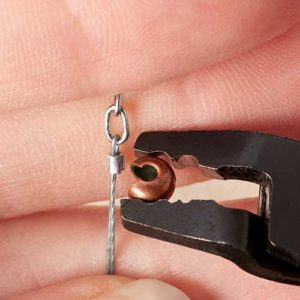
Step One: Crimp your crimp tubes on your jewelry wire with crimping pliers.
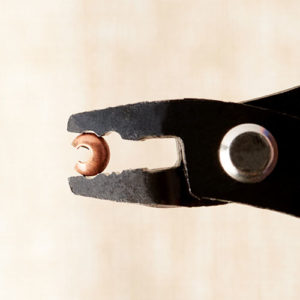
Step Two: Cup the crimp cover between the first notch of your crimping pliers. Make sure to have the opening facing outward.
Step Three: Slide the crimp cover over your crimped tube.
Step Four: Your crimp cover should fit and be encased inside the middle of your crimp cover. If it is not, you may want to try a larger crimp cover to avoid seeing any of the crimped tube.
Step Five: Gently squeeze your pliers over the crimped tube.
Step Six: Gently squeeze pliers around the crimp cover to round it out and to close the seams of the crimp cover. Completed crimp cover.
And this Czech beaded bracelet with owl dangle uses crimp covers to create an extra design element next to the bronze seed beads.
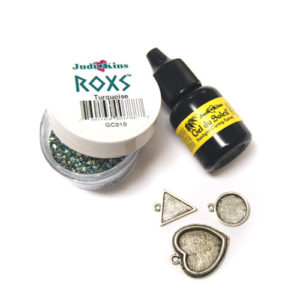
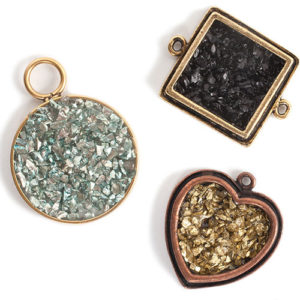
Nunn Design®: How to Make Pendants with Glitter Roxs and Gel du Soleil
From Nunn Design®, comes a fun tutorial on how to use Glitter Roxs and Gel du Soleil. Hop on the trend wagon and make a super easy pendant with glitter roxs.
Gel du Soleil
Gel du Soleil is a UV light sensitive resin. There is no mixing, no waste and the gel cures in 20 minutes when exposed to UV light. Because it is UV light sensitive, all aspects of the Gel du Soleil MUST be exposed to UV light in order for a piece to cure.
Glitter Roxs
Glitter Roxs are small pieces of translucent glass flakes imported from Germany. Because of their translucent quality, they fit the necessary restriction of curing success! Light can pass through the colored glass and cure.
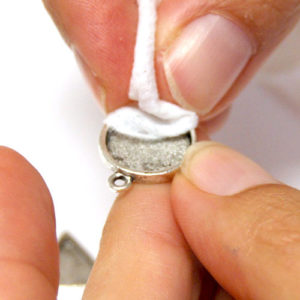
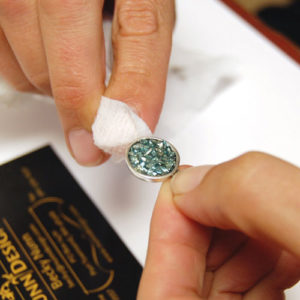
Step 2: When we plate our Nunn Design Findings, we have a process to antique them that often leaves some black antiquing. Use a wet wipe to clean the inside of the Nunn Design Bezel and remove any of the excess black antiquing that might be in your bezel.
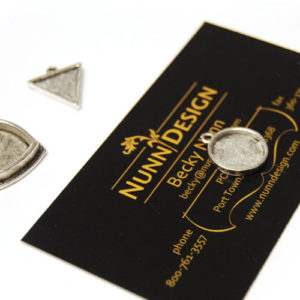
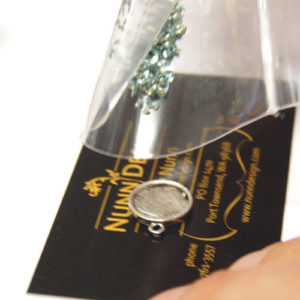
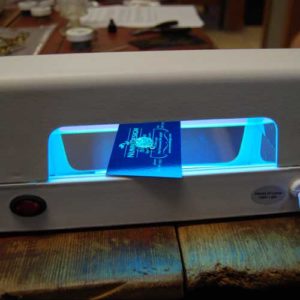
Step 3: Place your bezel onto a business card or a piece of card stock. This will aid you in transferring the bezel into the uv lamp once it is filled with resin.
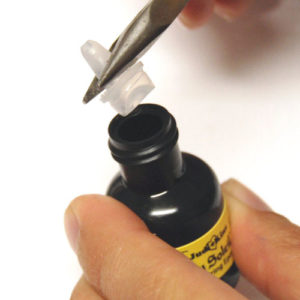
Step 4: Pop the nozzle off of your bottle of Gel du Soleil with a pair of needle nose pliers (if using the 5/16 oz bottle). Place the nozzle onto a small cello bag. Removing the nozzle will make is easier to pour the Gel du Soleil and limit excess bubbles in the resin.
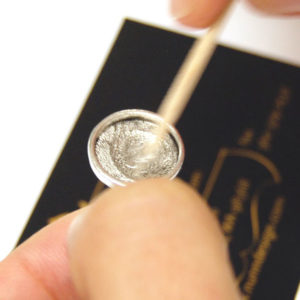
Step 5: Pour a very small drop of Gel du Soleil into the bezel, just enough to fill the base. Use a toothpick to move the Gel du Soleil around the base, making a nice even coating on the bottom of the bezel. When you are finished pouring the Gel du Soleil into the bezel, place the nozzle back onto the bottle and screw on the top.
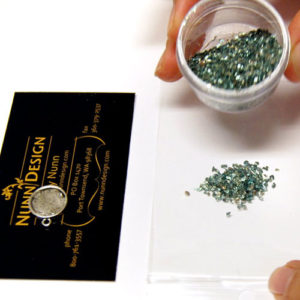
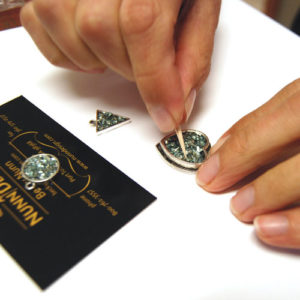
Step 6: I like to pour my Glitter Roxs from the plastic container onto a small cello bag. This helps avoid pouring too many of the Glitter Roxs into the bezel.
Step 7: Gently tap the small cello bag with Glitter Roxs to fill the base of your bezel. Warning: The Glitter Roxs are tiny shards of glass, so make sure to wear safety glasses and avoid putting your fingers near your eyes.
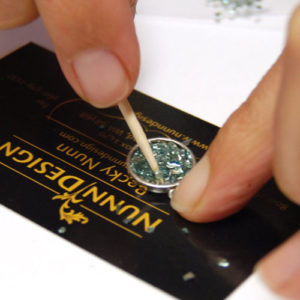
Step 8: Using a toothpick, stir your Glitter Roxs and Gel du Soleil until it feels like the flakes are slightly coated.
Step 9: If you have any excess Gel du Soleil on the bezel edges, use your wet wipe and Q-Tip to remove it. Once you expose the Gel du Soleil to the UV light, it will start to cure instantaneously, so make sure that you have all excess Gel du Soleil off of the sides. Pour your excess Glitter Roxs back into the containers avoiding any waste.
Step 10: Turn on the UV Lamp and transfer your business card with the bezel laying on the top, into the UV light. Make sure that your business card is level so that the Glitter Roxs will cure in the position you want them and not all squished to one side or the other. TIP: To allow multiple pieces in the uv light tray at the same time, you can remove the business card just minutes after you have placed the bezel in the uv light.
Step 11: Once 20 minutes has passed, remove your bezel. Using a toothpick, scrap over the top of your Glitter Roxs dislodging any pieces that might not have fully cured to the piece. If you have a lot of pieces that were dislodged, add some more Gel du Soleil, and place back into the Uv light.