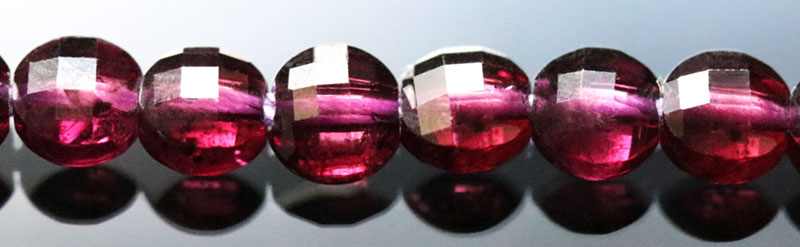
New to GoodyBeads are these luxurious 4mm Faceted Coin Gemstone Beads from DakotaStones. Get an up close look at the facets! Plus, two projects using these shimmering faceted gemstones!
Each bead is diamond cut with a “checkerboard” pattern. With an up close look, ‘the puffed edge leads to a checkerboard faceted face. That’s a lot of surface to catch and move light in a multitude of directions.’
Bracelets with 4mm Faceted Coin Gemstones
Who doesn’t love blue! Especially these Amazonite strand! We kept the simplicity of this bracelet by using Soft Flex Beading Wire and sliding on a gemstone and 11/0 Miyuki seed bead sequence. We made a sequence up to 7″ and used clamshell bead tips for the ends. Added a clasp and an inch of chain for an extender. (Adjust amount of beads to customize bracelet size.)
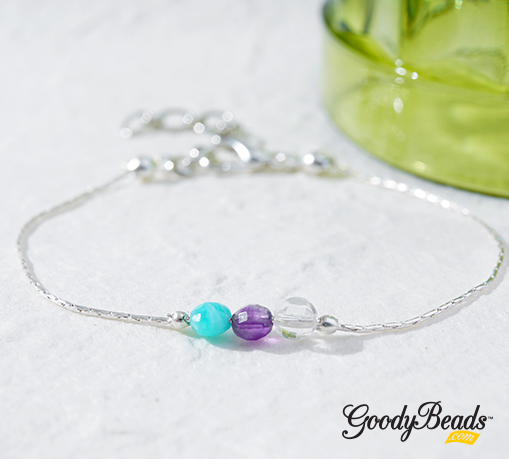
We kept this bracelet as simple as we can. We use three different gemstones: Amazonite, Amethyst, and Crystal Quartz all onto a .7mm beading chain. We first cut a 7″. At one end, we used a clamshell bead tip. Then we slid onto the beading chain a 2mm crimp tube, three gemstones and another crimp tube. Position the beads to the middle of the chain and using the Magical Crimping Pliers, crimp the crimp tubes on both sides of the gemstones. Cap the other end of the beading chain with another clamshell bead tip. Add your clasp and chain and you have a dainty gem bracelet!
A fun tip when making bracelet with beading chain, is for you not to be afraid to mix metals. Watch video for a step-by-step tutorial in making your own DIY adjustable bracelet!
Video
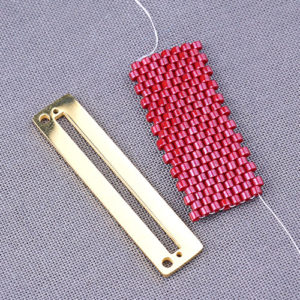
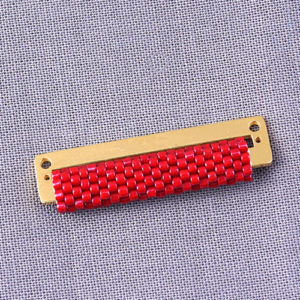
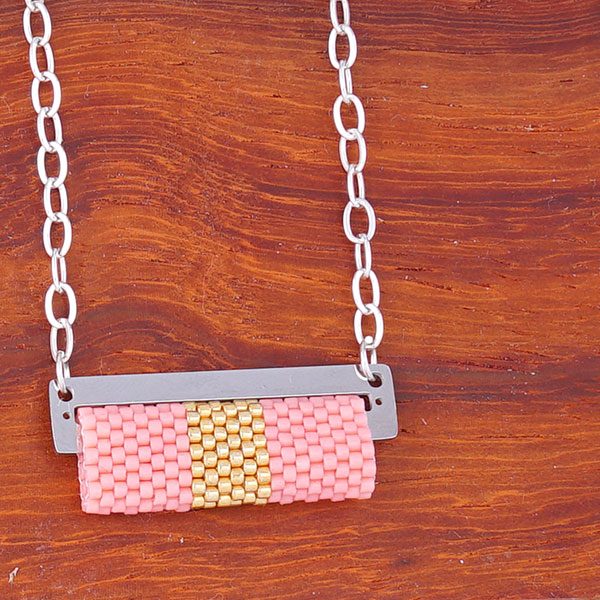
Beadable Findings: Peyote Tube Bar Pendant
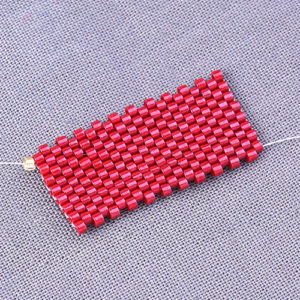
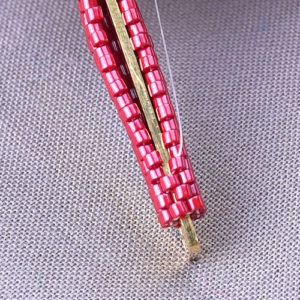
We are in love with our beadable findings! And with a simple knowledge of peyote-stitching Miyuki 11/0 Delicas, create a tube, attached through the Beadable Bar Pendant, to make a minimalistic neckalce.
You don’t have to stick to the 14 rows of peyote rows. You can make the tube longer and with different pattern designs for a longer and unique pendant.
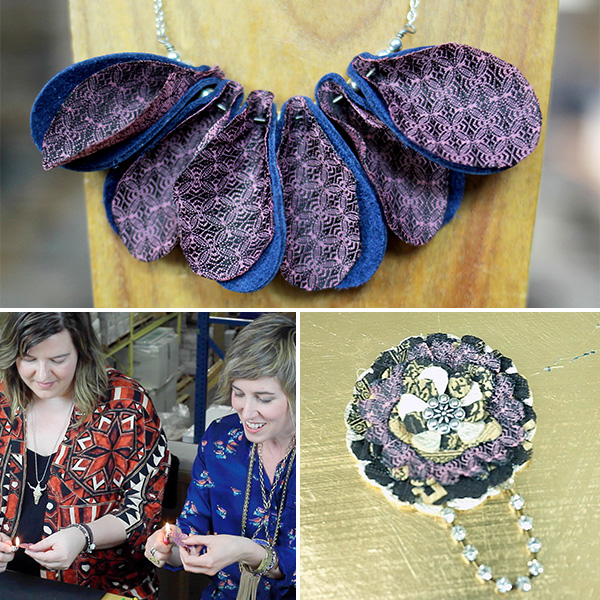
Tory and Candie Cooper are back with another inspiring video, recycling ties into fiber jewelry using the Sizzix Big Shot. Don’t miss out on this trendy DIY.
Layering Sizzix leather and old ties, create trendy fiber jewelry for any casual outfit! How will you use the Sizzix Big Shot Machine.
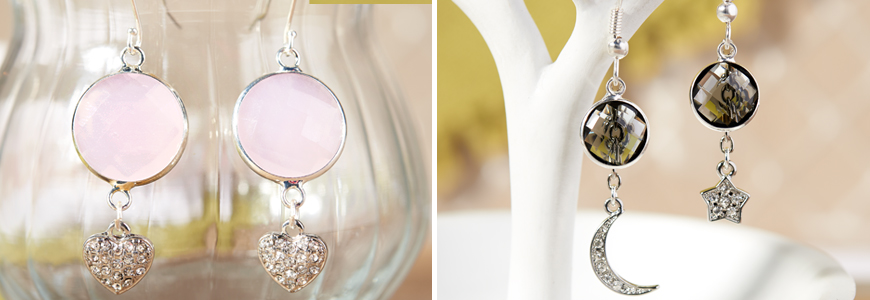
Easy DIY Earrings with Faceted Glass Charms & Links
Learn to make easy DIY earrings with faceted glass charms today! These fabulous earrings projects are the perfect easy DIY for your fast and fun adventures! All you need is a pair of pliers and jump ring opening skills.
Check out our previous post about opening Jump Rings.
The star of these earrings are the faceted glass charms and links. They are sold in gorgeous pastel hues and easy to use.
These pair of earrings uses link findings with Faceted Glass Charms attached with a small jump ring. What a simple idea, don’t you think? The first pair uses the combination of Faceted Glass Charms and Faceted Glass Links, while the second pair is so bubbly cute with Circles Connector and Faceted Glass Charms.
This first stunning pair of earrings uses the Faceted Glass Links with cute heart charms! All you need is to open a jump ring to attach the charm to the faceted glass links.
And we especially LOVE the star and moon combination. Talk about being trendy with asymmetrical earrings! Cut chain to 1/2″ and cut two pieces. Open a jump ring and attach star/moon charm to chain pieces. Open Earwire loop and slide on one end of the chain dangles and a faceted glass charm. Close loop. Repeat to make the second earring.
ImpressArt Texture Stamper Hammer – Video Tutorial
Add texture to your metal stamping jewelry with this Texture Stamper Hammer from ImpressArt. Watch this vendor video and see how simple you can add dimension to your designs!
A perk to ordering the Texture Stamper Hammer (TL00266) is that it comes with the Sprinkle Design Stamp, so you can start using this tool right away when you get it. Plus, with the twist of the handle knob, you can easily switch out different stamps for different designs! The Texture Stamper Hammer is the perfect tool for all skill levels. So start stamping right away!
An easy-to-wear piece of jewelry are cuff bracelets. We have this easy tutorial that will take less than 5 minutes to make and ready to wear. What you will need for this project are:
Wrap the end of the wire to the hoop. Use pliers to make a tighter wrap. Push wrapped coils together.
Pick up an Amethyst rondelle, loop wire towards middle of hoop and wrap two times. Make sure to push the wrapped coils together.
Pick up a Czech bead and repeat.
Repeat steps 3 and 4, going around the hoop earrings.
Make your coils at the end and cut off excess wire. Use pliers to make tighter coil wraps.
Repeat all steps for other earring.
Even Peyote Stitch on Czech Carrier Beads with FREE Patterns
New to GoodyBeads are the oh-so popular Czech Carrier Beads. We have an easy even count peyote stitch pattern to get you started.
Czech Carrier beads are making waves in the DIY jewelry making world. They have two holes and can be used for a stretch bracelet or intricate necklaces! Because they have two holes, they can be easily used in your favorite bead-stitching projects! The typical way to style carrier beads is bead stitching a tube of beads or seed beads to encase the carrier beads. We are using the classic peyote stitch tubes to slide over the carrier beads. Check out this tutorial and pattern ideas below!
Even Count Peyote Stitch
For these patterns, we used an even count peyote stitch pattern and created tubes to side over Czech Carrier beads. Check out this simple illustration below to understand how to do an even count peyote stitch pattern. Don’t forget to PIN this for later!
Even Count Peyote Stitch Tutorial
Peyote Stitch Patterns
We adore these colors! We used four colors to design these 15 different patterns. Make sure to DOWNLOAD PDF of these patterns and a quick tutorial of how to create tubes to add to your Czech carrier beads.
This step is important because this avoids the tubes from sliding off the carrier beads. We would recommend using GS Hypo Cement (A007224). It has a precision applicator, which helps get into small openings and a cap that stops overflowing glue from escaping and drying up. You have two options of when to add your glue.
First option is before you zip up your tube pattern. Apply glue to both sides of the carrier bead and lay it in the middle of your pattern. Fold your pattern around the carrier bead and sew the ends to zip up the tube patter.
Second option is after making your peyote stitch tubes. Complete your tubes and slide carrier bead half way through, still exposing the bead. Run your glue around the exposed area of the bead, let it sit for a second or two and slide the tube over the rest of the carrier bead.
Let it the beads dry completely before using. Make sure to read instructions for more information.
First we cut a 4 feet piece of wire. Fed one end of the wire through a 2′ piece of chain (this will be the extender chain for the necklace) and centered the chain at the middle of the beading wire. Slide on a 2mm crimp tube and using the Magic Crimper (TL00288) crimped the tube into a bead. You can check out our previous blog post HERE about the tool. Next, with both ends, slide on (25) size 4mm ivory miracle bead, (3) size 6mm miracle bead and (3) size 8mm miracle bead. Slide a 6mm miracle bead on each wire thread and slide on first carrier bead. As you can see we added a miracle bead in between each carrier bead. from the top strand, we used size 6mm miracle bead and the bottom used size 8mm miracle bead. This helps the necklace take shape. Reverse the pattern of strung beads to the end and crimp off the end with a lobster claw clasp.
One of our popular project request is our beadable fan earrings with 11/0 Miyuki Delicas and long tassels. Check our video to see how easy they are made.
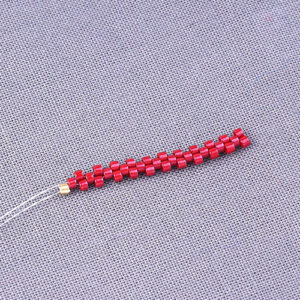
Starting with 2.5′ to 3′ of beading thread, attach a stopper bead leaving a 6″ tail end.
Start from one end of the fan, come up through the bottom hole.
Add your three delicas and go across the beadable opening and down the hole.
Sew up the next hole, add your three delicas, go across the beadable opening and down the hole.
Repeat this until you’ve gone across the beadable fan pendant.
You will now add your pearl bead by sewing up the hole closest to the round opening, add your pearl bead and go across the circle opening and down the hole.
Sew through the pearl bead again and up the hole, through the pearl again and down the hole.
Tie off your ends and cut excess off.
Open small jump ring and slide on tassel and through the middle hole of your fan pendant. Close jump ring.
Open earwire loop and attached top fan pendant loop to earwire. Close loop.
Repeat all steps for other earring.
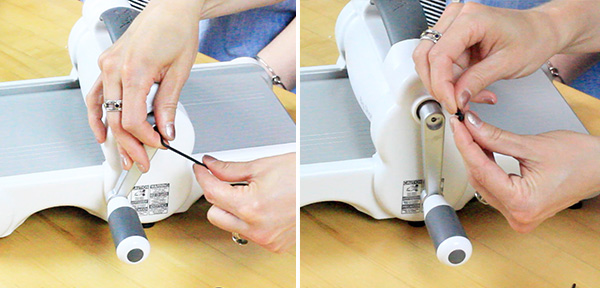
Sizzix Edition: Unbox & Setup Your Machine
Sizzix is new to GoodyBeads and we could not wait to show you videos of Candie Cooper and Tory using Sizzix to customize and design jewelry. Today, we have Tory and Candie demonstrating how to setup the Sizzix Big Shot Jewelry Studio Machine (SZ00049).
You’ll be so excited to just get it out of the box! Order the Sizziz Big Shot Jewelry Studio Machine today and see how easy it is to setup your machine. Plus, Candie will run through what is included in your machine, the platforms and their uses.
Once you have your machine ready to go, you are ready to cut out leather or fabric and make easy dangle earrings, tassels, pendants and so much more!
Artistic Wire® Crimp Tool For Large Wire Crimp Connectors
Watch as Wyatt White from Artistic Wire teaches how to make a cold connection with the Artistic Wire Crimp Tool for Large Wire Crimp Connector and examples of different ways you can create cold connection bracelets/bangles.
Before we get started on the video, here are few important products you will need:
Large Wire Crimp Connectors
These crimps are specially designed for making cold connections with 12, 14, and 16 gauge wires. There are three sizes of crimps with three finishes to choose from.
Artistic Wire Crimp Tool for Large Wire Crimp Connectors TL00310 is a heavier duty tool to crimp larger widths of crimp tubes and for larger gauges of wire. Compared to the original crimpers that has two notches: one to curve the crimp tube and the other to fold it, the Artistic Wire Crimp Tool has only one notch that makes an indent notch to squeeze the crimp tube onto the wire.
Video Tutorial
BeadSmith® Magical Crimping Pliers – Video Tutorial
We love how easy it is to use the Magical Crimping Pliers and how the tool cinches the outer parts of the crimp tube, thus creating what looks like a small 2mm bead. Pick this tool up today! It’ll be your new favorite tool! What you’ll need for this video tutorial:
Artistic Wire® Conetastic Cone Mandrels – Video Tutorial
Artistic Wire shows how easy it is to assemble and make wire cones using the Contastic Inverted Mandrels in this video tutorial. Learn how to use this nifty tool today!
We are inspired to show you this video tutorial from Artistic Wire on how to make wire wrapped cones using the Contastic Cone Mandrel (Item# TL00209). Use to make bead caps, connectors, or as a holiday tree charm like in our previous blog post.
Video Tutorial
We would love to know what you think of the tool and how you use it in your jewelry making.