Beadalon® Spin-N-Bead – Video Tutorial

We have a fun video tutorial with Beadalon’s Spin-N-Bead, Senior and Junior versions, which will make stringing on beads easier and faster!


GoodyBeads | Blog: Beadalon Spin-N-Bead Video Tutorial


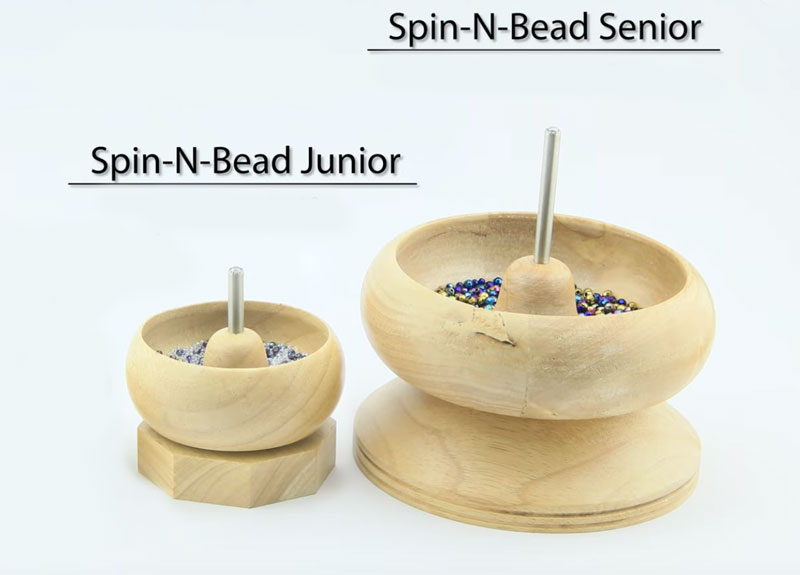
Beadalon Spin-N-Bead Senior

Spin-N-Bead Senior Bead Loader with One Curved Rigid Beading Needle (TL00333). String seed beads and other small beads quickly and easily with the Spin-N-Bead Senior. Because the bowl is bigger you can use larger beads, up to 6mm. The speed at which the beads will load diminishes as the beads get larger. This bead loader makes tedious bead stringing fast and easy. Fill the bowl about half-full of beads, then spin. Insert the curved needle into the spinning beads and watch them jump onto the needle. The beads nest all on their own! Rigid Curved Needle included. You can also buy extra curved needles separately with Z001463.


Beadalon Spin-N-Bead Junior

Beadalon Spin-N-Bead Junior (TL00341) is smaller than the Senior version and makes stringing seed beads, liquid silver beads, or other small beads quick and easy! Fill the bowl about half-full of beads, and then spin. Insert a Curved Big Eye Beading Needle into the spinning beads and watch them jump onto the needle! The beads nest all on their own – when ample beads are on the needle, then move them to the connected stringing material and dip the needle back into the spinning beads to load on another few inches. It’s fun to use and an excellent time saver. You can buy curved needles separately with Z001463.


Video Tutorial


Colorful Straw Earrings

Complete your large statement earrings collection with these Woven Straw Earrings.


What you’ll need:


Marrakesh Straw Earrings

GoodyBeads | Blog - Colorful Straw Earrings with FREE Tutorial

Items using in earrings: Z016792, TC02714 (2),  TC02430, Z011500

Directions:

  1. Using the flat nose pliers, gently pry the crimp end wider so that the straw piece in between.
  2. Slide crimp end over the straw component.
  3. Using nylon pliers, crimp the crimp end over snug over the straw.
  4. Open jump ring and slide on crimp end loop and earring loop. Close jump ring.
  5. Repeat all steps for other earring.


Blues Straw Earrings

GoodyBeads | Blog - Colorful Straw Earrings with FREE Tutorial

Items using in earrings: Z016790, Z011158, Z002858, TC02360 (2)

Directions:

  1. Cut 4″ of leather.
  2. Make a lark’s head knot with the leather through the straw connector. (Make sure to keep ends flushed together when making the knot.)
  3. Slide crimp end over both ends of the leather and crimp it with nylon pliers.
  4. Open earwire loop and slide on crimp end loop. Close loop.
  5. Repeat all steps for other earring.


DIY Hoop Earrings with Round Leather and Agate Pendant

Mix up your jewelry materials by making a pair of earrings by looping 2mm round leather cord and dangle an agate pendant. What you’ll need for earrings:

GoodyBeads | Blog - Leather Hoop and Gem Earrings FREE Tutorial

Directions:

  1. Cut 4 inch piece of leather.
  2. Cut leather ends at an angle.
  3. Glue angled ends together to create a loop. Let it dry for a few minutes.
  4. Open earwire, slide on agate pendant and leather loop; right where the leather ends are glued together. Close earwire.
  5. Repeat all steps for other earring.


Crystal Quartz Drop Earrings with Tutorial

Today’s FREE tutorial is wire wrapping Crystal Quartz points and making simple pair of earrings with them! All you need are a few tools and wire to get your started!

What you’ll need for tutorial:

Crystal Point Tutorial

Here are some earring examples to using your crystal points!

Crystal Hoop Earrings
We took three different graduated points and slid them over the hoop earrings for an easy pair of earrings!

Items used in earrings: CRY3-36PTAW00055, Z011592

GoodyBeads | Blog - Crystal Point Earrings with FREE Tutorial

Crystal Point Drop Earrings

In this example, we chose two points of the same length and dangled one point on either sides of the drop link. And a third point at a longer length at the middle.

Items used in example: CRY3-36PT, AW00055, Y013693, TCZ0077, A002413

GoodyBeads | Blog: Crystal Point Earrings with FREE Tutorial


Swarovski Psychology of Color: Peridot

For September, Swarovski’s Psychology of Colors pick is Peridot. Check out how earthy and natural this hue is!


SW_POC_Newsletter_Peridot


Jump into this color with high spirits and peacefulness! Peridot is a fresh and energetic color that makes you want to just relax and smell the roses! Here are some Swarovski colors to match this earthy hue:

  • Peridot
  • Peridot Shimmer
  • Chartreuse
  • Light Green
  • Iridescent Green
  • Chrysolite Opal
  • Luminous Green


Peridot Jewelry

SW_POC_PeridotProject_Main

Check out our other blog post with designs using Swarovski Peridot and Peridot Shimmer crystals!


DIY Beadable Cuff LInks – Pattern Tutorial

Our selection of beadable accessories are one of our favorite categories to play with. We’re giving you a basic pattern at how to bead stitch a beadable cuff link with Miyuki Delica beads.


What you’ll need for beadable link:


Tutorial

As you can see from the illustration, you will see how to ladder stitch across the channel of the beadable cuff link, while adding 3 Delica seed beads inside the channel. Add different colors and create fun patterns to complete your Cuff Link.

Screen Shot 2019-08-07 at 4.56.54 PM


Make sure to Click and Download the PDF Tutorial Pattern. You will also have a blank template for you to design and color a custom pattern for yourself. Here are some sample patterns you can see in the downloadable pdf also:

GoodyBeads | Blog - FREE Pattern Tutorial for Beadable Cuff Link.


Items used in samples:


Swingin’ Teardrop Earrings

Our simple and sweet tutorial today consists two of our favorite brands: TierraCast and Raven’s Journey. Create this easy pair of earrings today!

What you’ll need for earrings:

GoodyBeads Blog | Swingin' Teardrop Earrings with TierraCast findings and Raven's Journey Czech beads. FREE Tutorial.

Directions:

  1. Slide a teardrop bead onto the headpin and make a simple loop.
  2. Open loop you just made and slide through the under side of the hole loop on the TierraCast Teardrop Frame. Close loop.
  3. Open loop of earwire and slide through the top side of the TierraCast Teardrop Frame. Close loop.
  4. Repeat all steps for other earring.


Gemstone Ripple Necklace

Get lost in this mesmerizing DIY necklace with DakotaStones Gemstone Ladder Pendant set and Adjustable Necklace Sliding Clasp.


What you’ll need to make Gemstone Ripple Necklace:


GoodyBeads Blog | Gemstone Ripple Adjustable Necklace with DakotaStones Ladder Pendant Set

Directions:

  1. Cut necklace memory wire at 1/3″ of a coil with Memory Wire Shears.
  2. With Memory Wire Finishing Pliers, curl one end of your memory wire inwards, towards curve of your memory wire to make a simple loop.
  3. Slide on the sequence of your gemstone ladder set.
  4. Make another simple loop to the other end of your memory wire.
  5. Center gemstone set in the middle of the memory wire.
  6. With the 20 Gauge Artistic Wire, wrap 4 coils around the memory wire, on each end of the pendant set. Cut excess wire.
  7. Use crimping pliers to crimp the coils in Step 6 to keep coils and pendant set in place.
  8. Open jump ring on necklace sliding clasp and slide through one loop of memory wire. Close jump ring. Repeat to other jump ring and other memory wire loop.


Design necklace with these other 11 Piece Gemstone Ladder Pendant Sets


GoodyBeads | Blog - 3 Ways to making DIY necklaces with Gemstone Pendant Sets

Pendant Set Item Numbers: LAPLGIM15-38-LAD-PENPPLBRZ15-38-LAD-PENRCJ15-38-LAD-PENORIM15-38-LAD-PENLAPBRZ15-38-LAD-PENTQSBRZ15-38-LAD-PENMLTPYR15-38-LAD-PENPKBL15-38-LAD-PENMGI-FAN-PEN-11


Adjustable Fiber Bracelet

Fiber jewelry is a trend that keeps coming back in style. Check out this easy tutorial for making a simple adjustable bracelet with out Fabric Adjustable Bracelet Sliding Clasp with Tassels.


What you’ll need for this bracelet:


GoodyBeads Blog | Fiber bracelet with Adjustable bracelet sliding clasp and TierraCast Link.

TIP: If you find that your fiber bracelet or tassel has a kink, wet your fingers and run your fingers along the tassel or bracelet. Let it dampen and dry to straighten out its shape.


Directions:

  1. Use nylon bending pliers to bend a curve in the Amor link.
  2. Open a jump ring on the adjustable sliding clasp and feed it through one of the holes on the Amor link. Close jump ring.
  3. Repeat Step 2 to other jump ring.


Flat Memory Wire and Gemstone Bracelet – Video Tutorial

Candie Cooper came by the GoodyBeads Mezzanine to show us how to make an easy DIY wrap bracelet with flat memory wire and gemstone beads. Watch the video today!


GoodyBeads Blog: Flat Memory Wire and Gemstone Bracelet Video Tutorial

After the Spring Twin Cities Bead Bazaar, Candie stopped by to demonstrate how to make a classy and chic bracelet using 4mm faceted coin gemstone beads, wire wrapped around flat memory wire.


What you’ll need:


Video Tutorial


Leather Wrap Bracelet with Matubo Beads – Video Tutorial

We’ll show you how to make a leather wrap bracelet by fishtail braiding leather with new 2/0 Czech Matubo Beads.


For this bracelet tutorial, you’ll need:


Determine Length of 1.5mm Leather needed for a wrap bracelet

Use this method to determine the leather cord length you may need for a multi-wrap bracelet.

Take your wrist length and double the length. Multiply that by the number of wraps you want and then add 12”. That will give you an approximate cord length you will need to start your bracelet. (The extra 12” factors in the beads and leather you’ll be adding along with loop end.)

Example:

2 wraps for an 8.5” bracelet: (8.5” x2) x 2 wraps = 34 + 12 = 46” needed.

Or

4 wraps for a 7.5” bracelet: (7.5” x2) x 4 wraps = 60 + 12 = 72” needed.

Keep in mind, these total numbers are approximate. You will want to test the wrap length while you’re making your bracelet. Having extra length is better than being short on your wrapped length goal.


Video Tutorial

Leather bracelet tutorial begins at 15:00 mark.


Beadalon Knot-a-Bead Tool – Video Tutorial

Candie Cooper is back with Tory to show how easy it is to use the Beadalon Knot-A-Bead tool. Check out today’s video tutorial to knotting your own creating today!


GoodyBeads Blog | Beadalon Knot-a-Bead Tool Video Tutorial

Making knotted jewelry is a delicate skill that can be done with chain nose pliers, awl or tweezers. But with the Beadalon Knot-A-Bead tool, you can easily make quick and easy knots. Here is what you’ll need to get you started:


Video Tutorial


Instructions

  1. Make a loop with the end of your beading thread and make an over hand knot. This will create a loop for your necklace later.
  2. Slide on the silk cord, all the beads you’ll be knotting. It is helpful to layout your design ahead of time to determine your sequence.
  3. Slide a bead down to your first knot. Take thread and wrap it over the metal dowel/awl, and then under.
  4. Tie a knot and pull the silk cord upwards to cinch the knot together.
  5. Take the beaded portion and push it to the back to get it out of the way.
  6. Slide knot over to the right and hook thread under the yoke and pulling downwards and across to tighten the knot. There is a button lever on the left side. Push that to release the knot and thread.
  7. Slide over next bead and repeat.
  8. Once you’ve made a knot in between all your beads, repeat step 1 to other end of knotted beads to create a loop.
  9. Cut excess thread.
  10. Open a jump ring, slide through beading thread loop and a 6″-8″ chain end. Close jump ring.
  11. Repeat steps 10 to other end of knotted beads.
  12. Add your clasp to one end of your chain piece with a jump ring and your necklace is complete!


Along with the Beadalon Knot-a-Bead, you will get instructions on how to easily use the tool:

Beadalon Knot a Bead Tool Instructions


Sizzix Framelits And Embossing – Video Tutorial

Get your Sizzix Big Shot out and learn how to use Framelits Die and Embossing in this video segment with Candie Cooper and Tory Vezina!


GoodyBeads Blog | Sizzix How to Use Framelits and Embossing Folders Video Tutorial


Today’s blog post will feature Sizzix Framelits and Embossing Folders. Use Framelits to cut fun shapes to display your earrings or even use it for your scrapbooking needs. And use Embossing Folders to add a 3D texture to paper, fabric or even thin copper/metal pieces.


Embossing Folders

The first important rule when using Embossing Folders with the Sizzix Big Shot is the Extended Platform (SZ00053).

GoodyBeads Blog | Sizzix How to Use Framelits and Embossing Folders Video Tutorial

You will need the Extended Platform, which is included with Sizzix Big Shot Machine; to place your Embossing folder on to run it through the Sizzix Big Shot, instead of using the Movers and Shaper platform you would usually use to place your Dies on. There will be a visual on the Platform on how to use it with your Big Shot.


The Process to running the Embossing Folder through your Big Shot is to place the Extended Platform down, put your paper or thin piece of metal inside your Embossing Folder, put the Embossing folder on the Extended Platform and place the Cutting Pad on top. Run the whole thing through the machine and you will get a textured piece of paper or thin metal!


Make sure to check out these fun Embossing Folders to creating your own designs:

GoodyBeads Blog | Sizzix How to Use Framelits and Embossing Folders Video Tutorial

Embossing folders: SZ00075, SZ00074, SZ00073, SZ00072, SZ00070, SZ00071


Sizzix Framelits

The next important rule to cutting shapes using Framelits is the Extended Thin Die Adapter you will need to accompany the Extended Platform in using Framelit Dies (SZ00046 & SZ00048).

GoodyBeads Blog | Sizzix How to Use Framelits and Embossing Folders Video Tutorial


Framelits are dies with intricate and detailed designs best used with paper, fabric or thin pieces of metal or copper. Do not use Framelits with thick pieces of leather.


The process in running the Framelit Dies through the Big Shot is to place the Extended Platform down, then place the Extended Thin Die Adapter on top, followed by a Cutting Pad, Framelit with the form side facing up, your piece of paper and another Cutting Pad. Run all parts through the Big Shot for an intricate cut out piece of paper!


Video Tutorial

Candie and Tory will show you how easy it is using the Framelits Dies and Embossing Folders in this video tutorial!


BeadSmith® Endless Loom with Downloadable Tutorials

The Endless Loom from BeadSmith, designed by Deb Moffett-Hall, is a versatile tool to help create elastic band bracelets and even leather wrap bracelets. Read through to download step-by-step instructions to help you get started!


Check out our previous Endless Loom blog post to watch an introductory video.

Groovy 6 Stretch or Clasp Style Bracelet

Elastic_EndlessLoom

Download Stretch Bracelet Tutorial HERE.

This first tutorial uses 0.5mm Elastic to wrap around the Endless Loom. You can also have the option to add a Tube Magnetic Clasp (Y004709/Y003008/Y004707) to your bracelet.


Leather Wrap Bracelet

LeatherWrap_EndlessLoom

Download Leather Wrap Bracelet Tutorial HERE.

Even try out making a leather wrap bracelet using the Endless Loom. Coiling leather strands around the Endless Loom will help tame your cords and help you stitch even and straight rows. Check out the tutorial for easy tip and tricks to get your leather wrap bracelets started!


(Tutorial courtesy of BeadSmith and Deb Moffett-Hall)


Easy Sizzix Cuff Bracelet – Video Tutorial

Continuing from our Vintaj painted on Sizzix Leather blog/video, learn how to take your painted leather and make an easy cuff bracelet using Sizzix Cuff Dies and TierraCast buttons.


GoodyBeads Blog: Patina Leather and Sizzix Cuff Video Tutorial

Candie Copper is Back! She has tips and tricks for making a super simple leather cuff bracelet using the Cuff Dies and Button Hole Dies.


What you’ll need to make your cuff:


Video Tutorial


GoodyBeads Sizzix Leather with Vintaj Patina Cuff Tutorial