Swarovski® Create Your Own Style: Trio of Opulent Earrings

Our blog post today consists of three projects in one, using some of Swarovski’s newest pearl shapes! We are really loving these new shapes because they look organic with fun depths to them. Here are three pair of earrings pair the new pearls with some fitting TierraCast components.
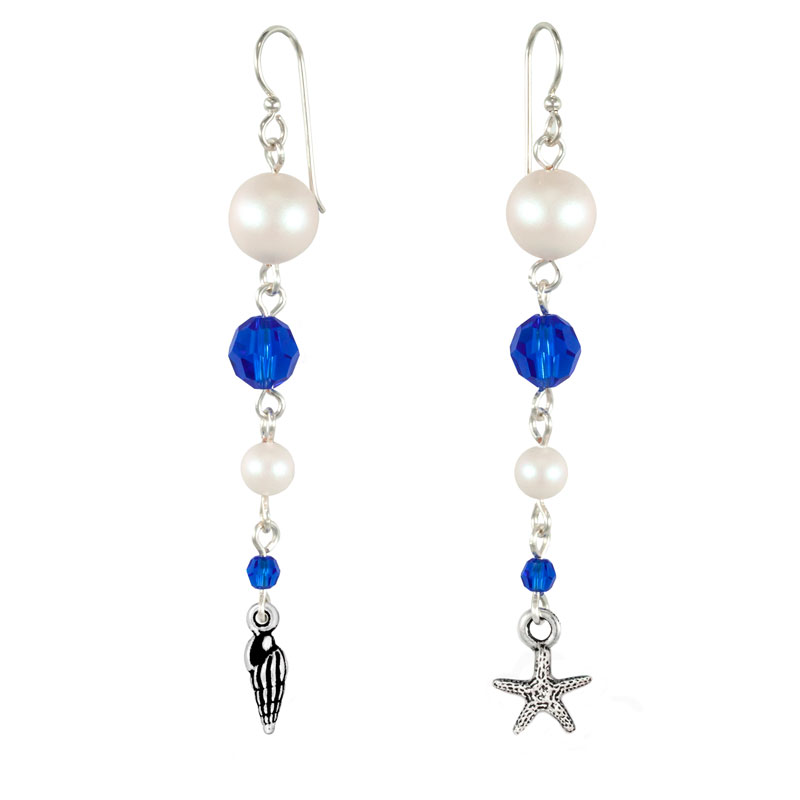
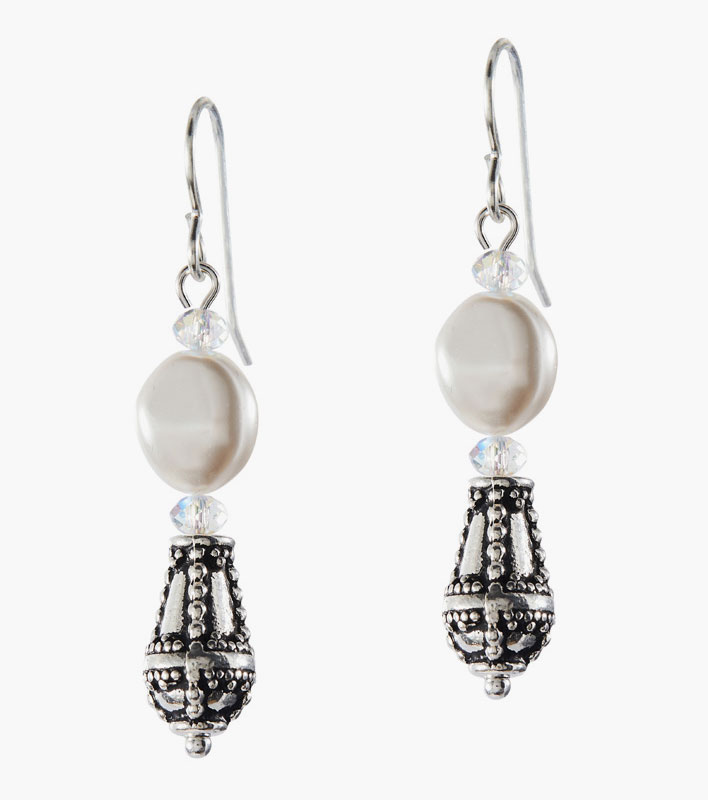
Opulent Earrings #1

Items used in earrings: SW02568 (2), SW01454 (4), TC02572 (2), TC02568 & A019612.

Directions:

  1. Open eyepin loop, slide on TierraCast charm and close loop.
  2. Slide the following on the eyepin and make a simple loop:
    crystal, pearl and crystal.
  3. Open dangle loop and slide on earwire loop and close loop.
  4. Repeat all steps for other earring.

Opulent Earrings #2

Items used in earrings: SW02579 (2), SW01454 (4), TC02576 (2), TC02297 & A019697.

Directions:

  1. Slide the following on to the headpin and make a simple loop:
    Opulent bead, crystal, pearl and crystal.
  2. Open ear wire loop, slide on pearl dangle and close loop.
  3. Repeat all steps for other earring.

Opulent Earrings #3

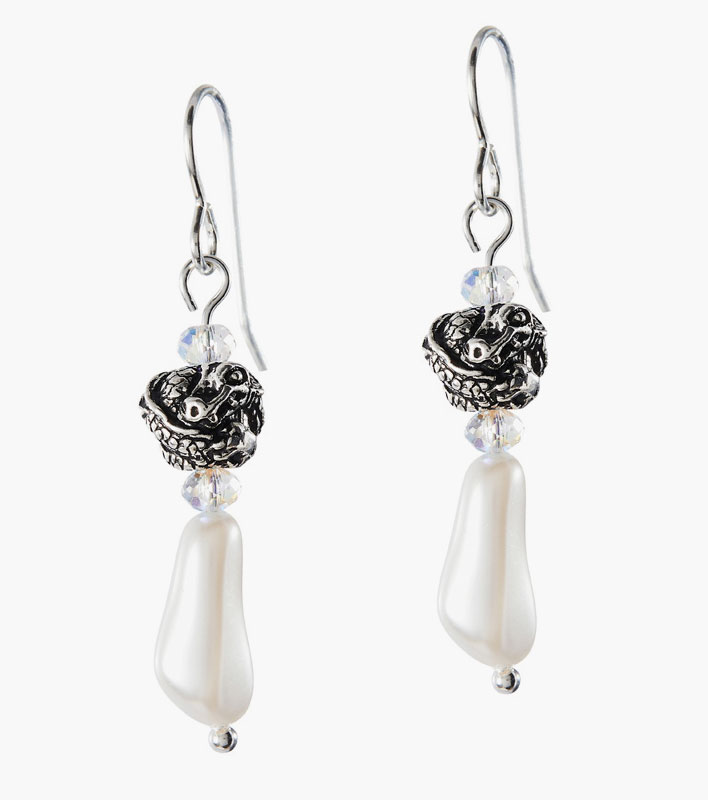
Items used in earrings: SW02604 (2), SW01454 (4), TC02562 (2), TC02297 & A019697.

Directions:

  1. Slide the following on the headpin and make a simple loop:
    Pearl, crystal, dragon bead and crystal.
  2. Open ear wire loop, slide on pearl dangle and close loop.
  3. Repeat all steps for other earring.


DIY Jewelry with Swarovski® Around the World: Africa

This month’s trip is Africa. Find out how beautifully wild this continent is from its earthy tones and bright bold colors. Plus, check out the hues Swarovski suggests to inspire your Africa trip along with a DIY jewelry project for you to try.

Africa

The canvas upon which this continent’s epic story is written is not only beautiful but astonishing. Whether heading out at dawn on a safari game drive following millions of wildebeest on their Great Migration or soaring high in a hot-air balloon to embrace the Serengeti, Africa creates the wildlife encounter of a lifetime. Wherever you find yourself on this big, beautiful continent, you will be touched by the wild lands, rich traditions, artisan craftsmanship and natural beauty – all of which these pieces pay tribute to.

Africa – Swarovski Crystal Colors

  • Tangerine
  • Fern Green
  • Light Siam

African Inspired DIY Jewelry

Our pair of earrings embraces the vibrant colors! It also incorporates Black Kamagong Wood Beads, which breaks up the rich colors and gives it a more organic design, as well as an earthy aspect.

What you’ll need for earrings:

  • (2) SW00969 – 4mm Tangerine Bicone Crystal
  • (2) SW00968 – 8mm Tangerine Round Crystal
  • (2) SW02092 – 4mm Light Siam Shimmer Bicone Crystal
  • (2) SW02497 – 9mm Light Siam Pear Cut Pendant
  • (2) SW00134 – 6mm Light Siam Bicone Crystal
  • (4) SW00370 – 4mm Fern Green Bicone Crystal
  • (2) TC02452 – 15x19mm Antique Gold Ethnic Fan Link by TierraCast
  • (2) TC02816 – 15mm Bright Gold Hammertone Dagger Bead
  • WD-BKG4RD – 4mm Black Kamagong Wood Round Beads\
  • Z013671 – 10mm White Fabric Tassel with Gold Cap
  • A019617 – 2 Inch Gold plated Eyepins
  • A008801 – 5mm Gold Plated Oval Jump Rings
  • A011517 – 4mm Gold Plated Round Jump Ring
  • A014108 – Gold Plated French Wire Earrings
  • SB00423 – 11/0 Galvanized Gold Seed Bead
    OR SB00269 – 11/0 Galvanized Gold Delica Seed Bead

Directions:

  1. Open oval jump ring, slide on light siam pendant and eyepin loop. Close jump ring.
  2. On eyepin from step 1, slide on the following and make a simple loop:
    seed bead, 4mm fern green bicone, seed bead, wood bead, seed bead, wood bead, seed bead, 4mm tangerine bicone and seed bead.
  3. Open another eyepin loop and slide through loop you made in step 2. Close loop.
  4. On eyepin, slide on a seed bead, 4mm light siam bicone and seed bead. Make a simple loop. Open loop and slide through first hole of ethnic link and close loop.
  5. On another eyepin, slide on the following:
    seed bead, wood bead, seed bead, 8mm tangerine round bead, seed bead, wood bead, seed bead.
  6. Make a simple loop about 4-5 in diameter, or large enough to slide on TierraCast dagger bead. Open loop and slide on TierraCast dagger bead.
  7. Open another eyepin loop, slide on eyepin loop of previous dangle and close loop. On this eyepin, slide on a seed bead, wood bead, seed bead, 4mm fern green bicone and seed bead. Make a simple loop. Open loop and slide through middle hole of ethnic link and close loop.
  8. Open 4mm round jump ring, slide on tassel and loop of another eyepin. Close jump ring.
  9. On eyepin, slide on the following and make a simple loop:
    seed bead, wood bead, seed bead, 6mm light siam bicone, seed bead, wood bead and seed bead.
  10. Open another eyepin loop and slide on loop you made in step 9. Close loop. Slide the eyepin a seed bead, wood bead and seed bead, and make a simple loop. Open loop and slide last hole of ethnic link. Close loop.
  11. Open earwire loop and slide through top of ethnic link and close loop.
  12. Repeat all steps for other


DIY By The Sea Earrings with Swarovski crystals & pearls

You can hear crashing waves when you wear these By the Sea Earrings. Ok, you might not hear them, but you will definitely want to wear these earrings to your next seaside adventure. It features the brilliant hue of Swarovski® Majestic Blue crystals and the luminescent sheen from the crystal pearls.

What you’ll need to make earrings:

  • TC00113 – 14mm Small Spindle Shell Charm by TierraCast
  • TC02680 – 13mm Tiny Seastar Charm by TierraCast
  • (2) SW01448 – 10mm Crystal Pearlescent White Swarovski Pearl
  • (2) SW01446 – 6mm Crystal Pearlescent White Swarovski Pearl
  • (2) SW01723 – Swarovski® 4mm Majestic Blue Round Crystal
  • (2) SW01725 – Swarovski® 8mm Majestic Blue Round Crystal
  • TCZ0077 – Sterling Silver Earring Wire by Tierracast
  • A019629 – 1 Inch Silver Plated 20 Gauge Eyepin

GoodyBeads Blog | By the Sea DIY Earrings FREE Tutorial

Directions:

  1. Open eyepin loop, slide on a charm and close loop. Slide a 4mm Majestic Blue crystal on the eyepin and make a simple loop.
  2. Open another eyepin loop, slide on loop you made in step 1 and close loop. Slide a 6mm Crystal Pearlescent on eyepin and make a simple loop.
  3. Open another eyepin loop, slide on loop you made in step 2 and close loop. Slide an 8mm Majestic Blue crystal on the eyepin and make simple loop.
  4. Open another eyepin loop slide on loop you made in step 3 and close loop. Slide a 10mm Crystal Pearlescent on eyepin and make a simple loop.
  5. Open earwire loop and slide on loop you made in step 4. Close loop.
  6. Repeat all steps for other earring.


DIY Angelic Crystal Dangle with TierraCast Findings

We’re making an angelic dangle today. You can make two and use them to dangle as earrings or add them to keychain, bookmarks or beadable gifts.

What you’ll need for an angelic dangle:

GoodyBeads Blog | DIY Angelic Dangle

Directions:

  1. Slide on 8mm crystal, bead cap, angel wings, 6mm crystal and rhinestone rondelle. Make a simple loop.
  2. Attach to an Beadable Gift or make two for some earring dangles.


DIY Criss Cross Leather Bracelet

We have a cute DIY for you today and it involves one of our favorite products, leather cord! We’re making an easy DIY leather bracelet with 2mm and 1mm leather cord to braid and make a criss cross design with flat ring links.

Here is what you’ll need:

GoodyBeads Blog | DIY Criss Cross Leather Bracelet with FREE tutorial.

Directions:

  1. Slide button onto the middle of a 30 Inch piece of 2mm leather and tie an overhand knot about ¾ of an inch from the button.
  2. Do 7 macramé square knots starting right up against the overhand knot with 50 inches of 1mm leather cord.
  3. Slide on a ring.  In front of the ring cross the left piece of the 1mm over the 2 strands of 2mm cord and then cross the right piece over the left piece.
  4. Take the ends of your 2 cords of 2mm leather and bend them back over the crisscrossed strands and go back thru the ring. Tighten, adjust and straighten your strands.
  5. Repeat steps 3 and 4, 8 more times. Adjust number of rings to make bracelet larger or smaller.
  6. After last ring do 7 macramé square knots.
  7. With all 4 pieces of cord make an overhand knot where the macramé ends. Trim ends of the 1mm cord
  8. Place another overhand knot using just the 2mm cords about one inch from first to create your button hole clasp.

Video Tutorial

You can view a similar version of this bracelet on our previous Facebook LIVE video HERE.


Charm Bracelet with Paperclip Chain and Adjustable Sliding Clasp

Hashing out our love for our newer paperclip chain, we’ve make a simple bracelet with dainty charms and adjustable with a sliding clasp.

What you’ll need:

GoodyBeads Blog - Paperclip Charm Bracelet FREE Tutorial

Directions:

  1. Cut paper clip to chain to consist of 15 links (6 inches).
  2. Open ring on star charm, slide through middle chain link and close ring.
  3. Open jump ring, slide through link two links right from the middle link and slide on moon charm. Close jump ring.
  4. Open jump ring, slide through link two from the left side of the middle link and slide on heart charm. Close jump ring.
  5. Open jump ring from sliding clasp and attach to either ends of the paper clip chain. Close jump ring. Repeat on other end. NOTE: If adjustable clasp is too long, trim chain on each side 1-2 inches.


DIY Gemstone Donut & Deerskin Necklace

Today’s DIY Gemstone Donut and Deerskin Necklace features three of our favorite brands. Dakota Stones gemstone donuts, LeatherCord USA deerskin lace and TierraCast barrel bead.

Items used in necklace:

GoodyBeads - DIY Gemstone Donut and Deerskin Lace Necklace

GoodyBeads - DIY Gemstone Donut and Deerskin Lace Necklace

Directions:

  1. Cut deerskin lace in half (if you’re using the 2 meter product item) or cut 3.5 feet of lace.
  2. Fold lace in half and slide through gemstone donut and make a lark’s head knot. Make sure the front side of the lace is facing outwards and evening out your lace ends.
  3. Slide barrel beads through both lace ends and slide to sit on top of lark’s head knot.
  4. Make an overhand knot to both of your lace end to complete your necklace.


Tassel Earrings with TierraCast® Findings and Miyuki Seed Beads

Our tutorial today features some trendy tassel earrings made with seed beads. You may recall our previous blog post on Beaded Tassel Tutorial. Today’s project will use that tutorial along with multiple colors of seed beads and beautiful TierraCast pieces.

What you’ll need:

  • Size 11/0 seed beads. We used 3 different colors in our sample:
    • SB00423, which will pair with the gold TierraCast finding. You can also use SB00422 and silver TierraCast finding.
    • Cream color: SB00444
    • Color seed bead: SB00447 You can also swap this color!

GoodyBeads.com Blog | Tassel Earrings with TierraCast® Findings and Miyuki Seed Beads with FREE Pattern Tutorial

Directions (Refer to Beaded Tassel Tutorial for example visuals):

  1. Make a wrapped loop to a 3 inch piece of wire. OR if you’re using an eyepin, coil the eyepin loop.
  2. Starting with 4 feet of thread, create a stopper bead on your thread leaving a 4-6 inch tail.
  3. Sew through the wire loop.
  4. Pick up the following bead sequence
    1. 20 cream seed bead
    2. Wine bead, cream bead, 2 wine bead, cream bead, 3 wine bead, cream bead
    3. 10 wine bead
    4. gold bead, wine bead, 2 gold bead, wine bead, 3 gold bead, wine bead
    5. 8 gold bead.
  5. Skip the last bead and sew back up through all the beads you’ve sewn and through wire loop. Don’t pull to hard, you want your fringe to hang loose.
  6. Repeat step 4 and 5 another 7 more times for a total of 8 tassel fringes.
  7. Tie thread ends together, securing it with a small dot of Super New Glue.
  8. Slide wire through cone and pick up 4mm round bead (pearl) and cream seed bead. Make a simple or wrapped loop.
  9. Open earwire and add tassel dangle.
  10. Repeat all steps for other earring.


Cymbal Koutalas DIY Chevron Jewelry

Some of our newest products are Cymbal Components, which pairs with Chevron Duo and Ginko beads. We have two awesome patterns using Czech Chevron Duos and the Cymbal Koutalas.

Chevron Spike Bracelet

Items used in bracelet: Z013806, SB00422, Z010306, SW01711 (3), Z011500, X003062, A021633, Z001124, TC01897 (4).

Make sure to follow our LINK to download the FREE tutorial for this bracelet.

This bracelet used stretch cord, which makes it to easy make and wear. It also uses some blingy Swarovski Hexagon, two-hole spike crystal beads, which breaks up the chevrons and adds a focal section!

Chevron Spike Earrings

Items used in earrings: Z013812, SB00423, Z010306, TC02816 (2), A014108, A006585 & A015211.

Still using the same Cymbal ending, we’ve made a this pair of earrings with Chevron beads and TierraCast dagger bead from the Hammertone Collection, all using gold findings.

Get FREE PDF tutorial HERE to make your own pair of earrings!


DIY Spike Drop Earrings

We’re showing you how easy bead-stitching can be with these Spike Drop Earrings. It uses two-hole Swarovski® spike crystal beads, Cymbal components, seed beads and TierraCast® Hammertone Dagger Bead.

What you’ll need for earrings:

GoodyBeads Blog | FREE Tutorial - DIY Spike Drop Earrings with free pattern tutorial.

Directions: (Similar to Honeycomb Tassel Drop Earrings Tutorial)

  1. With 2 feet of thread, pick up a seed bead, cymbal, seed bead, 1st spike bead, seed bead, 2nd spike bead, seed bead, 3rd spike bead, seed bead, dagger bead, seed bead. (Make sure to be sewing through the correct hole of spike beads)
  2. Sew up through the second hole of the 3rd spike bead, pick up a seed bead, through the second hole of the 2nd spike bead, pick up a seed bead and through the second hole of the 1st spike bead.
  3. Tie both ends together to bring your looped pattern together. (You can see something similar to the Honeycomb Tassel Drop PDF tutorial, as you’re substituting a few beads in the pattern.)
  4. Sew through a few beads before cutting thread ends off.
  5. Open earwire loop and slide on cymbal component. Close loop.
  6. Repeat all steps for other earring.


DIY Enamel and Faceted Glass Earrings

One thing we love about making jewelry is creating length and layers by linking connectors and dangles. When it comes to our Enamel Chevron and Faceted Glass Earrings, designed by Heidi, she did just that! She used enamel and faceted connectors with gold findings!

Here is what you’ll need for earrings:

  • 18mm White Mix Enamel Gold Plated Round Zigzag Connector – Z016108 (2)
  • 16mm Round Gold Plated Aqua Faceted Glass Connector – A021761 (2)
  • 10mm Round Clear Faceted Glass Charm with Gold Plating – A021745 (2)
  • 9mm Bright Gold Round Hammertone Post by Tierracast – TC02765
  • 3mm Gold Jump Rings – Z007861

Directions:

  1. Open jump ring with two pliers, slide on glass dangle and one loop of faceted glass connector. Close jump ring.
  2. Open another jump ring, slide on other loop of faceted glass connector and one loop of enamel connector. Close jump ring.
  3. Open another jump ring, slide on other loop of enamel connector and post ear wire loop. Close jump ring.
  4. Repeat all steps for other earring.


DIY Wrap Bracelet with Czech Fire Polish Beads

One of our favorite diy projects are making wrap bracelets. Using 1mm or 2mm leather cord, make wrap bracelets using all types of beads!

Today’s project is a version from our previous blog post on GoodyBeads Master Mixes with Swarovski® bicone crystals. Check out the blog post for a step-by-step look at how we sew on bicone crystals and seed beads. We will use this same method on this DIY wrap bracelet with Czech fire polish beads. Also, before you get started you will want to read the How to Make Leather Wrap Bracelets to help determine the length of leather cord you will need for your wrap bracelet.

Now that you’ve gotten those tips and tricks down, here is what you’ll need for this wrap bracelet:

  • TierraCast Button – item used in bracelet TC00900
  • 1.5mm Leather Cord – item used in bracelet Z019143
    Note: You can also use 1mm, 1.3mm and 2mm leather cord. The best use for small leather cord like 1mm-1.5mm is if you are using small beads like seed beads or sizes under 4 or 5mm in diameter. If you plan to use larger beads like 6mm or 8mm, using 2mm leather cord works best.
  • 11/0 Seed Beads – item used in bracelet SB00423
    Note: For smaller beads, use size 11/0 seed beads in the pattern. If using larger beads, you can use 8/0 or even size 6/0 seed beads.
  • 3mm Czech Fire Polish Beads – item used in bracelet A008815 (Qty 3 strands)
    Note: We used about 140 beads for our double wrap bracelet, which is a quantity of 3 Czech fire polish bead strands. You will need more for more wraps in your bracelet.
  • Beading NeedleA015211
  • Crystal Fireline (4lb)A006585

Goodybeads Blog - FREE tutorial for wrap leather bracelet with Czech fire polish beads.

Directions: (You can follow Master Mix Bracelet for tutorial visuals)

  1. Cut leather to length according to how many wraps you want. For a double wrap, we start out with 42 inches for a 7 inch bracelet.
  2. Slide leather through button hole, situating the button in the center, fold leather in half and make an overhand knot close enough to the button.
  3. With 4 feet of beading thread, tie the end of your beading thread to one piece of leather to harness your thread.
  4. Ladder stitch a seed bead in between the two leather cords.
  5. Ladder stitch two seed beads in between the two leather cords.
  6. Pick up a seed bead and Czech bead. Sew both in between both leather cords.
  7. Pick up a Czech bead and then a seed bead. Sew both between both leather cords.
  8. Repeat Steps 6 and 7 until you’ve reach a suitable length for wrist size.
  9. Tie off your beading thread and cut off excess.
  10. Take both ends of your leather cords and make an overhand knot, close enough to last beads you’ve stitched on.
  11. Make another overhand knot about 15mm to 20mm apart, or wide enough for your button to slide through.
    Optional: Make another overhand knot for an extended length if needed.
  12. Cut excess leather cord.


DIY Leather Hoop and Silver Teardrop Earrings

In today’s DIY, make a leather hoop and silver teardrop earrings using leather cord and TierraCast’s new Hammertone collection. Here is what you’ll need:

  • 2mm leather cord – item used in earrings A022076
  • 1mm leather cord – item used in earrings Z015514/A022070
  • TierraCast earring post – TC02764
  • Clear Earring Back – TC01208 (2)
  • TierraCast End Cap – TC02800 (2)
  • TierraCast Teardrop – TC02777 (2)
  • 5mm Oval jump ring – Z004093
  • 5mm TierraCast Nugget Spacer – TC02639 (6)

Directions:

  1. Cut a 4 inch piece of 2mm round leather and a 1 inch piece of 1mm round leather.
  2. Add 3 nugget beads to the 2mm round leather.
  3. String the teardrop charm onto the 1mm leather.
  4. Insert one end of the 2mm leather, the 2 ends of the 1mm leather and the other end of the 2mm leather into the crimp end.
  5. Check the length of the tear drop charm and 2mm leather, trim to desired lengths if needed.
  6. Then use a flat nose pliers to crimp the crimp end. Squeeze both sides.
  7. Open 5mm oval jump ring, add earring post and loop on crimp end.
  8. Close jump ring.
  9. Repeat all steps for other earring


Swarovski® Indian Pink Jewelry Tutorials

We’ve got TWO easy projects using February’s Swarovski Psychology of Color: Light Peach. Design jewelry with this passionate hue!

Indian Pink Gold Bracelet

GoodyBeads - DIY Adjustable bracelet with Swarovski Indian Pink Crystals. FREE Tutorial.

Items used in bracelet: SW00246, SW00233 (2), SW00232 (4), WR00126, Z011893 OR Z012152.

Directions:

  1. Cut a half coil of memory wire with memory wire cutters.
  2. Wrap a loop or coil one end of the memory wire with memory wire finishing pliers. Slide on the memory wire: TWO 4mm crystal, 6mm crystal, 8mm crystal, 6mm crystal and TWO 4mm crystal. Cut memory wire end, leaving 3/4 inch end. Coil or make a simple loop to that end with memory wire finishing pliers.
    (NOTE: You can substitute 20-gauge gold-colored wire for the memory wire in Steps 1 and 2.)
  3. Open a jump ring from adjustable bracelet and slide on one end of crystal link. Close jump ring.
  4. Repeat to other end of link and adjustable bracelet.

Pink Bali Tassel Earrings

GoodyBeads - DIY Earrings with Swarovski Indian Pink Crystals. FREE Tutorial.

Items used in earrings: SW00246 (2), SW00233 (2), A002413, A003563, SB00422, A019612, Z013681 & A021468.

Directions:

  1. Open jump ring and slide on tassel and eyepin loop. Close jump ring.
  2. Slide the following onto the eyepin and make a simple loop:
    seed bead, 8mm crystal, bali spacer, 6mm crystal and seed bead.
  3. Open crystal dangle loop and slide through an other ring of the flower spacer bead. Close loop.
  4. Open earwire loop and slide on ring opposite of where you added your crystal dangle. Close loop.
  5. Repeat all steps for other earring.


Golden Oasis Bracelet – Pattern Tutorial

We have a NEW pattern for you using some of TierraCast’s Oasis Stitch-In Two-Sided Link in their recent Finishing Touches launch, Czech Honeycomb, Czech DiamonDuo, seed beads and 4mm crystals from Swarovski®.

What you’ll need for tutorial:

Here is a list of what we used in bracelet sample: TC02703 (2), TC00378, SB00423, SB03301, Z013596, SW00808 (28), Z011522, A006587, A015211 & A008658.