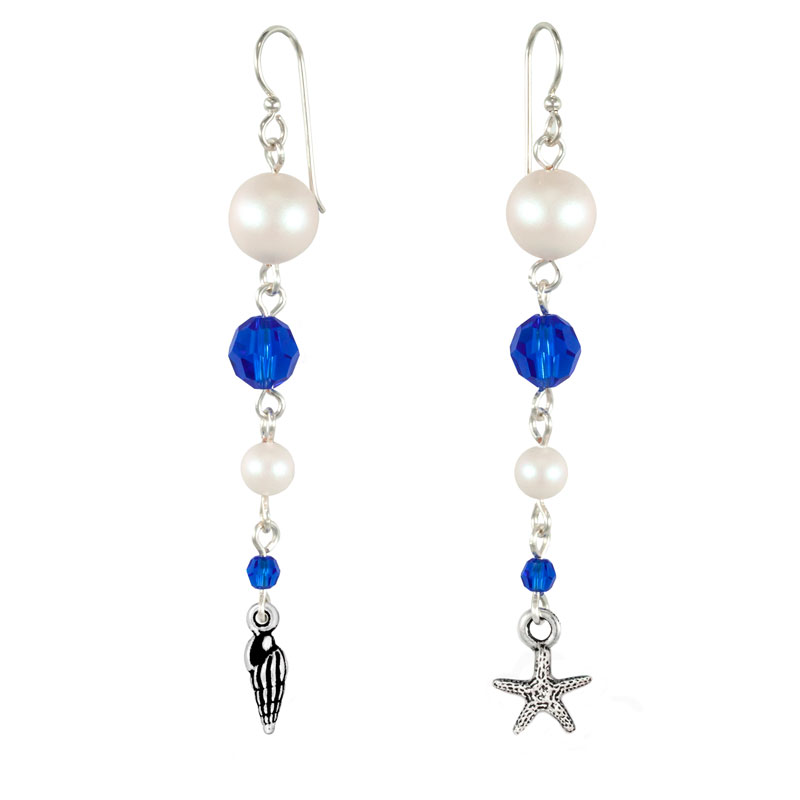
DIY By The Sea Earrings with Swarovski crystals & pearls

You can hear crashing waves when you wear these By the Sea Earrings. Ok, you might not hear them, but you will definitely want to wear these earrings to your next seaside adventure. It features the brilliant hue of Swarovski® Majestic Blue crystals and the luminescent sheen from the crystal pearls.

What you’ll need to make earrings:

  • TC00113 – 14mm Small Spindle Shell Charm by TierraCast
  • TC02680 – 13mm Tiny Seastar Charm by TierraCast
  • (2) SW01448 – 10mm Crystal Pearlescent White Swarovski Pearl
  • (2) SW01446 – 6mm Crystal Pearlescent White Swarovski Pearl
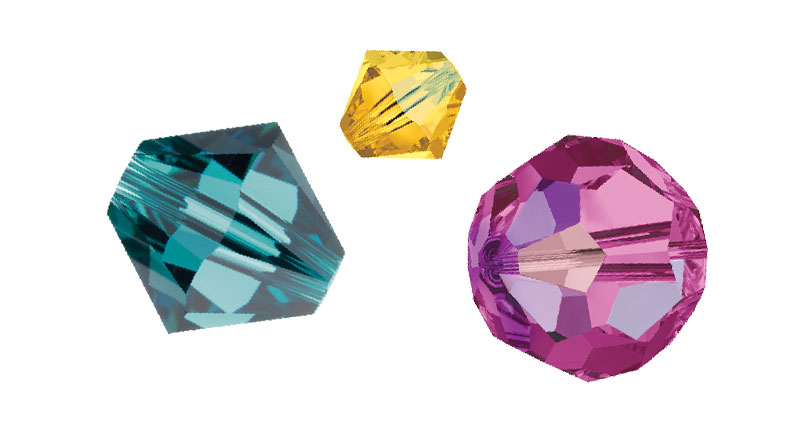
  • (2) SW01723 – Swarovski® 4mm Majestic Blue Round Crystal
  • (2) SW01725 – Swarovski® 8mm Majestic Blue Round Crystal
  • TCZ0077 – Sterling Silver Earring Wire by Tierracast
  • A019629 – 1 Inch Silver Plated 20 Gauge Eyepin

GoodyBeads Blog | By the Sea DIY Earrings FREE Tutorial

Directions:

  1. Open eyepin loop, slide on a charm and close loop. Slide a 4mm Majestic Blue crystal on the eyepin and make a simple loop.
  2. Open another eyepin loop, slide on loop you made in step 1 and close loop. Slide a 6mm Crystal Pearlescent on eyepin and make a simple loop.
  3. Open another eyepin loop, slide on loop you made in step 2 and close loop. Slide an 8mm Majestic Blue crystal on the eyepin and make simple loop.
  4. Open another eyepin loop slide on loop you made in step 3 and close loop. Slide a 10mm Crystal Pearlescent on eyepin and make a simple loop.
  5. Open earwire loop and slide on loop you made in step 4. Close loop.
  6. Repeat all steps for other earring.


DIY Jewelry with Swarovski® Around the World: India

This month’s trip is India. Find out how culturally rich and vibrant this country is from its colorful clothing to its exotic cuisine. Plus, bathe in the hues Swarovski suggests to inspire your India trip along with a DIY jewelry project for you to try.

India

One of the oldest civilizations in the world, India is a mosaic of multicultural experiences and rich heritage. Extending from the snow-covered Himalayan mountains to the tropical rain forests of the south, it is impossible to ignore India’s mesmeric conflation of the old and the new. Walking through the bustling city streets you are greeted by a diverse variety of cuisines, arts, crafts, faiths, and nature. Experiencing different textures, sounds and smells triggered the emotion that prompted these designs.

India – Swarovski Colors

  • Indicolite
  • Light Topaz (Note, we are using Light Colorado Topaz in DIY jewelry)
  • Fuchsia

India Inspired DIY Jewelry

GoodyBeads Blog | DIY Jewelry with Swarovski crystals. India Inspired DIY Jewelry.

GoodyBeads Blog | DIY Jewelry with Swarovski crystals. India Inspired DIY Jewelry.

What you’ll need for earrings:

  • 65mm Gold Plated Round Connector With Dot N Dash Tassel – Z017930
  • 9mm Light Colorado Topaz Pear Cut Pendant – SW02491 (2)
  • 8mm Indicolite Round Beads – SW02538 (2)
  • 4mm Bicone Crystal Fuchsia – SW00126 (2)
  • 11/0 Gold Seed Bead – SB00423
  • 2 Inch Gold Eyepin – A019611
  • Oval Jump Ring – A008801

Directions:

  1. Open jump ring, slide on crystal pendant and through inner loop of connector. Close jump ring.
  2. Open eyepin loop, slide through top loop of connector and close loop.
  3. Slide on the eyepin a seed bead, 8mm round crystal, seed bead, 4mm bicone crystal and seed bead.
  4. Open loop you made step 3, slide through earwire loop and close loop.
  5. Repeat all steps for other earring.


DIY Swarovski® Amethyst & Pearl Hoop Earrings

A fun new and old favorite, are these pair of summer-loving hoop earrings with Swarovski crystals and pearls.

What you’ll need:

  • 6mm Round White Swarovski Pearl – SW00665 (4)
  • 4mm Bicone Crystals, Light Amethyst – SW00195 (6)
  • 6mm Bicone Crystals, Light Amethyst – SW00196 (2)
  • 11/0 Silver Lined Amethyst Seed Bead – SB00339
  • 3mm Gold Round Beads – Z001310
  • Gold Plated Hoop – A013205
  • Earwires – TCZ0148
  • Gold Headpin – A019651
    Note: Directions are for making wrapped loops. If you prefer to make simple loops, we suggest using a harder gauge wire like A019658.

Directions:

  1. Slide on a headpin; 4mm bicone and seed bead. Make a simple or wrapped loop. Make a total of 4 dangles.
  2. Slide on a headpin; seed bead, 3mm round bead, pearl and seed bead. Make a simple or wrapped loop. Make a total of 4 dangles.
  3. Slide on a headpin; seed bead, 3mm round bead, 6mm bicone, 3mm round, seed bead, 3mm round, 4mm bicone and seed bead. Make a simple or wrapped loop. Make a total of 2 dangles.
  4. Cut the tab part of a hoop finding off.
  5. Make a simple loop to one end of your hoop perpendicular to the loop of the hoop. Refer to previous Memory Wire Hoop Tutorial blog post.
  6. Slide on the following to the hoop: 3mm round, step 1 dangle, 3mm round, step 2 dangle, 3mm round, step 3 dangle, 3mm round, step 2 dangle, 3mm round, step 1 dangle and 3mm round.
  7. Slide other hoop end through loop you make in step 5 and roll back a simple loop. (Again, refer to the Memory Wire Hoop Tutorial blog post.)
  8. Open ear wire loop and slide on hoop dangle. Close loop.
  9. Repeat Steps 4-8 for other earring.


DIY Swarovski Fine Rocks Hoop Earrings

Looking for an ultra cool statement earring? We’ve got the perfect DIY for you! Made with Swarovski Fine Rocks Tube and Memory Wire, you can create this glamorous hoop earrings today!

What you’ll need:

GoodyBeads Blog | DIY Hoop Earrings with Swarovski Fine Rocks Tube

Directions

  1. Cut two full rounds of memory wire with Memory Wire Cutters.
  2. Slide on a tube bead, curving it while you slide it through the memory wire. (Note, try using your pliers to help guide the memory wire through the fine rocks tube. Even twisting the fine rocks may help.)
  3. Slide post earring through your end cap, making sure the post end sticks out the end cap. Add a small dab of E-6000 with a toothpick. Cap one of the fine rocks with end cap.
  4. Add E-6000 to other end cap and cap other end of the Fine Rocks.
  5. Repeat all steps for other earring.
  6. Let pieces sit for a full 12-24 hours until it is completely dry before wearing.

Video Tutorial

Watch our previous Facebook LIVE where we show you how to make these pair of earrings HERE.


DIY Angelic Crystal Dangle with TierraCast Findings

We’re making an angelic dangle today. You can make two and use them to dangle as earrings or add them to keychain, bookmarks or beadable gifts.

What you’ll need for an angelic dangle:

GoodyBeads Blog | DIY Angelic Dangle

Directions:

  1. Slide on 8mm crystal, bead cap, angel wings, 6mm crystal and rhinestone rondelle. Make a simple loop.
  2. Attach to an Beadable Gift or make two for some earring dangles.


DIY Wrap Pearl & Denim Blue Bracelet

We’re starting June with one of our favorite style of DIY jewelry-making; memory wire wrap bracelets. Our DIY Wrap Pearl & Denim Blue Bracelet combines some of our favorite components; leather with hollow core, Swarovski pearls and tassels.

What you’ll need for bracelet:

GoodyBeads | DIY Wrap Pearl & Denim Blue Bracelet

Direction:

  1. Make a simple loop with Memory Wire Finishing Pliers.
  2. Slide the the following beads:
    1. 2 seed beads, 6mm pearl, seed bead, curve tube, 8mm pearl, seed bead, 8mm denim blue crystal, seed bead, 8mm pearl.
    2. end cap, 2.5″ of leather, bead cap
    3. 8mm pearl, seed bead, 8mm denim blue crystal, seed bead, 8mm pearl, curve tube, seed bead, 6mm pearl and 2 seed bead.
  3. Cut Memory Wire with a 1/2″ to 3/4″ end.
  4. Make a simple loop to that end with Memory Wire Finishing Pliers.


Blue Moonlight DIY Earrings

Blue is still a favorite among jewelry, so here’s some Blue Moonlight DIY Earrings with beaded chain and Swarovski® princess cut crystal pendants.

What you’ll need:

Directions:

  1. Take two links from the bead chain link by opening and closing the loops.
  2. Open jump ring, slide on one end of beaded chain and through crystal pendant. Close jump ring.
  3. Open earwire loop, slide on other beaded link end and close loop.
  4. Repeat all steps for other earring.


DIY Jewelry with Swarovski® Around the World: Ireland

This month’s trip is Ireland. Find out how rich and romantic this country is from its green landscapes and historical architects. Plus, venture the lush hues Swarovski suggests to inspire your Ireland trip along with a DIY jewelry project for you to try.

Ireland

As you follow the rolling hills from the Causeway Coast to the Sunny South East, your heart will be one with Ireland. Filled with centuries of ancient stories, rich culture and rugged, romantic landscapes, the “Emerald Isle,” is sure to put a sparkle in your eye. The wild unruly countryside and awe-inspiring sights lead to countless photographs in the hopes of capturing nature in its most majestic state. They say a picture is worth a thousand words, but these pieces capture all the heritage and beauty that is Ireland.

Here are some fun facts for your visit:

  • Ireland is named the Emerald Isles, first mentioned in William Brennan’s poem ‘When Erin first rose.”
  • Ireland is home to Guinness Beer
  • Riverdance consists of traditional Irish music and dance
  • The origins of Halloween is from Ireland
  • St. Patrick’s Day is a national Ireland holiday
  • Ireland has a history of world-known writers such as James Joyce, Oscar Wilde W. B. Yeats
  • Ireland has over 30,000 castles.

Ireland – Swarovski Colors

GoodyBeads Blog | Swarovski Around the World Ireland with FREE DIY Bracelet

  • Crystal Metallic Sunshine
  • Olivine
  • Crystal Vitrail Medium

Ireland Inspired DIY Jewelry

GoodyBeads Blog | Swarovski Around the World Ireland with FREE DIY Bracelet

GoodyBeads Blog | Swarovski Around the World Ireland with FREE DIY Bracelet

What you’ll need:

Directions:

  1. Make a simple loop to one end of your memory wire.
  2. Slide on 6 seed beads.
  3. Make various sequence of 1-3 crystals with a seed bead in between. And 6 seed beads in between each sequence.


DIY Jewelry with Swarovski® Around the World: Austria

Take a trip to Austria for this month’s destination. Find out how majestic and traditional this country is from its humble villages to intricate architecture to the majestic mountain. Plus, venture the cool hues Swarovski suggests to inspire your Austria trip along with a DIY jewelry project for you to try.

Austria

Austria may be one of Europe’s smallest countries, but it is also one of the most popular destinations in the world. Whether you’re traversing across its drawbridges or hiking up the Alps, the region’s roaring waters and crisp mountain air will greet you as if you were home. The inspiration of these pieces is derived from a multitude of Austria’s most iconic wonders — deep valleys, vast farmland, whimsical woodlands, raging rivers, and of course, its majestic mountains.

Here are some fun facts:

  • Swarovski Kristallwelten or Swarovski Crystal World is located in Austria – featuring a garden, sculptures and playground!
  • “Sound of Music” was filmed and set in Salzburg, Austria.
  • Many of the Classical music icons were born and lived in Austria, such as Mozart, Beethoven, Strauss, Schubert, and others.
  • Arnold Schwarzenegger was born in Austria
  • The first zoo was established here.

Austria – Swarovski Colors

Swarovski Create Your Style, has selected three colors to depict the majestic sites of Austria:

  • Crystal Clear
  • Crystal Clear AB
  • Denim Blue

Austria Inspired DIY Jewelry

Using a variation of round and bicone beads in the three colors, we made a chain link necklace by making wrapped loop links. Refer to our Wire Wrapped blog post on a visual tutorial.

What you’ll need:

Directions:

  1. Make a wrapped loop to one end of a 2-3 inch piece of wire. Slide on a seed bead, crystal and seed bead. Make another wrapped loop.
  2. Create another wrapped loop while sliding on link you made in step 1 before completing the loop. Slide on a seed bead, crystal and seed bead. Make another wrapped loop.
  3. Repeat step 2 with various different of crystals to create 7-10 links. With the last link wrapped loop, slide on the diamond link before completing the wrapped loop.
  4. Make next set of wrapped beaded links, linking the diamond link in Step 3.
  5. Repeat to your desired length. We made a length of 28 inches.
  6. Open jump ring of the bracelet sliding clasp and link each end of your beaded links to clasp.

As an alternative, you can use 20 gauge wire and make simple loops to create your beaded links.


Swarovski® Around the World

Pack your bags because you are invited to embark on a 6 month journey around the world to celebrate Swarovski’s 125th anniversary. Each place we visit will bring:

  • New Destination and inspirations
  • Sparkling color combinations
  • and Beautiful Swarovski inspirational projects

We will explore how color combinations act as a global identifier – just as a flag does for its country.

This global experience will begin this month of April through September and you don’t need a passport to enjoy the ride. Here is what you’ll expect for the months to come:


Swarovski® Amethyst Jewelry Tutorials

We’ve got TWO easy projects using March’s Swarovski Psychology of Color: Amethyst. Design jewelry with this passionate hue!

Amethyst Wrap Bracelet

Items used in bracelet: SB00422, SW02206 (30), SW00084 (20), SW00081 (20), WR00127 & A014097

Directions:

  1. Make a simple loop to the end of your memory wire with Memory Wire Finishing Pliers.
  2. Slide on the following bead sections onto the memory wire:
    Seed bead, silver curve tube, seed bead, light amethyst crystal, seed bead, amethyst crystal, seed bead, 3 amethyst shimmer crystals, seed bead, amethyst crystal, seed bead and light amethyst crystal.
  3. Repeat this sequence 9 more times. Then end with a seed bead.
  4. Cut memory wire end leaving a 1/4″ end and make a simple loop.

Ombré Amethyst Earrings

Items used in earrings: SW00198 (4), SW00195 (4), SW00105 (4), SB00422, A019656 & TCZ0077

Directions:

  1. On a headpin, slide on the following and make a simple or wrapped loop:
    Amethyst bicone, seed bead, amethyst bicone, seed bead, light amethyst, seed bead, light amethyst, seed bead, clear crystal, seed bead, clear crystal and seed bead.
  2. Open earwire loop and slide on crystal dangle. Close loop.
  3. Repeat all steps for other earring.


Swarovski® Psychology of Colors: Amethyst

For March, Swarovski’s Psychology of Colors pick is Amethyst. Check out how calming this hue is!

Amethyst is a rich purple hue for a creative and soothing design! Here are some Swarovski colors to matches this hue:

  • Light Amethyst
  • Amethyst Shimmer
  • Lavender DeLite
  • Paradise Shine
  • Elderberry
  • Vitrail
  • Tanzanite
  • Iris
  • Iridescent Red
  • Iridescent Purple
  • Cyclamen

Amethyst Jewelry

Make sure you stop over to our other blog post for jewelry designed with Amethyst.


Tassel Earrings with TierraCast® Findings and Miyuki Seed Beads

Our tutorial today features some trendy tassel earrings made with seed beads. You may recall our previous blog post on Beaded Tassel Tutorial. Today’s project will use that tutorial along with multiple colors of seed beads and beautiful TierraCast pieces.

What you’ll need:

  • Size 11/0 seed beads. We used 3 different colors in our sample:
    • SB00423, which will pair with the gold TierraCast finding. You can also use SB00422 and silver TierraCast finding.
    • Cream color: SB00444
    • Color seed bead: SB00447 You can also swap this color!

GoodyBeads.com Blog | Tassel Earrings with TierraCast® Findings and Miyuki Seed Beads with FREE Pattern Tutorial

Directions (Refer to Beaded Tassel Tutorial for example visuals):

  1. Make a wrapped loop to a 3 inch piece of wire. OR if you’re using an eyepin, coil the eyepin loop.
  2. Starting with 4 feet of thread, create a stopper bead on your thread leaving a 4-6 inch tail.
  3. Sew through the wire loop.
  4. Pick up the following bead sequence
    1. 20 cream seed bead
    2. Wine bead, cream bead, 2 wine bead, cream bead, 3 wine bead, cream bead
    3. 10 wine bead
    4. gold bead, wine bead, 2 gold bead, wine bead, 3 gold bead, wine bead
    5. 8 gold bead.
  5. Skip the last bead and sew back up through all the beads you’ve sewn and through wire loop. Don’t pull to hard, you want your fringe to hang loose.
  6. Repeat step 4 and 5 another 7 more times for a total of 8 tassel fringes.
  7. Tie thread ends together, securing it with a small dot of Super New Glue.
  8. Slide wire through cone and pick up 4mm round bead (pearl) and cream seed bead. Make a simple or wrapped loop.
  9. Open earwire and add tassel dangle.
  10. Repeat all steps for other earring.


Cymbal Koutalas DIY Chevron Jewelry

Some of our newest products are Cymbal Components, which pairs with Chevron Duo and Ginko beads. We have two awesome patterns using Czech Chevron Duos and the Cymbal Koutalas.

Chevron Spike Bracelet

Items used in bracelet: Z013806, SB00422, Z010306, SW01711 (3), Z011500, X003062, A021633, Z001124, TC01897 (4).

Make sure to follow our LINK to download the FREE tutorial for this bracelet.

This bracelet used stretch cord, which makes it to easy make and wear. It also uses some blingy Swarovski Hexagon, two-hole spike crystal beads, which breaks up the chevrons and adds a focal section!

Chevron Spike Earrings

Items used in earrings: Z013812, SB00423, Z010306, TC02816 (2), A014108, A006585 & A015211.

Still using the same Cymbal ending, we’ve made a this pair of earrings with Chevron beads and TierraCast dagger bead from the Hammertone Collection, all using gold findings.

Get FREE PDF tutorial HERE to make your own pair of earrings!


DIY Spike Drop Earrings

We’re showing you how easy bead-stitching can be with these Spike Drop Earrings. It uses two-hole Swarovski® spike crystal beads, Cymbal components, seed beads and TierraCast® Hammertone Dagger Bead.

What you’ll need for earrings:

GoodyBeads Blog | FREE Tutorial - DIY Spike Drop Earrings with free pattern tutorial.

Directions: (Similar to Honeycomb Tassel Drop Earrings Tutorial)

  1. With 2 feet of thread, pick up a seed bead, cymbal, seed bead, 1st spike bead, seed bead, 2nd spike bead, seed bead, 3rd spike bead, seed bead, dagger bead, seed bead. (Make sure to be sewing through the correct hole of spike beads)
  2. Sew up through the second hole of the 3rd spike bead, pick up a seed bead, through the second hole of the 2nd spike bead, pick up a seed bead and through the second hole of the 1st spike bead.
  3. Tie both ends together to bring your looped pattern together. (You can see something similar to the Honeycomb Tassel Drop PDF tutorial, as you’re substituting a few beads in the pattern.)
  4. Sew through a few beads before cutting thread ends off.
  5. Open earwire loop and slide on cymbal component. Close loop.
  6. Repeat all steps for other earring.