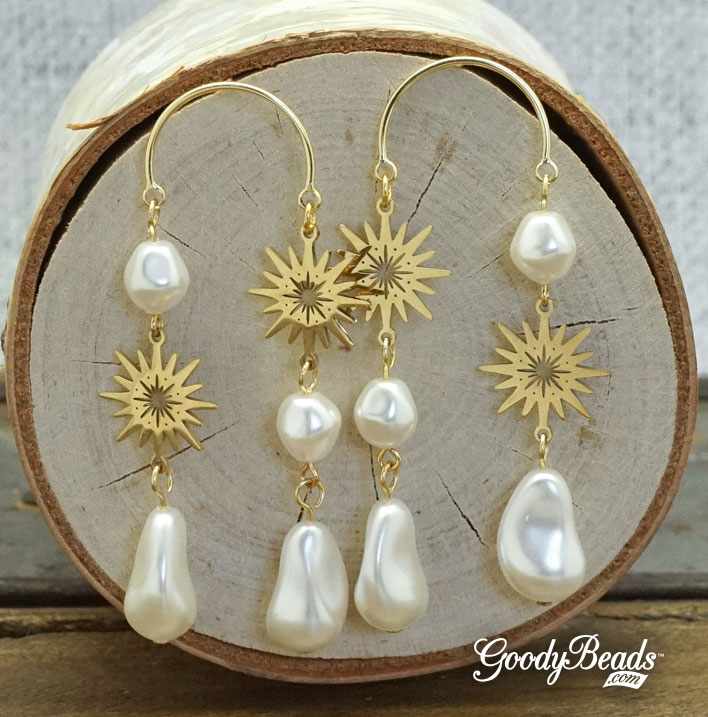
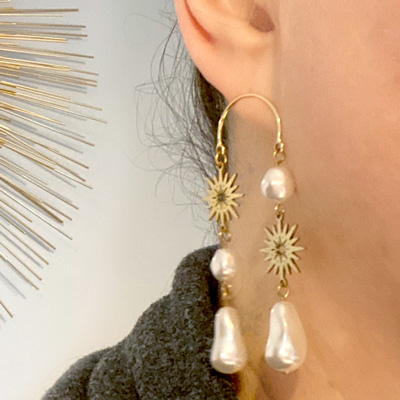
DIY Tiered Earrings with Swarovski® Baroque Pearl Beads
One of our fan favorites are the organic Baroque Pearl beads from Swarovski, especially used this tiered earrings from our Baroque Pearl Trend. Its freeform shape has a gorgeous shape at every angle you look at.
Items used in tiered earrings:
SW02594 (4) – 16mm Cream Crystal Baroque Drop Pearl
SW02569 (4) – 8mm Cream Crystal Baroque Round Pearl
Z005963 – 20mm Gold Plated Half Circle Post Earrings with 2 Loops
Slide on the following beads: 2.2mm TOHO round, 4mm crystal, 3mm TOHO round, 6mm crystal, 3mm TOHO round, 8mm crystal, 3mm TOHO round, 6mm crystal, 3mm TOHO round, 4mm crystal and 2.2mm TOHO round.
Fold over another Loop End to the other end of the chain.
Open oval jump ring, slide on a clasp loop and through one Loop End. Close jump ring.
Open another oval jump ring and slide on other Loop end. Close jump ring.
Designed by Miriam
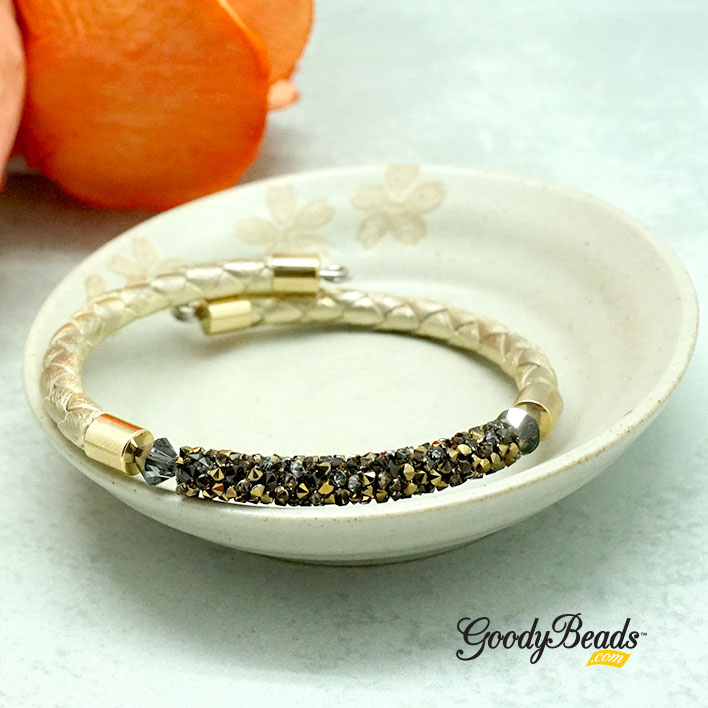
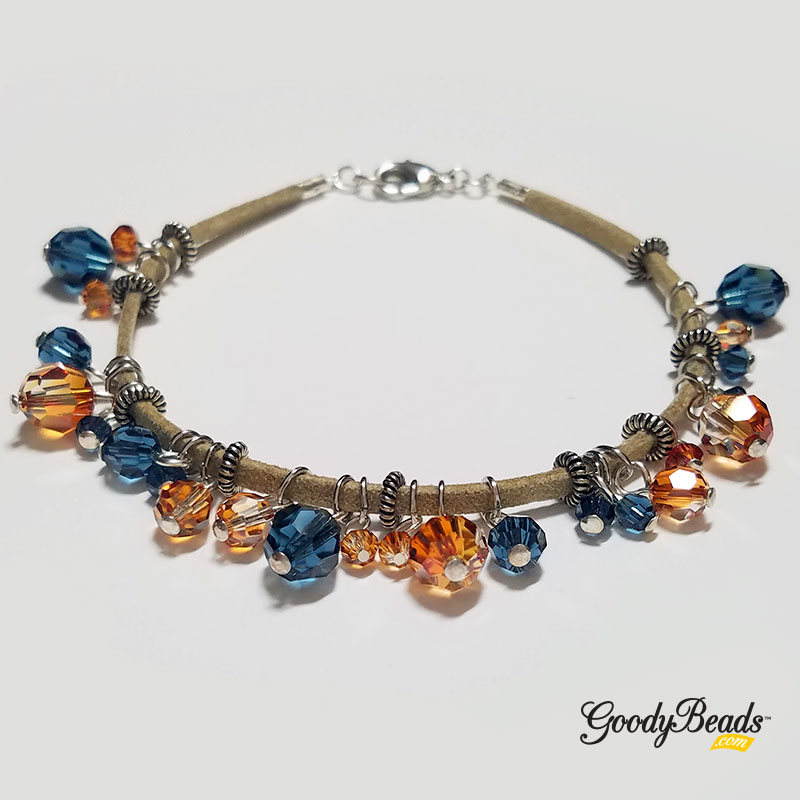
DIY Midnight Silver Memory Wire Bracelet with Swarovski Fine Rocks Tube
Feel glamorous in the DIY Midnight Silver Memory Wire Bracelet handmade and designed with Swarovski Fine Rocks Tube, Swarovski® crystals and metal beads on Memory Wire.
Make a simple loop at one end using a memory wire finishing pliers and add the following bead sequence: A. Square bead, fire polish, tube, fire polish, square beads, bicone, square bead, fire polish, tube, fire polish, square bead, end cap, 4 inches of leather, end cap, rondelle, disc, fine rocks, disc, rondelle, end cap, 4 inches of leather and end cap. B. 3 fire polish, square bead, bicone and square bead. Repeat 4 times and finish with 3 more fire polish beads.
Trim excess memory wire with Memory Wire Cutters leaving about a half an inch and make a simple loop. Tighten each side till beads no longer have extra space to move.
Spend the Holidays with Swarovski® – New Year
We’re celebrating the festive spirit with our friends at Swarovski: Create Your Style and celebrating with New Years Eve colors! Plus, we have a fun DIY project to get you hyped up for the new year.
Here are our selection of Swarovski crystals to embrace the festive and classic colors of New Years:
Cut two pieces of memory wire at a coil and a quarter.
Roll and make a simple loop to each end of the memory wire with memory wire finishing pliers.
Slide on a seed bead on each memory wire. Slide each square bead hole through each memory wire. Repeat this process 7 more times. End this portion with a seed bead to each memory wire.
Slide on small setting you made in Step 1, slide each memory wire through the two-hole setting. Slide on a seed bead to each memory. Repeat adding a medium setting, seed bead, large setting, seed bead, medium setting, seed bead and small setting.
Repeat Step 4.
Cut excess wire with memory wire cutters, leaving about a 3/4 inch end and make a simple loop.
Spend the Holidays with Swarovski® – Christmas Holiday
Using alcohol wipes clean all off the links and set aside to dry.
Using one 10mm Scarlet fancy stone glue into matching finding. Repeat four more times and set aside to dry for 24 hours.
Using one head pin slide on one 6mm Rouge Pearl and make a simple loop. Repeat 23 more times and set aside.
Using two 5mm jump rings attach each jump ring separately to the same side of one frame made in Step 2 (double jump ringing). Use two more 5mm jump rings to attach to the opposite side. Repeat this step four more times and set aside.
Using two 9mm jump rings, connect together two links made in Step 4 so that it is double jump ringed. Continue this process until all five stone set links are connected.
Using three pearl drops, attach to one side of the double medium jump ring connection between stone set links. Repeat for opposite side of the two 9mm jump ring connection. Repeat this step until you have 4 complete sets of 6 pearls between all 5 stone set links.
Using one end of the Maker’s toggle attach two small jump rings by attaching each jump ring separately to the same side of the toggle (double jump ringing). Repeat for other side of the toggle piece.
To attach the toggles to the ends of the bracelet use two medium jump rings to attach the double jump rings from the bracelet to the toggle. Repeat for the other side.
Bracelet and tutorial courtesy of Swarovski: Create Your Style.
DIY Carabiner Lariat Necklace with Swarovski® Baroque Pearl
Our lariat necklace tutorial today features the popular carabiner clasps, along with our newer Swarovski baroque pearls. Make this necklace long or short, it will be the start of some fun layering neck mess pieces.
Slide pearl onto the headpin and make a larger simple or wrapped loop. Make sure loop can slide on through clasp.
Open jump ring, slide on charm and close jump ring.
Cut chain to 16 inches. Or cut to your preferred length.
Open carabiner clasp by unscrewing clasp, slide on jump ring with charm and pearl drop. Then slide on both ends of your paper clip chain. Close clasp.
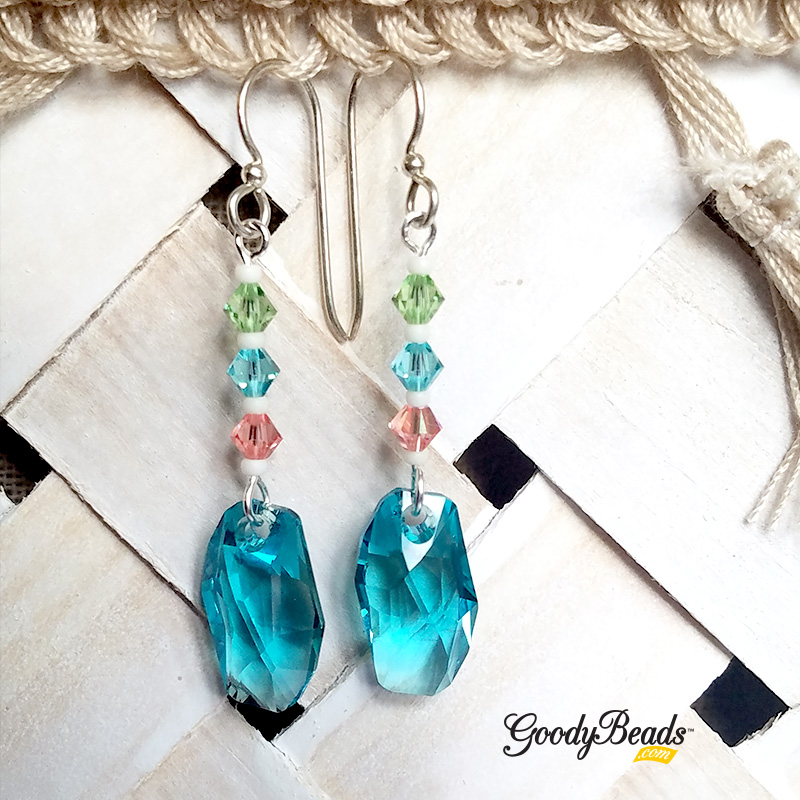
DIY Hanging Crescent Earrings with Swarovski® crystals
Today’s DIY hanging crescent earrings are gorgeous because they contain fun kidney shaped earring findings and popular crescent charms, topped off with Swarovski crystals. You can also make this in a silver version too.
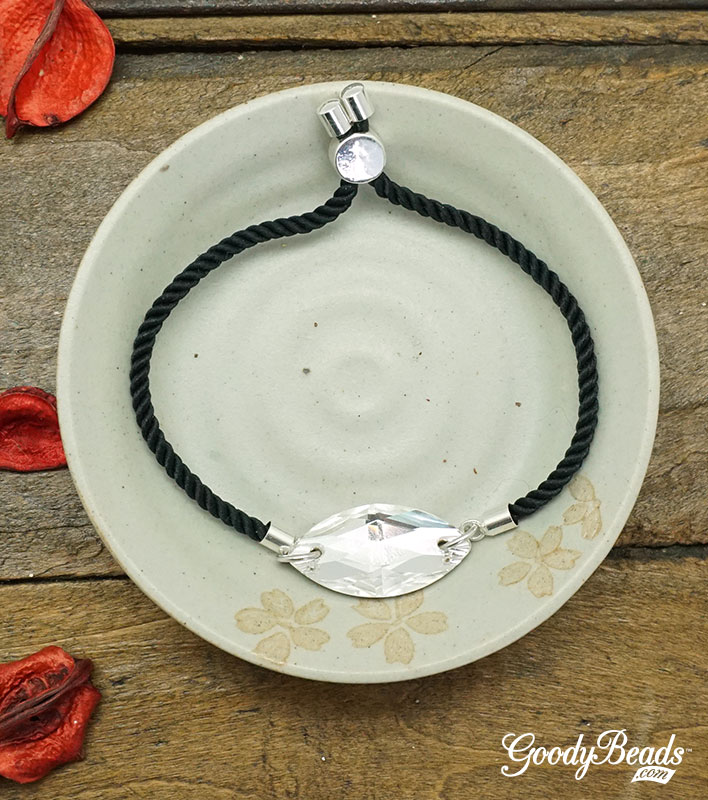
Z014807 – Black Twisted Satin Adjustable Bracelet Sliding Clasp
Directions:
Open a jump ring, slide on one side of the crystal link and through one ring on sliding clasp. Close jump ring.
Repeat with other jump ring and ring of sliding clasp.
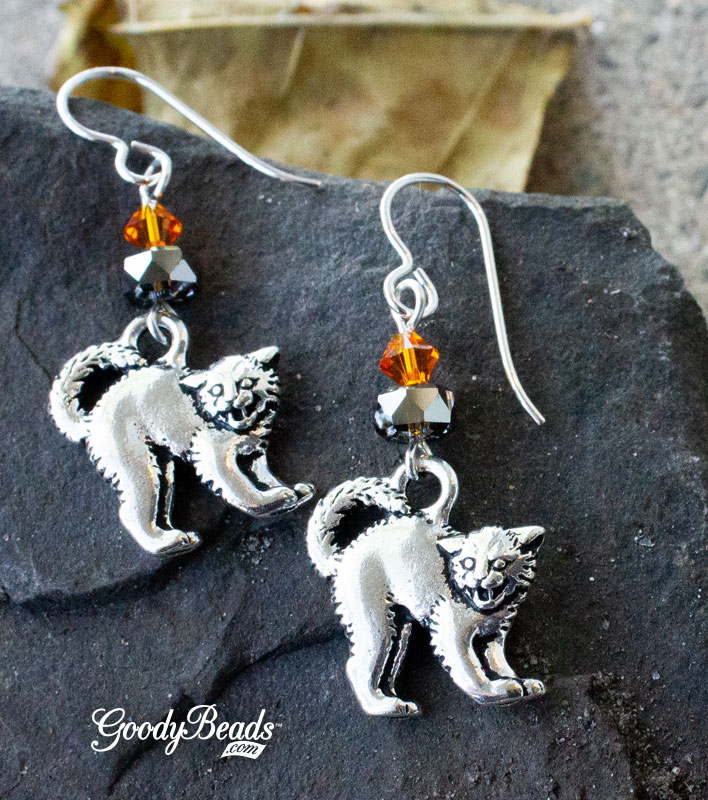
Spend the Holidays with Swarovski® – Fall/Halloween
We’re going to dive into fall weather with our friends at Swarovski: Create Your Style and celebrating with Fall & Halloween colors. Because we live here in the Midwest, we’ve started to see trees bursting with fall colors like dark greens, bright yellows and oranges, flaming reds and popping purples! Plus, we have a fun DIY project to get your spooky Halloween going.
Here are our selection of Swarovski crystals to embrace the fall and Halloween colors:
Black Colors – Jet Black, Silver Shade
Browns – Topaz, Light Topaz, Light Colorado Topaz, Golden Shadow
SW00398 (2) – Swarovski® 6mm bicone crystal beads silver night
Directions:
Cut 2 coils of memory wire.
Make a simple loop at one end of the memory wire with memory wire finishing pliers.
Cut leather piece in half or two pieces at 3 inches.
Slide on the following components on the wire: End cap, leather, end cap, bicone crystal, fine rocks tube, bicone crystal, end cap, leather and end cap.
Cut wire end with 3/4″ wire left with memory wire cutters and make a simple loop with memory finishing pliers.
Light Rose Shimmer Circle Post Earrings
Our earring project today is quick and easy! Using one of our newer post earrings with 2 loops, we are linking some beautiful Swarovski® light rose shimmer crystals with chain for this sweet pair of earrings!
What you’ll need for earrings:
SW02619 (4) – Swarovski 4mm Light Rose Shimmer Bicone Beads
SW02620 (4) – Swarovski 5mm Light Rose Shimmer Bicone Beads
SW02621 (4) – Swarovski 6mm Light Rose Shimmer Bicone Beads
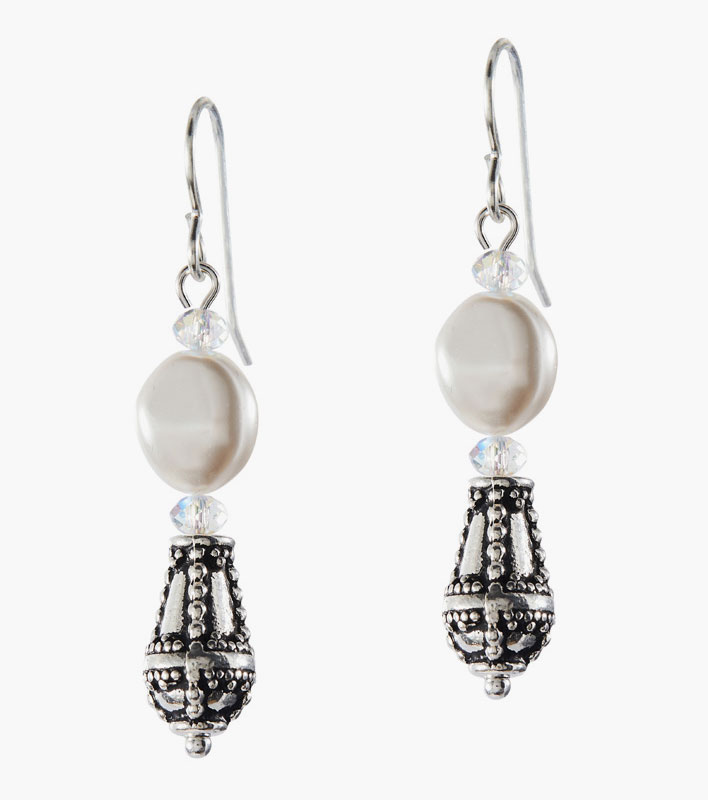
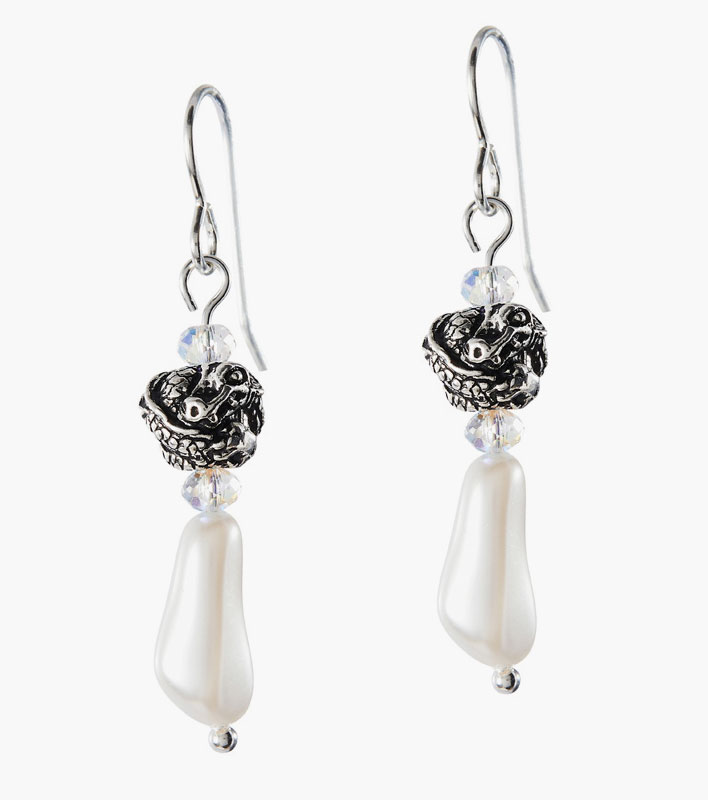
Swarovski® Create Your Own Style: Trio of Opulent Earrings
Our blog post today consists of three projects in one, using some of Swarovski’s newest pearl shapes! We are really loving these new shapes because they look organic with fun depths to them. Here are three pair of earrings pair the new pearls with some fitting TierraCast components.
Slide the following on the headpin and make a simple loop: Pearl, crystal, dragon bead and crystal.
Open ear wire loop, slide on pearl dangle and close loop.
Repeat all steps for other earring.
DIY Jewelry with Swarovski® Around the World: USA Grand Canyon
This month’s trip is Grand Canyon in Arizona, USA. Find out how majestic and rugged this iconic location is, from its wild animals to its breathtaking views. Plus, check out the hues Swarovski suggests to inspire your Grand Canyon trip along with a DIY jewelry project for you to try.
USA Grand Canyon
The Earth’s history is truly like no other. Over millions and millions of years this land has formed and then reformed to reveal what we all know as the Grand Canyon. The colorful stratified layers of rock composing the sides of the Grand Canyon change over the course of the day as the sun moves and the light transforms one scene into another leaving us with a view that takes your breath away. These textures and colors provided a boundless source of inspiration.
Grand Canyon – Swarovski Crystal Colors
Crystal Copper
Montana
Smoked Topaz
Grand Canyon Inspired DIY Jewelry
Our inspiration for this bracelet is the soft and supple micro-fiber suede. While we made a single wrap bracelet, you can certain add more length for a multi-wrap bracelet!
Slide a crystal bead onto a headpin and make a simple loop. Repeat to all crystal beads for a total of 24.
Open oval jump ring and slide on a crystal dangle you made in Step 1. Close jump ring. Repeat for all 24 crystal dangle.
Cut suede to the length of your bracelet/wrist length minus and inch.
At one end of the suede, lay end inside the crimp. Fold and crimp the sides to secure suede end.
Slide the following beads on the suede: Spacer bead and 3 bead dangles (through oval jump ring). Repeat this sequence another 7 more times. End with another spacer bead.
Fold over the crimp end to other suede end.
Open 4mm jump ring, slide on a close ring and through one loop of crimp end. Close jump ring.
Open another 4mm jump ring and slide on other crimp end loop. Close jump ring.
Open another 4mm jump ring, slide through 4mm jump ring step 8 and through lobster claw loop. Close jump ring.
Spread out your spacer beads to center your beads. NOTE: if you find that you need more beads, you can add more crystals and spacers to your liking.
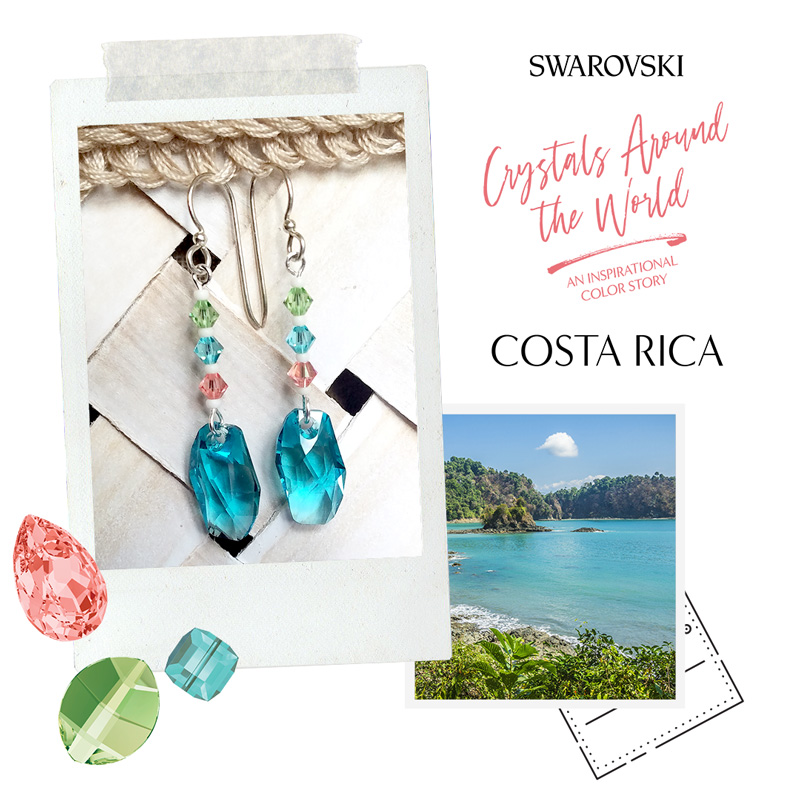
DIY Jewelry with Swarovski® Around the World: Costa Rica
This month’s trip is Costa Rica. Find out how tranquil this destination is from its tropical vibe to its endless blue skies. Plus, check out the hues Swarovski suggests to inspire your Costa Rica trip along with a DIY jewelry project for you to try.
Costa Rica
Starting as underwater volcanoes which then surfaced over thousands and thousands of years, Costa Rica has evolved into one of the largest, lush ecosystems in the world. Imagine yourself rappelling down a waterfall, relaxing in hot springs, hiking along the rolling fog of the cloud forest or exploring the pink sandy beaches of the Guanacaste coastline. Theses adventures paired with rich tropical flora and fauna and soft sunsets over crystal blue water were the incredible inspiration for these pieces – and my version of ‘paradise’.
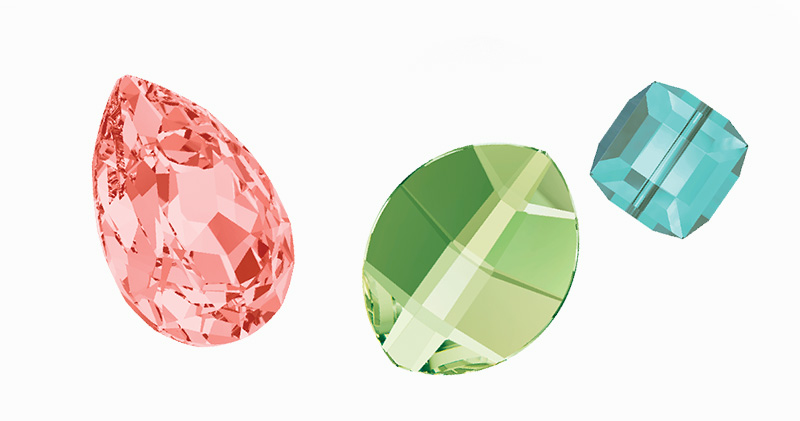
Costa Rica – Swarovski Crystal Colors
Peridot
Light Turquoise
Rose Peach
Costa Rica Inspired DIY Jewelry
Our pair of earrings is cool and bright! It has the simplicity for a warm beach stroll and an elegance for a beach-side patio dinner!
What you’ll need for earrings:
SW02553 (2) – Swarovski crystal 18mm Light Turquoise Meteor Pendant
TCZ0077 – Sterling Silver Earring Wire by TierraCast®
Directions:
On eyepin, slide on the following: seed bead, peridot crystal, seed bead, light turquoise crystal, seed bead, rose peach crystal and seed bead.
Make a simple loop about 4mm or large enough to slide on crystal pendant.
Open the loop you made in step 2 and slide on crystal pendant. Close loop.
Open earring wire loop and slide on on other eyepin loop. Close loop.
Repeat all steps for other earring.
DIY Jewelry with Swarovski® Around the World: Africa
This month’s trip is Africa. Find out how beautifully wild this continent is from its earthy tones and bright bold colors. Plus, check out the hues Swarovski suggests to inspire your Africa trip along with a DIY jewelry project for you to try.
Africa
The canvas upon which this continent’s epic story is written is not only beautiful but astonishing. Whether heading out at dawn on a safari game drive following millions of wildebeest on their Great Migration or soaring high in a hot-air balloon to embrace the Serengeti, Africa creates the wildlife encounter of a lifetime. Wherever you find yourself on this big, beautiful continent, you will be touched by the wild lands, rich traditions, artisan craftsmanship and natural beauty – all of which these pieces pay tribute to.
Africa – Swarovski Crystal Colors
Tangerine
Fern Green
Light Siam
African Inspired DIY Jewelry
Our pair of earrings embraces the vibrant colors! It also incorporates Black Kamagong Wood Beads, which breaks up the rich colors and gives it a more organic design, as well as an earthy aspect.
Open oval jump ring, slide on light siam pendant and eyepin loop. Close jump ring.
On eyepin from step 1, slide on the following and make a simple loop: seed bead, 4mm fern green bicone, seed bead, wood bead, seed bead, wood bead, seed bead, 4mm tangerine bicone and seed bead.
Open another eyepin loop and slide through loop you made in step 2. Close loop.
On eyepin, slide on a seed bead, 4mm light siam bicone and seed bead. Make a simple loop. Open loop and slide through first hole of ethnic link and close loop.
On another eyepin, slide on the following: seed bead, wood bead, seed bead, 8mm tangerine round bead, seed bead, wood bead, seed bead.
Make a simple loop about 4-5 in diameter, or large enough to slide on TierraCast dagger bead. Open loop and slide on TierraCast dagger bead.
Open another eyepin loop, slide on eyepin loop of previous dangle and close loop. On this eyepin, slide on a seed bead, wood bead, seed bead, 4mm fern green bicone and seed bead. Make a simple loop. Open loop and slide through middle hole of ethnic link and close loop.
Open 4mm round jump ring, slide on tassel and loop of another eyepin. Close jump ring.
On eyepin, slide on the following and make a simple loop: seed bead, wood bead, seed bead, 6mm light siam bicone, seed bead, wood bead and seed bead.
Open another eyepin loop and slide on loop you made in step 9. Close loop. Slide the eyepin a seed bead, wood bead and seed bead, and make a simple loop. Open loop and slide last hole of ethnic link. Close loop.
Open earwire loop and slide through top of ethnic link and close loop.