DIY Layered Necklace with Gemstones

Summer is about hot weather and even hotter trends. Layered or Neck-Mess Necklaces are a must-have for summer because they are easy to pair with your casual to dressy outfit. We’ve got a fun DIY for you using many different components like Limited Edition gemstones mixes, seed beads, necklace chain and instant pendants; all layered together.

We love the different gemstone shapes in the Blue Skies gemstone mix, where we used the heishi and round beads in this mix for our layered necklace.

Items used in necklace:

  • Z001033 – 32 Inch Rhodium Plated Cable Chain Necklace
  • X003062 – 5.5mm Jump Ring
  • Y005033 – 6mm Closed Ring
  • FTBW0001 – Fine SoftFlex Wire
  • X009683 – Limited Edition Clear Blue Skies Candy Jade Mix from Dakota Stones
  • SB00106 – 8/0 Galvanized Silver Seed Beads
  • A004830 – 2mm Silver Plated Crimp Tubes
  • Z010379/Z010376 – Wire Guardians
  • CH01180 (1 foot)- 11.6mm Silver Finish Steel Thin Paperclip Cable Chain

Instant Pendant:
Z016436 – Silver Instant Pendant with Cone
Get the components and pattern tutorial for the instant pendant in the Peyote Tube with Beadalon Instant Pendants blog post.

GoodyBeads.com blog | DIY Layered Necklace with Gemstones

Directions:

  1. Cut paperclip chain in half to make two 6 inch pieces.
  2. Cut a 20″ piece of soft flex wire.
  3. String on the following:
    1. Seed bead, crimp tube and seed bead.
    2. 5 round gemstones and seed bead. Repeat 6 more times.
    3. Crimp tube and seed bead.
  4. Loop one end of flex wire through a Wire Guardian, making sure to loop the wire guardian through a link of a 6″ paperclip chain. Slide flex wire through seed bead and crimp tube. And crimp the tube with crimping pliers. Cut end to leave about a 1/2 inch tail. Slide beads over to repeat and crimp on other end and other chain link.
  5. Open a jump ring and slide on other end of paperclip chain and link it to the ends of the chain necklace. This is where all the layers will link on.
  6. Cut a 30″ piece of soft flex wire.
  7. String on the following bead sections:
    1. Seed bead, crimp tube and seed bead
    2. Two small heishi and seed bead. Repeat and string on 24inches of this sequence.
    3. crimp tube and seed bead.
  8. Feed one end of the flex wire through the Wire Guardian, making sure to loop the wire guardian through the end link of the chain necklace. (Same place you attached the paperclip chain in step 5) Slide flex wire through seed bead and crimp tube and make a crimp. Cut end to leave a 1/2 inch tail. Slide all the beads over to hide the tail end and repeat crimping on this this end.

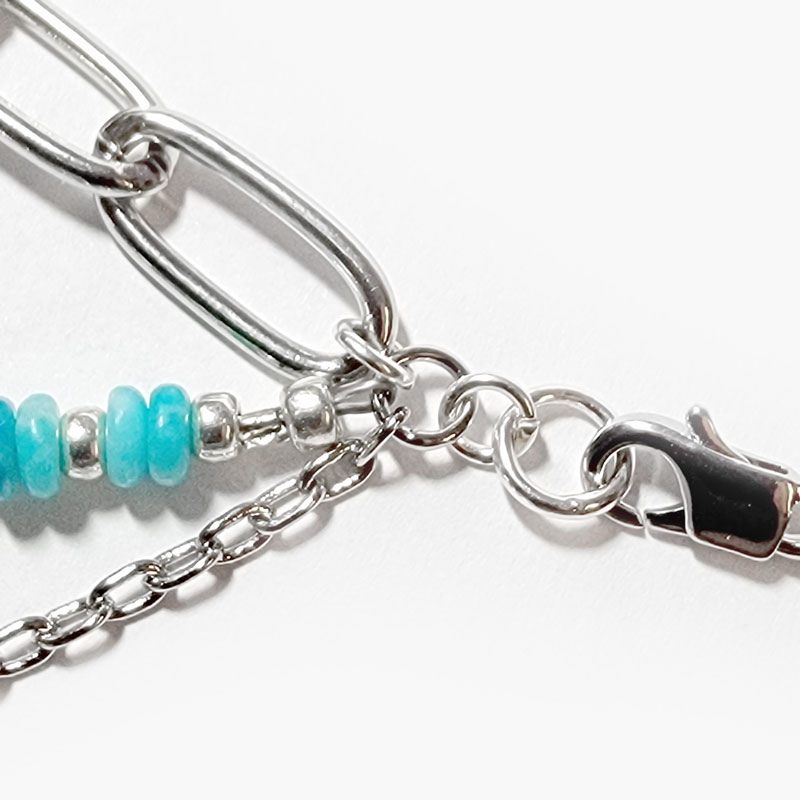
9. Unclasp both of the clasp on the chain necklace. Open jump ring, slide on ring where all the layers are linked at and a closed ring. Do on both sides and add clasp back on.

10. Make peyote tube add to instant pendant. You can find pattern tutorial from the Peyote Tube with Beadalon Instant Pendants with components. Gently open the loop of the instant pendant just big enough to slide chain necklace on. And gently close it.

–Click HERE for more DIY projects from Goodybeads–


Celebrate Summer with DIY Seed Bead Rainbow Earrings

Whether you’re celebrating summer or June’s Pride month, these rainbow earrings are what you need for summer fun! We have two rainbow earring designs, one using Delica seed beads with beadable components and another with round seed beads on a hoop! Check them out!

Rainbow Pendant Earrings Designed By So Vang

Be mesmerized with these pair of earrings using a using a rainbow of Delica seed beads! Items used in earrings:

GoodyBeads.com Blog | Celebrate Summer with DIY Seed Bead Rainbow Earrings

Directions:

  1. Add a 3 feet piece of thread to your needle.
  2. Add a stopper bead to your thread, leaving a 5 inch tail.
  3. Sew through top hole of the beadable channel. Pick up the 11 seed beads in the color sequence of the rainbow: SB00292, SB02337, SB02336, SB03777, SB00290, SB02311, SB00284, SB03545, SB00295, SB03388 & SB04034
  4. Sew through bottom hole of channel. Sew back through all seed beads. Tie both ends together to secure pattern, tie two times. Sew through top hole and sew through a few beads before cutting off excess. Add need to thread tail you left in step 2, sew down through all the beads, sew through bottom hole, sew through a few beads and cut off excess thread.
  5. Open ear wire and slide on beadable pendant.
  6. Repeat steps 2-5 for other earring; you should have enough of the thread on your needle to do the second earring.

Rainbow Hoop Earrings Designed by Heidi

Fall in love with these hoop earrings using a rainbow of seed beads. Items used in earrings:

GoodyBeads.com Blog | Celebrate Summer with DIY Seed Bead Rainbow Earrings

Directions:

  1. Open the hoop and slide on the following seed beads:
    1. 3 silver, 3 red, silver, 3 orange, silver, 3 yellow, silver, 3 green, silver, 3 blue, silver, 3 purple, 5 silver, 3 purple, silver, 3 blue, silver, 3 green, silver, 3 yellow, silver, 3 orange, silver, 3 red & 3 silver.
  2. Slide hoop end back into place and use pliers to gently crimp down the hoop end.
  3. Open earwire loop and slide on beaded hoop and close loop.
  4. Repeat all steps for other earring.

–Click Here for more DIY Projects from GoodyBeads–


DIY Porcelain Pineapple Necklace with Alphabet Charm

Summer is a HOT one and Summer means pineapples. Here is a simple DIY necklace with a porcelain pineapple bead and alphabet charms.

What you’ll need:

Directions:

  1. On a headpin, slide on the following and make a simple loop:
    8/0 seed bead, pineapple bead and 8/0 seed bead.
  2. Open a jump ring and slide on pineapple dangle and on chain necklace. Close jump ring.
  3. Open another jump ring, slide on alphabet charm and on chain necklace. Close jump ring.


DIY Jewelry with Swarovski® Around the World: Costa Rica

This month’s trip is Costa Rica. Find out how tranquil this destination is from its tropical vibe to its endless blue skies. Plus, check out the hues Swarovski suggests to inspire your Costa Rica trip along with a DIY jewelry project for you to try.

Costa Rica

Starting as underwater volcanoes which then surfaced over thousands and thousands of years, Costa Rica has evolved into one of the largest, lush ecosystems in the world. Imagine yourself rappelling down a waterfall, relaxing in hot springs, hiking along the rolling fog of the cloud forest or exploring the pink sandy beaches of the Guanacaste coastline. Theses adventures paired with rich tropical flora and fauna and soft sunsets over crystal blue water were the incredible inspiration for these pieces – and my version of ‘paradise’.

Costa Rica – Swarovski Crystal Colors

  • Peridot
  • Light Turquoise
  • Rose Peach

Costa Rica Inspired DIY Jewelry

GoodyBeads Blog | DIY Jewelry with Swarovski® Around the World: Costa Rica FREE tutorial.

GoodyBeads Blog | DIY Jewelry with Swarovski® Around the World: Costa Rica FREE tutorial.

Our pair of earrings is cool and bright! It has the simplicity for a warm beach stroll and an elegance for a beach-side patio dinner!

What you’ll need for earrings:

  • SW02553 (2) – Swarovski crystal 18mm Light Turquoise Meteor Pendant
  • SW00157 (2) – Swarovski crystal 4mm Peridot Bicone
  • SW02213 (2) – Swarovski crystal 4mm Rose Peach Shimmer Bicone
  • SW02552 (2) – Swarovski crystal 4mm Light Turquoise Bicone
  • SB00444 – 11/0 Matte Opaque Cream Seed Bead
    You can sub seed bead for 2mm Pearlescent Pearls SW01920 (8)
  • A001494 – 2 Inch Silver Plated Eyepin
  • TCZ0077 – Sterling Silver Earring Wire by TierraCast®

Directions:

  1. On eyepin, slide on the following:
    seed bead, peridot crystal, seed bead, light turquoise crystal, seed bead, rose peach crystal and seed bead.
  2. Make a simple loop about 4mm or large enough to slide on crystal pendant.
  3. Open the loop you made in step 2 and slide on crystal pendant. Close loop.
  4. Open earring wire loop and slide on on other eyepin loop. Close loop.
  5. Repeat all steps for other earring.


DIY Black and White Acetate Stripe Earrings

We love the classic black and white themed jewelry. It’s hip and gorgeously elegant all in one. Our pair consists of acetate connectors and enamel components, with of course gold findings! (Shop All Acetate Components)

What you’ll need for Kite Earrings:

GoodyBeads Blog | DIY Black and White Stripe Earrings FREE Tutorial

Directions:

  1. Open 6mm jump ring, slide on enamel charm and acetate connector. Close jump ring.
  2. Open 6mm jump ring and slide on other hole of acetate connector and close jump ring.
  3. Open 3mm jump ring slide on top 6mm jump ring and earring loop. Close jump ring.
  4. Repeat all steps for other earring. Note: You can flip flop the acetate for an asymmetrical look or keep it consistent.

Check out other Acetate DIY jewelry ideas.


DIY By The Sea Earrings with Swarovski crystals & pearls

You can hear crashing waves when you wear these By the Sea Earrings. Ok, you might not hear them, but you will definitely want to wear these earrings to your next seaside adventure. It features the brilliant hue of Swarovski® Majestic Blue crystals and the luminescent sheen from the crystal pearls.

What you’ll need to make earrings:

  • TC00113 – 14mm Small Spindle Shell Charm by TierraCast
  • TC02680 – 13mm Tiny Seastar Charm by TierraCast
  • (2) SW01448 – 10mm Crystal Pearlescent White Swarovski Pearl
  • (2) SW01446 – 6mm Crystal Pearlescent White Swarovski Pearl
  • (2) SW01723 – Swarovski® 4mm Majestic Blue Round Crystal
  • (2) SW01725 – Swarovski® 8mm Majestic Blue Round Crystal
  • TCZ0077 – Sterling Silver Earring Wire by Tierracast
  • A019629 – 1 Inch Silver Plated 20 Gauge Eyepin

GoodyBeads Blog | By the Sea DIY Earrings FREE Tutorial

Directions:

  1. Open eyepin loop, slide on a charm and close loop. Slide a 4mm Majestic Blue crystal on the eyepin and make a simple loop.
  2. Open another eyepin loop, slide on loop you made in step 1 and close loop. Slide a 6mm Crystal Pearlescent on eyepin and make a simple loop.
  3. Open another eyepin loop, slide on loop you made in step 2 and close loop. Slide an 8mm Majestic Blue crystal on the eyepin and make simple loop.
  4. Open another eyepin loop slide on loop you made in step 3 and close loop. Slide a 10mm Crystal Pearlescent on eyepin and make a simple loop.
  5. Open earwire loop and slide on loop you made in step 4. Close loop.
  6. Repeat all steps for other earring.


DIY Large Hoop Ring Earrings with Pinch Bail

Summer jewelry is about being big and making a statement. These pair of pinch bail earrings are the one you’ll need!

What you’ll need for pinch bail earrings:

  • (2) Z008275 – 50mm Bright Fine Silver Plated Flat Grande Hoop
  • Z016191 – 12x6mm Silver Plated Diamond Cut Open Charm/Connector
  • (2) TC02582 – 9mm Smooth Pinch Bail
  • Z012031 – Silver French Earwire Earrings

GoodyBeads Blog | DIY Large Hoop Ring Earrings with Pinch Bail - FREE Tutorial

GoodyBeads Blog | DIY Large Hoop Ring Earrings with Pinch Bail - FREE Tutorial

Directions:

  1. Slide large hoop and diamond cut connector through bail and pinch the bail to close.
  2. Open ear wire loop and slide on diamond cut connector. Close loop.
  3. Repeat all steps for other earring.


Summertime Acetate and Straw Earrings

Don’t start summer without this pair of DIY summertime earrings with acetate and straw!


Summer is about lounging in the sun and sipping on yummy ice tea. Take a few minutes to make this pair of lightweight earrings with acetate and straw components. All you need are a pair of pliers and know how to open and close a jump ring. An easy DIY project without a hiccup to your summer!


GoodyBeads Blog: Summertime Acetate and Straw Earrings with FREE Tutorial.

What you’ll need:


Directions

  1. Using an awl, bead reamer or a solid point like your round nose, pole a hole in between the outer two rings. This will be where you will add your jump ring.
  2. Open jump ring and slide through hole you make in Step 1 and through the hole of your acetate ring. Close jump ring.
  3. Take your flat nose pliers and grasp the loop of your earwire. Twist and turn your loop 90 degrees.
  4. Open two jump rings and slide through your earwire loop and acetate ring.
  5. Repeat all steps for other earring.