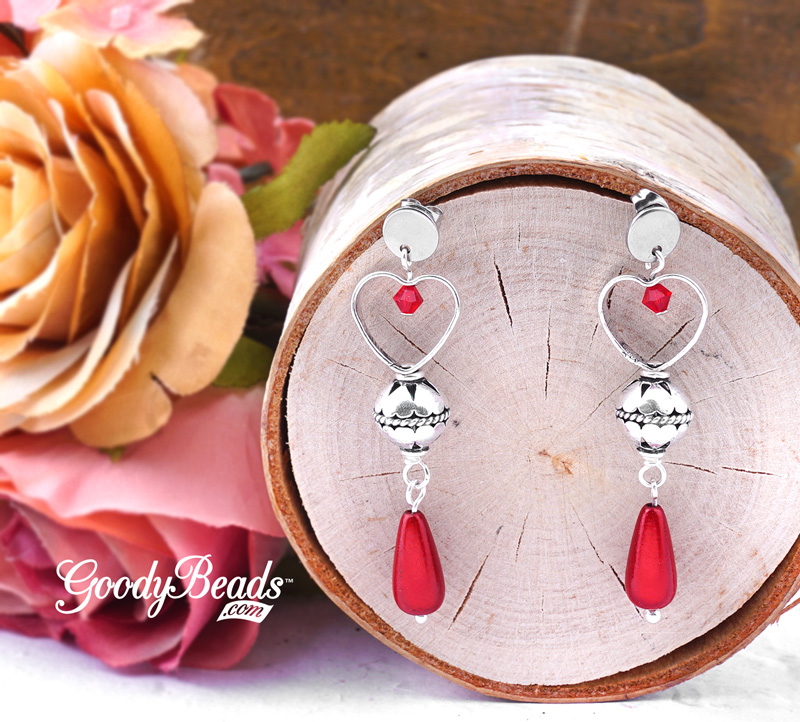
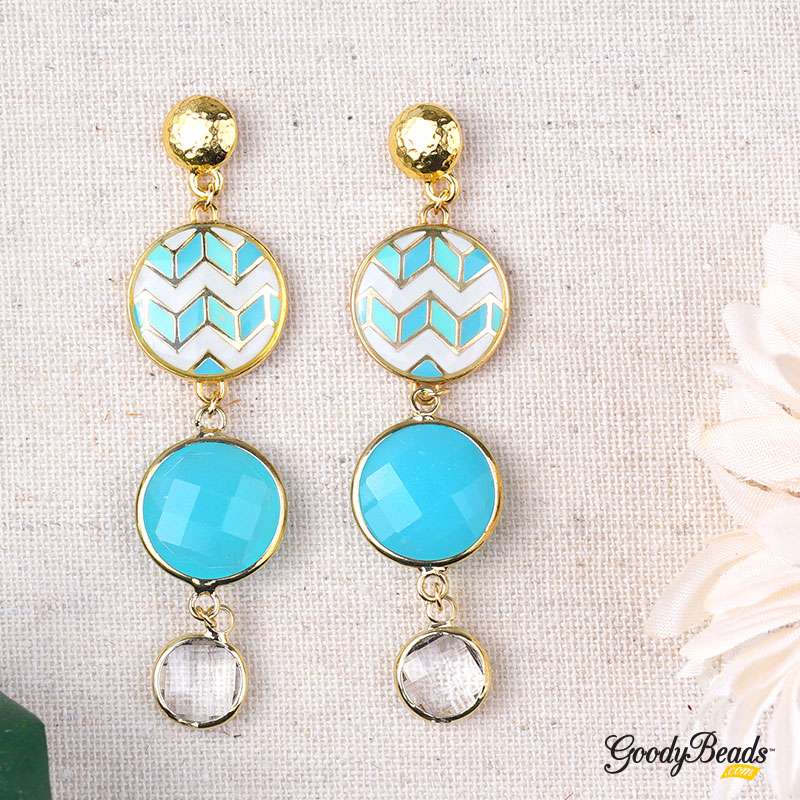
DIY Enamel and Faceted Glass Earrings

One thing we love about making jewelry is creating length and layers by linking connectors and dangles. When it comes to our Enamel Chevron and Faceted Glass Earrings, designed by Heidi, she did just that! She used enamel and faceted connectors with gold findings!

Here is what you’ll need for earrings:

  • 18mm White Mix Enamel Gold Plated Round Zigzag Connector – Z016108 (2)
  • 16mm Round Gold Plated Aqua Faceted Glass Connector – A021761 (2)
  • 10mm Round Clear Faceted Glass Charm with Gold Plating – A021745 (2)
  • 9mm Bright Gold Round Hammertone Post by Tierracast – TC02765
  • 3mm Gold Jump Rings – Z007861

Directions:

  1. Open jump ring with two pliers, slide on glass dangle and one loop of faceted glass connector. Close jump ring.
  2. Open another jump ring, slide on other loop of faceted glass connector and one loop of enamel connector. Close jump ring.
  3. Open another jump ring, slide on other loop of enamel connector and post ear wire loop. Close jump ring.
  4. Repeat all steps for other earring.


DIY Straw Post Earrings

We are looking forward to warmer weather, so we’re getting ready by making spring- or summer-like jewelry. In this pair Straw Post Earrings, we’ve incorporated our favorite straw components and post earrings!

What you’ll need:

Directions:

  1. Using the bead reamer, poke and ream a hole between the first and second coil of the straw oval connector.
  2. Open a jump ring, slide on post earring and through hole you made in Step 1. Close jump ring.
  3. Repeat all steps for other earring.
  4. Don’t forget the earring backs!


DIY Leather Hoop and Silver Teardrop Earrings

In today’s DIY, make a leather hoop and silver teardrop earrings using leather cord and TierraCast’s new Hammertone collection. Here is what you’ll need:

  • 2mm leather cord – item used in earrings A022076
  • 1mm leather cord – item used in earrings Z015514/A022070
  • TierraCast earring post – TC02764
  • Clear Earring Back – TC01208 (2)
  • TierraCast End Cap – TC02800 (2)
  • TierraCast Teardrop – TC02777 (2)
  • 5mm Oval jump ring – Z004093
  • 5mm TierraCast Nugget Spacer – TC02639 (6)

Directions:

  1. Cut a 4 inch piece of 2mm round leather and a 1 inch piece of 1mm round leather.
  2. Add 3 nugget beads to the 2mm round leather.
  3. String the teardrop charm onto the 1mm leather.
  4. Insert one end of the 2mm leather, the 2 ends of the 1mm leather and the other end of the 2mm leather into the crimp end.
  5. Check the length of the tear drop charm and 2mm leather, trim to desired lengths if needed.
  6. Then use a flat nose pliers to crimp the crimp end. Squeeze both sides.
  7. Open 5mm oval jump ring, add earring post and loop on crimp end.
  8. Close jump ring.
  9. Repeat all steps for other earring


Leather Hoop Earrings with Memory Wire

We love being innovative when designing and these leather hoop earrings are no exception to our imagination.

What you’ll need:

GoodyBeads Blog - FREE TUTORIAL: DIY Leather Hoop Earrings with memory wire and TierraCast findings.

Directions:

  1. Cut 2 rings of heavy duty memory wire.
  2. Cut your 14 inches of leather in half to have 2 – 7 inch pieces of leather.
  3. Slide the memory wire thru the hole in the center of the leather, trim excess memory wire.
  4. Put the Post earring into one of the end caps so the part of the earring that goes in your ear sticks out of the end cap’s small hole.
  5. Add 2-3 drops of super new glue into the end cap with the earring post and insert one end of your leather. Hold for 20-30 seconds so that the leather and earring post stay straight.
  6. Add glue to the end cap without the earring post and insert the other end of the leather. Hold for 20-30 seconds while the glue sets.
  7. Let set for 24 hours, so glue fully dries.
  8. Use earring backs when wearing.


Dot & Dash Fringe Earrings

Today’s tutorial is a revision of popular DIY Golden Fringe Earrings we did a few weeks back. Our Dot & Dash Fringe Earrings is on another level of gorgeous!

What you’ll need for earrings: (Silver alternative available)

Directions:

  1. Cut chain at these lengths and alternate the dots and dashes
    7 inches – Dash at beginning and end
    6 ¼ inches – dot at beginning and end
    5 ¾ inches – dash at beginning and end
    5 inches – dot at beginning and end
    4 ½ inches – dash at beginning and end
    3 7/8 inches – dot at beginning and end
    1 ½ inches – dash at beginning and end
    1 ½ inches – dot at beginning and end
    1 ¾ inches – dash at beginning, dot at end
    1 ¾ inches – dot at beginning, dash at end
    1 ¾ inches – dash at beginning, dot at end
    1 ½ inches – dot at beginning and end
    1 ½ inches – dash at beginning and end
  2. Slide what you’ve cut in Step 1, in the same sequence through the slide end tube.
  3. Slide the end of 3 7/8 inches through end tube.
  4. Slide the end of 4 ½ inches through end tube.
  5. Slide the end of 5 inches through end tube.
  6. Slide the end of 5 ¾ inches through end tube.
  7. Slide the end of 6 ¼ inches through end tube.
  8. Slide the end of 7 inches through end tube.
  9. Close side tab of end tube with a flat edge, like pliers.
  10. Open jump ring and slide on loop of end tube and ear wire loop. Close jump ring.
  11. Repeat all steps for other earring.


DIY Skipping Heartbeat Earrings

Today, we have this cute pair of DIY Skipping Heartbeat Earrings for Valentine’s Day. Get dolled up with this pair of heart stopping earrings!

What you’ll need:

GoodyBeads Blog | DIY Skipping Heartbeat Earrings with tutorial.

Directions:

  1. On a headpin with ball, slide on a miracle bead and make a simple loop.
  2. Slide a headpin through the heart frame from the inside outwards (bottom heart side). Slide on metal bead and make a simple or wrapped loop.
  3. Open loop of miracle bead dangle from step 1, slide through you made in step 2 and close loop.
  4. On a headpin, slide on 4mm bicone bead and slide headpin through the heart frame from the inside outwards (top heart side). Make a simple loop.
  5. Open loop you made in Step 4, slide onto post earring hole and close loop.
  6. Repeat all steps for other earring.