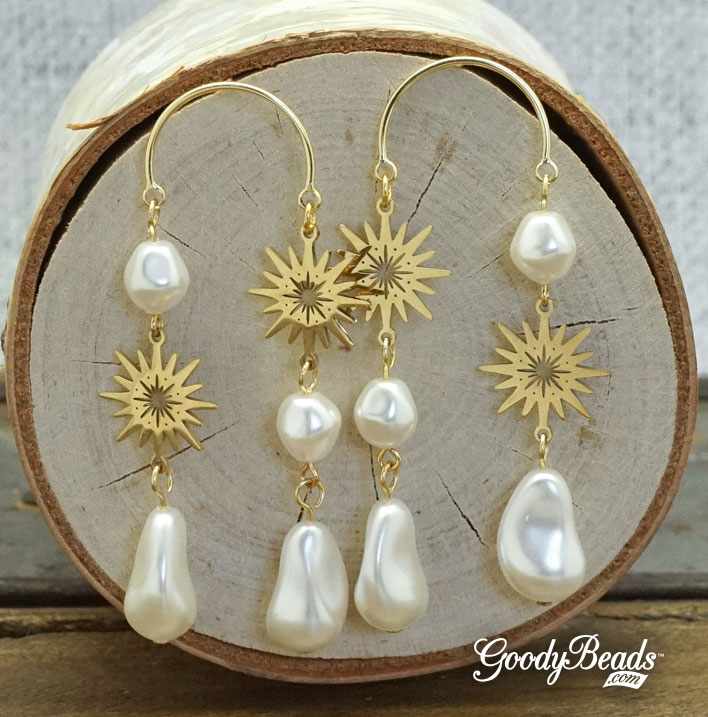
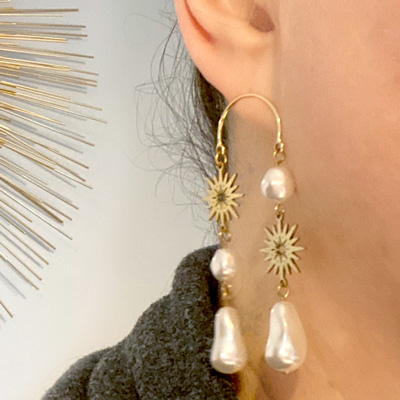
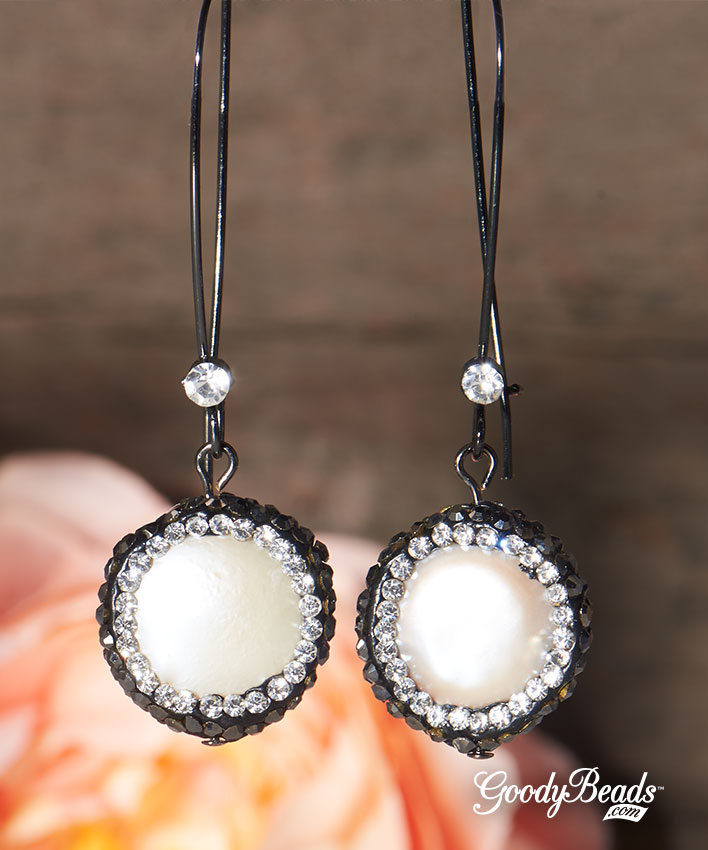
DIY Pearl Pavé Earrings with Rhinestone Pavé Beads

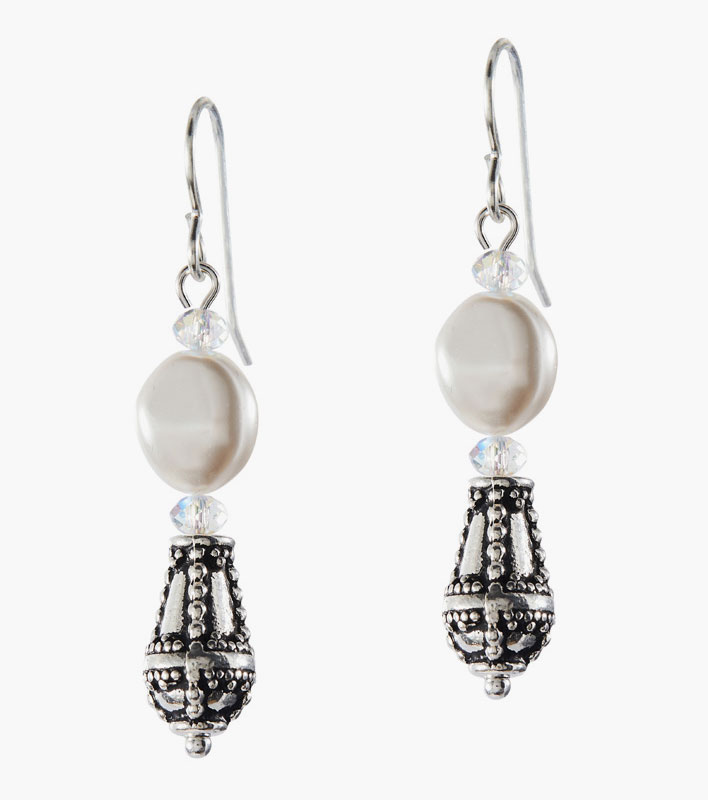
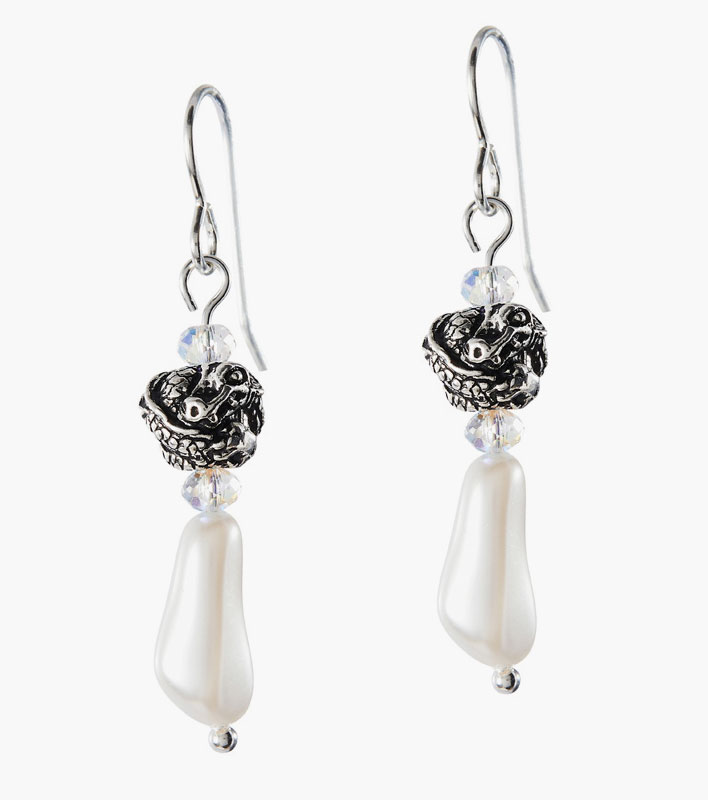
When I think about Mother’s Day, I think about pearls. They are what encompasses a mom; they’re precious, glowing and a treasure to have. Plus, these earrings are great to wear for any occasion! The rhinestones are laid around to frame the pearl. You can check out our other Rhinestone Pavé beads for more options!

Items used in earrings:

  • Z003029 (2) – 17mm Rhinestone Pavé Embellished Pearl Coin Bead
    Try out other Rhinestone Pavé beads.
  • Z009730 – 35mm Gunmetal Kidney with Clear Rhinestone Ear Wire
  • A019645 – 1.5 Inch Gunmetal Plated 22 Gauge Headpins

GoodyBeads.com Blog | DIY Pearl Pave Earrings FREE Tutorial

Directions:

  1. Slide a bead onto a headpin and make a simple loop.
  2. Open dangle loop and slide on the loop part of earring. Close dangle loop.
  3. The loop on the earring will need to be pinched to that the dangle doesn’t (run away) slide off of the earwire. Use round nose pliers to gently pinch it to make the opening smaller.
  4. Repeat all steps for other earring.


DIY Tiered Earrings with Swarovski® Baroque Pearl Beads

One of our fan favorites are the organic Baroque Pearl beads from Swarovski, especially used this tiered earrings from our Baroque Pearl Trend. Its freeform shape has a gorgeous shape at every angle you look at.

Items used in tiered earrings:

  • SW02594 (4) – 16mm Cream Crystal Baroque Drop Pearl
  • SW02569 (4) – 8mm Cream Crystal Baroque Round Pearl
  • Z005963 – 20mm Gold Plated Half Circle Post Earrings with 2 Loops
  • A019605 – 1.5 Inch Gold Plated 22 Gauge Eyepins
  • A019666 – 1.5 Inch Gold Plated 22 Gauge Headpins
  • A011517 – 4mm Gold Plated 20 Gauge Round Jump Ring
  • Z006004 (4) – 18mm Gold Plated Stainless Steel Sun Burst Connector

GoodyBeads.com Blog | DIY Tiered Earrings with Swarovski® Baroque Pearl Beads FREE Tutorial

Directions:

  1. Slide a baroque round pearl on an eyepin and make a simple loop. Make a total of 4 links.
  2. Slide a baroque drop pearl on a headpin and make a simple loop. Make a total of 4 dangles.
  3. Open loop of pearl dangle, slide on sunburst connector and close loop.
  4. Open loop from pearl link, slide on other end of sunburst connector and close loop.
  5. Open jump ring, slide on other end of pearl link, through left loop of earring and close jump ring.
  6. Open another pearl dangle loop, slide on another pearl link and close loop.
  7. Open loop of other pearl link, slide on another sunburst link and close loop.
  8. Open another jump ring, slide on other link of sunburst, through the right loop of earring and close jump ring.
  9. Repeat Steps 1-5 and link through right earring loop. Repeat 6-8 and link through left earring loop.

Earring Design by Tory


DIY Threader Earrings with Pearl Dangle

Threader earrings are very popular among minimalistic jewelry wearers. You can wear it threaded through one pierced hole and have a long dangle earring or if you have two next to each other, you can thread and loop through both. They are easy to wear and even easier to make! Try out this DIY threader earrings with pearl dangle.

Items used threader earrings:

  • Z019929 – Sterling Silver Box Chain Ear Threads
  • SW02567 (2) – Swarovski® 8mm White Crystal Baroque Round Pearl
  • A001494 – 1 Inch Silver Plated 24 Gauge Headpins

GoodyBeads.com Blog | DIY Threader Earrings with Pearl Dangle FREE Tutorial

Directions:

  1. Slide pearl on a headpin and make a simple loop.
  2. Open pearl dangle loop and slide on loop of earrings. Close loop.
  3. Repeat for other earrings.


Spend the Holidays with Swarovski® – Christmas Holiday

We’re celebrating festive spirit with our friends at Swarovski: Create Your Style and celebrating with Christmas Holiday colors. Plus, we have a fun DIY project to get hype up the holidays.

Here are our selection of Swarovski crystals to embrace the festive and classic colors of Christmas Holiday:

  • Reds – Siam, Light Siam, Scarlet, Rouge Pearl & Red Coral Pearl.
  • Green – Emerald, Luminous Green Mystic, Vitrail Medium, Olivine, Iridescent Tahitian Look and Eden Green Pearl.
  • Yellow/Gold/Bronze: Topaz, Light Topaz, Golden Shadow, Metallic Sunshine, Yellow Opal, Sunflower, Citrine, Copper & Metallic Light Gold,

Red Currant Road Bracelet

Items used in Bracelet: SW02559 (24), SW02635 (5), TC02648 (5), TC01870, TL00265, A011531, Z012973 & Z001065.

Directions:

  1. Using alcohol wipes clean all off the links and set aside to dry.
  2. Using one 10mm Scarlet fancy stone glue into matching finding. Repeat four more times and set aside to dry for 24 hours.
  3. Using one head pin slide on one 6mm Rouge Pearl and make a simple loop. Repeat 23 more times and set aside.
  4. Using two 5mm jump rings attach each jump ring separately to the same side of one frame made in Step 2 (double jump ringing). Use two more 5mm jump rings to attach to the opposite side. Repeat this step four more times and set aside.
  5. Using two 9mm jump rings, connect together two links made in Step 4 so that it is double jump ringed. Continue this process until all five stone set links are connected.
  6. Using three pearl drops, attach to one side of the double medium jump ring connection between stone set links. Repeat for opposite side of the two 9mm jump ring connection. Repeat this step until you have 4 complete sets of 6 pearls between all 5 stone set links.
  7. Using one end of the Maker’s toggle attach two small jump rings by attaching each jump ring separately to the same side of the toggle (double jump ringing). Repeat for other side of the toggle piece.
  8. To attach the toggles to the ends of the bracelet use two medium jump rings to attach the double jump rings from the bracelet to the toggle. Repeat for the other side.

Bracelet and tutorial courtesy of Swarovski: Create Your Style.


DIY Carabiner Lariat Necklace with Swarovski® Baroque Pearl

Our lariat necklace tutorial today features the popular carabiner clasps, along with our newer Swarovski baroque pearls. Make this necklace long or short, it will be the start of some fun layering neck mess pieces.

Items you’ll need for Lariat Necklace:

GoodyBeads.com Blog | DIY Carabiner Lariat Necklace with Swarovski® Baroque Pearl FREE Tutorial

GoodyBeads.com Blog | DIY Carabiner Lariat Necklace with Swarovski® Baroque Pearl FREE Tutorial

Directions:

  1. Slide pearl onto the headpin and make a larger simple or wrapped loop. Make sure loop can slide on through clasp.
  2. Open jump ring, slide on charm and close jump ring.
  3. Cut chain to 16 inches. Or cut to your preferred length.
  4. Open carabiner clasp by unscrewing clasp, slide on jump ring with charm and pearl drop. Then slide on both ends of your paper clip chain. Close clasp.


Swarovski® Create Your Own Style: Trio of Opulent Earrings

Our blog post today consists of three projects in one, using some of Swarovski’s newest pearl shapes! We are really loving these new shapes because they look organic with fun depths to them. Here are three pair of earrings pair the new pearls with some fitting TierraCast components.

Opulent Earrings #1

Items used in earrings: SW02568 (2), SW01454 (4), TC02572 (2), TC02568 & A019612.

Directions:

  1. Open eyepin loop, slide on TierraCast charm and close loop.
  2. Slide the following on the eyepin and make a simple loop:
    crystal, pearl and crystal.
  3. Open dangle loop and slide on earwire loop and close loop.
  4. Repeat all steps for other earring.

Opulent Earrings #2

Items used in earrings: SW02579 (2), SW01454 (4), TC02576 (2), TC02297 & A019697.

Directions:

  1. Slide the following on to the headpin and make a simple loop:
    Opulent bead, crystal, pearl and crystal.
  2. Open ear wire loop, slide on pearl dangle and close loop.
  3. Repeat all steps for other earring.

Opulent Earrings #3

Items used in earrings: SW02604 (2), SW01454 (4), TC02562 (2), TC02297 & A019697.

Directions:

  1. Slide the following on the headpin and make a simple loop:
    Pearl, crystal, dragon bead and crystal.
  2. Open ear wire loop, slide on pearl dangle and close loop.
  3. Repeat all steps for other earring.


DIY Red and Green Holiday Earrings with NEW Thread Bobbin Colors & Swarovski® Rouge Pearls

We’re getting ready for Christmas season with this Red and Green Holiday Earrings. Designed with our NEW Swarovski Rouge Pearls and Thread Bobbin colors, we’re using two colors to wrap with our Beadable Oval Pendants (Z011345 or Z011351) for a festive pair of earrings!

What you’ll need for these Holiday Earrings:

  • (2) Z011345 – Beadable Oval Pendant
  • (2) SW02560 – 8mm Swarovski Rouge Crystal Pearl
  • Z008003 – Seafoam Green Superlon Beading Thread Bobbin
  • Z008298 – Scarlet Superlon Beading Thread Bobbin
  • A019626 – 1.5 Inch Eyepin
  • TCZ0078 – Coil Earring Wire by TierraCast®
  • Needle

Directions:

1. Cut both threads to a length of about 8 feet. Feed both threads to your needle.

2. With your thread ends, anchor it to the inner loop of the beadable pendant with two knots. Cut tail to about 1/4 inch. Optional: You can use a small dot of glue to secure knot.

3. Sew down through middle hole and loop back through top loop. You will start from the inside towards the outside to one side. (You can refer to our previous blog post on sewing through this oval pendant, but these Red & Green Earrings will work from the middle outwards.)

4. Then sew other side starting from the middle and going outwards.

5. Sew through middle strands back and forth and cut off excess (Refer to video tutorial in previous beadable blog post). (Optional, you can use a small dot of glue for security, but not necessary. I’d suggest using a translucent glue that will not discolor the thread. Test out glue before use.)

6. Open eyepin loop, slide on top loop of pendant and close loop.

7. Slide on pearl and make a simple loop. Open earwire loop and slide on dangle.

8. Repeat all steps for other earring.


DIY By The Sea Earrings with Swarovski crystals & pearls

You can hear crashing waves when you wear these By the Sea Earrings. Ok, you might not hear them, but you will definitely want to wear these earrings to your next seaside adventure. It features the brilliant hue of Swarovski® Majestic Blue crystals and the luminescent sheen from the crystal pearls.

What you’ll need to make earrings:

  • TC00113 – 14mm Small Spindle Shell Charm by TierraCast
  • TC02680 – 13mm Tiny Seastar Charm by TierraCast
  • (2) SW01448 – 10mm Crystal Pearlescent White Swarovski Pearl
  • (2) SW01446 – 6mm Crystal Pearlescent White Swarovski Pearl
  • (2) SW01723 – Swarovski® 4mm Majestic Blue Round Crystal
  • (2) SW01725 – Swarovski® 8mm Majestic Blue Round Crystal
  • TCZ0077 – Sterling Silver Earring Wire by Tierracast
  • A019629 – 1 Inch Silver Plated 20 Gauge Eyepin

GoodyBeads Blog | By the Sea DIY Earrings FREE Tutorial

Directions:

  1. Open eyepin loop, slide on a charm and close loop. Slide a 4mm Majestic Blue crystal on the eyepin and make a simple loop.
  2. Open another eyepin loop, slide on loop you made in step 1 and close loop. Slide a 6mm Crystal Pearlescent on eyepin and make a simple loop.
  3. Open another eyepin loop, slide on loop you made in step 2 and close loop. Slide an 8mm Majestic Blue crystal on the eyepin and make simple loop.
  4. Open another eyepin loop slide on loop you made in step 3 and close loop. Slide a 10mm Crystal Pearlescent on eyepin and make a simple loop.
  5. Open earwire loop and slide on loop you made in step 4. Close loop.
  6. Repeat all steps for other earring.


DIY Pearly Posh Earrings with Swarovski Pearls

Let’s continue our love of summertime jewelry with these cute Pearly Posh Earrings. With only 4 components, you can whip these up in no time!

What you’ll need:

GoodyBeads Blog |

Directions:

  1. Slide a pearl onto a headpin and make a simple loop.
  2. Open up pearl dangle loop and slide through inner loop of connector. Close loop.
  3. Open earwire loop and slide on top loop of connector. Close loop.
  4. Repeat all steps for other earring.


DIY Swarovski® Amethyst & Pearl Hoop Earrings

A fun new and old favorite, are these pair of summer-loving hoop earrings with Swarovski crystals and pearls.

What you’ll need:

  • 6mm Round White Swarovski Pearl – SW00665 (4)
  • 4mm Bicone Crystals, Light Amethyst – SW00195 (6)
  • 6mm Bicone Crystals, Light Amethyst – SW00196 (2)
  • 11/0 Silver Lined Amethyst Seed Bead – SB00339
  • 3mm Gold Round Beads – Z001310
  • Gold Plated Hoop – A013205
  • Earwires – TCZ0148
  • Gold Headpin – A019651
    Note: Directions are for making wrapped loops. If you prefer to make simple loops, we suggest using a harder gauge wire like A019658.

Directions:

  1. Slide on a headpin; 4mm bicone and seed bead. Make a simple or wrapped loop. Make a total of 4 dangles.
  2. Slide on a headpin; seed bead, 3mm round bead, pearl and seed bead. Make a simple or wrapped loop. Make a total of 4 dangles.
  3. Slide on a headpin; seed bead, 3mm round bead, 6mm bicone, 3mm round, seed bead, 3mm round, 4mm bicone and seed bead. Make a simple or wrapped loop. Make a total of 2 dangles.
  4. Cut the tab part of a hoop finding off.
  5. Make a simple loop to one end of your hoop perpendicular to the loop of the hoop. Refer to previous Memory Wire Hoop Tutorial blog post.
  6. Slide on the following to the hoop: 3mm round, step 1 dangle, 3mm round, step 2 dangle, 3mm round, step 3 dangle, 3mm round, step 2 dangle, 3mm round, step 1 dangle and 3mm round.
  7. Slide other hoop end through loop you make in step 5 and roll back a simple loop. (Again, refer to the Memory Wire Hoop Tutorial blog post.)
  8. Open ear wire loop and slide on hoop dangle. Close loop.
  9. Repeat Steps 4-8 for other earring.