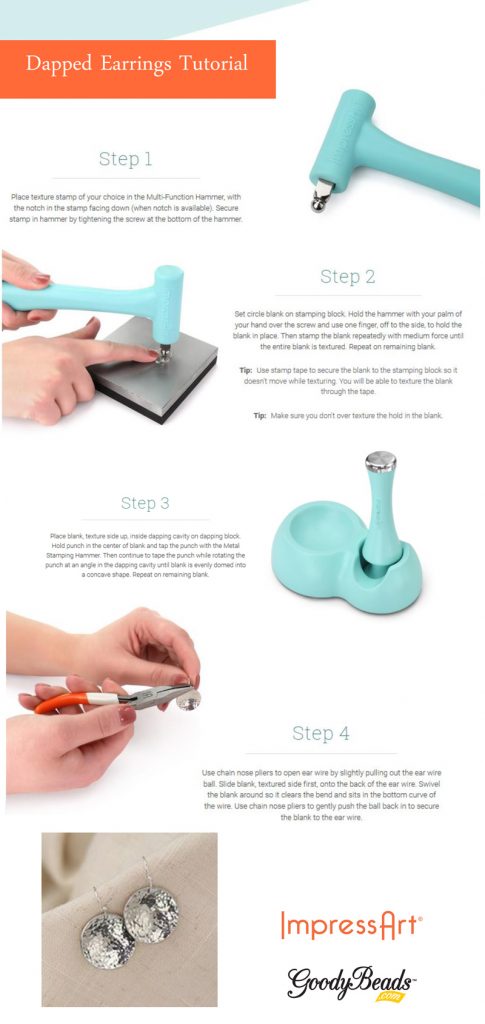
Have you tried metal stamping lately? It is a great time to start a new jewelry making adventure with metal stamping. Let’s start something easy with a heart blank and an adjustable chain necklace.
Stamp your message on heart blank. Optional: Use bracelet guides to help center your message.
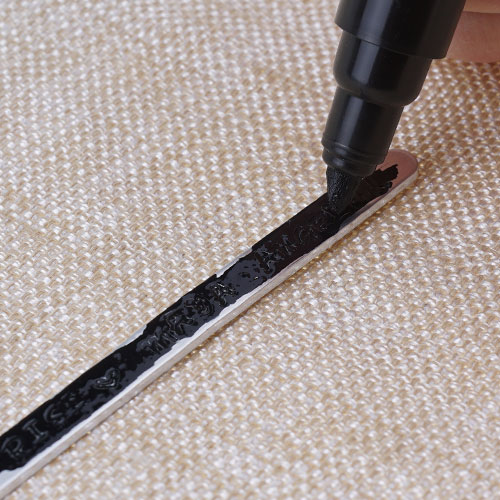
Mark in your stamps with a sharpie and wipe excess with a paper towel.
Determine the length of your necklace. wrap chain around the back of your neck and determine where you would want to situate your heart pendant. Cut length with cutters. And then cut chain piece in half.
Connect one chain piece with a jump ring to one side of your heart blank. Repeat to other chain and heart blank hole.
Add a jump ring to the left chain and close jump ring.
Add a jump ring to the right chain, while attaching the lobster clasp. Close jump ring.
DIY Bookmarks Using Metal Stamping Bracelet Blanks
If you’re planning to staying home this weekend but still looking for an adventure, why not curl up to a book! We have this wicked DIY idea taking metal bracelet blanks and making them into bookmarks! Plus, you can customize it with your own metal stamping design or verbiage and top it off with embellishments like leather, tassels, links and more!
For this bracelet, we used 12″ of leather cord and slid the leather cord through the hole. Center leather and make an overhand knot or Sliding Knot (Use this Tutorial). Add a large-hole gemstone to each leather end with knots.
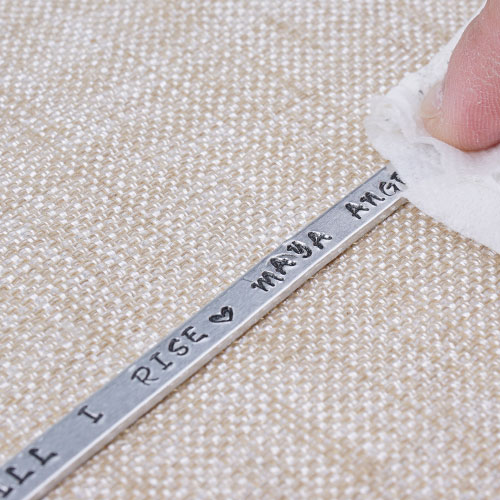
We wanted to add a fun quote and used “Still I Rise” a poem title by the famous Maya Angelou. to embellish, we attached a 3 inch piece of chain with a jump ring. Open eyepin, and attach other end of chain and close. Add Czech bead and make a simple loop. Open loop and add tassel.
ImpressArt®: How to Metal Stamp Mandala Patterns
This week’s tutorial from ImpressArt is a popular trend in Mandala metal stamping. A mandala design is a circular shape with geometric patterns.
Here is what you’ll need to start your mandala designs:
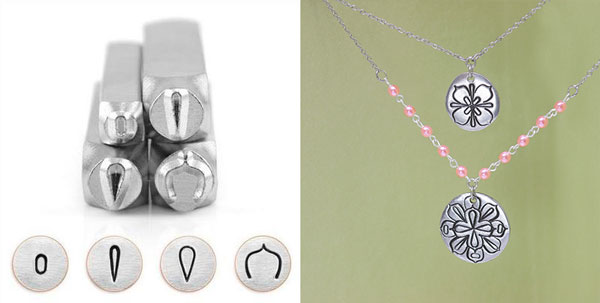
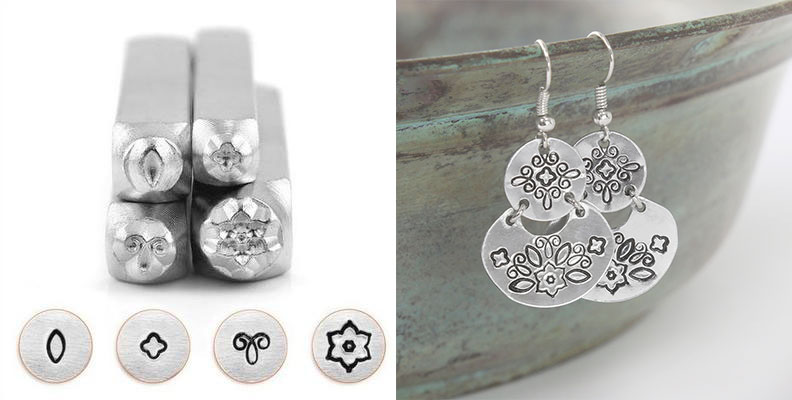
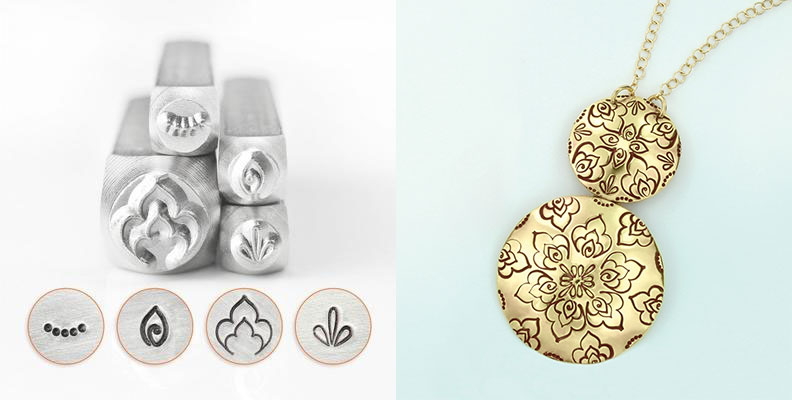
Mandala Design Stamp Pack: These packs comes with a set of 4 stamps. Combine these stamps endlessly to create intricate jewelry designs. Easily stamp beautiful on-trend mandalas, frames, accents, or borders. Here are 4 sets we have: Z018002, Z018004, Z009934, Z009935.
Stamp Enamel: An acrylic ink used to darken stamped impressions so your design will be clearly seen. We have this enamel pen in Black, Green, Gold & Brown.
Sticker Book Stamp Guides (Z021582): Stamp Guides makes it easy to space out letters, stamp in a straight line or curve, and stamp Mandalas and other intricate patterns
Tutorial also uses the texturing skill used in last week’s ImpressArt Tutorial.
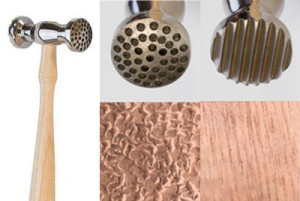
ImpressArt®: How to Use the Texture Stamping Hammer
This week’s tutorial from ImpressArt is all about metal stamp texturing. Texturing adds an extra dimension of design to your metal blanks. It also adds an organic look for your metal stamping needs. Here are some product you may need to get you started on texturing:
Texture Stamper Hammer (TL00266): This innovative tool creates unique, one of a kind textures using your metal stamps as texture heads. You can also interchange the stamping head with this hammer.
Ball Pen Texture Stamper Head (TL00313): This hammer head creates an organic, hammered texture look to your metal blanks. It is to be used with the Stamper Hammer.
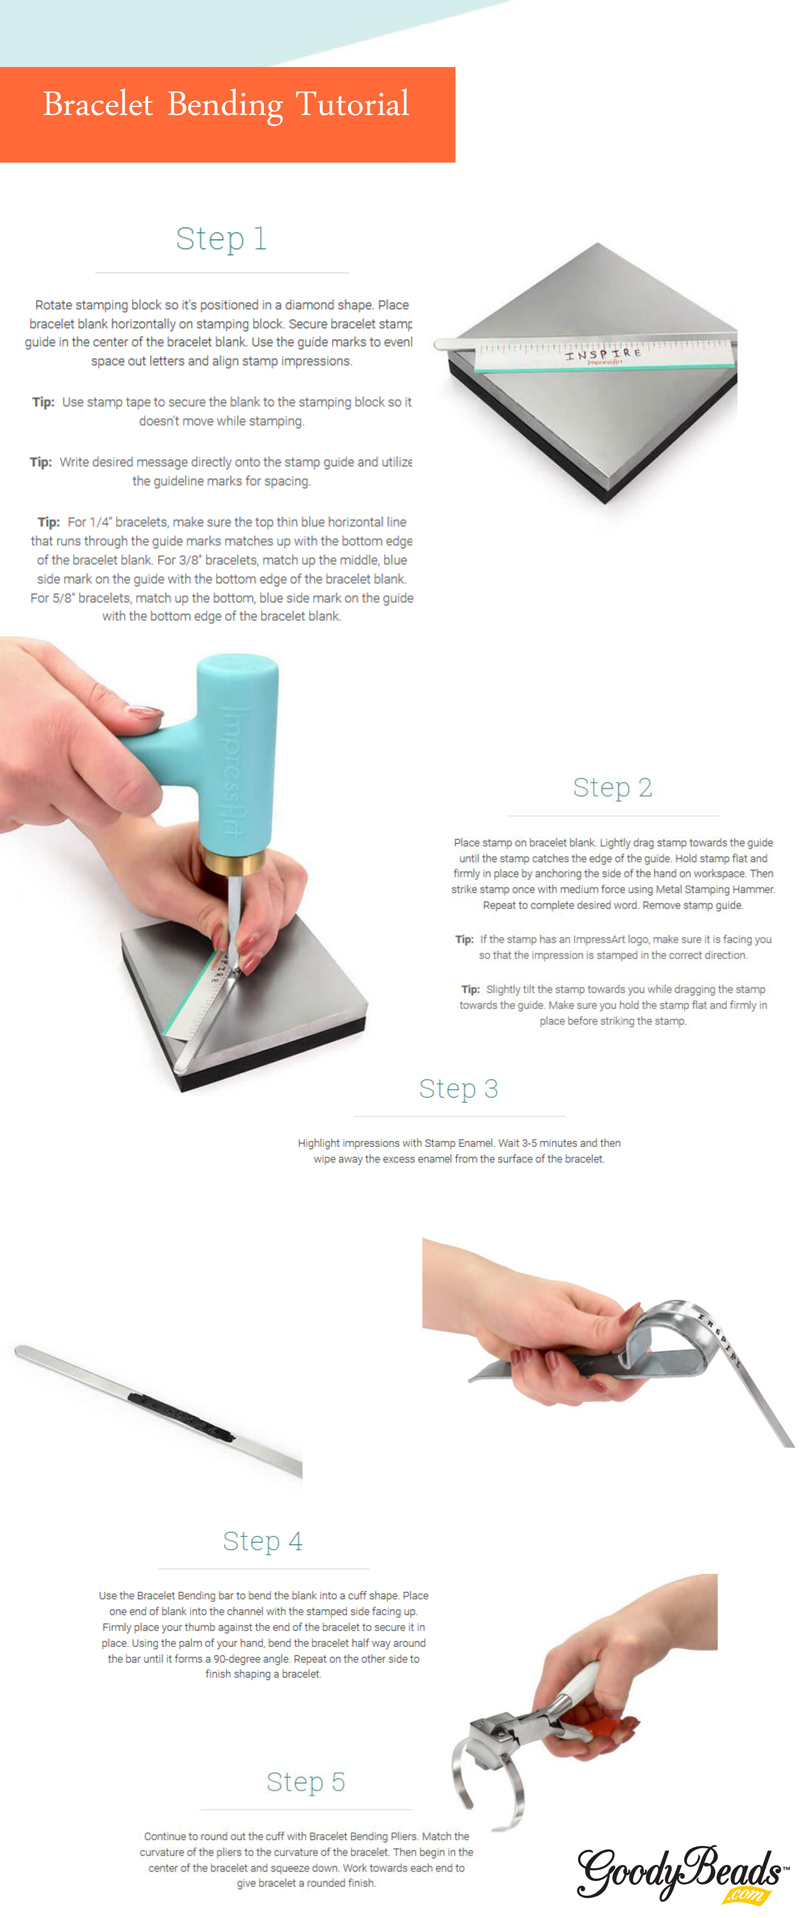
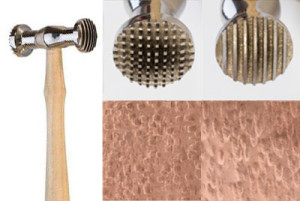
Texture Bracelet Tutorial
Using last week’s tutorial on Bracelet Bending, texturize the bracelet blank first before bending the blanks to create a bracelet.
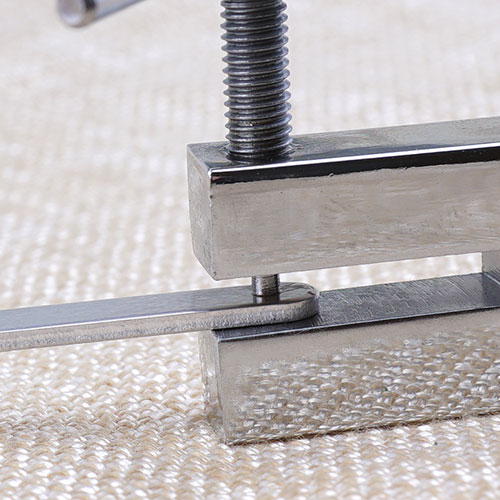
Impress Art®: How Make a Metal Bracelet with the Bracelet Bending Bar Kit
This week’s tutorial from ImpressArt is a simple tutorial on bracelet bending. See how easy it is to make a bracelet by using the bracelet bending tool.
Here are some tool you’ll need:
Bracelet Guides (Z021583) – This will help to keep your lettering straight when writing names or a simple phrase.
Bracelet Bending Pliers (TL00350) – This tool will give you the curve your bracelet will need to obtain a curved shape.
Bracelet Bending Bar Kit (TL00352) – This tool is very useful in bending the ends of your bar. Plus, this kit includes (4) 1/4 inch and (4) 38 inch Aluminum Bracelet Blanks.
Our friends at ImpressArt have given us a 5 week roll-out of educational tool knowledge, tips and tutorials. ImpressArt has a whole inventory of tools, guides and metal blanks for metal stamping. Metal stamping is a great tool and skill to use to customize and personalize jewelry and crafts with impressed words and designs. (Note: Though, many of these metal stamping tools are great for imprinting on metal, you can use them for stamping leather too.)
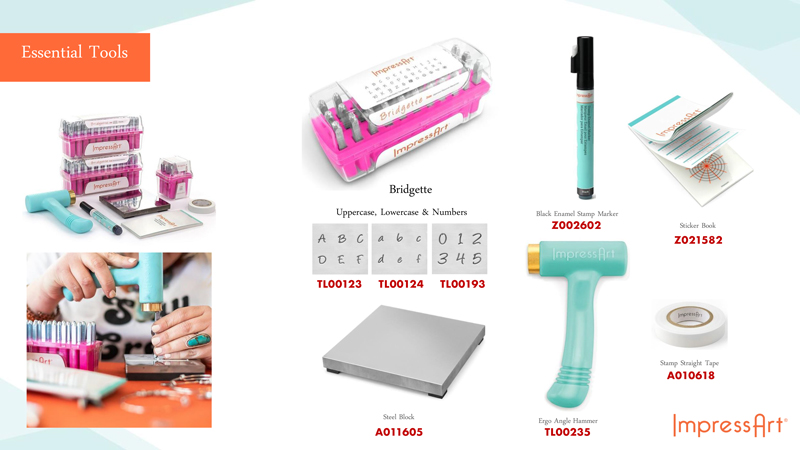
Essential Tools
To get started on customizing with metal stamping, we are starting with stamping essential this week.
These tools are what you will need to help you start metal stamping:
Metal Letter Stamping Sets – Great for personalizing jewelry and craft components. Many of these sets will have an Uppercase and Lowercase set, as well as a number set. Plus, there are different font styles you can get. (Item in image is Bridgette Set: TL00123, TL00124, TL00193) (An example of the stamps you will get with your letter set.)
Steel Block (A011605/A014415) : This a hard, stable block that you’ll need to place your stamping blanks to stamp on. This will assist you in giving you a solid impression when you stamp.
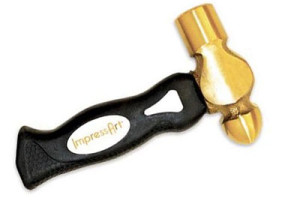
Ergo Angle Hammer (TL00235): ImpressArt’s Ergo-Angle handle provides ideal positioning for clean, even impressions and it’s one pound head provides optimal weight for deep crisp impressions. It’s short handle design features multiple holding options for maximum control and comfort.
Stamping Tape (A010618): A straight guide that allows precise accuracy when stamping letters on metal.
Sticker Guide (Z021582): Stamp Guides makes it easy to space out letters, stamp in a straight line or curve, and stamp Mandalas and other intricate patterns.
Enamel Stamp Marker (Z002602): Stamp Enamel Marker is an acrylic ink used to darken stamped impressions so your design will be clearly seen. Convenient applicator marker makes highlighting impressions quicker, easier and cleaner.
OptionalPolishing Cloth (A002371) : Use the polishing cloth to help wipe off excess enamel.
DIY Key Chain Tutorial
Here is a simple DIY Key Chain Tutorial using these essential tools and guides.
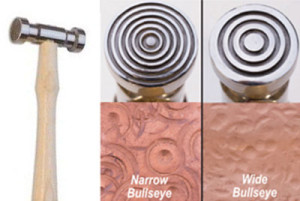
Make an impression with Mandala Stamp Packs and creating Mandala designs.
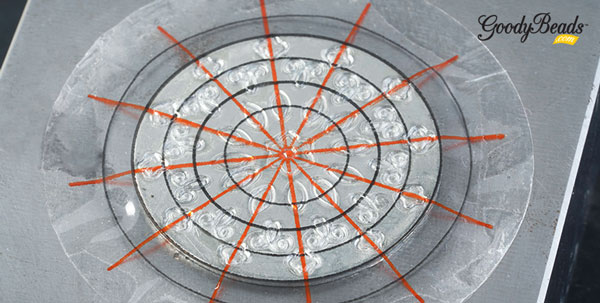
Mandala is an abstract and geometric pattern, usually in a circular form. Here are some tips, tools, and techniques to help you create your mandala designs!
A helpful supply to have when creating your circular shape is getting the ImpressArt Stamp Guides. These guides are stickers that you peel off and lay over your stamping blank. Once your design is stamped these stickers are easily removable! They also have markers to help you evenly space out your stamping, especially if you are using letter stamps.
But for Mandala there is a circular, see-through sticker guide with diagonal lines to help space out your stamps.
A tip when stamping is to stamp from the center out. And when stamping from the center out, stamp closer to you and rotate to keep the stamping even. Once your design is complete peel off the guide. There will be small patches still stuck within the stamped areas, so make sure to remove it all before adding your enamel or brushing it over with a Sharpie to make your designs stand out. Rub your polishing cloth of the surface to remove excess enamel or markings.
Mandala Stamp Samples
Each set ImpressArt Mandala Stamp Pack are sold at GoodyBeads with four different stamps. When combined can create an endless mandala design. See how ImpressArt using these stamp sets. Each set can be bought at GoodyBeads. (Images courtesy of ImpressArt)
We talked about looping and cutter tools in our Beading Essential: Tool Edition Part 1 blog post. In this second part of our Beading Essential: Tool Edition, we’ve selected a few metal working and hammer tools as well as other tools to make your jewelry making easier.
Hammers
These are not your average hammers you have lying around your house to hammer nails. These special hammers are extra sturdy, like steel hammers, and have versatile uses for jewelry making.
A010617 – Metal Stamping Hammer
TL00235 – Metal Stamping Hammer By ImpressArt
These two are metal stamping hammers that have sturdy brass heads ideal for striking metal stamps. Their short handles have comfortable grips to give the user a precise strike.
A012927 – Chasing Hammer
The Chasing Hammer is a great tool to use for metal working. The two-part hammer has a round side that is great for adding textures such as a hammered look (small dents) to metal. While the other side is flat and good for flattening wire and hammering rivets.
Texture hammers provide patterned texture on metal. Each hammer has a double head that has two different texture heads to create a different impression in your metal. Try turning your hammer when you strike, for a variation in your impression. Create unique impressions by changing up the angle and power of your strikes.
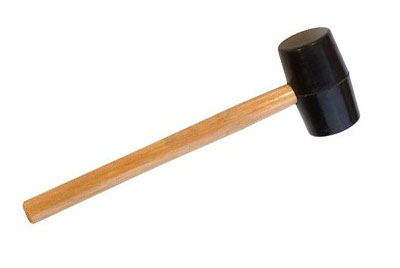
A011606 – Rubber Mallet
A rubber mallet will allow you to change a half-hard or dead-soft jewelry wire into hard wire. After you’ve shaped your own wire pendants, ear wires or clasps, for instance, you’ll want to use a rubber mallet to make them stronger, harder and to help them maintain their shape. Because of its soft head, it is also best to use a rubber mallet on color coated wire as each strike does not disturb the colored surface.
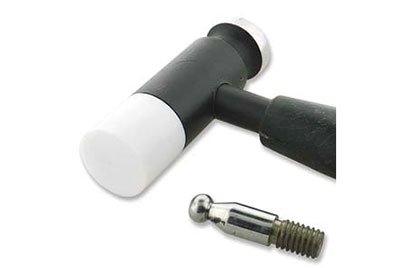
TL00146 – Whammer Wire Jewelry Hammer
With this tool, you get three tools in one. There is a convex steel head for flattening wire, an interchangeable nylon flat head for hardening wire or straightening colored wire, and a steel dapping head for creating dents or texture on metal.
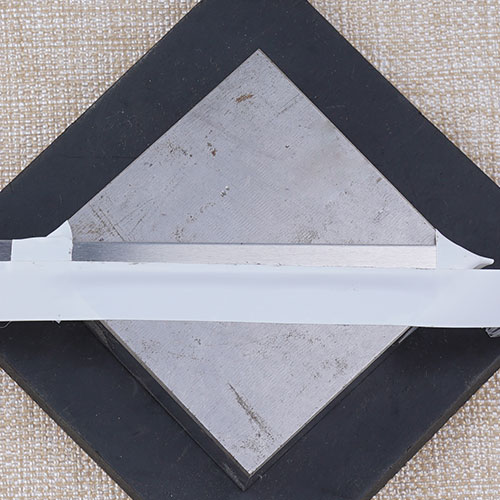
First, stamp your designs onto the stamping blank and sand the edges of your blank to smooth out the edges with Sanding Sponge Grit. Then, take one end of the blank and insert into the loop of the bar. Bend the blank around the curve of the bending bar. Repeat to the other side of the blank. Use Nylon Jaw Bending Pliers if you need to create a more curved look.
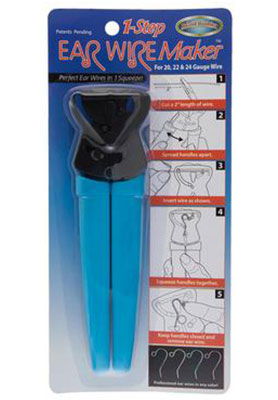
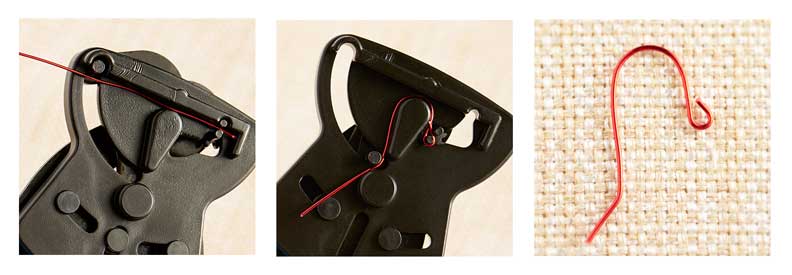
TL00199 – 1 Step Earwire Maker
Use the Earwire Maker to make ear wires with 20-, 22-, or 24-Gauge wire in one step. Also use the Bur Tool to smooth rough and sharp ends of the ear wire and/or harden the ear wire by hammering it with a rubber mallet or nylon whammer tool.
Note, after you have squeezed the pliers to make the ear wire, do not release the pliers. Remove ear wire while you have the pliers squeezed. Cut excess wire if you need to shorten the length of the end.
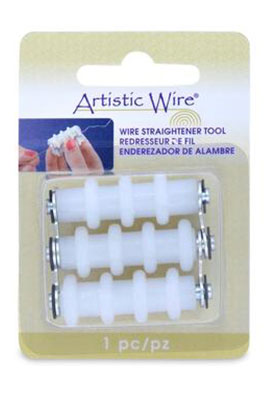
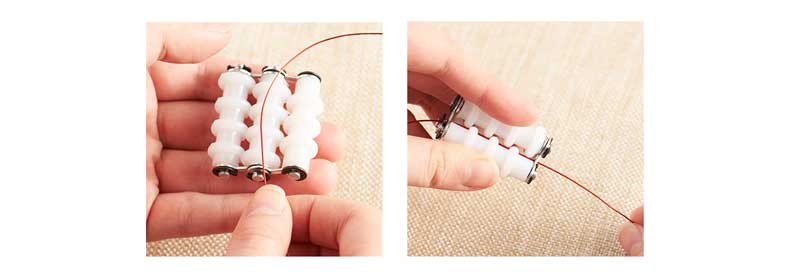
TL00208 – Straightener Tool
Wire is easier to use when it is flat. This wire straightener from Artistic Wire can help with straightening your curved, kinked, or bent wires.
Put your piece of wire in the middle of the three bars. Clasp the bars enclosing the wire on the inside. Pull your wire out and you should have a straighter wire. You may need to run the wire through a few times for more prominent kinks.