DIY Double Ring Mixed Media Earrings

We’ve compiled some of our favorites in today’s project! We have TierraCast findings with Leather Cord USA Nubuck leather lace and mixing metals with Nunn Designs hoops. Try these DIY earrings out today!

Items used in earrings:

  • TCZ0077 – Sterling Silver Earring Wire by Tierracast®
  • Z004551 (2) – 30mm Ant. Silver Grande Organic Hoop by Nunn Design
  • Z008273 (2) – 35mm 24k Gold Plated Frame Hoop by Nunn Designs
  • Z016427 – 10mm Black Nubuck Lace
  • A008807 – 7mm Silver Plated 16 Gauge Round Jump Rings
  • A008799 – 5mm Oval Silver Plated 21 Gauge Jump ROpings
  • Tools: TL00043 – Leather Hole Punch Pliers
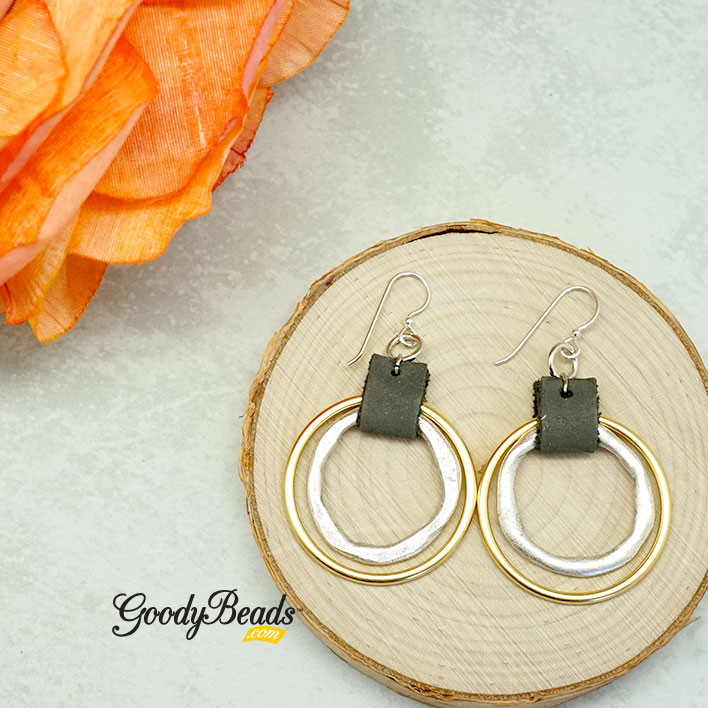
GoodyBeads.com Blog | DIY Double Ring Mixed Media Earrings FREE Tutorial

Directions:

  1. Cut two pieces of leather at 1.5″ long.
  2. Punch a hole 1/8″ from the edge of your piece of leather. Punch a hole on each leather end. Repeat on the other leather piece.
  3. Open oval jump ring, slide on a hole of a leather piece, slide on a gold and silver ring and slide through other hole of that leather piece. Close jump ring.
  4. Open 7mm jump ring, slide on oval jump ring from step 3 and through ear wire loop. Close jump ring.
  5. Repeat Steps 3 and 4 for other earring.


DIY Golden Fine Rocks Bracelet

Are you getting your New Year’s jewelry ready? Why not make this fun bracelet to ring in the new year.

Items used in bracelet:

  • WR00120 – Large Silver Heavy Duty Memory Wire
  • CH00926 (6) – 5mm Braided Metallic Gold Round Leather Cord
  • SW02313 – Swarovski® Light Colorado Topaz Dorado Fine Rocks
  • Z006380 (4) – 5mm Gold Brass Cord End Cap
  • SW00398 (2) – Swarovski® 6mm bicone crystal beads silver night

GoodyBeads Blog | DIY Golden Fine Rocks Bracelet FREE Tutorial

GoodyBeads Blog | DIY Golden Fine Rocks Bracelet FREE Tutorial

Directions:

  1. Cut 2 coils of memory wire.
  2. Make a simple loop at one end of the memory wire with memory wire finishing pliers.
  3. Cut leather piece in half or two pieces at 3 inches.
  4. Slide on the following components on the wire:
    End cap, leather, end cap, bicone crystal, fine rocks tube, bicone crystal, end cap, leather and end cap.
  5. Cut wire end with 3/4″ wire left with memory wire cutters and make a simple loop with memory finishing pliers.


DIY Glam Cuff with Flat Leather and Glue-in Cuff

Let’s get to rocking out to beautiful fall weather with this DIY Glam Cuff. It will be your fun go-to jewelry accessory for your cool, fall fashion.

What you’ll need:

  • Z020292 – Rose Gold Glue-in-Cuff
  • CH01080 (7) – 10mm Multi-Colored Shimmer Flat Leather
  • CH00821 (15) – 5mm Matte Gold Pearl Metallic Flat Leather
  • A015821 – Super New Glue

Directions:

  1. Cut 5mm leather in half.
  2. Add glue to bezel part of Glue-in-Cuff .
  3. Starting at one end, line up all three strand ends to that end.
  4. Keeping the leather straight, lay it inside the bezel part of the cuff. Press leather firmly to adhere.
  5. Cut excess leather.
  6. Let it dry for a full 24 hours before wearing.

Try these other DIYs using Flat Leather.


DIY Leather Band Bracelet with Large-Hole Gemstones

Let’s welcome fall with a this fun DIY using LeatherCord USA 1.5mm leather, Blue Crazy Lace large-hole gemstones from Dakota Stones and the perfect findings from TierraCast to pull it all together.

What you’ll need:

GoodyBeads Blog | DIY Leather Band Bracelet with Large-Hole Gemstones FREE Tutorial

Directions:

  1. Cut 4 pieces of leather at 9″.
  2. Slide all 4 pieces of leather through a barrel bead and center the bead in the middle of the leather pieces.
  3. Divide 2 leather pieces to each side of the barrel bead.
  4. On one side, fold the inner leather in half and slide a gemstone bead onto both leather ends.
  5. Fold the outer leather strands in half, laying them on either side of the gemstone you added in Step 4 and slide all 4 ends through a barrel bead. Adjust leather strands to lay flat, and slide barrel up close to the gemstone you previously added.
  6. Using nylon pliers or a flat nose pliers, gently crimp down on the barrel bead to keep the middle leather and gemstone in place.
  7. Repeat steps 4 through 6 to other side of the bracelet.
  8. Trim to wrist size and minus about ½ inch; making sure your barrel/gemstone design is centered and you’re making a straight flush cut.
  9. Add an end cap to one end of your leather design, making sure all 4 leather strands fit inside and crimp down on your end cap using a flat nose or nylon pliers. Repeat on the other end of the bracelet.
  10. Open 1 jump ring and slide on your end cap loop and clasp loop. Repeat on the other end cap loop and magnet end.

— Click HERE for more DIY projects from GoodyBeads–


DIY Leather Twist Necklace with Gemstone Donut

The days are getting cooler, so fall is surely coming soon. Why not try this leather necklace with a TWIST to accompany your fall weather fashion!

What you’ll need:

Directions:

1. Cut a 60”-70” piece of leather cord and fold in half. Slide the mid point through donut hole. **Note – it’s better to have too much leather starting out than not enough. You can always cut it before making the sliding knots in the final step.

2. Pull cord ends through to almost make a lark’s head knot.

3. Flip donut around.

4. Take the midpoint of the loop and make a twist. Pull cord ends through that loop.

5. Pull your cords to create a cross loop.

6. Make sliding knots to cord ends to make it adjustable. Check out previous blog on how to make a Sliding Knot.


DIY Men’s Bracelet Set with Leather and Silver Findings

Today’s tutorial features this men’s bracelet set. Ladies can even love them too! These three bracelets consists of leather, metal beads and even hematite beads.

GoodyBeads Blog | DIY Men's Leather Bracelet Set FREE Tutorial

Hematite Stretch Bracelet

GoodyBeads Blog | DIY Men's Leather Bracelet Set FREE Tutorial - Hematite Stretch Bracelet

Items used in bracelet: HEM6RD-F-8, A021474 & A021633.

Directions:

  1. Cut elastic to twice your wrist length or about 15 inches. Pull and pre-stretch your elastic to loosen the elasticity.
  2. Cut the tip of your needle. Fold your elastic in half and loop the needle at the mid point.
  3. Slide on the elastic the following beads: 4 hematite beads and silver tube. Repeat 4 more times.
  4. Wrap around your wrist to see if it enough to wrap around your wrist. If it is too much, remove a hematite bead. If it’s too tight, add another hematite bead.
  5. Follow illustrations below to make the Tricky Rick knot, to tie off your ends. Glue the knot if you would like. Cut excess elastic, leaving about a 1/4″ stub.

Rustic Round Leather Bracelet

GoodyBeads Blog | DIY Men's Leather Bracelet Set FREE Tutorial - Rustic Round Leather Bracelet

Items used in bracelet: CH00156 (7″), Z003438 (2), A015821, Z003436 & Z009583. NOTE: if 7″ is too short, order an inch or two more.

Directions:

  1. Glue the end of the leather cord and clasp end with super new glue. Let it dry for a minute.
  2. Slide on the leather the Stitch Bead, Plain Tube Bead and Stitch Bead. Slide to situate and centered on the leather.
  3. Glue the other leather end with other clasp end. Unclasp the clasp and let bracelet dry for a few minutes or hours.

Wide Leather Cross Bracelet

GoodyBeads Blog | DIY Men's Leather Bracelet Set FREE Tutorial - Wide Leather Cross Bracelet

Items used in bracelet: CH00040 (8), CH00769 (8), CH00861 (8), A015691 & A015821.

Directions:

  1. Cut all leather cord to 7.5″ or to your desired length.
  2. Glue all three leather cord ends to end clasp with super new glue, situating the 10mm to the bottom. (Make sure to face the fronts of your leather pieces to one side of the clasp.) Let glue dry for a few minutes.
  3. Cross the two 5mm leather and glue the other leather ends to the other side of the clasp. Hold leather in place for a minute or two to let the components bond. Let piece sit and dry for another few moments before wearing.

Check out other Leather Bracelet DIYs to inspired some fun men’s bracelets.


Honeycomb Lattice Licorice Leather Bracelet – FREE Pattern Tutorial

Today’s tutorial digs into the love of licorice leather bracelets and how casual it plays with any fashion style. Embellish it with a bead tube and you have a fun piece of jewelry for a dazzling summer!

GoodyBeads Blog | Honeycomb Lattice Licorice Leather Bracelet - FREE Pattern Tutorial

Items used in bracelet:

  • SB00066 – 8/0 Black Opaque Seed Bead
  • SB00423 – 11/0 Galvanized Yellow Gold Seed Bead
  • SB03303 – Chalk Champagne DiamonDuo
  • (8) SW00358 – Swarovski® 4mm Bacon Fuchsia AB 2X
  • Z001106 – Gold Plated Magnetic Clasp For Licorice Leather
  • A006585/A006587 – Crystal Fireline Thread
  • Z011831 – Crystal Full Amber Honeycomb
  • Z014871 – Turquoise Green Lumi Honeycomb
  • (2) A015841 – 12mm Black Rubber O-Rings
  • A015821 – Super New Glue
  • A022052 – Matte Black Regaliz Licorice Leather

Pattern Tutorial

GoodyBeads Blog | Honeycomb Lattice Licorice Leather Bracelet - FREE Pattern Tutorial

Get FULL and FREE pattern tutorial HERE.


DIY Leather & Gemstone Bracelet with Large Rhinestone Clasp

One of our happiest combinations are leather and gemstone. Throw in a fantastic large rhinestone clasp and this bracelet is one you’ll wear all the time.

Items used in bracelet sample:

GoodyBeads Blog | DIY Leather & Gemstone Bracelet with Large Rhinestone Clasp

GoodyBeads Blog | DIY Leather & Gemstone Bracelet with Large Rhinestone Clasp

Directions

  1. Cut the 2 meter of leather in half. Take one and cut in half again.
  2. Take your two strands and slide both through rhinestone clasp loop and center. Make an overhand knot with all four strands, close to clasp loop.
  3. Flare out your ends and determine which are your middle two strands and your side strands. Take one gemstone and slide through the two middle cords.
  4. Decide your two left and right strands. Slide a gemstone through the two left strands and another gemstone to the two right strands.
  5. Slide another gemstone through the two middle strands.
  6. Take your two left strands and slide through one hole of oval bead. And take your two right strands and slide through other hole of oval bead.
  7. Repeat Steps 3-6 one more time.
  8. Repeat Steps 3-5 again.
  9. Rhinestone clasp comes with an end connector with a small loop. Open jump ring, slide through small loop and close.
  10. Make sure to wrap bracelet on your wrist to help determine where you want to situate your knot. Take your four ends and slide jump ring through all ends and do an overhand knot with the jump ring/ring connector within the knot.
  11. Try on the bracelet and adjust knot you made previously if you need to make length shorter or longer. Cut leather ends as an option.

Video Tutorial

You can check out our previous Facebook LIVE episode where we demonstrate how to make this bracelet HERE.


DIY Wrap Pearl & Denim Blue Bracelet

We’re starting June with one of our favorite style of DIY jewelry-making; memory wire wrap bracelets. Our DIY Wrap Pearl & Denim Blue Bracelet combines some of our favorite components; leather with hollow core, Swarovski pearls and tassels.

What you’ll need for bracelet:

GoodyBeads | DIY Wrap Pearl & Denim Blue Bracelet

Direction:

  1. Make a simple loop with Memory Wire Finishing Pliers.
  2. Slide the the following beads:
    1. 2 seed beads, 6mm pearl, seed bead, curve tube, 8mm pearl, seed bead, 8mm denim blue crystal, seed bead, 8mm pearl.
    2. end cap, 2.5″ of leather, bead cap
    3. 8mm pearl, seed bead, 8mm denim blue crystal, seed bead, 8mm pearl, curve tube, seed bead, 6mm pearl and 2 seed bead.
  3. Cut Memory Wire with a 1/2″ to 3/4″ end.
  4. Make a simple loop to that end with Memory Wire Finishing Pliers.


DIY Criss Cross Leather Bracelet

We have a cute DIY for you today and it involves one of our favorite products, leather cord! We’re making an easy DIY leather bracelet with 2mm and 1mm leather cord to braid and make a criss cross design with flat ring links.

Here is what you’ll need:

GoodyBeads Blog | DIY Criss Cross Leather Bracelet with FREE tutorial.

Directions:

  1. Slide button onto the middle of a 30 Inch piece of 2mm leather and tie an overhand knot about ¾ of an inch from the button.
  2. Do 7 macramé square knots starting right up against the overhand knot with 50 inches of 1mm leather cord.
  3. Slide on a ring.  In front of the ring cross the left piece of the 1mm over the 2 strands of 2mm cord and then cross the right piece over the left piece.
  4. Take the ends of your 2 cords of 2mm leather and bend them back over the crisscrossed strands and go back thru the ring. Tighten, adjust and straighten your strands.
  5. Repeat steps 3 and 4, 8 more times. Adjust number of rings to make bracelet larger or smaller.
  6. After last ring do 7 macramé square knots.
  7. With all 4 pieces of cord make an overhand knot where the macramé ends. Trim ends of the 1mm cord
  8. Place another overhand knot using just the 2mm cords about one inch from first to create your button hole clasp.

Video Tutorial

You can view a similar version of this bracelet on our previous Facebook LIVE video HERE.


DIY Gemstone Donut & Deerskin Necklace

Today’s DIY Gemstone Donut and Deerskin Necklace features three of our favorite brands. Dakota Stones gemstone donuts, LeatherCord USA deerskin lace and TierraCast barrel bead.

Items used in necklace:

GoodyBeads - DIY Gemstone Donut and Deerskin Lace Necklace

GoodyBeads - DIY Gemstone Donut and Deerskin Lace Necklace

Directions:

  1. Cut deerskin lace in half (if you’re using the 2 meter product item) or cut 3.5 feet of lace.
  2. Fold lace in half and slide through gemstone donut and make a lark’s head knot. Make sure the front side of the lace is facing outwards and evening out your lace ends.
  3. Slide barrel beads through both lace ends and slide to sit on top of lark’s head knot.
  4. Make an overhand knot to both of your lace end to complete your necklace.


Leather Crescent & Acetate Necklace

We love mixing up different components in this DIY necklace. We have leather crescents mixed with acetate and silver findings, tied together with soft leather lace.

What you’ll need for necklace:

  • 34mm Burgundy Leather Crescent Connector Charm – Y017383
    Try out other colors in Black (Y017382) or Light Brown (Y017384)
  • 18mm Acetate Coin Charm – Z007238
  • 50mm Antique .999 Fine Silver Plated Large Open Frame Hoop by Nunn Designs – Z008376
  • 5.5mm Silver Plated Round Jump Rings – X003062
  • 7mm Silver Plated Round Jump Rings – A008807
  • Black Deerskin Lace – Z010954

GoodyBeads Blog | FREE Tutorial - DIY Necklace with Acetate, leather and silver findings.

Directions

  1. Open 5.5mm jump ring, slide on acetate charm and concave-side hole of leather crescent. Close jump ring.
  2. Open another 5.5mm jump ring, slide through other hole of leather crescent. Close jump ring.
  3. Open 7mm jump ring, slide through jump ring from Step 2 and close jump ring.
  4. Cut deerskin leather lace to 36 inches.
  5. Fold leather in half, slide looped end through Large Open Frame Hoop and 7mm jump ring from Step 3. Make a lark’s head knot.
  6. Make an overhand knot to both ends of leather together.


DIY Wrap Bracelet with Czech Fire Polish Beads

One of our favorite diy projects are making wrap bracelets. Using 1mm or 2mm leather cord, make wrap bracelets using all types of beads!

Today’s project is a version from our previous blog post on GoodyBeads Master Mixes with Swarovski® bicone crystals. Check out the blog post for a step-by-step look at how we sew on bicone crystals and seed beads. We will use this same method on this DIY wrap bracelet with Czech fire polish beads. Also, before you get started you will want to read the How to Make Leather Wrap Bracelets to help determine the length of leather cord you will need for your wrap bracelet.

Now that you’ve gotten those tips and tricks down, here is what you’ll need for this wrap bracelet:

  • TierraCast Button – item used in bracelet TC00900
  • 1.5mm Leather Cord – item used in bracelet Z019143
    Note: You can also use 1mm, 1.3mm and 2mm leather cord. The best use for small leather cord like 1mm-1.5mm is if you are using small beads like seed beads or sizes under 4 or 5mm in diameter. If you plan to use larger beads like 6mm or 8mm, using 2mm leather cord works best.
  • 11/0 Seed Beads – item used in bracelet SB00423
    Note: For smaller beads, use size 11/0 seed beads in the pattern. If using larger beads, you can use 8/0 or even size 6/0 seed beads.
  • 3mm Czech Fire Polish Beads – item used in bracelet A008815 (Qty 3 strands)
    Note: We used about 140 beads for our double wrap bracelet, which is a quantity of 3 Czech fire polish bead strands. You will need more for more wraps in your bracelet.
  • Beading NeedleA015211
  • Crystal Fireline (4lb)A006585

Goodybeads Blog - FREE tutorial for wrap leather bracelet with Czech fire polish beads.

Directions: (You can follow Master Mix Bracelet for tutorial visuals)

  1. Cut leather to length according to how many wraps you want. For a double wrap, we start out with 42 inches for a 7 inch bracelet.
  2. Slide leather through button hole, situating the button in the center, fold leather in half and make an overhand knot close enough to the button.
  3. With 4 feet of beading thread, tie the end of your beading thread to one piece of leather to harness your thread.
  4. Ladder stitch a seed bead in between the two leather cords.
  5. Ladder stitch two seed beads in between the two leather cords.
  6. Pick up a seed bead and Czech bead. Sew both in between both leather cords.
  7. Pick up a Czech bead and then a seed bead. Sew both between both leather cords.
  8. Repeat Steps 6 and 7 until you’ve reach a suitable length for wrist size.
  9. Tie off your beading thread and cut off excess.
  10. Take both ends of your leather cords and make an overhand knot, close enough to last beads you’ve stitched on.
  11. Make another overhand knot about 15mm to 20mm apart, or wide enough for your button to slide through.
    Optional: Make another overhand knot for an extended length if needed.
  12. Cut excess leather cord.


DIY Leather Hoop and Silver Teardrop Earrings

In today’s DIY, make a leather hoop and silver teardrop earrings using leather cord and TierraCast’s new Hammertone collection. Here is what you’ll need:

  • 2mm leather cord – item used in earrings A022076
  • 1mm leather cord – item used in earrings Z015514/A022070
  • TierraCast earring post – TC02764
  • Clear Earring Back – TC01208 (2)
  • TierraCast End Cap – TC02800 (2)
  • TierraCast Teardrop – TC02777 (2)
  • 5mm Oval jump ring – Z004093
  • 5mm TierraCast Nugget Spacer – TC02639 (6)

Directions:

  1. Cut a 4 inch piece of 2mm round leather and a 1 inch piece of 1mm round leather.
  2. Add 3 nugget beads to the 2mm round leather.
  3. String the teardrop charm onto the 1mm leather.
  4. Insert one end of the 2mm leather, the 2 ends of the 1mm leather and the other end of the 2mm leather into the crimp end.
  5. Check the length of the tear drop charm and 2mm leather, trim to desired lengths if needed.
  6. Then use a flat nose pliers to crimp the crimp end. Squeeze both sides.
  7. Open 5mm oval jump ring, add earring post and loop on crimp end.
  8. Close jump ring.
  9. Repeat all steps for other earring


Leather Hoop Earrings with Memory Wire

We love being innovative when designing and these leather hoop earrings are no exception to our imagination.

What you’ll need:

GoodyBeads Blog - FREE TUTORIAL: DIY Leather Hoop Earrings with memory wire and TierraCast findings.

Directions:

  1. Cut 2 rings of heavy duty memory wire.
  2. Cut your 14 inches of leather in half to have 2 – 7 inch pieces of leather.
  3. Slide the memory wire thru the hole in the center of the leather, trim excess memory wire.
  4. Put the Post earring into one of the end caps so the part of the earring that goes in your ear sticks out of the end cap’s small hole.
  5. Add 2-3 drops of super new glue into the end cap with the earring post and insert one end of your leather. Hold for 20-30 seconds so that the leather and earring post stay straight.
  6. Add glue to the end cap without the earring post and insert the other end of the leather. Hold for 20-30 seconds while the glue sets.
  7. Let set for 24 hours, so glue fully dries.
  8. Use earring backs when wearing.