DIY Gemstone, Ribbon & Leather Bracelet with Video Tutorial

We’ve got a special DIY for your summer outfits! Create a leather bracelet with large-hole gemstones and braided with silk ribbon. This tutorial is a revamp of our previous blog post: Criss Cross Leather Bracelet by Dakota Stones. Check out this blog post for written directions on how to make these bracelets. Plus, below is a previous LIVE episode where Tory demonstrates how to braid and make this leather bracelet!

GoodyBeads.com Blog | DIY Gemstone, Ribbon & Leather Bracelet with FREE Video Tutorial

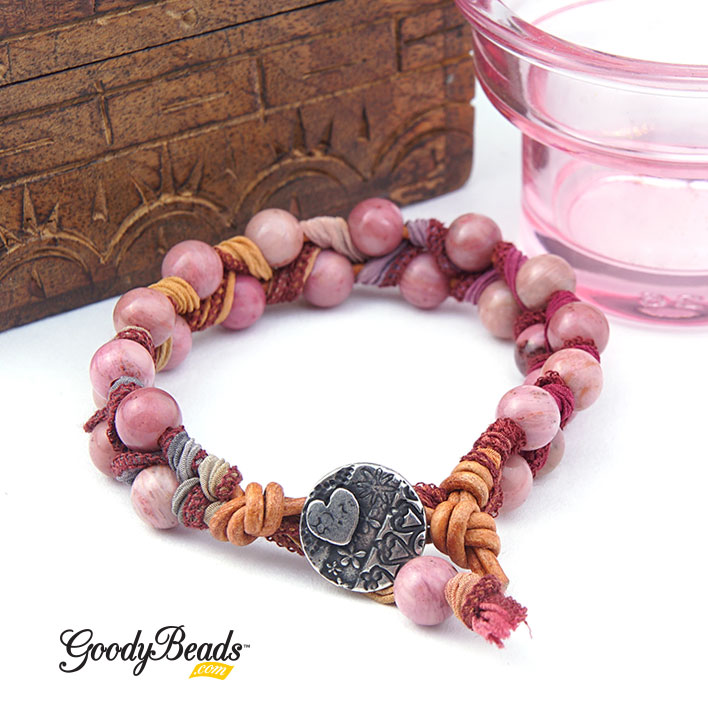
Items used in bracelets:

  • TC02349 – 16.5mm Antique Pewter Amor Round Button by TierraCast®
  • A022076 – 2mm Natural Light Brown Round Leather Cord
  • A021777 – Tutti Frutti Hand Dyed Silk Ribbon
  • RHO8RDLH-8 – Rhodonite Large Hole 8mm Round

Bracelet Video Tutorial

CLICK HERE to Watch the Facebook Tutorial Video

CLICK HERE for more DIY projects from Goodybeads

Tutorial begins at 3:30 minutes.


DIY Leather Fringe Bib Necklace with Deerskin Leather Lace

Try out this fun DIY bib necklace with deerskin lace fringe and Black Gold Amazonite large-hole gemstone beads from our Deerskin Lace March 2018 Trend.

Exceptionally strong, yet soft and supple, Deerskin Lace is expertly cut from only the finest North American deer hides. Great for all your jewelry and beading projects or for garment lacing. Deerskin Lace is the softest leather lace around. 

Items used in necklace:

GoodyBeads.com Blog | DIY Leather Bib Necklace with Deerskin Leather Lace FREE Tutorial

Directions:

  1. Cut 7 pieces of leather lace at 10 inches.
  2. Cut 6 pieces of leather lace at 7 inches.
  3. Take a 7″ leather and make a lark’s head knot on the bottom bar of the bib necklace. Repeat 2 more times.
  4. Make a lark’s head knot with the 10″ leather, 7 times.
  5. Make a lark’s head knot with the 7″ leather, 3 times.
  6. Slide a gemstone to the middle strand of your leather fringes and make a knot. Repeat outwards, staggering your knots so that your fringes get shorter and shorter. Make sure your knots are where you’d want them to be and then cut off excess leather.
  7. Tie one end of the chain with the side hole of your bib connector with a 3″ piece of leather, twice. Repeat to other side.
  8. Optional, you can cut chain in half to add a clasp. Or cut chain shorter for a shorter length.


Black & White Gemstone Leather Necklace

This Gemstone Leather Necklace incorporates the classic black and white colors. It is a fun piece for a business pantsuit or a small dinner party. Made with large-hole gemstones and 1mm leather cord, you can make this in fun necklace in minutes!

What you’ll need for Gemstone Leather Necklace:

GoodyBeads.com Blog | Black & White Gemstone Leather Necklace with large-hole Gemstones.

GoodyBeads.com Blog | Black & White Gemstone Leather Necklace with large-hole Gemstones.

Directions:

  1. Open 4mm jump ring, slide through loop of clasp and close jump ring. Open another 4mm jump ring, slide through closed ring and close jump ring. Open lobster clasp and clasp onto the closed ring.
  2. Cut a piece of leather at 27 inches.
  3. Slide one end of the leather through a 4mm jump ring in step 1, about 1.5 inch of the way. Make a slip knot. Use pliers to tighten the slip knot before cutting off excess leather end.

4. Slide on the following onto the leather:
3 onyx beads, 5 flat brass beads and 3 onyx beads.
5. Repeat step 3 to other leather end and through other 4mm jump ring from Step 1.


John’s DIY Bottle Opener with Large-Hole Gemstones

Need a gift for the holidays? This easy gift-giving beadable DIY bottle opener is what you’ll want. It’s easy to make and great for a quick gift you can wrap right up. Pair it with some cool looking large-hole gemstones for a masculine vibe.

What you’ll need for DIY Bottle Opener:

GoodyBeads.com Blog | John's DIY Bottle Opener with Large-Hole Gemstones FREE Tutorial

Directions:

  1. Twist of the end of the bottle opener and slide on 4 gemstones.
  2. Twist the end back onto the bottle opener end.

Need more easy DIY gift-giving ideas? Check out these Beadable ideas!


DIY Ring Link Adjustable Leather Bracelet

Today’s project is the DIY Ring Link Adjustable Leather Bracelet we demoed at the Pinners Conference. This project uses some of our favorite branded components like TierraCast ring component, Dakota Stones large-hole gemstones and Leather Cord USA 1.5mm leather! Combine them all and get a fun DIY you’ll need to make for all your friends.

What you’ll need for Ring Link Adjustable Leather Bracelet:

GoodyBeads Blog | DIY Ring Link Adjustable Leather Bracelet FREE Tutorial

Directions:

  1. Cut two pieces of leather at 18” length each.
  2. Take one leather piece, fold in half and make a lark’s head knot on the TierraCast ring.
  3. Slide a gemstone onto both strands of leather ends.
  4. Repeat steps 2 and 3 with other leather.
  5. Cross leather ends, keeping strands straight. And then tie a sliding knot with an 8” piece of leather:
    1. Lay an inch of leather end over the bracelet’s leather strands.
    2. Hold end under your non-dominant hand and wrap around all the leather strands.
    3. Continue to wrap cord around leather strands loosely, working back towards the cut end of wrapping cord. Make 5 coils.
    4. Thread leather under and through all the coils you’ve just created.
    5. Adjust the coils so they sit neatly and pull both leather ends in opposite directions to secure knot.
    6. Trim away excess leather close to coil
  6. Make an overhand knot with leather ends. Cut off excess leather.


DIY Leather Band Bracelet with Large-Hole Gemstones

Let’s welcome fall with a this fun DIY using LeatherCord USA 1.5mm leather, Blue Crazy Lace large-hole gemstones from Dakota Stones and the perfect findings from TierraCast to pull it all together.

What you’ll need:

GoodyBeads Blog | DIY Leather Band Bracelet with Large-Hole Gemstones FREE Tutorial

Directions:

  1. Cut 4 pieces of leather at 9″.
  2. Slide all 4 pieces of leather through a barrel bead and center the bead in the middle of the leather pieces.
  3. Divide 2 leather pieces to each side of the barrel bead.
  4. On one side, fold the inner leather in half and slide a gemstone bead onto both leather ends.
  5. Fold the outer leather strands in half, laying them on either side of the gemstone you added in Step 4 and slide all 4 ends through a barrel bead. Adjust leather strands to lay flat, and slide barrel up close to the gemstone you previously added.
  6. Using nylon pliers or a flat nose pliers, gently crimp down on the barrel bead to keep the middle leather and gemstone in place.
  7. Repeat steps 4 through 6 to other side of the bracelet.
  8. Trim to wrist size and minus about ½ inch; making sure your barrel/gemstone design is centered and you’re making a straight flush cut.
  9. Add an end cap to one end of your leather design, making sure all 4 leather strands fit inside and crimp down on your end cap using a flat nose or nylon pliers. Repeat on the other end of the bracelet.
  10. Open 1 jump ring and slide on your end cap loop and clasp loop. Repeat on the other end cap loop and magnet end.

— Click HERE for more DIY projects from GoodyBeads–


DIY Beadable Wine Stopper with Large Swarovki Crystal

Kicking off a full month of DIY projects for the month of February, we start out with an easy beadable wine stopper. With a mandrel thickness of 2.5mm, mix up large-hole beads and select metal beads/spacers. Even Large-Hole Gemstones will work! You can also check out our Bead Pen & Large-Hole Beads HOT Category for a selection of beads you can use on the wine stopper. Here is how we designed our Wine Stopper.

Items used in Wine Stopper:

Directions:

  1. Unscrew the ball of the wine stopper (set aside).
  2. Slide onto the mandrel: Crystal, metal spacer, lampwork and metal bead.
  3. Screw back on the ball.