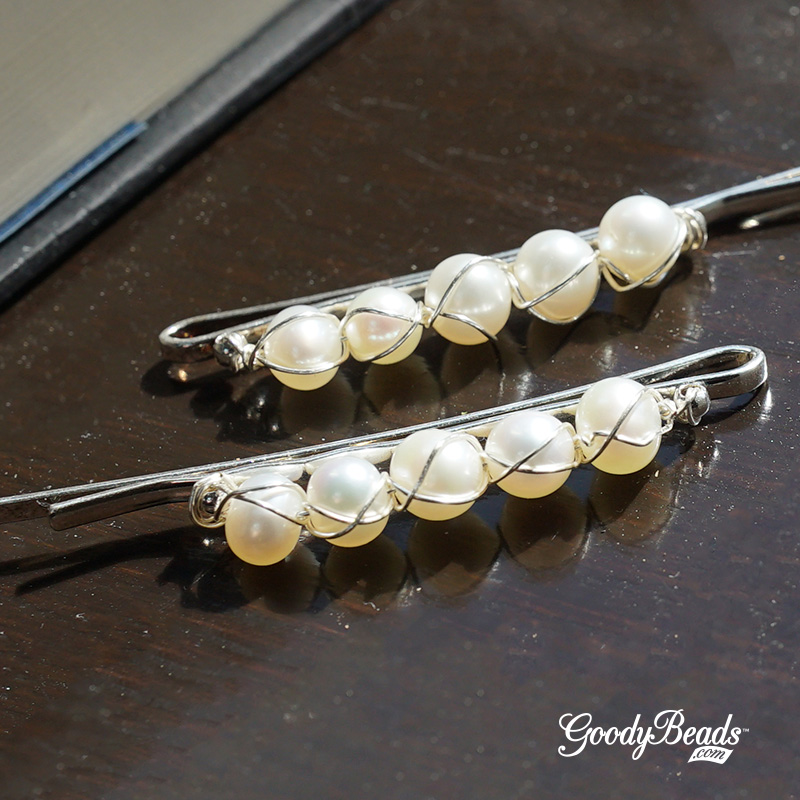
DIY Natural Pearl Hair Pin

Hair accessories are very popular this year. From the comeback of scrunchies to oversized fabric headbands, today’s project features a DIY pearl hair pin. Natural pearls are wire wrapped on a Silver Plated Hair Pin with 2 Loops.

What you’ll need for Pearl Hair pin project:

Directions:

  1. Cut a 14 inch piece of wire.
  2. Loop one time through one end of the wire through a hole of the hair pin. Twist the shorter wire around the other wire twice and push coils close to hole of the hair pin.
  3. Slide on 5 beads or how ever many you need to fit between the two holes of the hair pin.
  4. Slide wire through other hair pin hole.
  5. Criss cross around pearls and back again.
  6. Cut off excess.

Video Tutorial

Check out our previous Facebook LIVE episode with this tutorial. Tutorial starts at 10 minutes.


DIY Jewelry with Swarovski® Around the World: Costa Rica

This month’s trip is Costa Rica. Find out how tranquil this destination is from its tropical vibe to its endless blue skies. Plus, check out the hues Swarovski suggests to inspire your Costa Rica trip along with a DIY jewelry project for you to try.

Costa Rica

Starting as underwater volcanoes which then surfaced over thousands and thousands of years, Costa Rica has evolved into one of the largest, lush ecosystems in the world. Imagine yourself rappelling down a waterfall, relaxing in hot springs, hiking along the rolling fog of the cloud forest or exploring the pink sandy beaches of the Guanacaste coastline. Theses adventures paired with rich tropical flora and fauna and soft sunsets over crystal blue water were the incredible inspiration for these pieces – and my version of ‘paradise’.

Costa Rica – Swarovski Crystal Colors

  • Peridot
  • Light Turquoise
  • Rose Peach

Costa Rica Inspired DIY Jewelry

GoodyBeads Blog | DIY Jewelry with Swarovski® Around the World: Costa Rica FREE tutorial.

GoodyBeads Blog | DIY Jewelry with Swarovski® Around the World: Costa Rica FREE tutorial.

Our pair of earrings is cool and bright! It has the simplicity for a warm beach stroll and an elegance for a beach-side patio dinner!

What you’ll need for earrings:

  • SW02553 (2) – Swarovski crystal 18mm Light Turquoise Meteor Pendant
  • SW00157 (2) – Swarovski crystal 4mm Peridot Bicone
  • SW02213 (2) – Swarovski crystal 4mm Rose Peach Shimmer Bicone
  • SW02552 (2) – Swarovski crystal 4mm Light Turquoise Bicone
  • SB00444 – 11/0 Matte Opaque Cream Seed Bead
    You can sub seed bead for 2mm Pearlescent Pearls SW01920 (8)
  • A001494 – 2 Inch Silver Plated Eyepin
  • TCZ0077 – Sterling Silver Earring Wire by TierraCast®

Directions:

  1. On eyepin, slide on the following:
    seed bead, peridot crystal, seed bead, light turquoise crystal, seed bead, rose peach crystal and seed bead.
  2. Make a simple loop about 4mm or large enough to slide on crystal pendant.
  3. Open the loop you made in step 2 and slide on crystal pendant. Close loop.
  4. Open earring wire loop and slide on on other eyepin loop. Close loop.
  5. Repeat all steps for other earring.


DIY Large Hoop Ring Earrings with Pinch Bail

Summer jewelry is about being big and making a statement. These pair of pinch bail earrings are the one you’ll need!

What you’ll need for pinch bail earrings:

  • (2) Z008275 – 50mm Bright Fine Silver Plated Flat Grande Hoop
  • Z016191 – 12x6mm Silver Plated Diamond Cut Open Charm/Connector
  • (2) TC02582 – 9mm Smooth Pinch Bail
  • Z012031 – Silver French Earwire Earrings

GoodyBeads Blog | DIY Large Hoop Ring Earrings with Pinch Bail - FREE Tutorial

GoodyBeads Blog | DIY Large Hoop Ring Earrings with Pinch Bail - FREE Tutorial

Directions:

  1. Slide large hoop and diamond cut connector through bail and pinch the bail to close.
  2. Open ear wire loop and slide on diamond cut connector. Close loop.
  3. Repeat all steps for other earring.


DIY Sandy Wave Earrings

Sink your feet into this fun DIY. It consists of straw beads and connectors.

What you’ll need for earrings:

  • Rattan Straw Round Bead – Z017902
  • Rattan Straw Off Center Hoop Pendant – Z017897
  • 2 Inch Eyepin – A019599
  • TierraCast® Silver Bead Aligner – TC00356 (4)
  • 5mm Jump Ring – A001528
  • TierraCast® Earring Wire – TC02297

GoodyBeads Blog | DIY Rattan Straw Sandy Wave Earrings - FREE tutorial

Directions:

  1. Using a Bead Reamer, round nose pliers or awl, poke a hole at the top of the off center straw pendant, between the first and second outer ring.
  2. Open jump ring, slide through hole you make in Step 1, and through an eyepin loop. Close jump ring.
  3. Slide on the following on the eyepin and make a wrapped loop: bead aligner, rattan round bead and bead aligner.
  4. Open earwire loop, slide on dangle and close loop.
  5. Repeat all steps for other earring.


DIY Bubbly Earrings with Thread Beads and Gold Findings

Embrace summer boho jewelry with handmade thread beads. Today’s DIY would pair perfectly with a beachside cocktail!

What you’ll need for earrings:

  • Ivory Thread Beads – Z017904
  • 2 Inch Headpin with Ball – A019696
  • Matte Gold Circles Connectors – Z014013 (2)
  • TierraCast® Gold Earring Wire – TCZ0139
  • 4mm Bicone Crystal Luminous Green – SW00574 (4)

GoodyBeads Blog | DIY Thread Bead and Bubbly Earrings - FREE tutorial

Directions:

  1. Slide the following onto a headpin: bicone crystal, thread bead and bicone crystal.
  2. Make a wrapped loop, making sure to attach to a connector hole before completing wrapped loop. (You can also make a simple loop and attach to connector).
  3. Open earwire loop, slide through other connector hole and close loop.
  4. Repeat all steps for other earring.


DIY Large Ring Earrings with White Enamel Link

You know it’s summer when jewelry gets bigger and bigger. These pair of earrings consists of large 50mm rings from Nunn Design and accented with white enamel connectors. It’s going to be a grand Summer with these earrings.

What you’ll need for earrings:

  • 50mm Grand Hoop from Nunn Design – Z008275 (2)
  • 12mm White Enamel Round Connector – Z008744 (2)
  • 5mm Oval Jump Rings – A008799
  • TierraCast Earwire – TCZ0078

Directions:

  1. Open jump ring, slide on ring and a loop on enamel connector. Close jump ring.
  2. Open another jump ring, slide on other hole of enamel connector and earwire loop. Close jump ring.
  3. Repeat all steps for other earring.


DIY Golden Bubbly Earrings

You’re going to feel giddy with these pair of earrings! It’s all gold on gold, well gold-plated.

What you’ll need:

GoodyBeads Blog | DIY Golden Bubbly Earrings

Directions:

  1. Open large jump ring, slide on teardrop hoop, round hoop and small jump ring. Close jump ring.
  2. Open earwire loop and slide on small jump ring you added in step 1. Make sure that the teardrop hoop is situated on the backside of earwire. Close loop.
  3. Repeat all steps for other earring.

You certainly make a silver version too with the following silver-plated components: Z007856, Z020042, Z016674 (2), Z016723 (2) & Z012031.


DIY Mint Mosaic Cuff

One our newer products are the Thin Square Flat Cuff Bracelet from Nunn Design. They’re so easy to use. Wear them as is or add some beads like our large selection of Large-Hole Interchangeable beads.

What you’ll need for cuff:

Directions

  1. Slide onto the cuff stopper bead, large-hole bead and stopper bead.
  2. Situate and center the beads on the cuff.

Mosaic Trio Cuff

Items used in Cuff: Z016185, Z009424 (2), Z006779, A006781 & A006780.

Directions

  1. Slide onto the cuff stopper bead, THREE large-hole bead and stopper bead.
  2. Situate and center the beads on the cuff.


DIY Enamel and Faceted Glass Earrings

One thing we love about making jewelry is creating length and layers by linking connectors and dangles. When it comes to our Enamel Chevron and Faceted Glass Earrings, designed by Heidi, she did just that! She used enamel and faceted connectors with gold findings!

Here is what you’ll need for earrings:

  • 18mm White Mix Enamel Gold Plated Round Zigzag Connector – Z016108 (2)
  • 16mm Round Gold Plated Aqua Faceted Glass Connector – A021761 (2)
  • 10mm Round Clear Faceted Glass Charm with Gold Plating – A021745 (2)
  • 9mm Bright Gold Round Hammertone Post by Tierracast – TC02765
  • 3mm Gold Jump Rings – Z007861

Directions:

  1. Open jump ring with two pliers, slide on glass dangle and one loop of faceted glass connector. Close jump ring.
  2. Open another jump ring, slide on other loop of faceted glass connector and one loop of enamel connector. Close jump ring.
  3. Open another jump ring, slide on other loop of enamel connector and post ear wire loop. Close jump ring.
  4. Repeat all steps for other earring.


Swarovski® Indian Pink Jewelry Tutorials

We’ve got TWO easy projects using February’s Swarovski Psychology of Color: Light Peach. Design jewelry with this passionate hue!

Indian Pink Gold Bracelet

GoodyBeads - DIY Adjustable bracelet with Swarovski Indian Pink Crystals. FREE Tutorial.

Items used in bracelet: SW00246, SW00233 (2), SW00232 (4), WR00126, Z011893 OR Z012152.

Directions:

  1. Cut a half coil of memory wire with memory wire cutters.
  2. Wrap a loop or coil one end of the memory wire with memory wire finishing pliers. Slide on the memory wire: TWO 4mm crystal, 6mm crystal, 8mm crystal, 6mm crystal and TWO 4mm crystal. Cut memory wire end, leaving 3/4 inch end. Coil or make a simple loop to that end with memory wire finishing pliers.
    (NOTE: You can substitute 20-gauge gold-colored wire for the memory wire in Steps 1 and 2.)
  3. Open a jump ring from adjustable bracelet and slide on one end of crystal link. Close jump ring.
  4. Repeat to other end of link and adjustable bracelet.

Pink Bali Tassel Earrings

GoodyBeads - DIY Earrings with Swarovski Indian Pink Crystals. FREE Tutorial.

Items used in earrings: SW00246 (2), SW00233 (2), A002413, A003563, SB00422, A019612, Z013681 & A021468.

Directions:

  1. Open jump ring and slide on tassel and eyepin loop. Close jump ring.
  2. Slide the following onto the eyepin and make a simple loop:
    seed bead, 8mm crystal, bali spacer, 6mm crystal and seed bead.
  3. Open crystal dangle loop and slide through an other ring of the flower spacer bead. Close loop.
  4. Open earwire loop and slide on ring opposite of where you added your crystal dangle. Close loop.
  5. Repeat all steps for other earring.


Dot & Dash Fringe Earrings

Today’s tutorial is a revision of popular DIY Golden Fringe Earrings we did a few weeks back. Our Dot & Dash Fringe Earrings is on another level of gorgeous!

What you’ll need for earrings: (Silver alternative available)

Directions:

  1. Cut chain at these lengths and alternate the dots and dashes
    7 inches – Dash at beginning and end
    6 ¼ inches – dot at beginning and end
    5 ¾ inches – dash at beginning and end
    5 inches – dot at beginning and end
    4 ½ inches – dash at beginning and end
    3 7/8 inches – dot at beginning and end
    1 ½ inches – dash at beginning and end
    1 ½ inches – dot at beginning and end
    1 ¾ inches – dash at beginning, dot at end
    1 ¾ inches – dot at beginning, dash at end
    1 ¾ inches – dash at beginning, dot at end
    1 ½ inches – dot at beginning and end
    1 ½ inches – dash at beginning and end
  2. Slide what you’ve cut in Step 1, in the same sequence through the slide end tube.
  3. Slide the end of 3 7/8 inches through end tube.
  4. Slide the end of 4 ½ inches through end tube.
  5. Slide the end of 5 inches through end tube.
  6. Slide the end of 5 ¾ inches through end tube.
  7. Slide the end of 6 ¼ inches through end tube.
  8. Slide the end of 7 inches through end tube.
  9. Close side tab of end tube with a flat edge, like pliers.
  10. Open jump ring and slide on loop of end tube and ear wire loop. Close jump ring.
  11. Repeat all steps for other earring.


ImpressArt®: How to Use the Texture Stamping Hammer

This week’s tutorial from ImpressArt is all about metal stamp texturing. Texturing adds an extra dimension of design to your metal blanks. It also adds an organic look for your metal stamping needs. Here are some product you may need to get you started on texturing:

  • Texture Stamper Hammer (TL00266): This innovative tool creates unique, one of a kind textures using your metal stamps as texture heads. You can also interchange the stamping head with this hammer.

Texture Bracelet Tutorial

Using last week’s tutorial on Bracelet Bending, texturize the bracelet blank first before bending the blanks to create a bracelet.


DIY Golden Fringe Earrings with Ball Chain

Let’s celebrate and toast to 2019 and welcome 2020! We have the perfect pair of earrings to celebrate the glam with this DIY Golden Fringe Earrings. Designed with ball chain and end tubes, you can whip up this pair of easy earrings before the ball drops!

What you’ll need:

Dec19_BallChainEarrings_image

Directions:

  1. Cut chain with the following ball counts: 17, 23, 25, 31, and 35. Cut a quantity fo two each.
  2. Slide the following chain into the tube by hooking one ball inside the tube: 17, 23, 25, 31, 35, 35, 31, 25, 23, 17.
  3. Close the other side of the end tube with a flat nose.
  4. Open jump ring and slide on loop of earwire and loop of end tube. Close jump ring.
  5. Repeat all steps for other earring.


Impress Art®: How Make a Metal Bracelet with the Bracelet Bending Bar Kit

This week’s tutorial from ImpressArt is a simple tutorial on bracelet bending.  See how easy it is to make a bracelet by using the bracelet bending tool.

GB_ImpressArt_BendingBar_tools

Here are some tool you’ll need:

  • Bracelet Guides (Z021583) – This will help to keep your lettering straight when writing names or a simple phrase.
  • Bracelet Bending Pliers (TL00350) – This tool will give you the curve your bracelet will need to obtain a curved shape.
  • Bracelet Bending Bar Kit (TL00352) – This tool is very useful in bending the ends of your bar. Plus, this kit includes (4) 1/4 inch and (4) 38 inch Aluminum Bracelet Blanks.
  • Other Tools: Letters Stamping SetEnamel Marker, Hammer & Steel Block.

Bracelet Bending Tutorial

GB_ImpressArt_BendingBar_tut2


DIY Jewelry and Crafts with Swarovski® Ruby crystals

We’ve got THREE easy projects using December’s Swarovski Psychology of Color: Ruby. Design jewelry with this bold hue!

Ruby Snowflake Ornament

Fitting for the holiday season is making snowflake ornaments! Here’s our version using Ruby crystals, clear crystals and wavy discs.

GoodyBeads | Blog - DIY Snowflake Ornament with Swarovski Ruby Crystal Beads - FREE Tutorial

Items used in ornament: SW00131 (12), SW00102 (12), SW00104 (6), Z018412, SB00423 & A006240

Directions:

  1. On a prong, slide on the following and make a simple loop with memory wire finishing pliers:
    1. 3 seed beads, 4mm crystal, disc, ruby crystal, disc, 8mm crystal, disc, ruby crystal, disc, 4mm crystal, 3 seed beads.
  2. Repeat the same sequence of beads to each prong.

Ruby Hoop Earrings

Make this pair of trendy hoop earrings!

GoodyBeads | Blog - Ruby Crystals Hoop Earrings - FREE Tutorial

Items used in earrings: SW00131 (10), TC00278 (4), Z001052 & A015821.

Directions:

  1. Slide through the hoop:
    1. bead cap, 5 ruby crystals and bead cap.
  2. To the top of the last bead cap, add a small dot of glue. Let this dry for a few minutes to keep bead cap in place with the hoop earrings.
  3. Repeat all steps for other earring.

Ruby Rockestar Earrings

These beautiful Ruby crystals really standout next to these grey/black diamond crystals.

SW_POC_Ruby_Project3

Items used in earrings:SW00131 (2), SW02072 (2), TC00278 (2), SB00422, TC00055 (2), A007499 & A001495

Directions:

  1. Open eyepin loop, slide on star charm and close eyepin.
  2. On the eyepin, slide a seed bead, Ruby crystal, bead cap, 4mm black diamond crystal, and seed bead. Make simple loop.
  3. Open dangle loop and slide on post earring loop. Close loop.
  4. Repeat all steps for other earring.