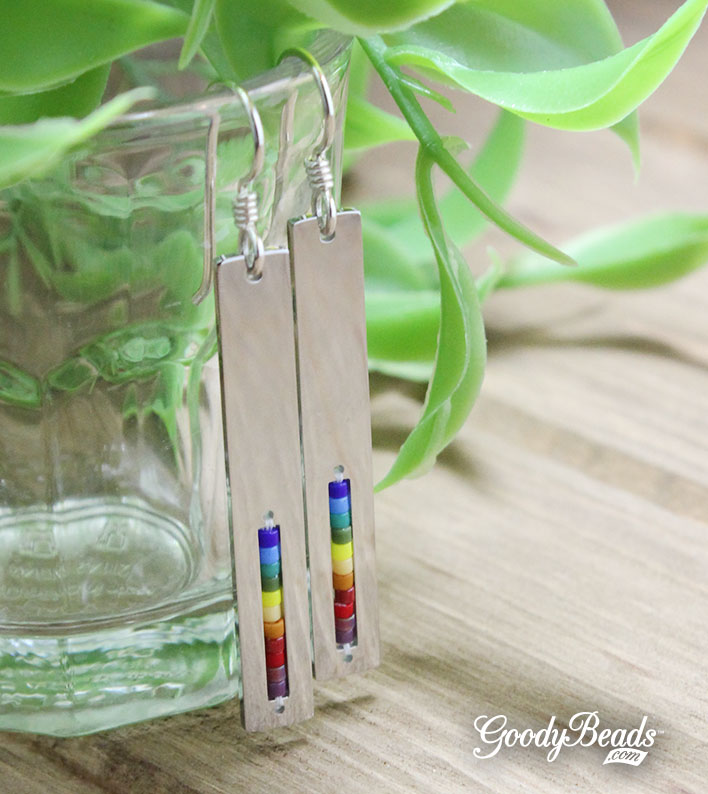
Celebrate Summer with DIY Seed Bead Rainbow Earrings
Whether you’re celebrating summer or June’s Pride month, these rainbow earrings are what you need for summer fun! We have two rainbow earring designs, one using Delica seed beads with beadable components and another with round seed beads on a hoop! Check them out!
Rainbow Pendant Earrings Designed By So Vang
Be mesmerized with these pair of earrings using a using a rainbow of Delica seed beads! Items used in earrings:
- Z005128 (2) – Beadable Pendant
- A006585 – Crystal Fireline 4lb
- A006767 – Needle
- TCZ0078 – TierraCast Earring
- 11/0 Delica Seed Beads:
Directions:
- Add a 3 feet piece of thread to your needle.
- Add a stopper bead to your thread, leaving a 5 inch tail.
- Sew through top hole of the beadable channel. Pick up the 11 seed beads in the color sequence of the rainbow: SB00292, SB02337, SB02336, SB03777, SB00290, SB02311, SB00284, SB03545, SB00295, SB03388 & SB04034
- Sew through bottom hole of channel. Sew back through all seed beads. Tie both ends together to secure pattern, tie two times. Sew through top hole and sew through a few beads before cutting off excess. Add need to thread tail you left in step 2, sew down through all the beads, sew through bottom hole, sew through a few beads and cut off excess thread.
- Open ear wire and slide on beadable pendant.
- Repeat steps 2-5 for other earring; you should have enough of the thread on your needle to do the second earring.
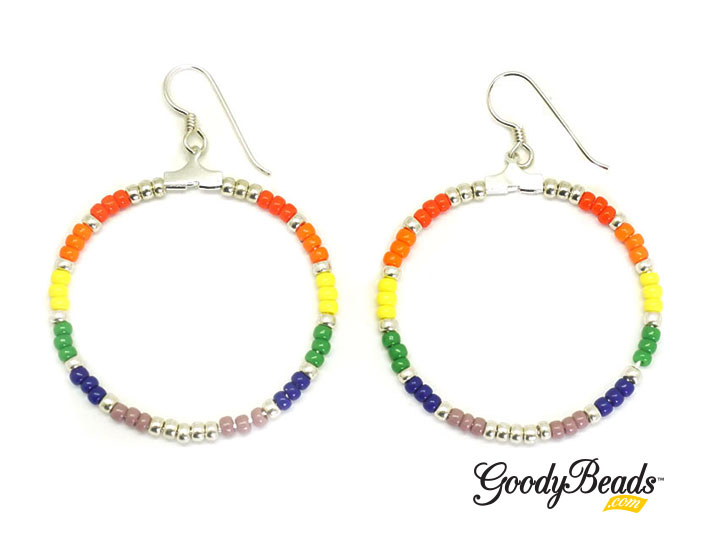
Rainbow Hoop Earrings Designed by Heidi
Fall in love with these hoop earrings using a rainbow of seed beads. Items used in earrings:
Directions:
- Open the hoop and slide on the following seed beads:
- 3 silver, 3 red, silver, 3 orange, silver, 3 yellow, silver, 3 green, silver, 3 blue, silver, 3 purple, 5 silver, 3 purple, silver, 3 blue, silver, 3 green, silver, 3 yellow, silver, 3 orange, silver, 3 red & 3 silver.
- Slide hoop end back into place and use pliers to gently crimp down the hoop end.
- Open earwire loop and slide on beaded hoop and close loop.
- Repeat all steps for other earring.