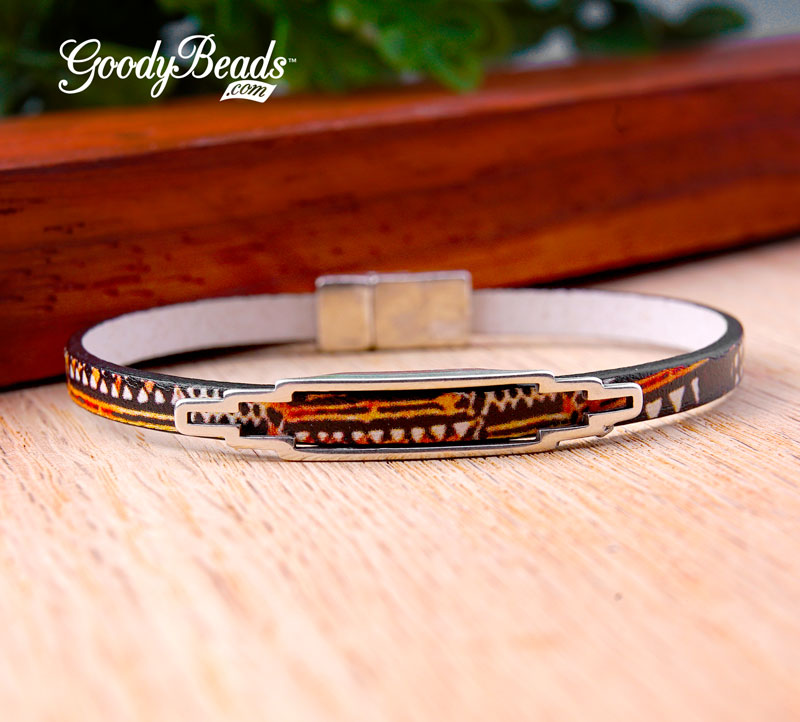
DIY Bracelet with Safari Leather and Leather Slider
We are in love with this tribal print leather from our Bold Leather Trend. Frame it with the Retro Frame Slider (Y006267) and you have an earthy and colorful bracelet!
Cut leather at the length of your wrist, subtract half an inch. (You can also leave length as is, slide on clasp with out gluing. If you find the bracelet took big, cut a bit off leather off to adjust the length.)
Slide slider frame onto the leather.
Glue both of your leather ends into the clasp using super new glue.
Illusion Necklace with Swarovski® Crystals
Our illusion necklace is made with gorgeous Swarovski Aquamarine Shimmer crystal beads and using the simple technique of flat crimping.
Your choice of clasp (Clasp used in example: A021129)
Swarovski Aquamarine Shimmer Round Crystal – 4mm SW02034 (12), 6mm SW02035 (8), 8mm SW02036 (6)
Add more crystals for more sparkle!
Directions:
Cut beading wire at 18″, 20″, 22″ and 24″ long
Flush all pieces of wire at one end and slide all ends in the end cap. Crimp the end cap.
On each wire, slide on sequences of crimp tube, crystal and crimp tube. Crimp the crimp tubes on both sides of the crystal. Space out the sequences of beads throughout your strands.
Once you have all your crystals crimp down, flush the other ends of your beading thread, slide another end cap over it and crimp the end cap.
Attach your clasp to the end of your end caps with jump ring.
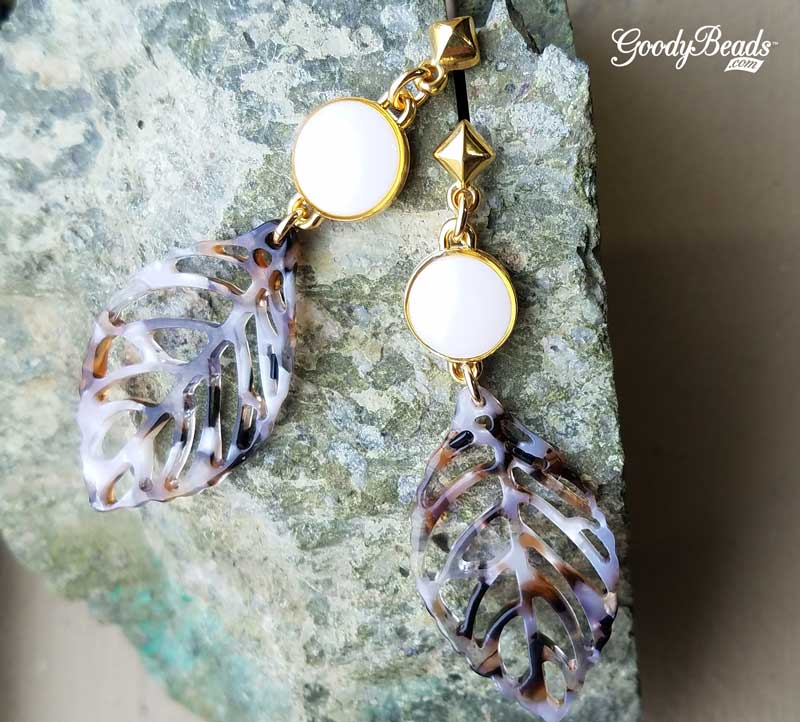
DIY Post Earrings with Enamel Charms and Chain
Turquoise and Make this fun pair of post earrings with enamel charm points hanging on a long piece of chain and you have a gorgeous new accessory you can wear everyday.
Cut two pieces of rollo chain at 2 inches, make sure they have an ODD number of chains links. (You can adjust the length to your preference.)
Open 3mm jump ring and slide on point pendant and one chain link you cut in Step 1. Close jump ring.
Open the 4mm jump ring, slide on other end of chain link and through post earring hole. Close jump ring.
Repeat Steps 3 and 4 for other earring.
Holiday Lightbulb Snowflake Ornament with Swarovski® Crystals
We LOVE the holidays because of the bright and beautiful decorations. Are you busting out your lights and tree soon? Why not make some festive holiday snowflake ornaments to elevate your holiday design! These are designed with glass lightbulb beads and Swarovski crystals.
On a spoke, slide on a seed bead, an emerald bicone, red lightbulb, seed bead, crystal rondelle, seed bead & white lightbulb bead. Make a simple loop with memory finishing pliers.
Skip a spoke and on the third spoke, slide on a seed bead, clear bicone, green lightbulb, seed bead, crystal rondelle, seed bead & red lightbulb bead. Make a simple loop.
Skip a spoke and on the fifth spoke, slide on a seed bead, red bicone, white lightbulb, seed bead, crystal rondelle, seed bead & green lightbulb bead. Make a simple loop.
On the next spoke, slide on a seed bead, clear bicone, green lightbulb, seed bead, crystal rondelle, seed bead & red lightbulb bead. Make a simple loop. (This sequence should mimic the spoke across.)
On the next open spoke, slide on a seed bead, red bicone, white lightbulb, seed bead, crystal rondelle, seed bead & green lightbulb bead. Make a simple loop. (This sequence should mimic the spoke across.)
On the last open spoke, an emerald bicone, red lightbulb, seed bead, crystal rondelle, seed bead & white lightbulb bead. Make a simple loop with memory finishing pliers. (This sequence should mimic the spoke across.)
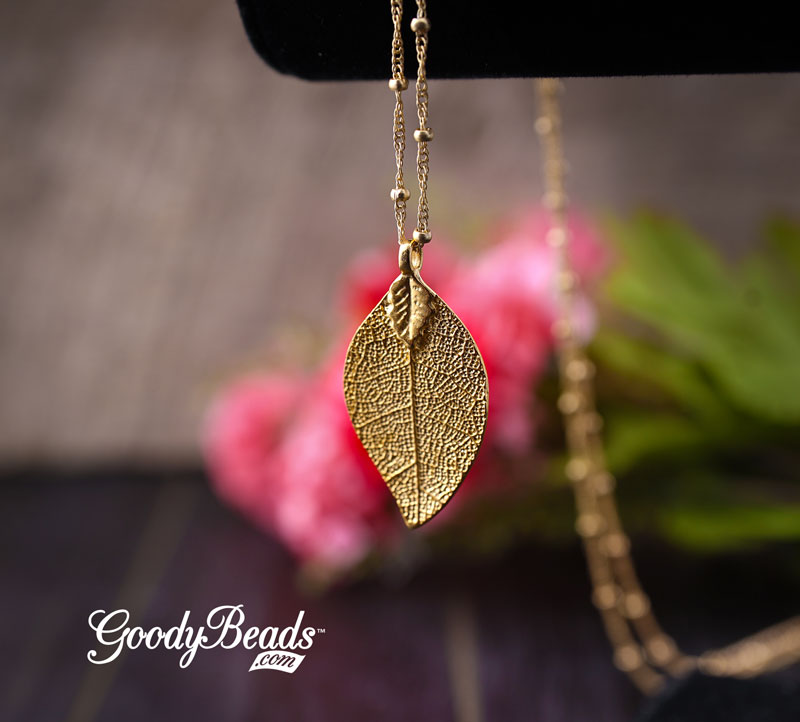
Golden Leaf Pendant Necklace
We’re still in a fall mood. The color of fallen leaves and the smell of autumn in the air really makes you want to just sit and take a hot chocolate break all the time. Our project today is dedicated to autumn leaves and how golden and magical it looks outside.
Cut rhinestone chain to consist of 18 -20 rhinestones.
Cup the last rhinestone with the end connector.
Using flat nose pliers, nylon pliers or serrated pliers, gently push down the two prongs of the end connector to secure chain end.
Repeat Step 3 to other chain end.
Open both jump rings on the adjustable bracelet sliding clasp and set aside.
Cut 2 inches off both open ends of the sliding clasp chain. (This will shorten your bracelet sliding clasp.)
Slide back on the jump ring onto the sliding clasp chain and through a loop of the end connector. Close jump ring.
Repeat Step 7 to other sliding clasp chain end and end connector.
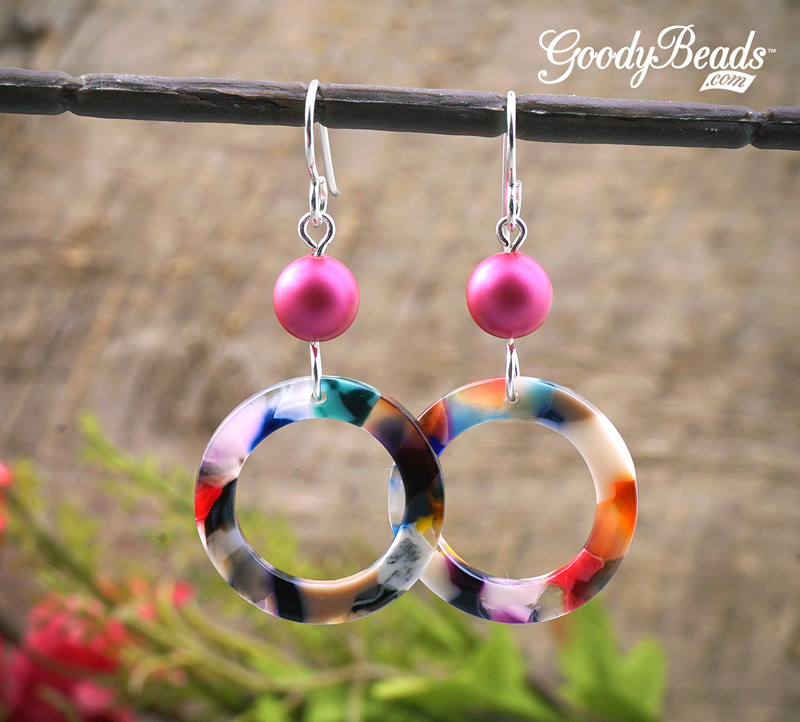
DIY Earrings with Swarovski Mulberry Pearl and Acetate
The new Swarovski pearl color, mulberry, is a bold and fall-suitable hue! We paired it with some colorful acetate components, to make a fun pair of earrings!
Open eyepin and slide on earwire loop. Close eyepin loop.
On the eyepin, slide on pearl and make a simple loop. (Make a larger loop to fit round acetate.)
Open loop and slide on acetate ring. Close loop.
Repeat all steps for earring.
Chevron Chain Necklace
Chevron is one of those trendy shapes that probably won’t ever go out of style. And with our chevron chain, you can easily make this stunning silver chevron chain necklace.
Cut chevron chain to 3 inches or 18 links. Cut 3 pieces.
Open 3mm jump ring, slide on dagger charm, close jump ring.
Open another 3mm jump ring, slide through jump ring in Step 2 and through pointed loop on one of your chevron chain. Close jump ring.
Open 5mm jump ring, slide through other loop of your chain in Step 3 and through Hammer Ring. Close jump ring.
Open another 5mm jump ring, slide through hammer ring and close jump ring.
Open another 5mm jump ring, slide through jump ring step 5 and close jump ring.
Open a 3mm jump ring, slide through pointed loop on your second chevron chain and close jump ring. Repeat for the third chain.
Open a 5mm jump ring, side through a 3mm jump ring in step 7 and through 5mm jump ring in step 6. Close jump ring.
Repeat Step 8 with third chain.
Open jump ring loop on adjustable necklace chain and slide through other end of the second chevron chain. Close jump ring.
Repeat Step 10 with other end of adjustable necklace chain and third chevron chain.
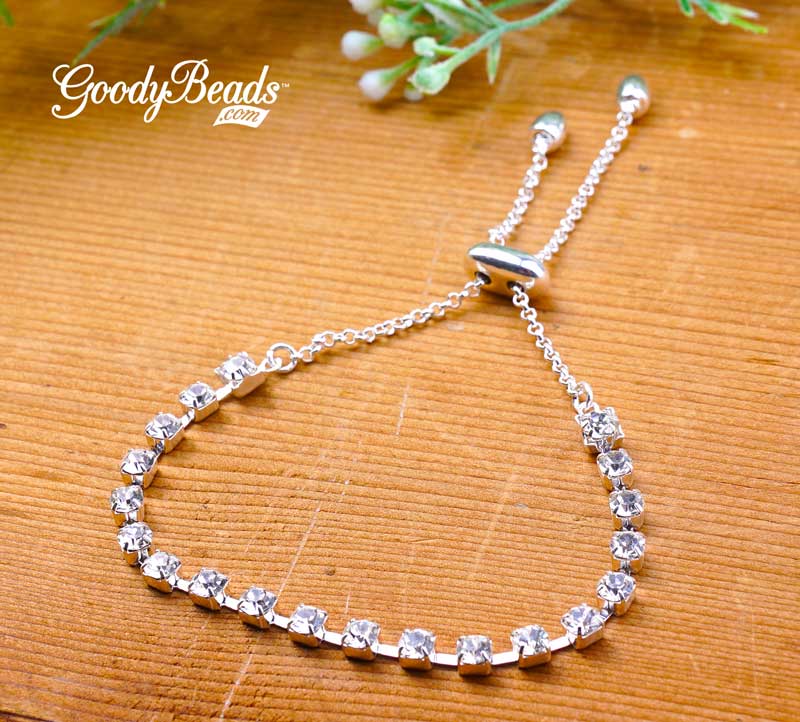
DIY Pendant Necklace with Layered Crescent Connectors
Channel your celestial side with this DIY Pendant Necklace with Crescent connectors and charms. Here’s what you’ll need to make your own DIY Crescent Pendant Necklace:
Buy the SILVER Version as a Buy-All Project – BAP0014
Buy the GOLD Version as a Buy-All Project – BAP0015
Directions:
Open jump ring and slide on small crescent and through hole of concave side on the medium crescent charm. Close jump ring.
Open another jump ring, slide on other hole of medium crescent charm and through hole of concave side on large crescent charm. Close jump ring.
Open another jump ring, slide on other hole of large crescent charm and close jump ring.
Slide your 3 feet of chain through jump ring from step 3.
Use another jump ring to link both your chain ends together. Note: Adjust necklace length to your preference by cutting off excess chain. For a short length of necklace, use a clasp to attach the chain ends.
Silver Acorn Hoop Earrings
It’s fall-mania with these cute cute cute pair of earrings with an acorn charm! All you need to do is taking your jump ring and connecting the acorn charm to a lovely Semi Hoop Earring (Z019973).
Open jump ring, slide on leaf acetate and enamel connector. Close jump ring.
Open another jump ring, slide through other hole of connector and through post earring loop. Close jump ring.
Add your earring backs and you are ready to rock our fall!
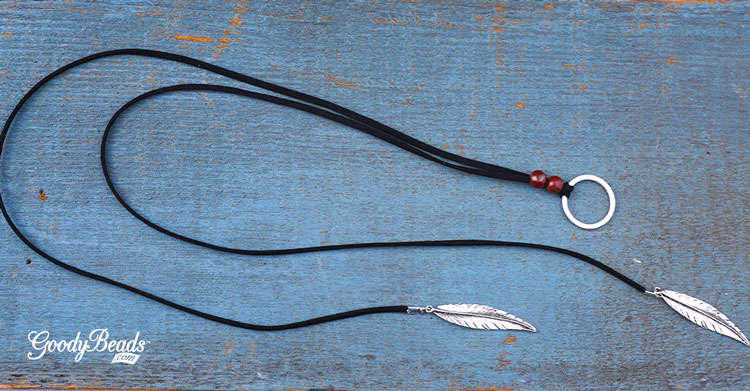
3 Ways to Wear DIY Suede and Gemstone Lariat Necklace
Today’s tutorial features the DIY Suede and Gemstone Necklace. This necklace is easy to make and can be worn three different ways. First, let’s get to designing this necklace!
What you’ll need:
3mm Micro-Fiber Ultra Suede Cord (Item used in example Z007132)
Fold suede in half and make a lark’s head knot with the suede on the Hammertone ring.
Slide two large-hole beads on to both suede cords. (Cut ends at and angle to help get both ends through large-hole bead.)
At each suede end, fold over the Crimp Cover Ends.
Open a jump ring, slide on feather charm and loop end of Crimp Cover Ends. Repeat to other end.
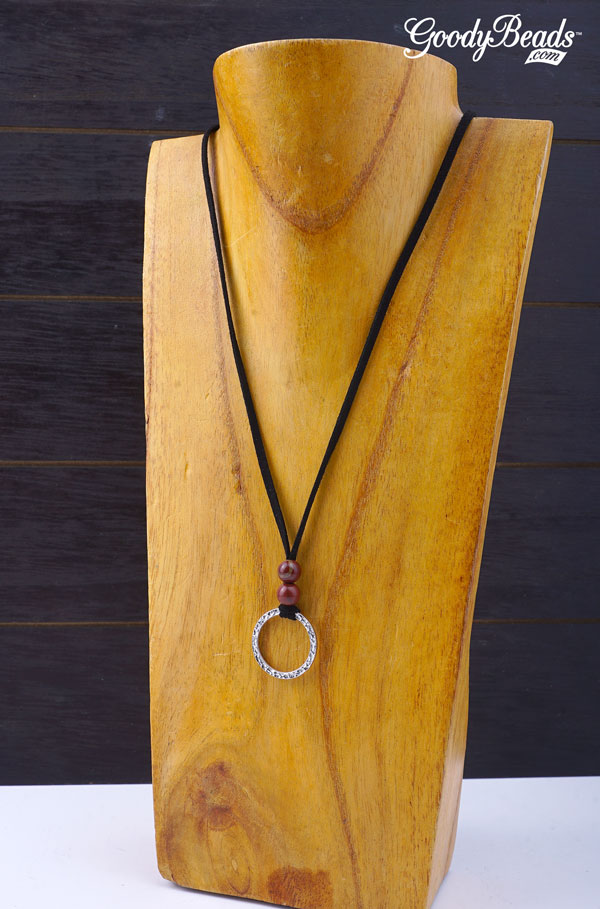
3 Ways to Wear the Necklace
Here are three ways that you can chnage up your suede and gemstone necklace.
1. With the Hammertone ring at the front of your necklace, wrap the suede around your neck and slide both ends through the ring. This creates an illusion of two necklaces!
2. Wrap both suede ends around your neck in the same direction and loop both ends into the Hammertone ring!
With the Hammertone ring at the front, tie your suede ends at the back of your neck. Adjust length as needed.
DIY Acorn Pearl Earrings
Acorns are a symbolism of fall weather, so these pair of earrings are fitting for the season.
Cut ball chain with 10 ball links. Cut two pieces.
Cup each end of the ball chain with clam shell end caps.
On a headpin, slide on a pearl, an end cap and make a simple loop.
Open pearl dangle loop and slide on loop of clam shell. Close loop.
Open earwire loop and slide on other end of ball chain loop. Close loop.
Repeat steps 3 – 5 to other ball chain link.
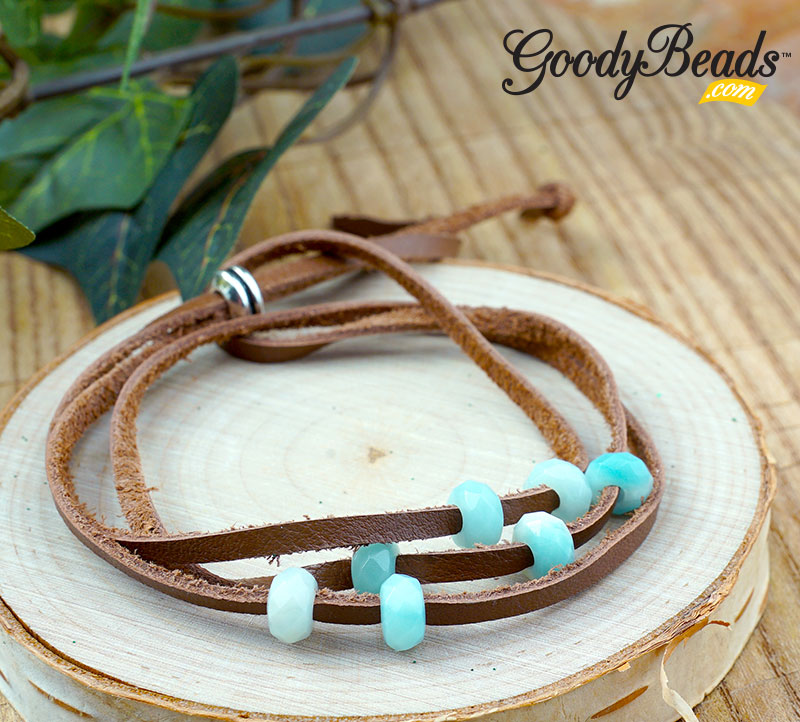
Amazonite and Leather Wrap
Design this wrap bracelet with Amazonite large-hole faceted gemstones and Deertan Lace leather. It’s also adjustable with a sliding clasp and easy to make!
Slide 7 gemstones onto the leather. (Cut ends at and angle to help push leather through.)
Take both of your leather ends and slide through TierraCast bead.
Make a knot at each leather end.
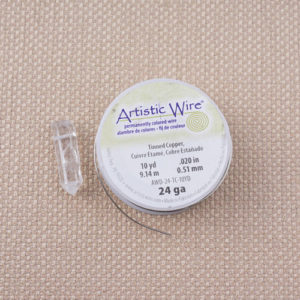
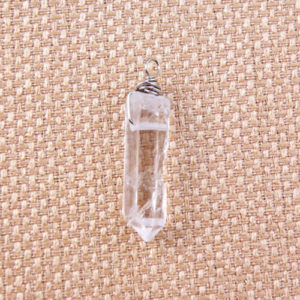
Crystal Quartz Drop Earrings with Tutorial
Today’s FREE tutorial is wire wrapping Crystal Quartz points and making simple pair of earrings with them! All you need are a few tools and wire to get your started!
Tools: Round Nose Pliers, Chain Nose Pliers and Side Cutter
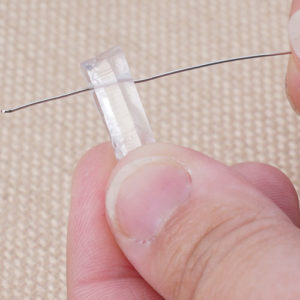
Crystal Point Tutorial
Step One: Gather your materials and tools.
Step Two: Cut a 5 Inch piece of wire and slide wire through crystal an inch of the way.
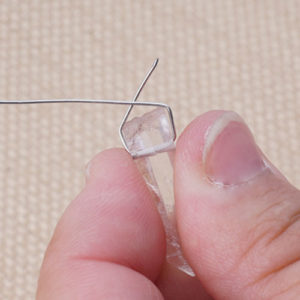
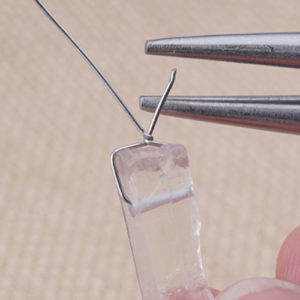
Step Three: Wrap both wire ends to the top of the crystal and criss cross them.
Step Four: Using a round nose, grasp the wires where they cross.
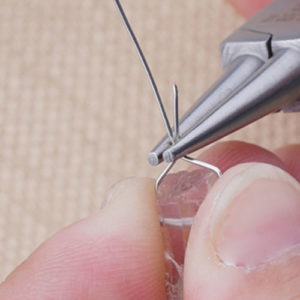
Step Five: Without moving your pliers, twist the crystal a few times to create a tight twist at the cross.
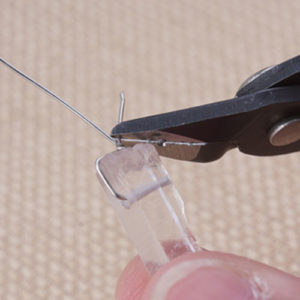
Step Six: Cut off smaller wire end.
Step Seven: With the round nose pliers, make a full loop.
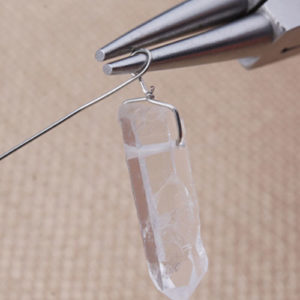
Step Eight: Grasp the loop with flat nose pliers and wrap the wire around the base of the loop a few times. Don’t worry about making them perfect coils.
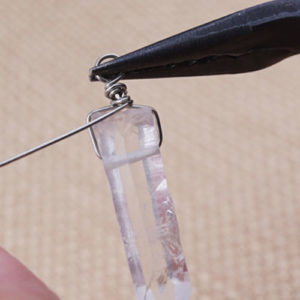
Step Nine: Cut off excess wire, tuck in the wire end and you are ready to make more!
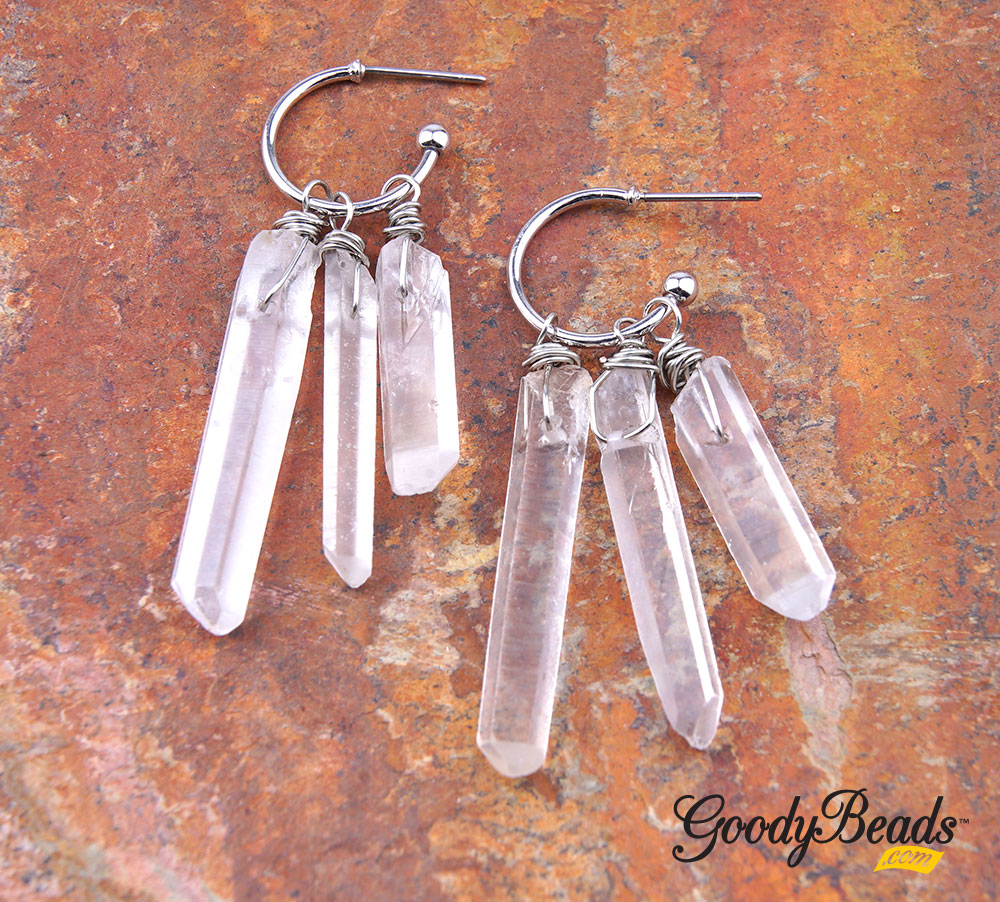
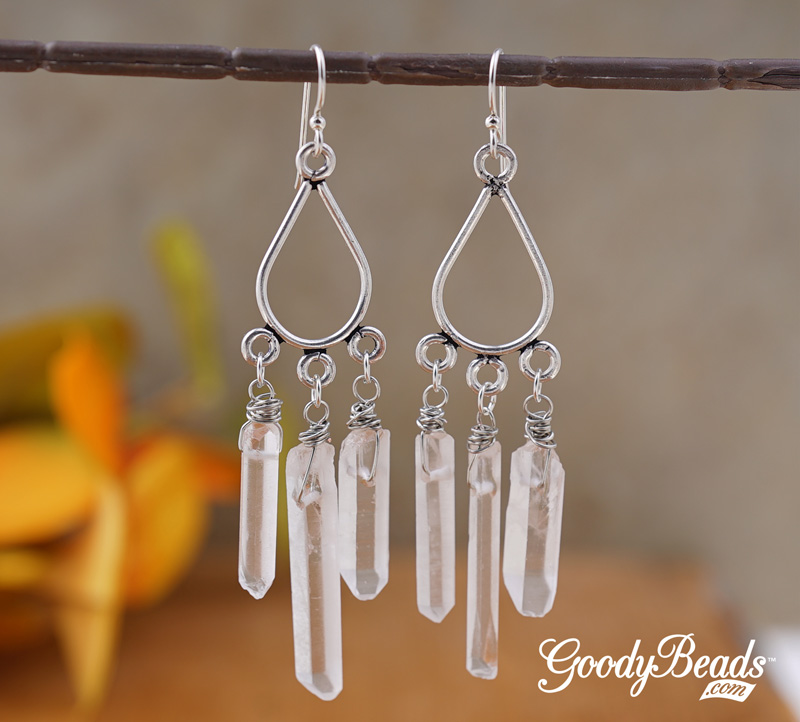
Here are some earring examples to using your crystal points!
Crystal Hoop Earrings
We took three different graduated points and slid them over the hoop earrings for an easy pair of earrings!
In this example, we chose two points of the same length and dangled one point on either sides of the drop link. And a third point at a longer length at the middle.