We’re combining two fun beadable accessories in these fan earrings. Beadable accessories are easy to use because all you need to do is bead-stitch size 11 delica beads inside the channels. The colors and ideas are endless with beadable accessories.
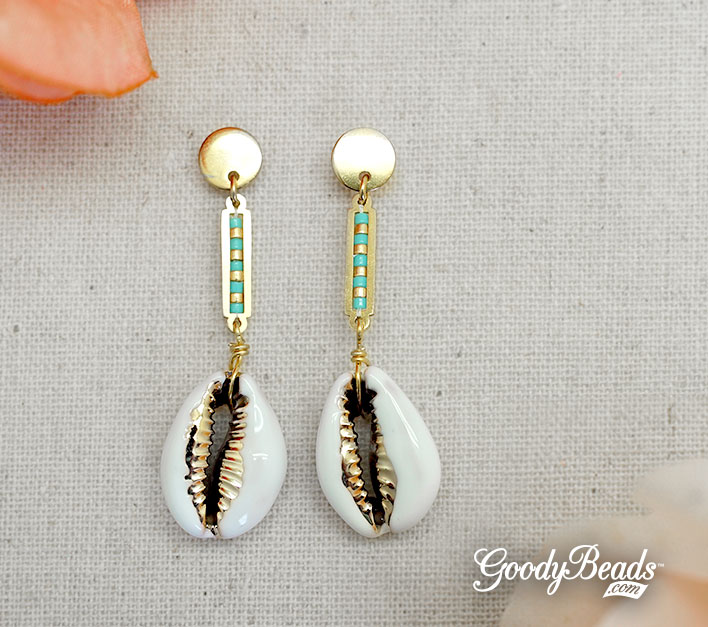
Can you hear this DIY calling to you? This pair of cowrie shell earrings is designed with enamel cowrie shells and our fun beadable links. Get this free tutorial today and be summer-ready!
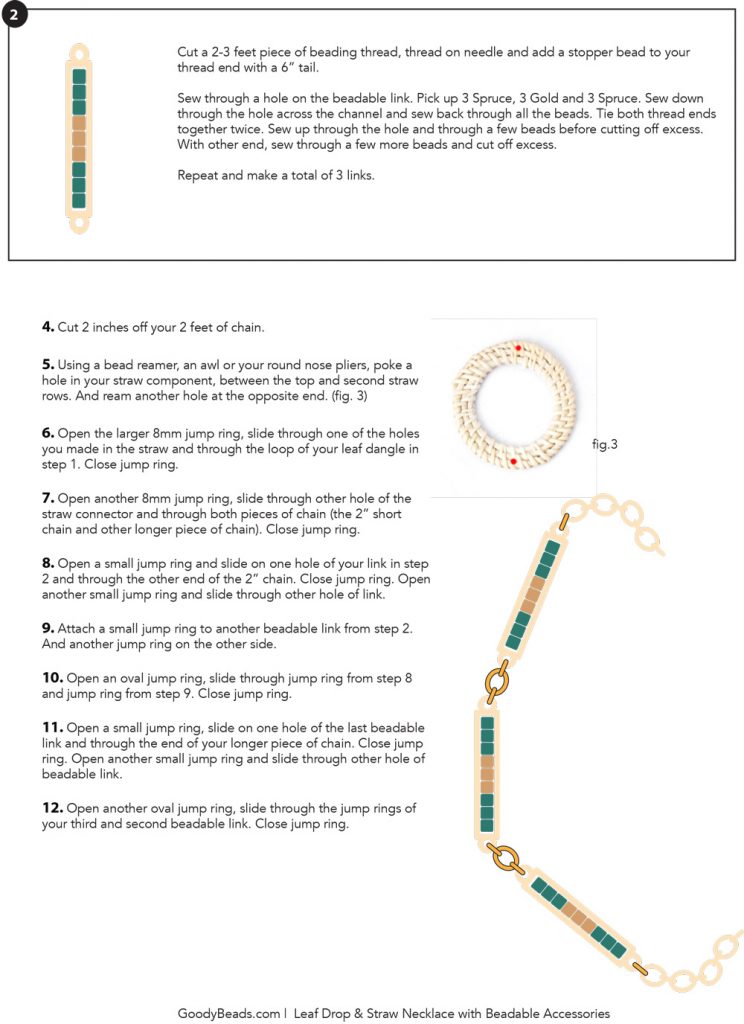
Add a foot of beading thread to your needle and add a bead stopper to your thread end, leaving about a 5 inch tail.
Sew through one hole of beadable link and pick up Sea Opal and Gold Delica seed beads, alternating between the colors. Pick up a total of 9 beads. Sew down through the other beadable link across the link channel. Sew back through all the beads. Pull off the bead stopper and tie both threads together, tie two times. Sew thread ends through a few beads before cutting off excess.
Cut a 3 inch piece of wire. Insert a third of the wire through the shell and fold wire. Wrap the longer piece of wire on top and around the shorter piece of wire.
Make a simple loop with the shorter wire.
Open loop, slide in beadable link and close loop.
Open earwire loop and slide on other end of beadable link.
Pantone 2021 Color of the Year: Ultimate Gray & Illuminating
Pantone has produced their color pick for 2021. Or should we say picks! With 2020 being a rough year for everyone around the world, Pantone’s color picks Ultimate Gray and Illuminating challenges a ‘forward’ thinking for the future. We will dive into Pantone’s meaning for their color picks for 2021 and we’ll give you a fun DIY jewelry to embrace this color combination!
2016 was the year Pantone debuted a first-time, duo-color that blurs the line of femininity and masculinity; Rose Quartz and Serenity. With the current event of 2020, it is no wonder their pick for 2021 doesn’t blur the line of colors but complement two opposite colors that works “together to support one another.” While Ultimate Gray is justly a neutral gray color, Illuminating is a bright yellow, it is “a marriage of color conveying a message of strength and hopefulness that is both enduring and uplifting.“
Pantone states, ” Emboldening the spirit, the pairing of PANTONE 17-5104 Ultimate Gray + PANTONE 13-0647 [Illuminating] highlights our innate need to be seen, to be visible, to be recognized, to have our voices heard. A combination of color whose ties to insight, innovation and intuition, and respect for wisdom, experience, and intelligence inspires regeneration, pressing us forward toward new ways of thinking and concepts.”
How do you feel about Pantone’s picks for 2021?
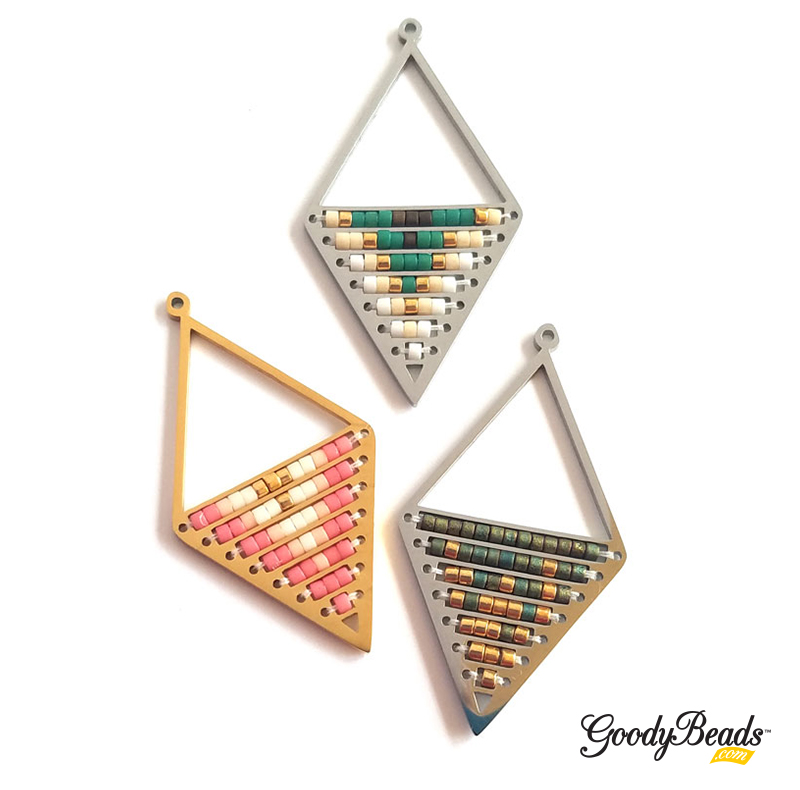
DIY Beaded Silvery Yellow Diamond Color Block Earrings
We love the color combination and the emboldening message it represents. Here is a fun design using the two colors in our pair of DIY earrings. We’ve made a simple colorblock diamond earrings using Delica beads in a brick stitch.
DIY Beaded Frilly Fringe Earrings with FREE Pattern Tutorial
Make today a pair of Beaded Frilly Fringe Earrings with size 11/0 seed beads or Delicas. Beaded earrings are everywhere! They are a fun piece for any occasion because of the many color combinations you can create with them. Our FREE DIY is this easy-to-follow pattern tutorial.
NOTE: in this pair of earrings (above), in Steps 3-5 where you are brick stitching each row, you’ll add a TWO delicas to create each row instead of one.
Slide on 4 delicas and make another knot, close to the last delica.
Slide on a delica bead. (This will act as your slider piece at the end).
Slide on 1.5 – 2 inches of 1st delica beads.
Alternate the 1st and 2nd delicas 5-6 times.
Slide on 1.5 – 2 inches of 2nd delica beads.
Alternate the 2nd and 3rd delicas 5-6 times.
Slide on 1.5 – 2 inches of 3rd delica beads.
Alternate the 3rd and 4th delicas 5-6 times.
Slide on 1.5 – 2 inches of 4th delica beads.
Alternate the 3rd and 4th delicas 5-6 times.
Slide on 1.5 – 2 inches of 3rd delica beads.
Alternate the 2nd and 3rd delicas 5-6 times.
Slide on 1.5 – 2 inches of 2nd delica beads.
Alternate the 1st and 2nd delicas 5-6 times.
Slide on 1.5 – 2 inches of 1st delica beads.
slide needle through delica you added in step 4. You’re going to make a loop, so feed needle through the side that has the silk cord end.
Put necklace on to determine the length you would like your necklace. Necklace in sample is 38″ long. It can be adjusted to be shorter too.
Make a knot at the other cord end. Slide on 4 delicas and make another knot close to the last delica. Cut off excess silk cord.
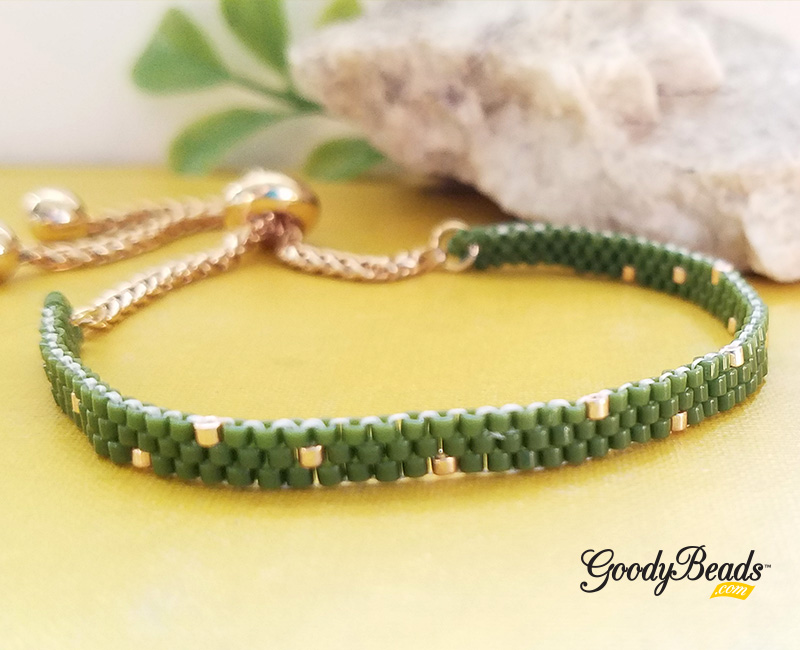
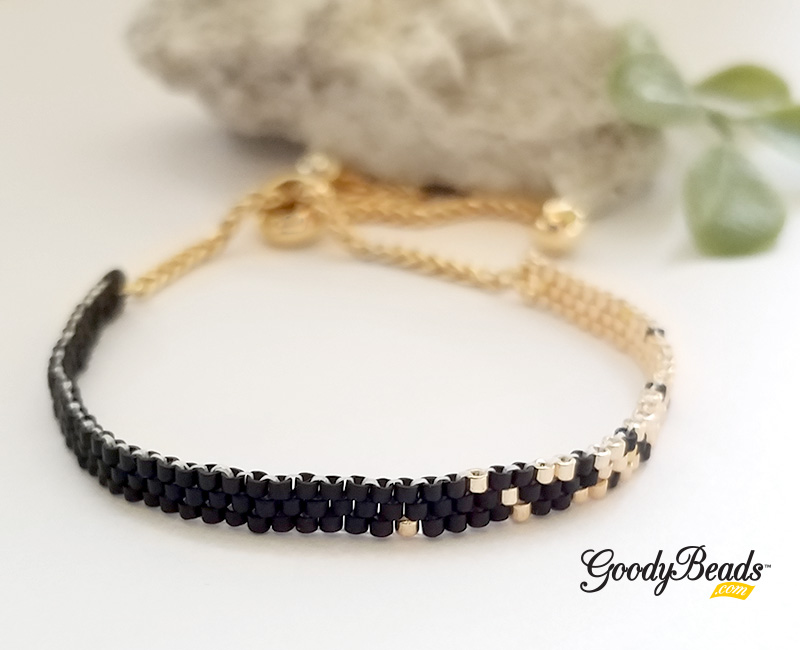
DIY Delicate Delica Adjustable Bracelet
Looking for an easy weekend project? Why not get into a super simple peyote stitch pattern and make it into an adjustable bracelet! We’re using size 11/0 Delica seed beads, making an odd-stitch peyote stitch pattern. Make a simple wrap bracelet with one color delica or multiple, you choose! Get the FREE downloadable PDF tutorial for the Delicate Delica Adjustable Bracelet HERE!
If you’re not a fan of an adjustable bracelet, you can also alter it with a lobster clasp and jump ring. Or even make a multi-wrap bracelet
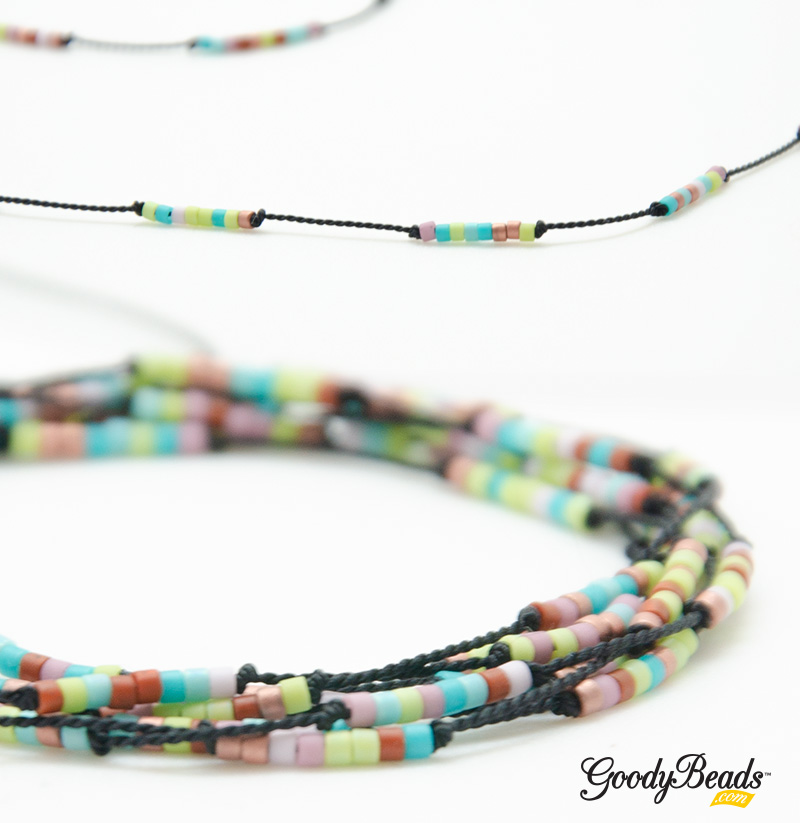
DIY Delicate Delica Necklace or Wrap Around Bracelet
Today’s project is perfect for Summer because it’s delicate and minimalistic; the right kind of jewelry to not outshine your summer style! Made with only two products, Griffin silk cord (No. 4 cord) and Miyuki 11/0 Delica mix, this project is easy to make for a lazy summer day.
What you’ll need:
Griffin silk cord (No. 4 cord) – Item used in necklace A006569
Miyuki 11/0 Delica mix – Item used in necklace SB03797
Unravel your Griffin cord and straighten/smooth the strands to remove kink. (Refer to Silk Cord Blog)
Make a knot at the end of your silk cord, leaving a 1/4 tail. Sew on 4 delica seed beads.
Make a knot 4 inches from the first knot you made. Sew on 8 delicas and make another knot close to the end of your delicas.
Make a knot about 1/2″ from the previous knot. Sew on 8 delicas and make another knot close to the end of your delicas.
Repeat step 4 until you have about 5-6 inches left of your Griffin cord.
Sew through the last delica that you added in the beginning (Step 2). this will act as your slider and create your necklace loop. Pick 3 more delicas and make a knot at the end of your Griffin cord, 1/4″ from to the needle. Cut off needle.
You can wear this wrapped around your necklace two times or wear it as a wrap-around bracelet, using the slider piece to adjust.
You can also shorten the pattern to alter the length of your necklace.
DIY Beadable Column Bead with Twist Off Bezel
One of our newest products and one of So’s favorites are the new Beadable Accessories: Column Bead with Twist Off Bezel. Use size 11/0 Delica seed beads to create a tubular design and encase it around the bezel area of the column bead. Plus, the bead has a twist off side that you can easily create your tube and slide it on the bezel and twist sides back on.
Make a cute and colorful necklace with one two or three column beads!
Even Peyote Count Stitch
For the column beads, you will be creating a tubular design with an Even Count Peyote Stitch. Below is an example how to stitch an Even Count Peyote design:
As a side note, you can create a wider tube starting with 7 seed beads if your design needs an odd count stitch.
Beadable 18mm Column Bead & Pattern Template
To use the 18mm column bead, you can get them in Gold Plated (Z001456) and Rhodium Plated (Z001453). Use an Even Count Peyote Stitch starting with 12 Delica seed beads. Then you will be making 30 rows and then wrap pattern into a tube shape by stitching and zip up the sides.
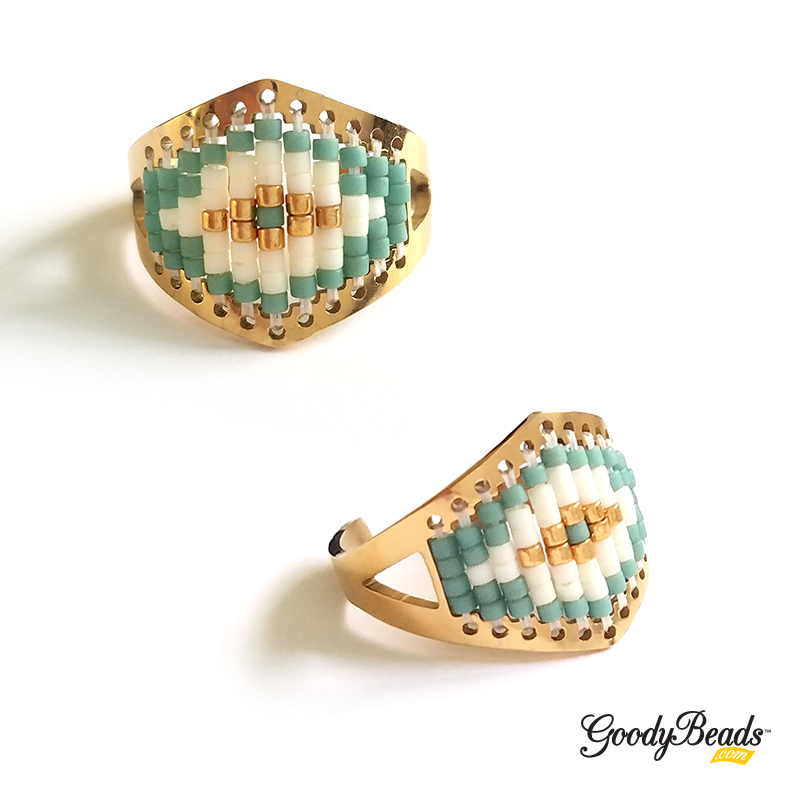
DIY Beadable Diamond Ring & Pendant with FREE Pattern Template
Some of our newer beadable products are in and we, meaning So Vang, is pretty excited to get designing! We have new Diamond Beadable Pendant and Diamond Beadable Ring, with example designs and templates so that you can get designing on your own!
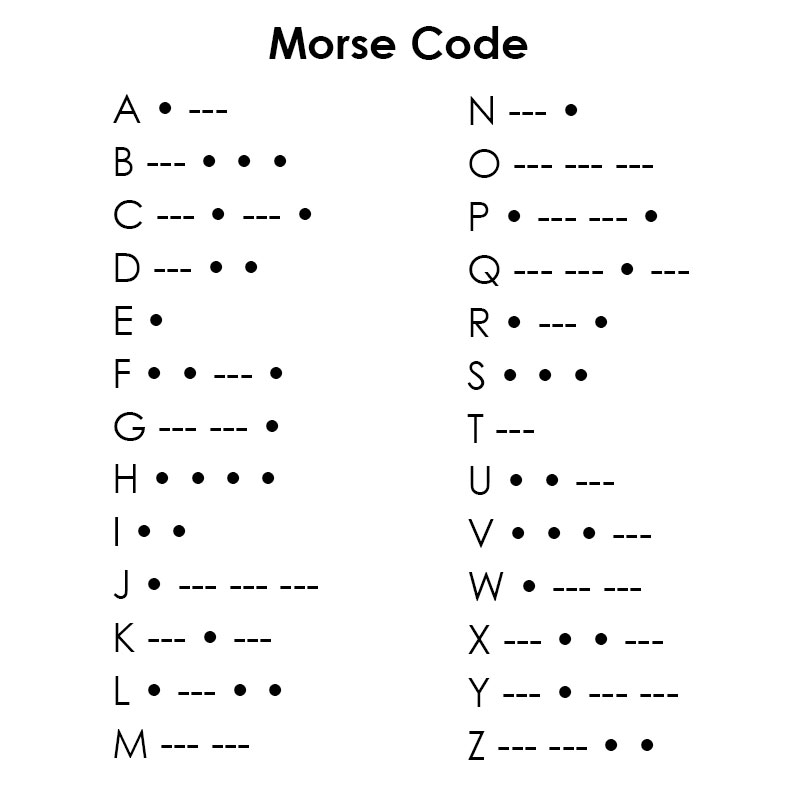
Design delicate and minimalistic necklaces with a secretive morse code, using Miyuki Delica seed beads, strung on beading chain.
Morse Code Letters
Morse code is a type of telecommunication invented in the early 19th century that takes texts and converts them into dots and dashes. Each letter has a series of dots and/or dashes. Here is what they look like:
One of our popular project request is our beadable fan earrings with 11/0 Miyuki Delicas and long tassels. Check our video to see how easy they are made.
Starting with 2.5′ to 3′ of beading thread, attach a stopper bead leaving a 6″ tail end.
Start from one end of the fan, come up through the bottom hole.
Add your three delicas and go across the beadable opening and down the hole.
Sew up the next hole, add your three delicas, go across the beadable opening and down the hole.
Repeat this until you’ve gone across the beadable fan pendant.
You will now add your pearl bead by sewing up the hole closest to the round opening, add your pearl bead and go across the circle opening and down the hole.
Sew through the pearl bead again and up the hole, through the pearl again and down the hole.
Tie off your ends and cut excess off.
Open small jump ring and slide on tassel and through the middle hole of your fan pendant. Close jump ring.
Open earwire loop and attached top fan pendant loop to earwire. Close loop.