Lotus Inspired Jewelry

The Lotus is iconic and symbolic in many cultures. Learn its significance and check out our DIY lotus jewelry, inspired by the lotus motif.

Lotus: A Religious Symbolism

  • Through Egyptian art, “(t)he Lotus is used as a symbol in ancient Egyptian art representing the sun, of creation, rebirth and was a symbol of Upper Egypt. As a symbol of the sun it is closely associated with Atum-Ra, the Sun god and later with Nefertum, lotus god of perfume. Lotus flowers, also called water lilies, open in the morning and close again at night symbolizing rebirth and regeneration. ” (LandofPyramids)
  • In Buddahism, the Lotus symbolize not only rebirth, but also purity and spiritual enlightenment. (LotusFlowerMeaning)
  • And in Hinduism, the Lotus motif is a strong symbol associated with “beauty, fertility, prosperity, spirituality, and eternity.” (LotusFlowerMeaning)

Check out our jewelry using the strong and symbolic meaning of Lotus.

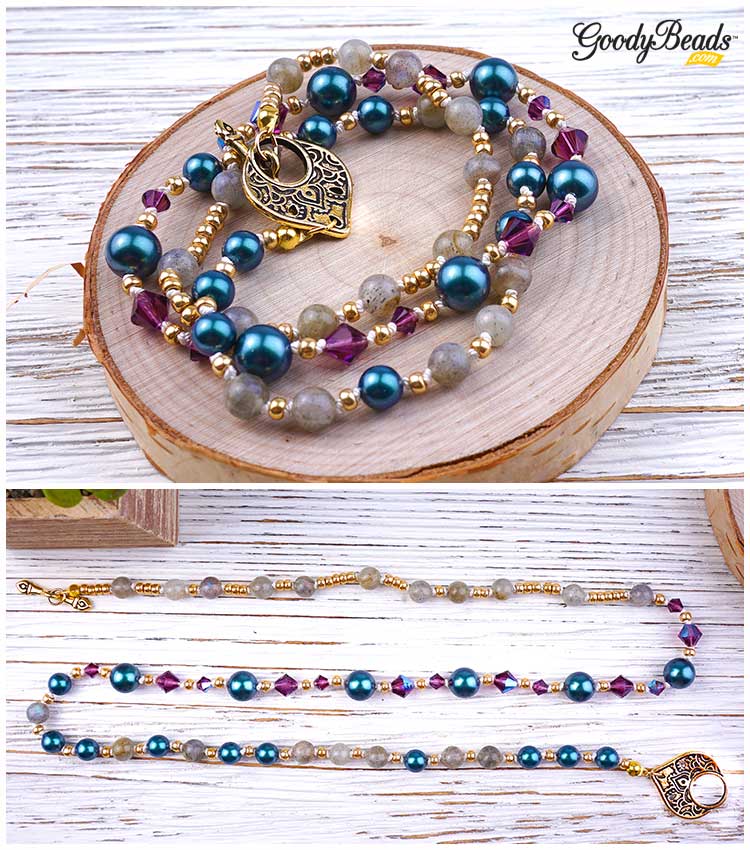
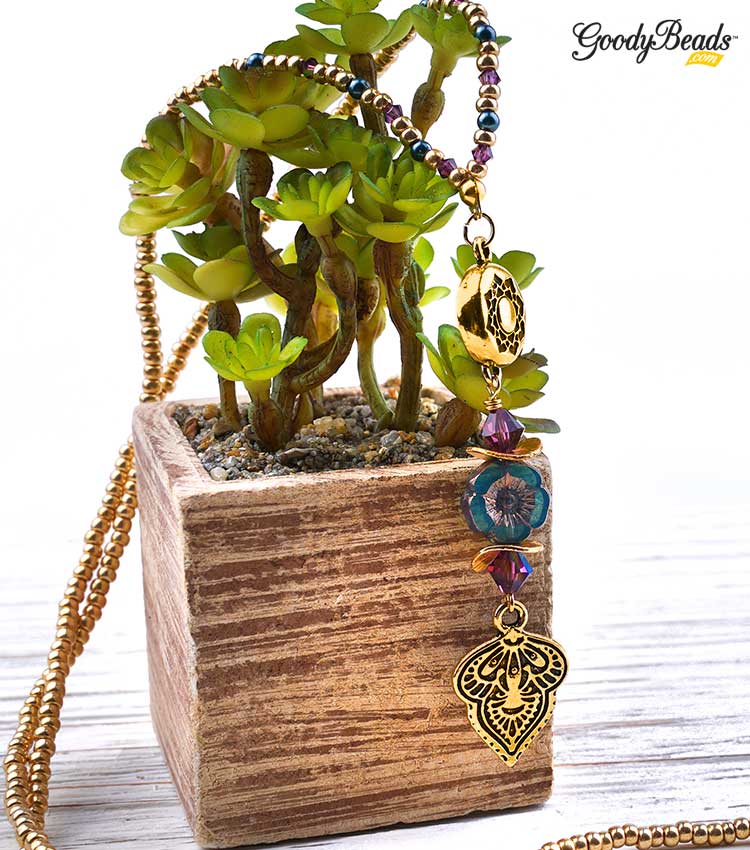
Lotus Porcelain Necklace

GoodyBeads Blog Lotus and Porcelain Necklace - Free Tutorial

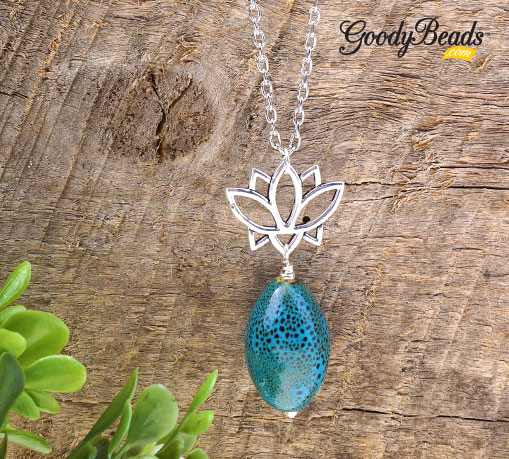
We paired a stunning TierraCast Lotus link with an organic-looking porcelain oval bead. Take a headpin, slide on a small silver seed bead, porcelain bead and another seed bead. Make a wrapped loop by hooking on the lotus link before wrapping the headpin. Open a jump ring, slide on the top part of the lotus and onto the necklace chain and close jump ring. STUNNING, don’t you think?

Items used in necklace: TC02466, A019656A008273, SB00106, A001528, Z001033

Lotus Chain Earrings

GoodBeads Blog Czech Lotus Drop Bead - Free Tutorial

We can’t get enough of the beading chain here at GoodyBeads. We used the same tutorial and concept from our previous blog to make this pair of earrings with Czech Lotus Coin Beads.

Items used in earrings: Z018245, CH00724, X001505, TC01897 (2), TCZ0077

Lotus Link Bracelet

LotusJewelry_Bracelet

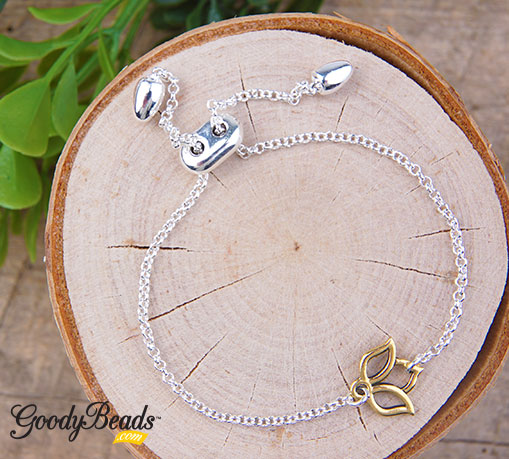
Who doesn’t love a simple adjustable bracelet! We certainly do. We used the Silver Plated Adjustable Rollo Chain Bracelet Sliding Clasp (Z012151) with a gold lotus charm. The contrasting metal really makes the lotus charm pop!


Purple Velvet Earrings with Free Tutorial

Here’s a fun pair of earrings using TierraCast hoops, Czech rondelle beads and 24-Gauge wire. This easy step-by-step tutorial will make you want to scream with delight!


What you will need for Earrings:

Tutorial


Swarovski: New Shimmer Crystals and Pearl

We’ve launched a beautiful selection of new Swarovski from their new Fall/Winter 2019/2020 Innovation: Be Yourself. Our first selection consists of new Crystal Shimmer and Amethyst Shimmer bicone crystals, and Crystal Iridescent Tahitian Look Pearl. Plus, we have two lovely jewelry pieces to compliment the hues of these new Swarovski.


Passion Pearl Wrap Bracelet

GoodyBeads Blog | New Swarovski wrap bracelet with knotted Griffin silk cord.

In this three -wrap bracelet, we used Griffin Silk Cord knotted with Tahitian Look Pearls, Amethyst Shimmer bicone crystals and 6mm Labradorite round beads with size 8/0 gold seed beads. Plus, we finished up this piece with gold findings.

Items used in 6.5″ bracelet: SB00107, LBT6RD-8, SW01915 (10), SW01916 (6), SW01908 (6), SW01906 (7), Z008768, A006581, TC02395, A008801

  1. Make a knot at the end of the silk cord and cut excess end. Slide over knot with a clamshell bead tip (Check previous blog on examples). Optional, add a small dab of Super New Glue to the knot before sliding the clamshell over.
  2. Slide on a seed bead and make another knot flushed to the seed bead.
  3. Slide on a 6mm Tahitian Pearl and make a knot.
  4. Side on a seed bead and make another knot.
  5. Repeat with alternating with pearl beads or 6mm Labradorite beads until you reach your desired wrist length. This will be your first row.
  6. Next row, alternate a knot between an 8mm Amethyst Shimmer bicone crystal, seed bead, 4mm Amythest Shimmer bicone crystal, seed bead, 8mm Tahitian Pearl and seed bead. Repeat until your desired wrist length.
  7. For your third row, alternate seed beads and Labradorite beads in no particular order to wrist length.
  8. End with a knot, add a small dab of glue and cap off with a clamshell bead tip.
  9. Open jump ring and attach either clamshell bead tip end to a toggle clasp. Repeat to other bead tip end.


Passion Flower Necklace

Sep18_NewSwarovski_image2

We used the Griffin Silk cord to complete the bracelet with a necklace with similar beads as in the bracelet with TierraCast Findings.

Items used in necklace: TC02387, A019617, SW01908 (2), Z018414, Z018257, TC02397, A008801Z008768A006581, SW01912 (6), SW01905 (6), SB00107

  1. Open loop of eyepin and slide on TierraCast Mehndi charm. Close loop.
  2. Slide on the following beads onto the eyepin and make a simple loop or wrap loop: 8mm Ameythst Shimmer bicone crystal, wavy disc (concave down), Czech Hibiscus, wavy disc (concave up) and 8mm Amythest Shimmer bicone crystal. (If making a wrapped loop, make sure to slide on TierraCast magnetic clasp end before finishing loop off.)
  3. Make a knot at the end of the silk cord. Slide on a seed bead, 3mm bicone, a seed bead, a pearl, 2 seed bead, 3mm bicone, 2 seed bead, a pearl, 3 seed bead, a 3mm bicone, 3 seed bead and a pearl.
  4. Slide on seed beads to accomodate a length large enough to slide over your head.
  5. End silk cord with pearl, 3 seed bead, 3mm bicone, 3 seed bead, a pearl, 2 seed bead, 3mm bicone, 2 seed bead, pearl, a seed bead, 3mm bicone and seed bead.
  6. Take both ends of your silk cord and make a knot to tied the ends together.
  7. Slide a clamshell bead tip over the knot.
  8. Open jump ring and slide on loop of bead tip and other end of the TierraCast magnetic clasp. Close loop.


Sweetheart Leather Earrings with Tutorial

Eat your heart out ladies and swoon over this simple pair of leather earrings using round leather cord and Czech rondelles. Learn to make with this visual tutorial!


This tutorial is perfect for using a short amount of round leather or leftover cuts from previous projects. What you will need for this DIY leather earrings are:


Tutorial

Items used in earrings tutorial: A019631, Z019697, Z008251, CH00791, TCZ0078


Raven’s Journey: Czech Glass Beads

Lenka Bindzar, owner of Raven’s Journey, specializes in Czech glass beads. The quality, expertise, detail and modernizing she puts into her Czech bead designs helps to obtain an overall mission of continuing Czech Republic tradition and customer satisfaction. Check out these new Raven’s Journey Czech beads we’ve just added to our inventory!


Before starting Raven’s Journey, Lenka’s own journey started when she settled in Seattle, WA from Czechoslovakia. While looking for beads to make a collar for her dog, she stumbled upon a shop that sold Czech beads. With the small selection she encountered, she traveled back home in search of finding Czech bead manufacturers. She happened to find a small family-owned bead pressing company. And from there, her ideas flourished and has been designing and creating pressed glass beads since. You can see the hard work she puts continuing her mission to “work closely with artisans in the Czech Republic to continue the tradition of creating and producing the finest quality glass beads in the world.” We are proud to support the tradition and history of Czech glass beads!

RavenJOurney_image

We love the coin beads with pressed lotus, owls, skulls and bird bead.

One of the most popular Czech bead shapes are rondelles. Some mimics a picasso finish, opaque, translucent and more. These Czech beads has an organic look and color, making them easy to use and pair up with different beads like gemstones, boro glass, pearls, etc.

Czech rondelles: Z018261, Z018263, Z018266, Z018270, Z018280, Z018310, Z018311, Z018314, Z018315, Z018349, Z018363


RavenJOurney_image4

One of our favorites are the beautiful Czech Hibiscus. They are prefect for summer jewelry designing or for flower-lovers! And they come in a smaller 7mm size. Try these hibiscus beads with Porcelain beads, Swarovski crystals and wood beads.

Czech hibiscus: Z018246, Z018247, Z018248, Z018254, Z018255, Z018256, Z018257, Z018258, Z018259, Z018260


What is your favorite Czech beads and how do you like to use them?


Even Peyote Stitch on Czech Carrier Beads with FREE Patterns

New to GoodyBeads are the oh-so popular Czech Carrier Beads. We have an easy even count peyote stitch pattern to get you started.

Czech Carrier beads are making waves in the DIY jewelry making world. They have two holes and can be used for a stretch bracelet or intricate necklaces! Because they have two holes, they can be easily used in your favorite bead-stitching projects! The typical way to style carrier beads is bead stitching a tube of beads or seed beads to encase the carrier beads. We are using the classic peyote stitch tubes to slide over the carrier beads. Check out this tutorial and pattern ideas below!


Even Count Peyote Stitch

For these patterns, we used an even count peyote stitch pattern and created tubes to side over Czech Carrier beads. Check out this simple illustration below to understand how to do an even count peyote stitch pattern. Don’t forget to PIN this for later!

Even Count Peyote Bead Stitch Delica Seed Beads
Even Count Peyote Stitch Tutorial


Peyote Stitch Patterns

CarrierBEads02

We adore these colors! We used four colors to design these 15 different patterns. Make sure to DOWNLOAD PDF of these patterns and a quick tutorial of how to create tubes to add to your Czech carrier beads.

Plus, you can download this Carrier Bead Pattern Template, where you can create your own designs!


Glue/Adhesive

This step is important because this avoids the tubes from sliding off the carrier beads. We would recommend using GS Hypo Cement (A007224). It has a precision applicator, which helps get into small openings and a cap that stops overflowing glue from escaping and drying up. You have two options of when to add your glue.

First option is before you zip up your tube pattern. Apply glue to both sides of the carrier bead and lay it in the middle of your pattern. Fold your pattern around the carrier bead and sew the ends to zip up the tube patter.

Second option is after making your peyote stitch tubes. Complete your tubes and slide carrier bead half way through, still exposing the bead. Run your glue around the exposed area of the bead, let it sit for a second or two and slide the tube over the rest of the carrier bead.

Let it the beads dry completely before using. Make sure to read instructions for more information.


Pearly Pastel Necklace

Here’s a simple necklace we created with the beads we made above. It’s strung on using Fine Soft Flex Beading Wire (FTBW0001) and ivory miracle beads.

First we cut a 4 feet piece of wire. Fed one end of the wire through a 2′ piece of chain (this will be the extender chain for the necklace) and centered the chain at the middle of the beading wire. Slide on a 2mm crimp tube and using the Magic Crimper (TL00288) crimped the tube into a bead. You can check out our previous blog post HERE about the tool. Next, with both ends, slide on (25) size 4mm ivory miracle bead, (3) size 6mm miracle bead and (3) size 8mm miracle bead. Slide a 6mm miracle bead on each wire thread and slide on first carrier bead. As you can see we added a miracle bead in between each carrier bead. from the top strand, we used size 6mm miracle bead and the bottom used size 8mm miracle bead. This helps the necklace take shape. Reverse the pattern of strung beads to the end and crimp off the end with a lobster claw clasp.


Items used for necklace: SB02334, SB00269, SB01822, SB02346, A006587, A015211, Z016460, A007224, A011534, FTBW0001, TC01897 (2), A010140 (2 pks), A010141, A010142 (2 pks) and CHZ0101


Paisley Duos Bracelets – Pattern Tutorial

We are loving these Czech Paisley duos two-hole beads. Their shape makes them versatile that you can turn or flip them when bead stitching and create a whole new design! We have two simple bead stitch bracelet designs you can easily make with Czech Paisley Duos.

paisleyimage

Paisley Stripe Bracelet

This is a simple bracelet you loop your beading threads and make a knot to bring everything together. We love how these paisley beads cup each other nicely like a yin yang. Use two different colors to make this Paisley Stripe Bracelet.

— Download Paisley Stripe Bracelet PDF Tutorial —

Items used: SB03628SB03642, SB00106, A006585, A001528, Z007856, A021129, A015211

Paisley Leather Wrap Bracelet

paisleyimage2

We used the same two Paisley colors to stitch a leather wrap bracelet. Find the leather wrap bracelet tutorial from the How to Make a Leather Wrap Bracelet blog post to help make this bracelet and to determine length of desired wraps you want. We first started with adding 5 beads of one color and then one of the second paisley color. Repeat this pattern then gradate in the middle of your bracelet to 5 of the second color and one of your first color.

Items used: SB03628, SB03642, A015211, Z018647/A022075, A006596, TC01245

BeadSmith® Paisley Duos Patterns

BeadSmith has some wonderful patterns online using the Paisley Duos. Make sure to stop by their website for inspiration and pattern tutorials HERE.


How to Make a Leather and Memory Wire Bracelet – Video Tutorial

Learn how make our popular leather and memory wire bracelets in our video tutorial and watch as we teach you how to finish your memory wire bracelet with the nifty Memory Wire Finishing Pliers.

Leather and Memory Wire Components

Here are items you need in order to make your leather and memory wire bracelet.

Round Leather

Round Leather is the star of your bracelet. We carry 5mm and 6mm round leather cord, which will need to have a hollow core or hole inside the leather. The hollow core helps the memory wire go through the leather. Make sure when selecting your leather cord to read the descriptions, as not all round leather cords have a hollow core or hole. All leather cord is sold in inches, so order according to the amount of inches you will need for your project.

Another type of cord you can use are Regaliz® Licorice Leather with Hole as seen in our Leather & Swarovski Trend. They are thicker in size with flatten sides.

You can also use Hollow Rubber Cord. These are 3mm in diameter and sold in foot increments. Make sure they say “hollow” in the description for memory wire.

Memory Wire

Memory Wire is the skeleton of your bracelet. Make sure the wire you are selecting is round as we also carry flat memory wire and that “Memory Wire” in the description and/or name.

End Caps

End caps will be used to cap the ends of your leather cord. They make your leather ends look cleaner and finished. When looking for end caps, you can find them in Findings: Clasps & End Caps, TierraCast Findings, or search “End Caps.” PLUS, read the descriptions to determine their inside diameter/opening. This will help to accommodate the round leather size you choose to order.

Beads

Lastly, add these beads to your bracelet: glass beads, Swarovski crystals, gemstones, wood and any type of beads that will slide easily through the memory wire. Don’t forget some accent beads like bead caps, metal beads and seed beads.

Some beads we would not recommend are large-hole beads like interchangeable large-holes or large-hole gemstones because their holes are large and may wiggle around on the memory wire. Some tubes will not work because their shape will not curve along with the memory wire. Pearl beads can be tricky because some will have holes to small for the memory wire.

Tools

The best tool to cut your memory wire is the Memory Wire Cutter (TL00206). This cutter is meant to cut through heavy-duty wire like memory wire or thicker gauge wires.

One of your best friends in making your bracelet is the Memory Wire Finishing Pliers (TLZ0207). It’s a sturdy round plier used to loop your wires. It has two mandrel sides to create a consistent 2mm or 4mm loop. This tool will make it easier for your hands to making a loop compared to your round-nose pliers.

Video Tutorial

Watch our facebook live spin-off video below to learn how to add leather cord and end caps to memory wire and how to loop with the Memory Wire Finishing Pliers.

Items used: WR00121, CH00924 (3″), TC01854, SW00171, SW00180, SW00182, A022201, A022205

Memory Wire Bracelet Examples

You don’t have to only use leather cords. Here are some fun examples we used with leather and/or beads.

MemoryWire_1

(Leather & Swarovski Wrap Bracelets, Cork Cord and Wood Beads, Round Leather and Wire Bracelets)

MemoryWire_2

(Flamingo and Palm Tree Blog, Summer Wrap Bracelets, Memory Wire Leather Wrap Blog)

MemoryWire_3

(Fall Gemstone Trend, Turquoise Czech Glass Beads)

MemoryWire_4

(February Birthstone, March Birthstone, Naturally Coastal)


Honeycomb Rosebud Oval Earrings – FREE Tutorial

So Vang has created these beautiful Honeycomb Rosebud earrings using Czech Honeycomb, SuperDuos, Miyuki seed beads and the Oval Groovy Bead Frame. Check out this FREE tutorial on how to make your own.

Inspired by the gorgeous Frida Kahlo and the iconic flowers in her hair, is a pair of beautiful earrings that Frida would’ve love to wear!

Supplies you will need:

Make sure to try different colors and combinations even a monochromatic purple pair of earrings with cream seed beads.

Honeycomb-Rosebud

Don’t forget to get the FREE Honeycomb Rosebud Oval Earrings Tutorial!


Honeycomb Tassel Drop Earrings Tutorial

Were you able to make it to the Twin Cities Bead Bazaar this past weekend? We had so much fun! We’re sharing this fun tutorial that So Vang taught as a Make & Take class. Made with honeycomb beads, 8/0 Miyuki seed beads and silver findings, this easy pair of earrings are easy to wear and to make for your girlfriends!


These are items you will need to make these lovely pair of earrings:


Blog_HoneycombTasselEarrings_Image

Items used in image: Z013596, Z014010, A002413, A008998, A006585, SB00106,


Tucson 2018 Gem Show

We are back from the Gem Show in Tucson, Arizona. We’ve brought back a bunch of new products and new ideas. AND made lots of NEW friends. Take a look at this quick video and images from our trip.


There were beautiful Czech beads, charms, links, leather, gemstones, beaded jewelry and so much more. Did you go to the Gem Show? What did you see? What was your favorite?


Images


Two-Hole Beads Trend with Pattern Tutorial

One of our October 2017 Trend is all about two-hole beads and we love the versatility it brings to bead stitching. Check out what we made with SuperDuos, DiamonDuos, Honeycomb beads, and Tango. Plus, two BRAND NEW patterns for you to try out, created from our designer So Vang.


SuperDuo Fan Earrings

GoodyBeads | Blog: Two Hole Beads - SuperDuo Fan Earrings with FREE Tutorial

SuperDuos are certainly a must-have when square stitching. These SuperDuo Fan Earrings takes minutes to make and think of all the different color combinations you can use. Get your downloadable Pattern Tutorial here.


Honeycomb Beaded Tube Necklace

GoodyBeads | Blog: Two Hole Beads - Honeycomb Tube Necklace with FREE Tutorial

You’ve seen So use Czech Honeycomb in many of her designs. Here is an easy downloadable pattern you can follow. Use this pattern to make a focal necklace piece, add this tube on a bead pen or make earring by sliding it on a headpin, sandwiched between bicone crystals. What will you make?


Honeycomb Jewel and DiamonDuo Bracelet

GoodyBeads | Blog: Two Hole Beads - Honeycomb Jewel Bracelet with FREE Tutorial

You’ve seen this popular bracelet before in our Czech Honeycomb Jewel Bead blog post. Check this blog post and learn how to make this bracelet with our other two-hole favorites: Honeycomb and DiamonDuo.


Wire Snowflake Ornament Forms and Tutorial

The holidays are coming up and we’ve got a fun tutorial with tips and tricks to creating snowflake ornaments with wire snowflake ornament forms.


Wire Snowflake Ornament Forms

The Wire Snowflake forms comes in FOUR different sizes. Depending on the amount of beads you want on each peg will determine which ornament form to buy.

A006240 – 3 3/4″

Z009715 – 4 1/2″

A006241 – 6″

Z009790 – 9″


Tools

Tools are important when completing your ornament. Because the snowflake form has thicker gauge wire, it is best to cut the wire with a Memory Wire Cutter (FTTL0005). You will create a simple loop at the tip of your pegs, for this you can use round nose pliers and roll a loop. However, we love to use the Memory Wire Finishing Pliers (TLZ0207), which creates less stress on looping the pegs. And Serrated Pliers (A001682) to close your loops because it helps grip the peg wires without slipping.


Tutorial


Inspirational Ornaments

Here are some inspiring ornaments you can create with lampwork beads, Swarovski® crystals, Chinese crystals, bead caps and more!

Oct17_Ornament_03

Products used:Z009715, A008538, Z001553, SB00106, A002934 (2)

Each peg consists of: seed bead, gold Czech, bead cap, (4) Chinese crystal, bead cap, gold Czech and seed bead.


Oct17_Ornament_01

Products used:Z009715, A002934 (2), SW00360 (12), A005569 (2), SB00106, A002413, A019704

Each peg consists of: seed bead, bicone crystal, bead cap, lampwork, bead cap, bicone crystal and seed bead. Open jump ring, slide through one peg loop, through loop of tassel and close jump ring. Open another jump ring, slide on peg loop opposite of previous peg loop, through an ornament hook and close loop.

Oct17_Ornament_02

Products used:Z009715A002934 (2), SB00106A002413, SW00114 (12), A008316 (2), A0019700

This is a different color version like the purple and white snowflake from above. Repeat the same steps for this blue and white ornament.


GoodyBeads EZ DIY Series: Adjustable Wire Bangle Bracelet

With a few tools, memory wire, and your favorite beads; you can make yourself an easy DIY adjustable wire bangle bracelet. Check our tutorial series to learn how!


GoodyBeads EZ DIY Series: DIY Adjustable Wire Bangle Bracelet FREE Tutorial


Items used: WR00109, Z017508, Z014870, TC00264, A013728, FTTL0005, A013732.


GoodyBeads Inspiration: Memory Wire

One of the most simple jewelry accessory to make are memory wire wrap bracelets. Memory wires are preformed to maintain its circular shape. All you have to do is add your choice of beads, leather, spacers and charms to memory wire and make a simple loop at both ends. Here are some fun examples of how we used memory wire.


GoodyBeads | Blog: Memory Wire Inspired Jewelry Examples

  1. Summer Wrap Bracelets – June ’16 Trend
  2. Beachy Flamingo and Palm Tree DIY Bracelets – Blog
  3. Pink Ribbon Bracelets – Sept ’15 Trend
  4. Memory Wire Leather Wrap Bracelets – Blog
  5. Flat Memory Wire – Aug 15′ Trend
  6. March Birthstone – March ’16 Trend


GoodyBeads | Blog: Memory Wire Inspired Jewelry Examples

  1. Cork Cord and Wood Beads – March ’16 Trend
  2. Beachy Bright Czech Glass – July ’15 Trend
  3. Leather Wrap Bracelets – July ’15 Trend
  4. Czech Glass Memory Wire Bracelets – Oct ‘ 15 Trend
  5. February Birthstone – Feb ’16 Trend
  6. March Birthstone – March ’16 Trend
  7. Memory Wire Bracelets – Dec ’14 Trend
  8. Wrap Suede & Chain Bracelets – Nov ’15 Trend