Make DIY Jewelry with PaperClip Chain Trend

Paperclip jewelry is a hot looking trend for all fashionistas. It presents a very modern and bold look as it rolls away from the minimalistic and dainty trend. Its elongated chain link shape mimics the average paper clip office supplies.

Paperclip History

However, did you know that the paperclip is a ‘non-violent symbol of resistance, unity, and national pride’ during World War II. You can read more on its symbolic history HERE as well as some fun facts about paperclip. Because while you are getting into this trend, it’s one that has been a part of history.

Paperclip Jewelry on the Runway

My first initial look at the paper clip jewelry trend is from the HOT runway look of Stella McCartney’s collection in March 2019. The earrings were a cascade of colorful paperclips draped over the model’s shoulder. It was a vibrant look towards spring/summer jewelry with its multicolor paper clips and shoulder duster length.

Image from Vogue

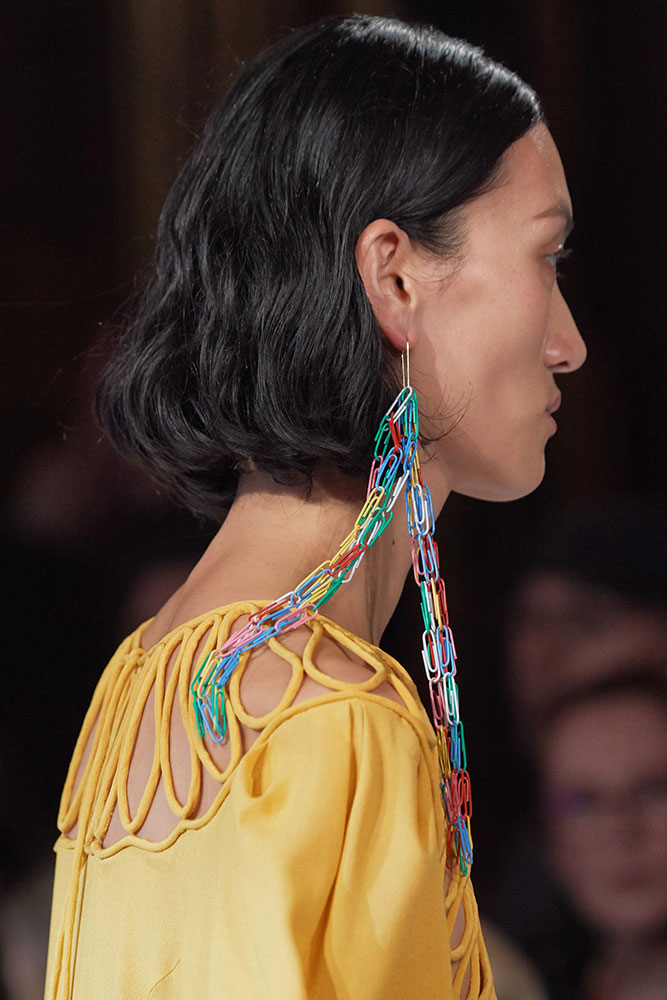
Since then, it has evolved into the creation of elongated chains to mimic the paperclip shape. Its shape create length and bolder statement pieces.

Paperclip Chain Selection

Check our selection of paperclip chain in multiple size, thickness and finish:

Here are some of our DIY selections using paper clip chain.
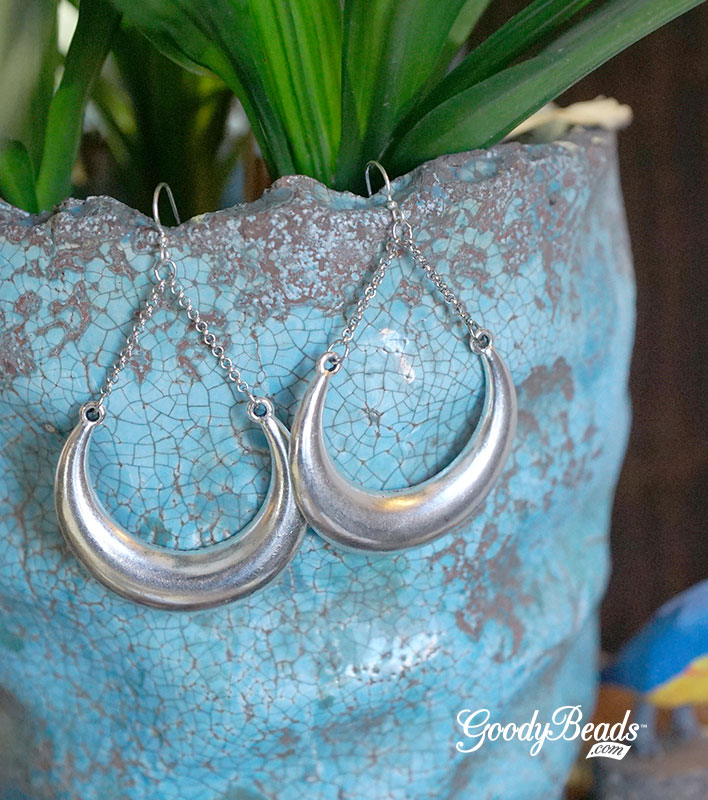
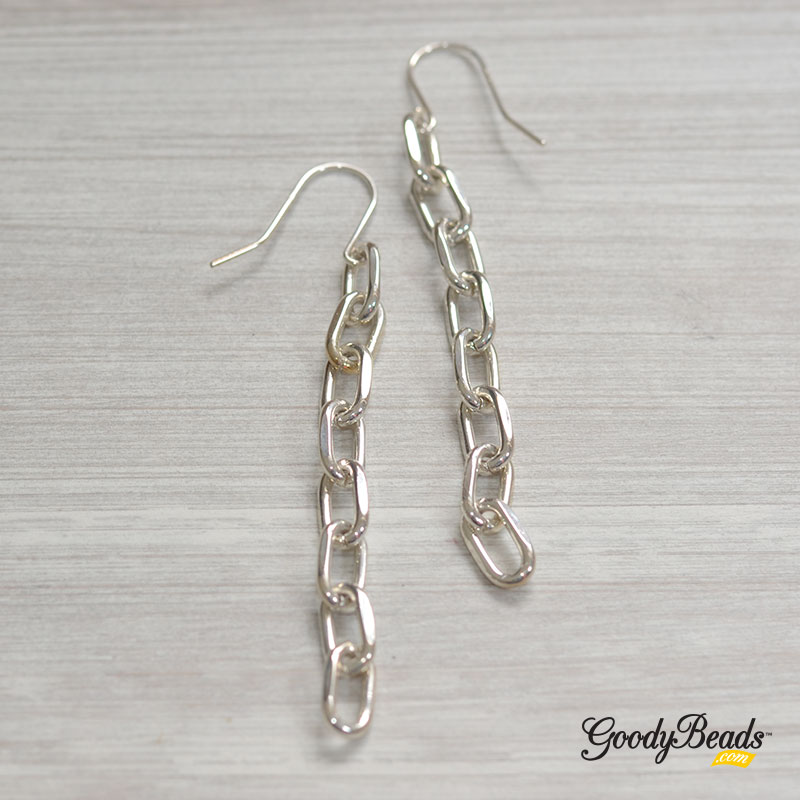
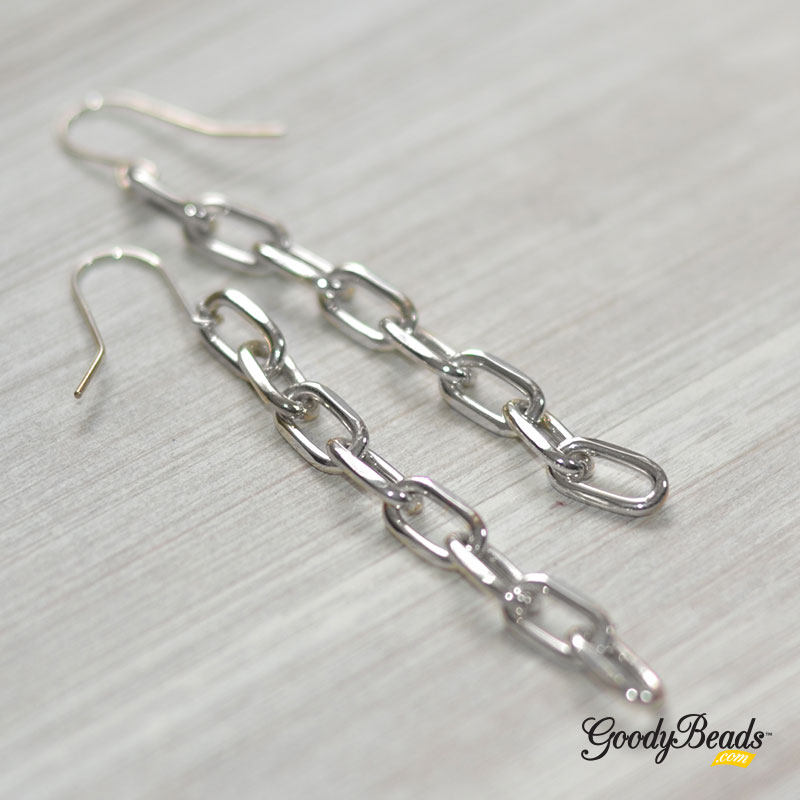
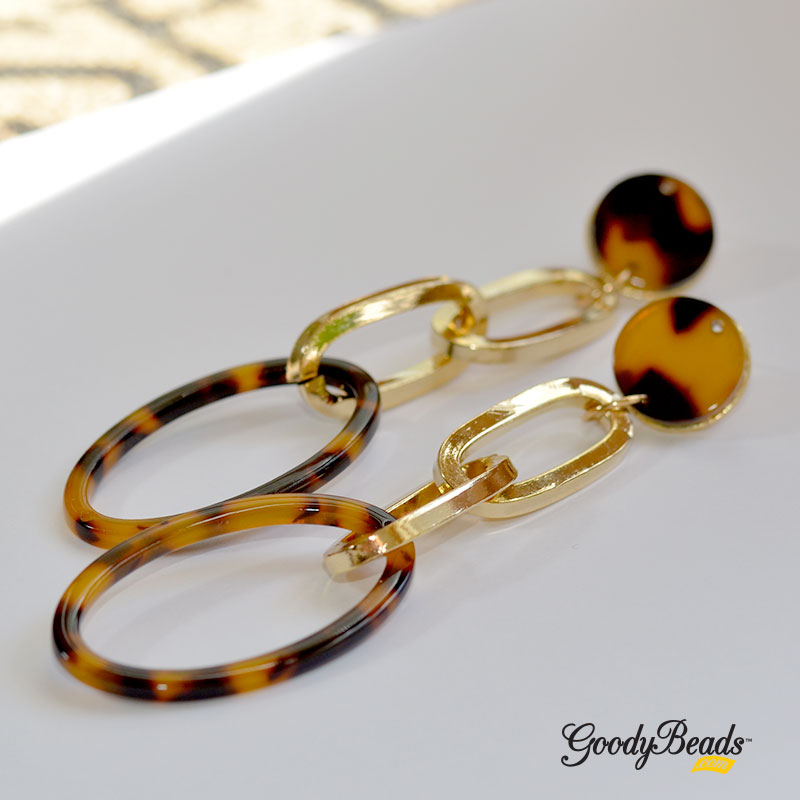
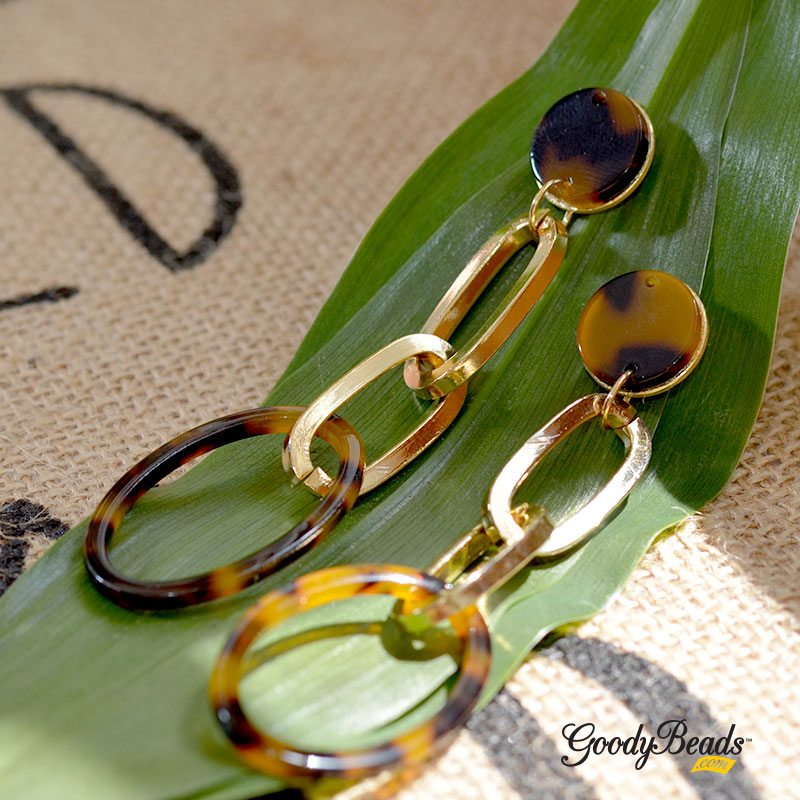
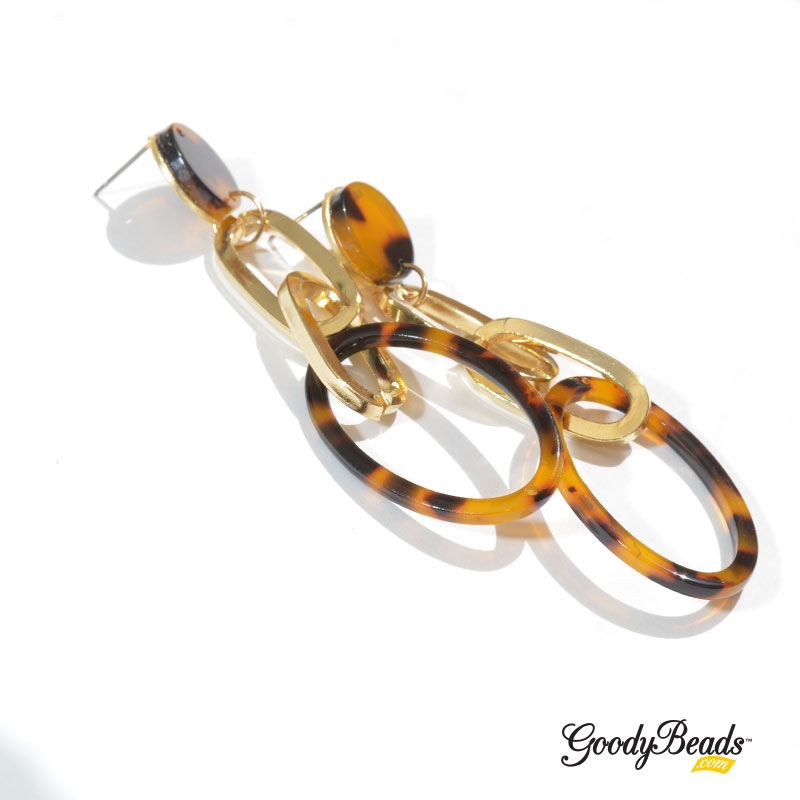
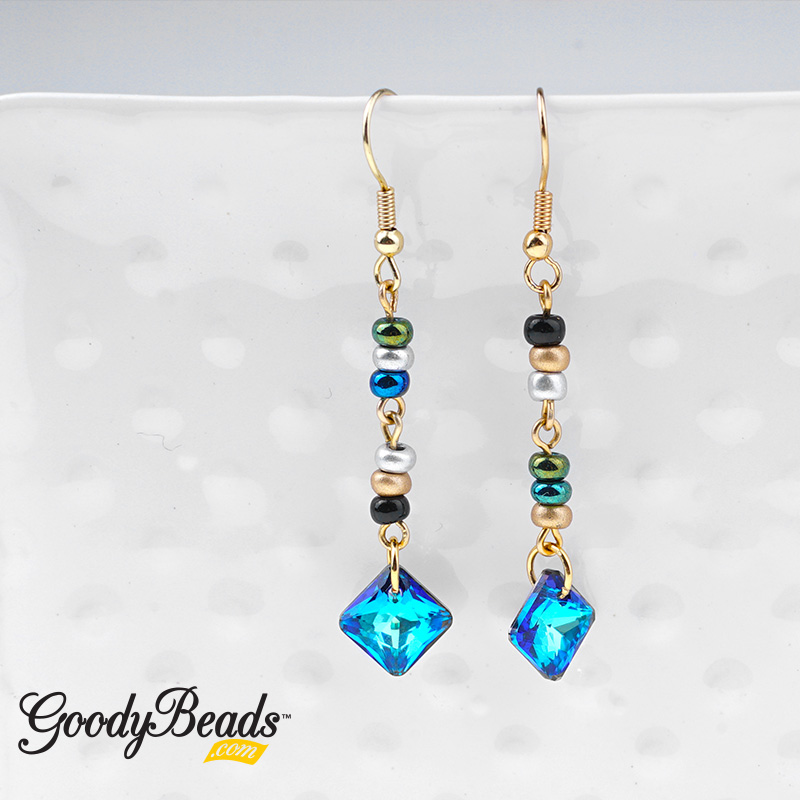
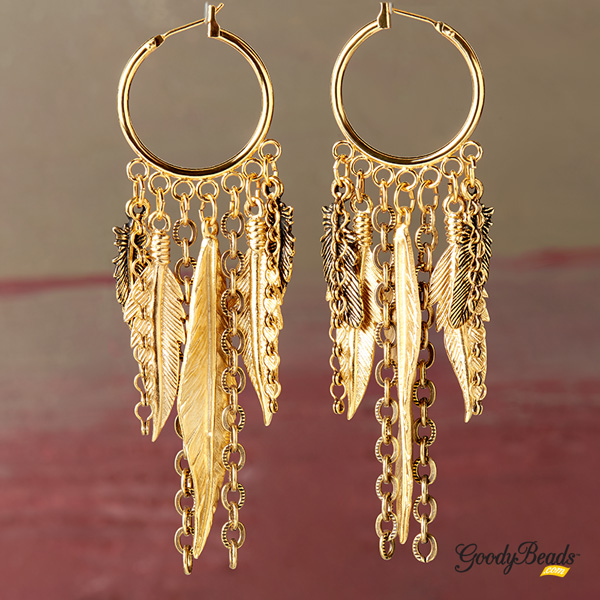
DIY Earrings

Use a link of the paper clip chain to make connecter pieces or long chain length for earrings! The great thing about the LARGE CHUNKY paper clip chain we offer is that each link isn’t a closed, soldered ring. So can use two flat nose pliers to open the links like a jump ring, which is great because you wouldn’t be wasting a link if you had to cut them if they were soldered closed.
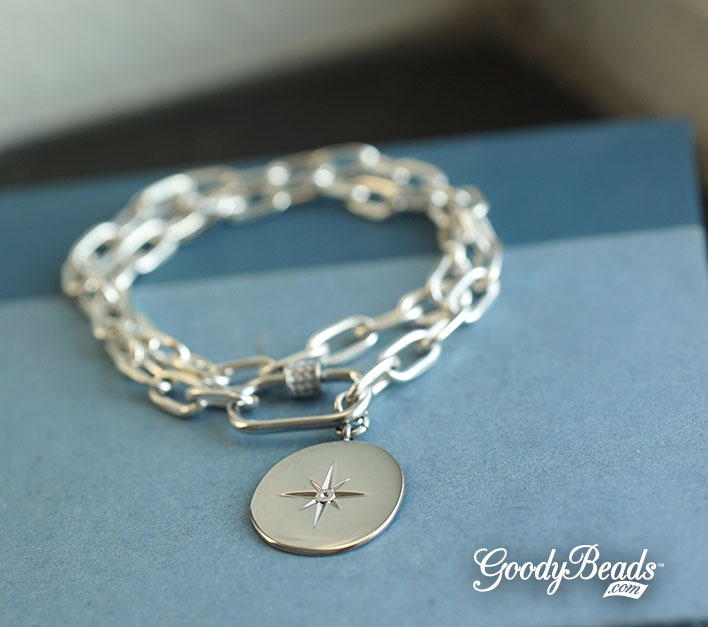
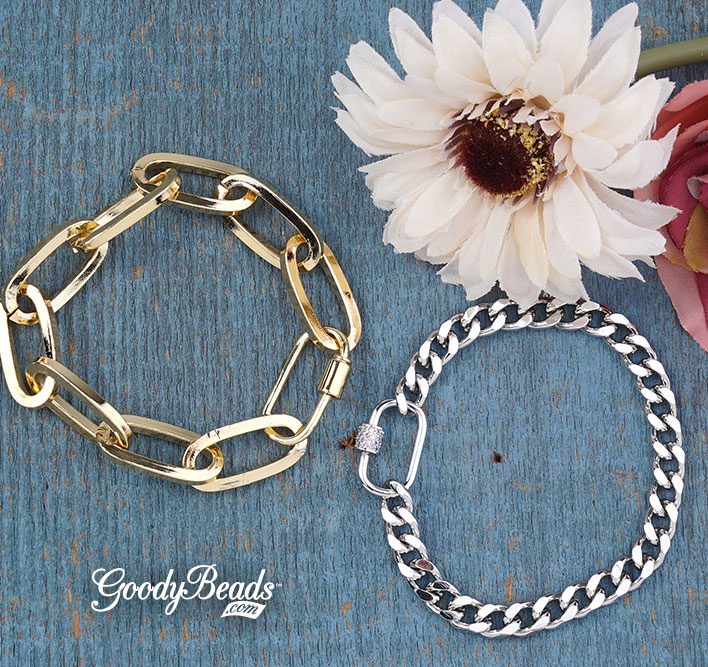
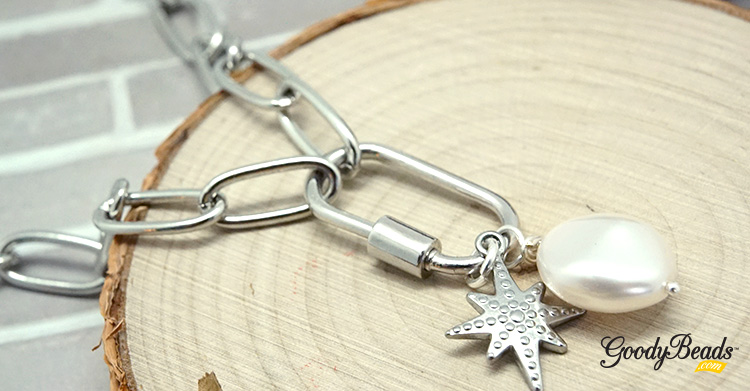
DIY Bracelets

Paper clip chain is very versatile and gender neutral. It’s chunky enough to be a hardy bracelet for men and a beautiful piece for some arm candy love!
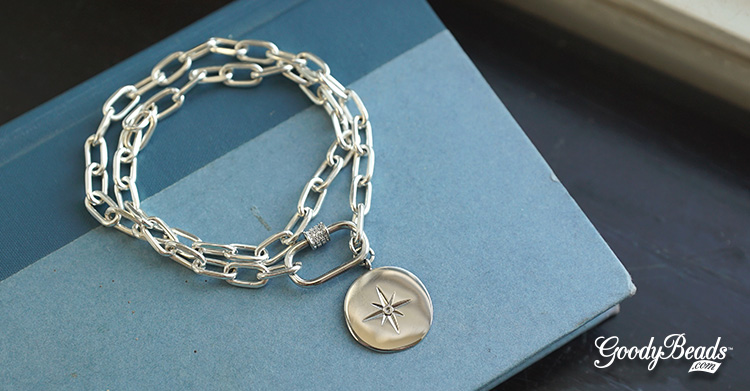
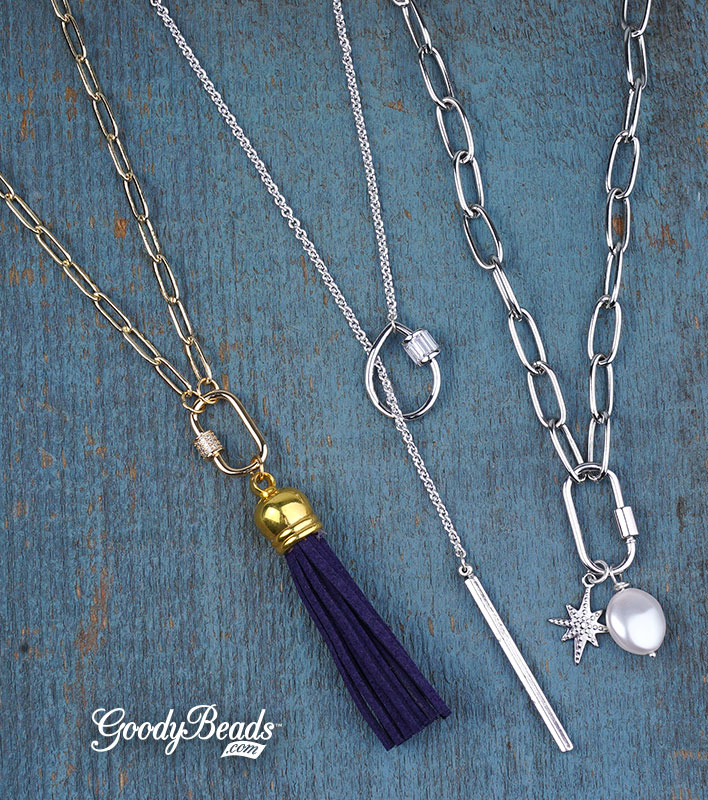
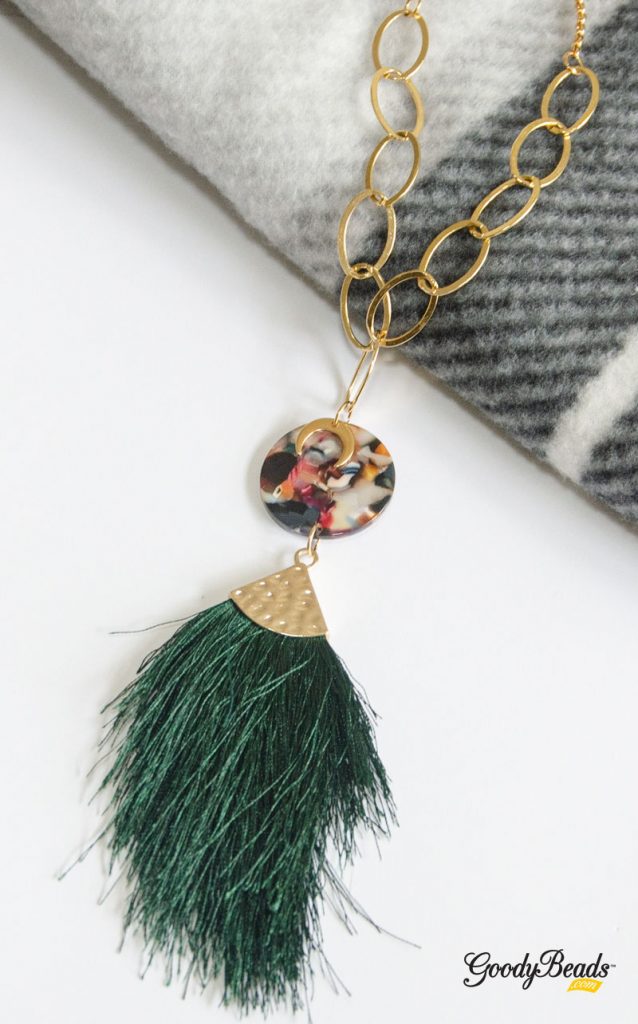
DIY Necklaces

We’ve seen a lot of necklace designs with paper clip chain, especially pairing it a carabiner clasp or hanging a statement pendant or charm. Whether your choosing, it will make bold statement necklace or lariat!

Tell us what you think about the Paper Clip Chain trend!


DIY Carabiner Starburst Necklace or Wrap Bracelet

Fall in love with this versatile piece of jewelry that acts as a necklace and a wrap bracelet. Designed with paperclip chain and a bold carabiner clasp, it’s a showstopper piece with a large Starburst Charm.

Items used in jewelry:

  • Z006008 – 20.5mm Stainless Steel Round Starburst Charm
  • Z004793 – 20mm Silver Plated Jewelry Carabiner Rhinestone Lock Clasp
  • CH01172 (2) – 10.9mm Silver Finish Steel Paperclip Cable Chain
  • X003062 – 5.5mm Silver Plated 18 Gauge Round Jump Rings

Get all the components for this project here

GoodyBeads.com Blog | DIY Carabiner Starburst Necklace or Wrap Bracelet

Directions:

  1. Cut chain to 15 inches.
  2. Open jump ring and slide on one end of chain. Close jump ring.
  3. Open another jump ring, slide through jump ring from step 2 and through charm loop. Close jump ring.
  4. Unscrew carabiner clasp and slide through other end of chain.
  5. Wear it wrapped around twice for a wrap bracelet or as a necklace.

Designed by Heidi


DIY Chunky Paperclip Chain Bracelet with Large Mindful Pendant Charm

Paperclip chain and chunky jewelry is the new statement accessory for this new year. It’s simplistic and draws your attention because of its bold presence. Top it off with a large TierraCast 8 Fold Path Pendant and you’re set for your own runway!

Items used in Paperclip Chain Bracelet:

  • TC02496 – 32mm Antique Silver 8 Fold Path Pendant by TierraCast
  • CH01170 – 26.5mm Imitation Rhodium Finish Jumbo Paperclip Cable Chain
  • A008807 – 7mm Silver Plated 16 Gauge Round Jump Rings
  • Z008325/Z008360 – 33mm Large Swivel Lobster Clasp

Get all the components for this project here

GoodyBeads.com Blog | DIY Chunky Paperclip Chain Bracelet with Large Mindful Pendant Charm FREE Tutorial

Directions:

  1. Cut a piece of chain consisting of 9 links.
  2. Open jump ring, slide on one end of the chain and through clasp loop. Close jump ring.
  3. Open another jump ring, slide in charm and close jump ring.
  4. Open another jump ring, slide through chain end again, through jump ring of the pendant charm and close jump ring.

Designed by Heidi


5 DIY Jewelry Designs with Carabiner Lock Clasp

One of our newest products for 2020 is the Carabiner Lock Clasp. We have 5 examples for designing DIY jewelry with this clasp.

Chunky and Cool Bracelets

Items used in bracelets:

In our bracelet examples above, we’ve only used 2 components: chain and carabiner lock clasps. Because it opens by unscrewing its side, you can easily cut your chain to your bracelet length and slide your chain ends through the clasp. No jump rings required, just fun bracelets to pair with your arm candy collection. Plus, these bracelets are the perfect starter to add your charms or tassels to personalize it!

Neck Mess Love

Items used in necklace:

In our 3 necklaces, we’re making the clasp the focal/statement piece. Create a fun pendant drop with tassels, charms or baubles. Or design a modern, minimalistic lariat chain necklace.


DIY Heidi’s Large Crescent Earrings

We’ve have an easy pair of earrings for your fun fall fashion with these DIY Large Crescent Earrings.

Items used in earrings:

GoodyBeads Blog | DIY Heidi's Large Crescent Earrings FREE Tutorial

Directions:

  1. Cut FOUR chain pieces to approximately 1 inch.
  2. Open jump ring, slide on one chain end, through one crescent end loop and close jump ring.
  3. Open another jump ring, slide on another chain end, through other crescent end loop and close jump ring.
  4. Open another jump ring, slide both ends of the chain ends and through earwire loop. Close jump ring.
  5. Repeat all steps for other earring.


DIY Paperclip Punk Earrings

Being trendy might not be what you’re aspiring for, but this Paperclip Punk Earrings says it all about your wild style!

What you’ll need:

  • 10.9mm Paper Clip Cable Chain – CH01172
  • Sterling Silver Earrings – Z001008

GoodyBeads Blog | DIY Paperclip Punk Earrings FREE Tutorial

GoodyBeads Blog | DIY Paperclip Punk Earrings FREE Tutorial

Directions:

  1. Cut chain to consist of 8 links. Cut two pieces. (Note: if you would like a long chain earring, cut a long piece)
  2. Open earwire loop and slide on chain piece you cut in Step 1. Close loop.
  3. Repeat all steps for other earring.


DIY Paperclip Tortoise Earrings

We are channeling our wild side with these earrings, which consist of paperclip chain and tortoise acetate components.

What you’ll need:

GoodyBeads Blog | DIY Paperclip Acetate Hoop Earrings - FREE Tutorial

GoodyBeads Blog | DIY Paperclip Acetate Hoop Earrings - FREE Tutorial

Directions:

  1. On the flat, rimmed side of hoop earring, add a E-6000 to the rim. Gently place the 15mm round acetate connector on the rim, making sure to align the acetate holes with the post vertically. Repeat to other post earring and acetate. Let both pieces dry for a few hours or until glue dries.
  2. Gently open paperclip chain to have a link consisting of two links. Before closing the link, slide on oval acetate pendant. Close link.
  3. Open jump ring, slide on other chain link and through bottom hole of acetate connector you glued in Step 1.
  4. Repeat Steps 2 & 3 for other earring.

GoodyBeads Blog | DIY Paperclip Acetate Hoop Earrings - FREE Tutorial


DIY Peacock Necklace with Acetate Component and Tassel

Today’s Peacock Tassel Necklace consists of some of our favorite products, acetate, chain, charms and tassels. Come make this lovely necklace today!

What you’ll need for necklace:

GoodyBeads Blog | DIY Gold Peacock Tassel Necklace

Directions:

  1. Cut large oval chain to consist of 11 links.
  2. Open 9mm jump ring, slide on tassel and through one hole of acetate connector. Close jump ring.
  3. Open another 9mm jump ring, slide through other hole of acetate, crescent charm and the middle link of large oval chain you cut in Step One. Close jump ring.
  4. Open 6mm jump ring, slide on one end of large oval chain and through one end of rollo chain. Close jump ring.
  5. Repeat step 4 to other chain ends. Note: you can chain the length of your necklace by shortening the rollo chain length.


Blue Moonlight DIY Earrings

Blue is still a favorite among jewelry, so here’s some Blue Moonlight DIY Earrings with beaded chain and Swarovski® princess cut crystal pendants.

What you’ll need:

Directions:

  1. Take two links from the bead chain link by opening and closing the loops.
  2. Open jump ring, slide on one end of beaded chain and through crystal pendant. Close jump ring.
  3. Open earwire loop, slide on other beaded link end and close loop.
  4. Repeat all steps for other earring.


Easy DIY Chain Bracelets

Today’s tutorial demonstrates how easy making simple bracelets can be. Simple and dainty with only three components; chain, jump rings and lobster clasp.

What you’ll need:

GoodyBeads Blog | FREE Tutorial for DIY chain bracelet with full components list.

Directions:

  1. Measure chain to wrist size and then cut a link short of your measurement.
  2. Open 4mm jump ring, slide on one end of chain end and through lobster clasp. Close jump ring.
  3. Gently open split ring with a split ring pliers (FTTL0006) and slide split ring through other end of chain.
    Note: If you find that your bracelet is a bit long, take off clasp end, cut another chain link off and reattach lobster clasp. If you find that your bracelet is short, add another split ring with a 4mm jump ring to the first split ring you attached to the chain.
  4. Repeat all steps for other bracelets.


Charm Bracelet with Paperclip Chain and Adjustable Sliding Clasp

Hashing out our love for our newer paperclip chain, we’ve make a simple bracelet with dainty charms and adjustable with a sliding clasp.

What you’ll need:

GoodyBeads Blog - Paperclip Charm Bracelet FREE Tutorial

Directions:

  1. Cut paper clip to chain to consist of 15 links (6 inches).
  2. Open ring on star charm, slide through middle chain link and close ring.
  3. Open jump ring, slide through link two links right from the middle link and slide on moon charm. Close jump ring.
  4. Open jump ring, slide through link two from the left side of the middle link and slide on heart charm. Close jump ring.
  5. Open jump ring from sliding clasp and attach to either ends of the paper clip chain. Close jump ring. Repeat on other end. NOTE: If adjustable clasp is too long, trim chain on each side 1-2 inches.


DIY Jewelry with Swarovski® Around the World: Austria

Take a trip to Austria for this month’s destination. Find out how majestic and traditional this country is from its humble villages to intricate architecture to the majestic mountain. Plus, venture the cool hues Swarovski suggests to inspire your Austria trip along with a DIY jewelry project for you to try.

Austria

Austria may be one of Europe’s smallest countries, but it is also one of the most popular destinations in the world. Whether you’re traversing across its drawbridges or hiking up the Alps, the region’s roaring waters and crisp mountain air will greet you as if you were home. The inspiration of these pieces is derived from a multitude of Austria’s most iconic wonders — deep valleys, vast farmland, whimsical woodlands, raging rivers, and of course, its majestic mountains.

Here are some fun facts:

  • Swarovski Kristallwelten or Swarovski Crystal World is located in Austria – featuring a garden, sculptures and playground!
  • “Sound of Music” was filmed and set in Salzburg, Austria.
  • Many of the Classical music icons were born and lived in Austria, such as Mozart, Beethoven, Strauss, Schubert, and others.
  • Arnold Schwarzenegger was born in Austria
  • The first zoo was established here.

Austria – Swarovski Colors

Swarovski Create Your Style, has selected three colors to depict the majestic sites of Austria:

  • Crystal Clear
  • Crystal Clear AB
  • Denim Blue

Austria Inspired DIY Jewelry

Using a variation of round and bicone beads in the three colors, we made a chain link necklace by making wrapped loop links. Refer to our Wire Wrapped blog post on a visual tutorial.

What you’ll need:

Directions:

  1. Make a wrapped loop to one end of a 2-3 inch piece of wire. Slide on a seed bead, crystal and seed bead. Make another wrapped loop.
  2. Create another wrapped loop while sliding on link you made in step 1 before completing the loop. Slide on a seed bead, crystal and seed bead. Make another wrapped loop.
  3. Repeat step 2 with various different of crystals to create 7-10 links. With the last link wrapped loop, slide on the diamond link before completing the wrapped loop.
  4. Make next set of wrapped beaded links, linking the diamond link in Step 3.
  5. Repeat to your desired length. We made a length of 28 inches.
  6. Open jump ring of the bracelet sliding clasp and link each end of your beaded links to clasp.

As an alternative, you can use 20 gauge wire and make simple loops to create your beaded links.


DIY Tassel Droplet Earrings

Tassels are an all year round kind of component for jewelry-making. Here’s how we make these pair of earrings combined with fancy large oval chain.

Items needed in earrings:

GoodyBeads Blog | FREE tutorial - Tassel Droplet Earrings

Directions

  1. Cut oval chain to consist of 3 links.
  2. Open jump ring, slide on last link and a tassel. Close jump ring.
  3. Open another jump ring, slide on middle link and a tassel. Close jump ring.
  4. Open another jump ring, slide on last link and a tassel. Close jump ring.
  5. Open another jump ring, slide on a tassel and close jump ring.
  6. Open another jump ring, slide through post earring hole, through jump ring in Step 5, and one end of chain link. Close jump ring.
  7. Repeat all steps for other earring.


DIY Charmed Necklace with Paper Clip Chain

We’re channeling our simplicity in this DIY Charmed Necklace. Along with the trend of dainty and minimalistic jewelry, we’ve upped the size of our chain with paperclip chain and added a large clasp. Then tying it together with a gorgeous Nunn Design charm!

What you’ll need for necklace:

  • 11.9mm Gold Plated Paper Clip Cable Chain – CH01151 (2)
  • 16mm Gold Plated Spring Ring Clasp – Z003190
  • 16x13mm Small Disk Metal Charm by Nunn Design – Z021685
  • 9mm Matte Gold Jump Ring – Z011398

Directions

  1. Cut chain to 18 inches (or desired length).
  2. Gently open loop of clasp with chain nose pliers. Slide chain end through loop and close.
  3. Open jump ring, slide on charm and close jump ring.
  4. Open clasp and slide charm through.


DIY Golden Feather Hoop Earrings

We love a good statement earring. Especially one with fun components and feather charms!

What you’ll need for earrings:

  • 20mm Gold 7 Ring Chandelier Lever Earlier – A010234
  • 23mm Antique Gold Small Feather Charm by TierraCast – TC01366 (4)
  • 35mm Satin Gold Feather Charm – Z016357 (4)
  • 51mm Satin Gold Large Wispy Feather Charm – Z015964 (2)
  • 3mm Gold Plated Ladder Chain – CH00523
  • 4mm Antique Gold Plated Oval Cable Chain – CH00021
  • 5mm Gold Plated 21 Gauge Oval Jump Rings – A008801

GoodyBeads Blog - FREE Tutorial for DIY Golden Feather Earrings.

Directions:

  1. Cut ladder chain to consist of 8 links. Cut a total of 4 pieces.
  2. Cut oval chain to consist of 18 links. Cut a total of 4 pieces.
  3. Open jump ring, slide on small feather charm, a piece of ladder chain and through first loop of chandelier earrings. Close jump ring.
  4. Open another jump ring, slide in medium feather charm and slide through second loop of chandelier. Close jump ring.
  5. Open another jump ring, slide on a piece of oval chain and through third loop of chandelier. Close jump ring.
  6. Open another jump ring, slide on large feather and through fourth loop of chandelier. Close jump ring.
  7. Repeat step 5 and attach to fifth loop of chandelier.
  8. Repeat step 4 and attach to sixth loop of chandelier.
  9. Repeat step 3 and attach to last loop of chandelier.

As an alternative, you can make a silver version with these silver-like components: A010233, TC00041 (4), Z016356 (4), Z015963 (2), CH00524, CH00020, A008799.