Swarovski: New Shimmer Crystals and Pearl

We’ve launched a beautiful selection of new Swarovski from their new Fall/Winter 2019/2020 Innovation: Be Yourself. Our first selection consists of new Crystal Shimmer and Amethyst Shimmer bicone crystals, and Crystal Iridescent Tahitian Look Pearl. Plus, we have two lovely jewelry pieces to compliment the hues of these new Swarovski.


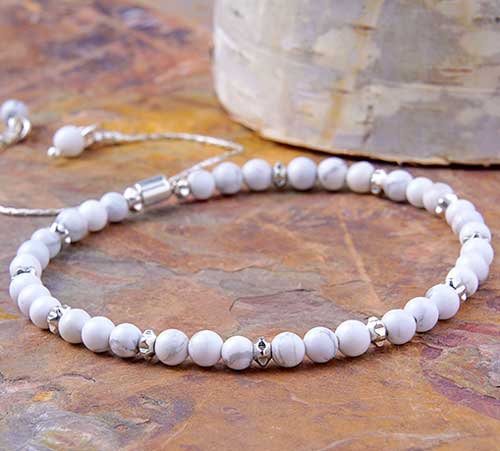
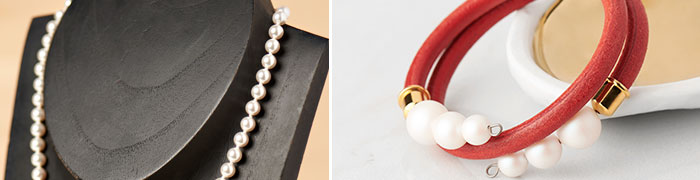
Passion Pearl Wrap Bracelet

GoodyBeads Blog | New Swarovski wrap bracelet with knotted Griffin silk cord.

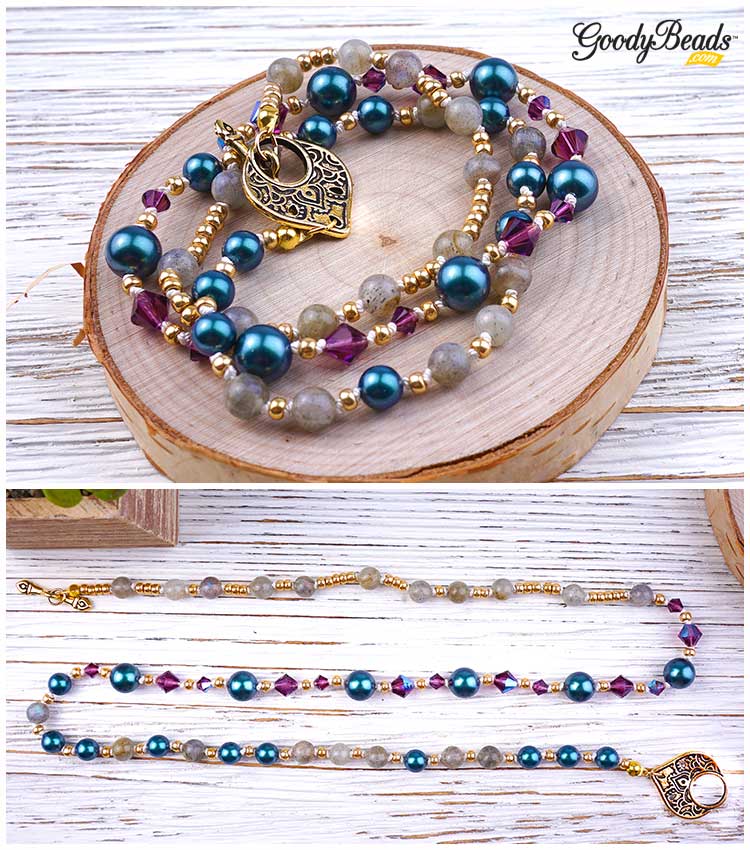
In this three -wrap bracelet, we used Griffin Silk Cord knotted with Tahitian Look Pearls, Amethyst Shimmer bicone crystals and 6mm Labradorite round beads with size 8/0 gold seed beads. Plus, we finished up this piece with gold findings.

Items used in 6.5″ bracelet: SB00107, LBT6RD-8, SW01915 (10), SW01916 (6), SW01908 (6), SW01906 (7), Z008768, A006581, TC02395, A008801

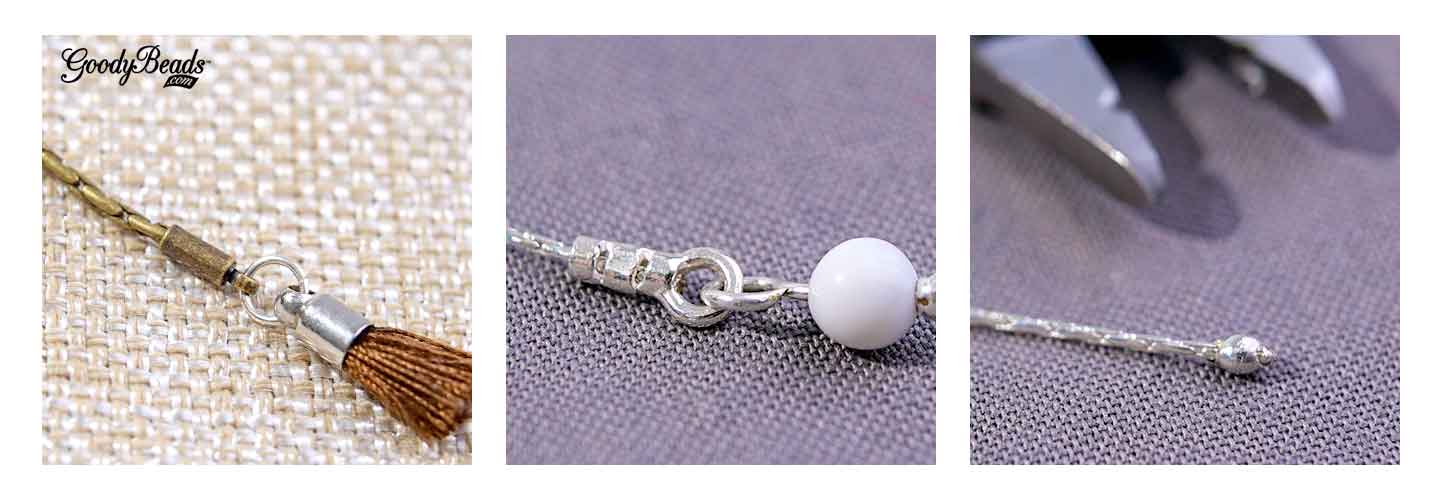
  1. Make a knot at the end of the silk cord and cut excess end. Slide over knot with a clamshell bead tip (Check previous blog on examples). Optional, add a small dab of Super New Glue to the knot before sliding the clamshell over.
  2. Slide on a seed bead and make another knot flushed to the seed bead.
  3. Slide on a 6mm Tahitian Pearl and make a knot.
  4. Side on a seed bead and make another knot.
  5. Repeat with alternating with pearl beads or 6mm Labradorite beads until you reach your desired wrist length. This will be your first row.
  6. Next row, alternate a knot between an 8mm Amethyst Shimmer bicone crystal, seed bead, 4mm Amythest Shimmer bicone crystal, seed bead, 8mm Tahitian Pearl and seed bead. Repeat until your desired wrist length.
  7. For your third row, alternate seed beads and Labradorite beads in no particular order to wrist length.
  8. End with a knot, add a small dab of glue and cap off with a clamshell bead tip.
  9. Open jump ring and attach either clamshell bead tip end to a toggle clasp. Repeat to other bead tip end.


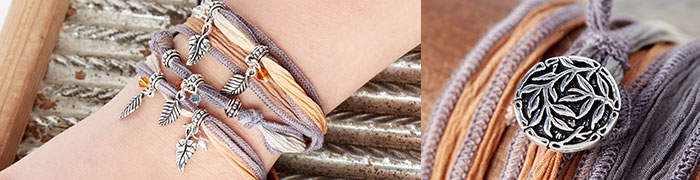
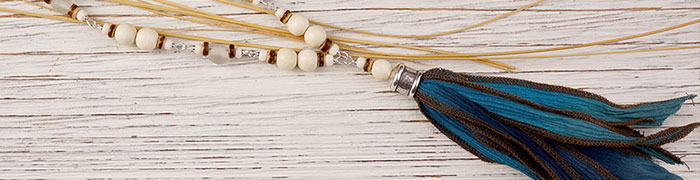
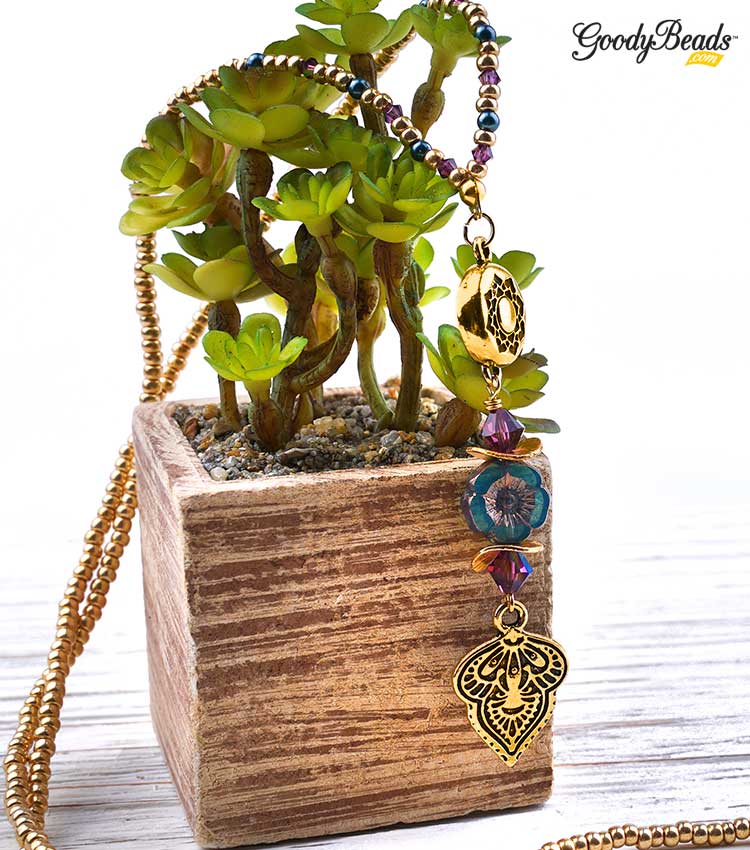
Passion Flower Necklace

Sep18_NewSwarovski_image2

We used the Griffin Silk cord to complete the bracelet with a necklace with similar beads as in the bracelet with TierraCast Findings.

Items used in necklace: TC02387, A019617, SW01908 (2), Z018414, Z018257, TC02397, A008801Z008768A006581, SW01912 (6), SW01905 (6), SB00107

  1. Open loop of eyepin and slide on TierraCast Mehndi charm. Close loop.
  2. Slide on the following beads onto the eyepin and make a simple loop or wrap loop: 8mm Ameythst Shimmer bicone crystal, wavy disc (concave down), Czech Hibiscus, wavy disc (concave up) and 8mm Amythest Shimmer bicone crystal. (If making a wrapped loop, make sure to slide on TierraCast magnetic clasp end before finishing loop off.)
  3. Make a knot at the end of the silk cord. Slide on a seed bead, 3mm bicone, a seed bead, a pearl, 2 seed bead, 3mm bicone, 2 seed bead, a pearl, 3 seed bead, a 3mm bicone, 3 seed bead and a pearl.
  4. Slide on seed beads to accomodate a length large enough to slide over your head.
  5. End silk cord with pearl, 3 seed bead, 3mm bicone, 3 seed bead, a pearl, 2 seed bead, 3mm bicone, 2 seed bead, pearl, a seed bead, 3mm bicone and seed bead.
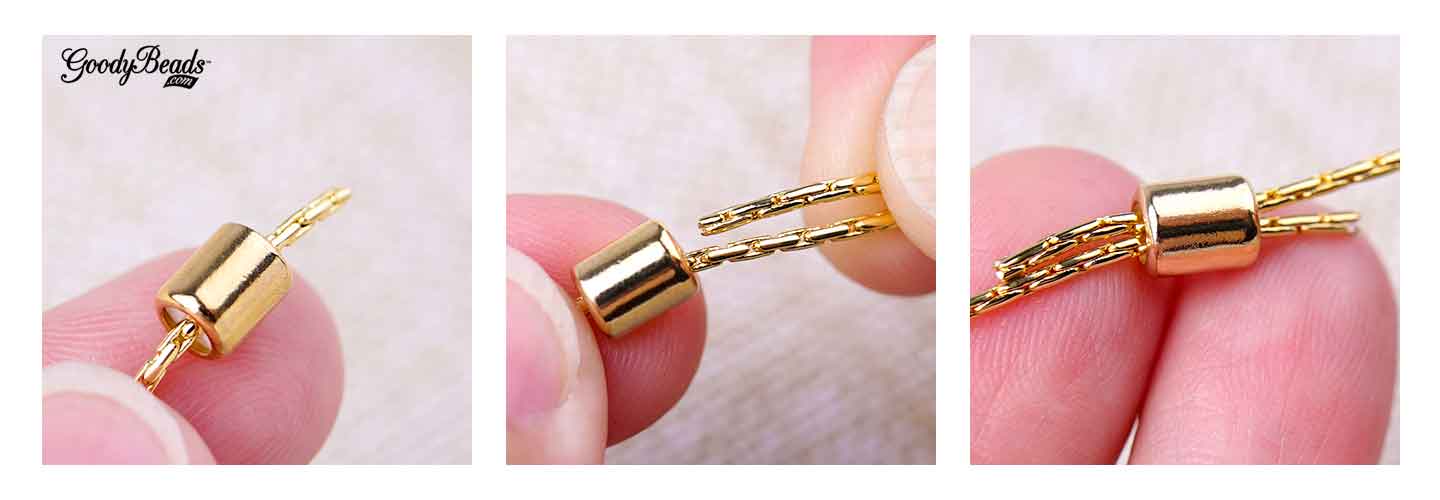
  6. Take both ends of your silk cord and make a knot to tied the ends together.
  7. Slide a clamshell bead tip over the knot.
  8. Open jump ring and slide on loop of bead tip and other end of the TierraCast magnetic clasp. Close loop.


GoodyBeads EZ DIY Series: Easy Leather Hook Bracelet

Continue summer with this easy DIY leather bracelet with a hook clasp, leather cord and slider beads.

Items you will need:

Leather-EZDIY

Items used in bracelet: A022075, A019042, A017235, A015821


Beading Chain and Slide on Clasps

Learn how easy it is to make an adjustable bracelet using Slide on Clasps with Beading Chain.

Adjustable bracelets can be a versatile piece of jewelry to fit any size wrist. From our Adjustable Beading Chain Jewelry trend, we used dainty 0.7mm or 1.25mm chains with beads, while adding a Slide on Clasp to create an adjustable bracelet.

What you will need:

SlideOnClasp_tutorial

When measuring the length of chain, measure your wrist length and add 2-2.5 inches. 

  1. Cut chain to your desired length. Slide one end through the Slide on Clasp.
  2. Lay the other end of the chain parallel to the first chain end.
  3. Grasping the two chains, push the Slide on Clasp over the other chain end.

Ways to cap your chain ends:

chain-ends_tutorial

  1. For the 1.25mm chain, use 2mm End Caps with a dab of Super New Glue to add the end cap. (Z008570/Z008574/Z008575)
  2. For the 0.7mm chain, crimp a Ring End Cap at the ends. (X001505)
  3. Another way to finish off the 0.7mm chain with crimping 2mm crimp tube with the Magical Crimping Tool.

Here’s different ways to design with beading chain with gemstones, beads, etc.

Howlite Silver Bracelet

Slideonclasp_image1

We used these lovely glossy Howlite gemstones with silver brass beads. However, what we love about this bracelet is pairing it with a Channel Bangle in the Suede Channel Bangle Bracelet. Two bracelets in one.

Items used in bracelet: WHT4RD-8, CH00724, X001505, Z008576, A019691, A022220

Bone & Brass Bracelet

Slideonclasp_image2

We continued our theme of using brass beads in this next bracelet. We also played with the neutral bone beads and the antique brass beading chain.

Items used in bracelet: CH01005, A002413, A022220, A022226, Z004893, Z008575 (2), Z013976, Z008581


ImpressArt Texture Stamper Hammer – Video Tutorial

Add texture to your metal stamping jewelry with this Texture Stamper Hammer from ImpressArt. Watch this vendor video and see how simple you can add dimension to your designs!


A perk to ordering the Texture Stamper Hammer (TL00266) is that it comes with the Sprinkle Design Stamp, so you can start using this tool right away when you get it. Plus, with the twist of the handle knob, you can easily switch out different stamps for different designs! The Texture Stamper Hammer is the perfect tool for all skill levels.  So start stamping right away!


Hammer Video Tutorial

Hammer Tool: TL00266


Sizzix Edition: Leather Cuff Bracelet

Candie Cooper is back again with Tory for an easy project using the Sizzix Big Shot.

Make sure to check out how to Unbox your Sizzix Big Shot in our previous blog post.

GoodyBeads Sizzix Cuff Bracelet

An easy-to-wear piece of jewelry are cuff bracelets. We have this easy tutorial that will take less than 5 minutes to make and ready to wear. What you will need for this project are:


Video Tutorial

Items used in cuff example: Z020292, SZ00015, SZ00034, A015821


Adjustable Bracelets with Swarovski® Crystals

We have an easy DIY project for you that makes creating bracelets even easier. With the Adjustable Bracelet Sliding Clasp, all you need to add is your favorite link! This project consists of sparkling Swarovski Crystals and two simple ways to incorporate them with the adjustable bracelet finding!


Adjustable Bracelet Sliding Clasp

The Adjustable Bracelet Sliding Clasp comes in two different chain types in gold, silver or rhodium finishes. These findings come in wheat or rollo chain, with a sliding clasp that easily moves to adjust to your wrist size and jump rings that make attaching links, beads, connectors and more a breeze.

braceletclasp-tutorial

You can get these clasps in:


Tutorials for Swarovski Crystal Bracelets

Link Swarovski Sew-On Stone Crystals with jump rings. We opened one of the jump rings on the chain and slid on one end of the crystal. Do the same to the other jump ring. Link a large sew-on crystal with 5mm oval jump rings. This bracelet is all set and ready to wear!

Items used for bracelet: Z012178, SW01804 (Qty 2), SW01805, A008801


We can’t get enough of the Swarovski Fine Rocks Tube Crystal! We used 22-Gauge wire, cut a 3″ piece and made a wrapped loop on one end. Slide on a silver disc spacer (Z002570), tube crystal and another spacer. Made another wrapped loop to finish off the link! We love the jump rings on the clasp because you can easily open the jump rings and attach your tube crystal!

Items used for bracelet: Z012151, SW01740, Z002570, AW00031


2018 B&B Show: Swarovski Demos with So Vang

We were fortunate to do two demos at the Swarovski Create Your Style booth during Bead & Button. So Vang demos making beadable cuffs and rings using Swarovski two-hole spike crystal beads and creating hoop to dangle Swarovski Majestic Blue pendants with Beadalon Memory Wire. Check out our facebook videos and components to inspire your next creation.

Crystal Spike Cuff & Ring

If you’ve done fabric sewing and done a ladder stitch to close openings, this technique would be easy for you. Below is a illustrated look at what a ladder stitch looks like from this external website we found. So every time you come up, that’s when you will sew through your bead hole before sewing across and down.

ladder-stitch-diagram1

One of our popular demos was bead stitching Swarovski two-hole spike beads on Beadable Accessories like the cuff and rings. Download our components list HERE for this demo and watch our facebook video of how So Vang ladder stitches the spike beads on beadable rings and cuffs.

Cuff components: Z001859, A006585, SW01714 (6), A015211

Ring components: Z001454,A006585,SW01714 (3), A015211


Majestic Blue Drop Earrings with Memory Wire

Make simple drop earrings using Memory Wire and a few tools. Watch as So shows you how easy it is to create hoops and dangle crystal pendants off it. Download the pdf file HERE to get components and tools used for this super easy demo!

Tools: TLZ0207, TL00206, TL00236

Gold Majestic Blue Drop Earrings: WR00126, A019615, SW01725 (2), TCZ0140

Silver Majestic Blue Drop Earrings: WR00127, A001528, TCZ0078, SW01747


2018 Bead & Button Show: Seaside Flora Leather Bracelet

We were able to sponsor this make & take class along with Dakota Stones during the 2018 Bead & Button Show with Candie Cooper. See how easy it is to create this Seaside Flora Leather Bracelet.

Perfect for a beachside getaway and catching some rays, this bracelet is made with black gold Amazonite and White African Opal gemstones from Dakota Stones, 1mm leather cord and silver beads.


Items used for bracelet:

A022071, WAF10RDLH-8, BGA8RDLH-8, Z009385 (12)


Bracelet Tutorial

  1. Cut leather in half or about 24″ each.
  2. Slide both strands of leather through large gemstone bead (WAF10RDLH-8) and make an overhand knot with all 4 strands.
  3. Separate and fan out the four strands.
  4. With the middle two strands, slide on a small black gold Amazonite gemstone. Next, with the bottom two strands, slide on a metal bead. And with the top two strands, slide on a metal bead.
    seaside flora leather bracelet tutorial
  5. Repeat Step 4 sequence, five more times. End with a small gemstone to the middle two strands.
  6. Evenly space out the beads to fit your wrist size. Make and overhand knot with all four strands. Make another knot about 3/4″ from previous knot.
    seaside flora leather bracelet tutorial
  7. Cut excess leather ends.


Download PDF file HERE.


Gift Ideas for Dad

Celebrate fathers everywhere with gifts he can proudly wear and still be fashionable! Check out these easy DIY gift ideas to prepare for Father’s Day.


Leather Keychain

FatherDayIdea_Images4

Keychains are a smart gift to give Dad! Make it a memorable accessory that he can hang his keys from! From our Facebook Live show, we showed how easy it is to make braided leather keychains. And from a previous Father’s Day post, we did a tutorial on riveting flat leather for a simplistic keychain with a stamped dogtag charm.


Components from left picture to right:

  1. CH00474 & Z010962, CH00156Z010962, CH00475 & A022075
  2. MCKR0002Z009650A001530CH00185TC01679,  TC01812,  TL00191


Leather Bracelets

MotherDayIdea_Images3

Create a modern leather bracelet with round and Regaliz® leather. From our Men’s Bracelet trend, these leather bracelets will never go out of style. Leather bracelets with a touch of silver makes accessorizing with men’s fashion easily from casual denim to a neat blazer.


Bracelet components from left to right:

  1. A015313A019014
  2. CH00475 & Z001235
  3. CH00126, Z003438, Z002073, A014254
  4. CH00125, Y002136Z003438
  5. CH00157, A003853, A022061


Gemstone Stretch Bracelets

FatherDayIdea_Images1

From rock stars to movie stars, you see more men wearing stretch bracelets everywhere. We especially love a bracelet of all Gemstones like these dark Sardonyx or mix it up some gemstones with silver spacers or beads. Check our Easy Elastic Bracelet Tutorial to learn how to make a stretch bracelet with a surgeon’s knot. Or use the Elastic Cord Needle and watch how Beadalon® finishes off their stretch bracelet in this Vendor Video Post.


Bracelet bead components from left to right:

  1. SDW10RD-8
  2. TGE8RDLH-F-8 , BCL8RD-8 , (2) TC00340, (6) TC00032


Paisley Duos Bracelets – Pattern Tutorial

We are loving these Czech Paisley duos two-hole beads. Their shape makes them versatile that you can turn or flip them when bead stitching and create a whole new design! We have two simple bead stitch bracelet designs you can easily make with Czech Paisley Duos.

paisleyimage

Paisley Stripe Bracelet

This is a simple bracelet you loop your beading threads and make a knot to bring everything together. We love how these paisley beads cup each other nicely like a yin yang. Use two different colors to make this Paisley Stripe Bracelet.

— Download Paisley Stripe Bracelet PDF Tutorial —

Items used: SB03628SB03642, SB00106, A006585, A001528, Z007856, A021129, A015211

Paisley Leather Wrap Bracelet

paisleyimage2

We used the same two Paisley colors to stitch a leather wrap bracelet. Find the leather wrap bracelet tutorial from the How to Make a Leather Wrap Bracelet blog post to help make this bracelet and to determine length of desired wraps you want. We first started with adding 5 beads of one color and then one of the second paisley color. Repeat this pattern then gradate in the middle of your bracelet to 5 of the second color and one of your first color.

Items used: SB03628, SB03642, A015211, Z018647/A022075, A006596, TC01245

BeadSmith® Paisley Duos Patterns

BeadSmith has some wonderful patterns online using the Paisley Duos. Make sure to stop by their website for inspiration and pattern tutorials HERE.


Artistic Wire® Crimp Tool For Large Wire Crimp Connectors

Watch as Wyatt White from Artistic Wire teaches how to make a cold connection with the Artistic Wire Crimp Tool for Large Wire Crimp Connector and examples of different ways you can create cold connection bracelets/bangles.

Cold connect large gauges of wire to making bracelets/bangles by crimping Large Wire Crimp Connectors with Artistic Wire Crimp Tool (TL00310).

Before we get started on the video, here are few important products you will need:


Large Wire Crimp Connectors

These crimps are specially designed for making cold connections with 12, 14, and 16 gauge wires. There are three sizes of crimps with three finishes to choose from.

The 1.5 mm large crimps are used with 16 Gauge wires – Z009603, Z009606, Z009609

The 2.0 mm large crimps are used with 14 Gauge wires – Z009604, Z009607, Z009610

And the 2.2 mm large crimps are used with 12 Gauge wires – Z009605, Z009608, Z009611

Or you can purchase the variety set – Z009600, Z009601, Z009602


Wire

Using size 12, 14 and 16 are thicker gauge wires, best to use for these crimp connectors.


Crimp Tool

Artistic Wire Crimp Tool for Large Wire Crimp Connectors TL00310 is a heavier duty tool to crimp larger widths of crimp tubes and for larger gauges of wire. Compared to the original crimpers that has two notches: one to curve the crimp tube and the other to fold it, the Artistic Wire Crimp Tool has only one notch that makes an indent notch to squeeze the crimp tube onto the wire.


Video Tutorial


GoodyBeads EZ DIY Series: Adjustable Flat Leather Bracelet

Learn to make an adjustable flat leather bracelet using 10mm flat leather and loop bar end connectors.

The key component to making an adjustable flat leather bracelet is the end connector. The loop bar end connector has two channels. One channel is open to slide the leather through and the other channel is a closed channel where you glue and insert the leather end. Here is an easy tutorial on how to make the adjustable bracelet using two loop bar end connectors.


EZDIY_AdjustableFlatLeather_tut1

Items used: X003849, CH00759, A022105 (2), A015821


How to Make a Leather and Memory Wire Bracelet – Video Tutorial

Learn how make our popular leather and memory wire bracelets in our video tutorial and watch as we teach you how to finish your memory wire bracelet with the nifty Memory Wire Finishing Pliers.

Leather and Memory Wire Components

Here are items you need in order to make your leather and memory wire bracelet.

Round Leather

Round Leather is the star of your bracelet. We carry 5mm and 6mm round leather cord, which will need to have a hollow core or hole inside the leather. The hollow core helps the memory wire go through the leather. Make sure when selecting your leather cord to read the descriptions, as not all round leather cords have a hollow core or hole. All leather cord is sold in inches, so order according to the amount of inches you will need for your project.

Another type of cord you can use are Regaliz® Licorice Leather with Hole as seen in our Leather & Swarovski Trend. They are thicker in size with flatten sides.

You can also use Hollow Rubber Cord. These are 3mm in diameter and sold in foot increments. Make sure they say “hollow” in the description for memory wire.

Memory Wire

Memory Wire is the skeleton of your bracelet. Make sure the wire you are selecting is round as we also carry flat memory wire and that “Memory Wire” in the description and/or name.

End Caps

End caps will be used to cap the ends of your leather cord. They make your leather ends look cleaner and finished. When looking for end caps, you can find them in Findings: Clasps & End Caps, TierraCast Findings, or search “End Caps.” PLUS, read the descriptions to determine their inside diameter/opening. This will help to accommodate the round leather size you choose to order.

Beads

Lastly, add these beads to your bracelet: glass beads, Swarovski crystals, gemstones, wood and any type of beads that will slide easily through the memory wire. Don’t forget some accent beads like bead caps, metal beads and seed beads.

Some beads we would not recommend are large-hole beads like interchangeable large-holes or large-hole gemstones because their holes are large and may wiggle around on the memory wire. Some tubes will not work because their shape will not curve along with the memory wire. Pearl beads can be tricky because some will have holes to small for the memory wire.

Tools

The best tool to cut your memory wire is the Memory Wire Cutter (TL00206). This cutter is meant to cut through heavy-duty wire like memory wire or thicker gauge wires.

One of your best friends in making your bracelet is the Memory Wire Finishing Pliers (TLZ0207). It’s a sturdy round plier used to loop your wires. It has two mandrel sides to create a consistent 2mm or 4mm loop. This tool will make it easier for your hands to making a loop compared to your round-nose pliers.

Video Tutorial

Watch our facebook live spin-off video below to learn how to add leather cord and end caps to memory wire and how to loop with the Memory Wire Finishing Pliers.

Items used: WR00121, CH00924 (3″), TC01854, SW00171, SW00180, SW00182, A022201, A022205

Memory Wire Bracelet Examples

You don’t have to only use leather cords. Here are some fun examples we used with leather and/or beads.

MemoryWire_1

(Leather & Swarovski Wrap Bracelets, Cork Cord and Wood Beads, Round Leather and Wire Bracelets)

MemoryWire_2

(Flamingo and Palm Tree Blog, Summer Wrap Bracelets, Memory Wire Leather Wrap Blog)

MemoryWire_3

(Fall Gemstone Trend, Turquoise Czech Glass Beads)

MemoryWire_4

(February Birthstone, March Birthstone, Naturally Coastal)


4 Last-Minute Mother’s Day Ideas

Don’t have a gift for Mother’s Day? We have 4 last-minute gift ideas for the deserving mother and women.

Whether it’s your Mom, sister, Aunt, Grandmother, wife or other beautiful women in your lives, a small gift can show your appreciation. If it’s handmade, that’s extra bonus points! Plan with handmade jewelry made with Swarovski Pearls, customized glass tiles with photos, easy-to-make beadable gifts or select the many DIY kits available.


Pearls

It’s been a tradition to gift pearls for mothers, so why not on Mother’s Day. While it embodies purity and love, it’s the kind of jewelry that reflects the elegance of a woman. Here are different ways to use Swarovski Pearls.

MotherDayIdea_Pearls01

Make a simple knotted pearl necklace with griffin silk cord or a leather wrap memory wire bracelet from our Swarovski Wrap Bracelet Trend.

MotherDayIdea_Pearls02

Wire-wrap pearls to make linked earrings or a waterfall necklace (Wire-Wrap Loop and June Birthstone Trend). Or make cascading earrings with Swarovski pearls and crystals in this stunning lampwork glass earrings (Wedding Jewelry Trend).


Customized Glass Tiles

MotherDayIdea_GlassTile

One project you can get kids involved in making are customized glass tiles with photos. Check out our previous blog how to make customized glass tile for a fun keychain dangle, ring or add a magnet to stick on the fridge.


Beadable Ideas

An easy-to-make gift idea are beadable products like bead pens or beadable gifts.

MotherDayIdea_BeadPens

Bead pens are perfect for moms to slip into their handbag or on their work desk. They are sturdy in weight and customizable with beads. Check out Hot Category: Bead Pens for compatible bead pens and large-hole beads to create one today.

MotherDayIdea_BeadableGifts

Don’t forget that moms will also love beadable gifts like a letter opener, winestopper or even a beadable keychain. Add large-hole beads and wrap it up for an acceptable gift!

MotherDayIdea_BeadableGifts2

(Easy Gifts Trend)


DIY Kits

If you can’t decide what to make, pick up a DIY kit. Make jewelry with an easy Earring, Bracelet or Necklace Kit and gift it. These kits are packaged with bead, findings and instructions, so you can even stick on a bow and gift the whole kit for the crafty, beading lady!

MotherDayIdea_Kits01

MotherDayIdea_Kits02

OR buy two and make them together.

(Kits shown: TL00197, KT00154, KT00144, KT00248, KT00176, KT00150, KT00250)


5 Ways to Use Hand-Dyed Silk Ribbon

Check out these 5 ways to use hand-dyed silk ribbon. If you haven’t picked up on these Hand-Dyed Silk Ribbon, you’re missing out! Grab some today and make your favorites!


These quality hand-dyed silk ribbon are 34″ long and hemmed around the edges for a finished look without the fraying. They come in many different color combinations that gradients across the ribbon. No two will look the same because they are hand-dyed and handmade. Here are five ways to use hand-dyed silk ribbon in your jewelry-making or be inspired!

1 Braided Cuff

Ribbon01

In our previous blog post, Fishtail Braided Cuff Video Tutorial with Candie Cooper, Tory and Candie demonstrate how easy it is to braid your very own cuff bracelet. Watch the video HERE and pick up some ribbon and cuffs today!


2 Charm Wrapped Bracelet

Ribbon02

Another easy way to make a bracelet is by adding charms and dangles. Slide on metal charms and beads, staggering through the ribbon. At one end, make a double knot to secure a button. Wrap the bracelet around your wrist and loop the other ribbon end around the button. This will help determine where you will tie a loop to slide over the button.


3 Links and Connectors with Ribbon

Ribbon03

Use TierraCast Links from our TieraCast Components Trend! Bend the link slightly with Nylon Jaw Bracelet Bending Pliers (Z005839). Feed one end of the silk ribbon down one hole of the link and up the other hole. After you center the link, wrap the ribbon around your wrist and tie the ends for a simple bracelet OR add a favorite clasp.

Ribbon08

You can use Druzy Connectors also for all you gemstone lovers, from our Glitzy Gemstone Trend.


4 Ribbon Necklace

Ribbon04

One easy way to use hand-dyed ribbon is to add a pendant and make it a necklace. In this necklace, we made a pendant with Swarovski® crystals, a flowery lampwork bead and silver findings. We attached the dangle to a bail and fed the ribbon through the bail. Tie ends together to your preferred length.

Ribbon05

Here’s another way to make a necklace from our TieraCast Components Trend. We took the hammered toggle clasp and used the ring part of the toggle. You will take your ribbon and make a lark’s head knot by folding your ribbon in half, slide the folded end through the larger hold of the ring toggle about an inch or two, take the other ribbon ends and slip it through the loop of your ribbon fold. Pull your ribbon ends all the way to latch the ring toggle to the middle of your ribbon. Tie your ends together to a preferred length and then add dangles and charms to the small hole of your ring toggle.

The second image is also a ribbon necklace with wood beads and silver findings with a seashell pendant. Be inspired from our Coastal Charm Trend.


5 Ribbon Tassel

Ribbon07

Tassels are everywhere! What a neat way to create a tassel with ribbon! From our Silk Ribbon in Jewelry blog post, you will see an easy tutorial in creating these tassel earrings.

Ribbon06

We used the same concept from above for this necklace from our Naturally Coastal Trend. Instead of a straight blunt cut at the end, we cut each section individually at a diagonal. This will help create a fun wispy tassel.


What is your favorite ways to use Hand-Dyed Ribbon? We would love know how you use ribbon in your jewelry making!