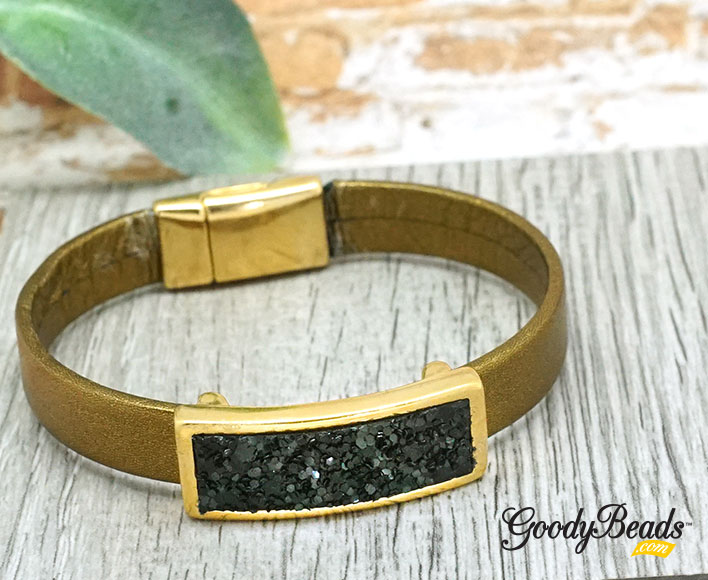
Don’t you love sweater weather? The DIY Bling Leather Bracelet is flashy and subtle with fun metallic and bling flat leather. It’s the perfect leather bracelet to pair with your fall & winter style.
Items used in bracelet:
Z003873 – Shiny Gold Long Leather Setting Slider for 10mm Flat Leather
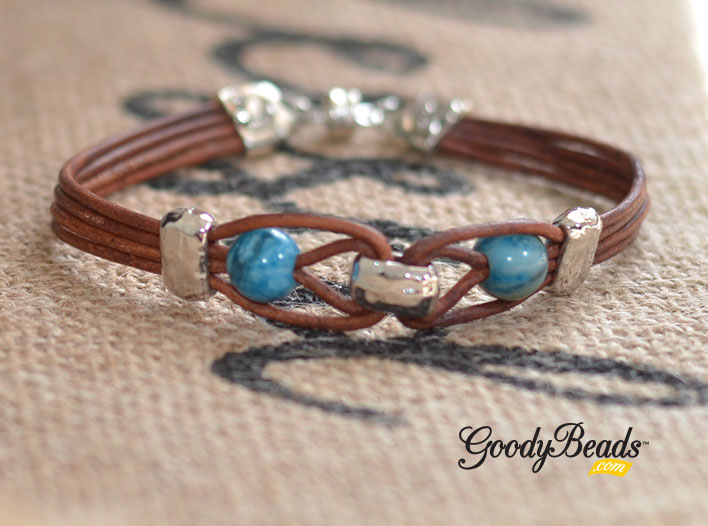
DIY Leather Band Bracelet with Large-Hole Gemstones
Let’s welcome fall with a this fun DIY using LeatherCord USA 1.5mm leather, Blue Crazy Lace large-hole gemstones from Dakota Stones and the perfect findings from TierraCast to pull it all together.
What you’ll need:
BCL8RDLH-8 – 8mm Blue Crazy Lace Large-Hole Gemstones
Slide all 4 pieces of leather through a barrel bead and center the bead in the middle of the leather pieces.
Divide 2 leather pieces to each side of the barrel bead.
On one side, fold the inner leather in half and slide a gemstone bead onto both leather ends.
Fold the outer leather strands in half, laying them on either side of the gemstone you added in Step 4 and slide all 4 ends through a barrel bead. Adjust leather strands to lay flat, and slide barrel up close to the gemstone you previously added.
Using nylon pliers or a flat nose pliers, gently crimp down on the barrel bead to keep the middle leather and gemstone in place.
Repeat steps 4 through 6 to other side of the bracelet.
Trim to wrist size and minus about ½ inch; making sure your barrel/gemstone design is centered and you’re making a straight flush cut.
Add an end cap to one end of your leather design, making sure all 4 leather strands fit inside and crimp down on your end cap using a flat nose or nylon pliers. Repeat on the other end of the bracelet.
Open 1 jump ring and slide on your end cap loop and clasp loop. Repeat on the other end cap loop and magnet end.
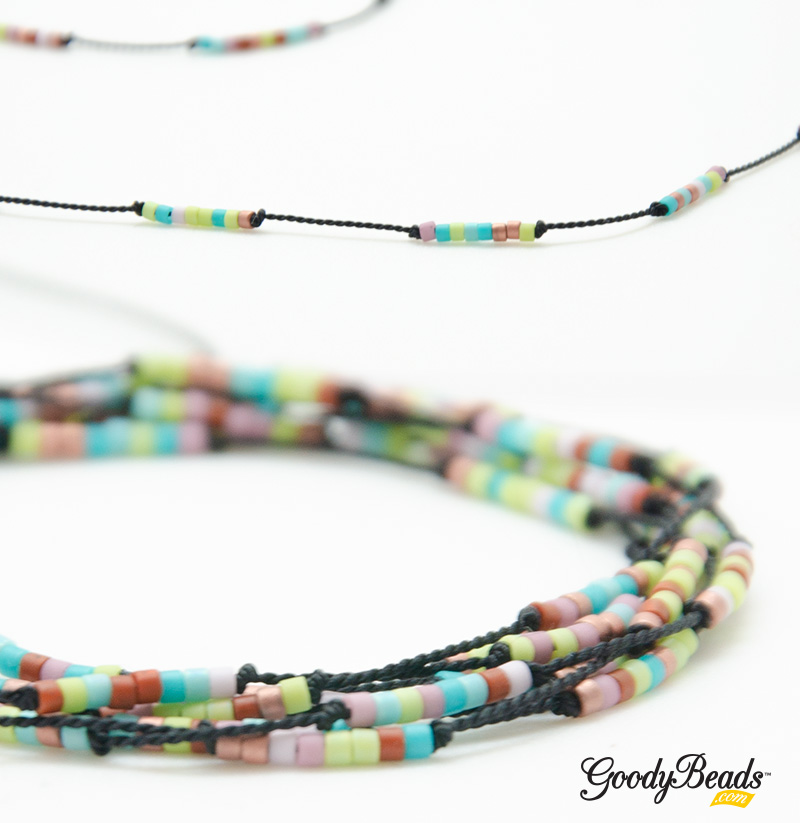
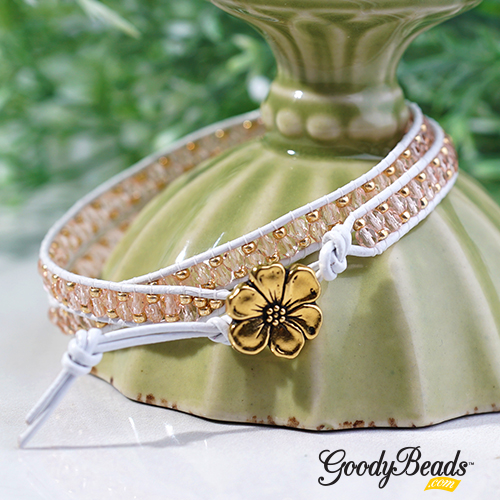
DIY Delicate Delica Necklace or Wrap Around Bracelet
Today’s project is perfect for Summer because it’s delicate and minimalistic; the right kind of jewelry to not outshine your summer style! Made with only two products, Griffin silk cord (No. 4 cord) and Miyuki 11/0 Delica mix, this project is easy to make for a lazy summer day.
What you’ll need:
Griffin silk cord (No. 4 cord) – Item used in necklace A006569
Miyuki 11/0 Delica mix – Item used in necklace SB03797
Unravel your Griffin cord and straighten/smooth the strands to remove kink. (Refer to Silk Cord Blog)
Make a knot at the end of your silk cord, leaving a 1/4 tail. Sew on 4 delica seed beads.
Make a knot 4 inches from the first knot you made. Sew on 8 delicas and make another knot close to the end of your delicas.
Make a knot about 1/2″ from the previous knot. Sew on 8 delicas and make another knot close to the end of your delicas.
Repeat step 4 until you have about 5-6 inches left of your Griffin cord.
Sew through the last delica that you added in the beginning (Step 2). this will act as your slider and create your necklace loop. Pick 3 more delicas and make a knot at the end of your Griffin cord, 1/4″ from to the needle. Cut off needle.
You can wear this wrapped around your necklace two times or wear it as a wrap-around bracelet, using the slider piece to adjust.
You can also shorten the pattern to alter the length of your necklace.
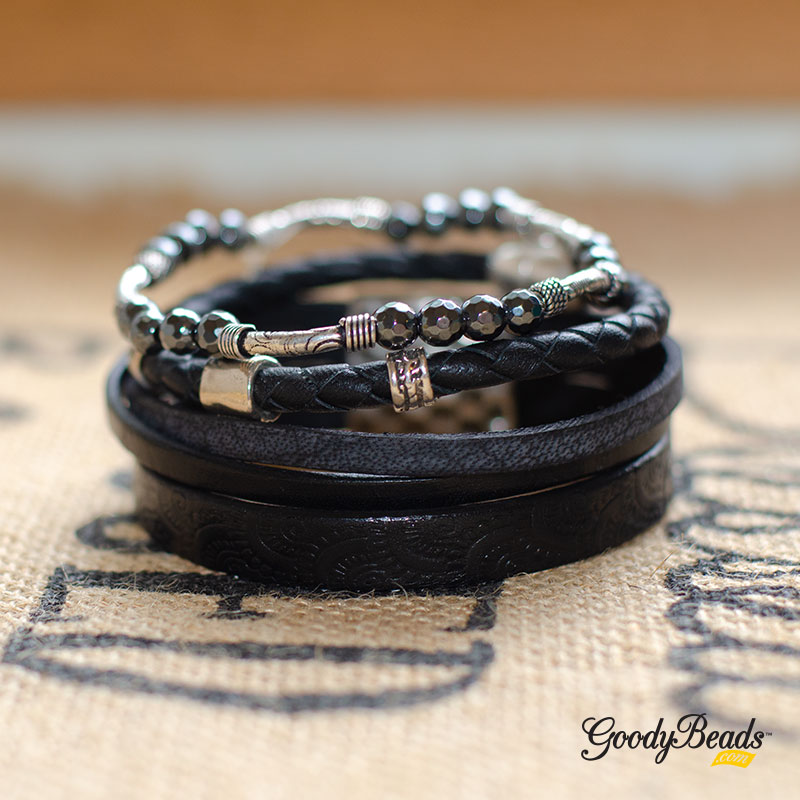
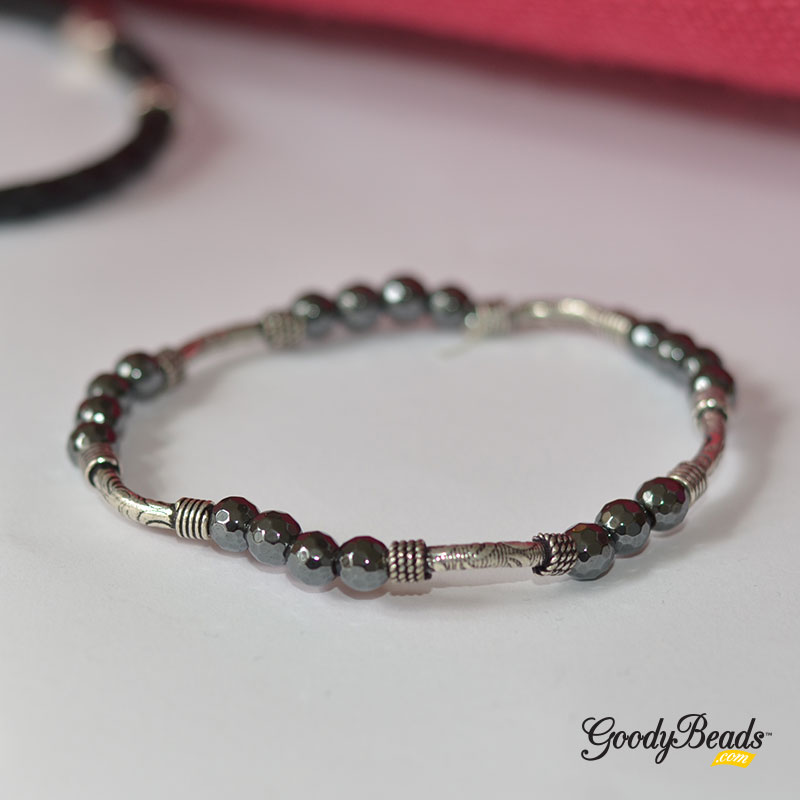
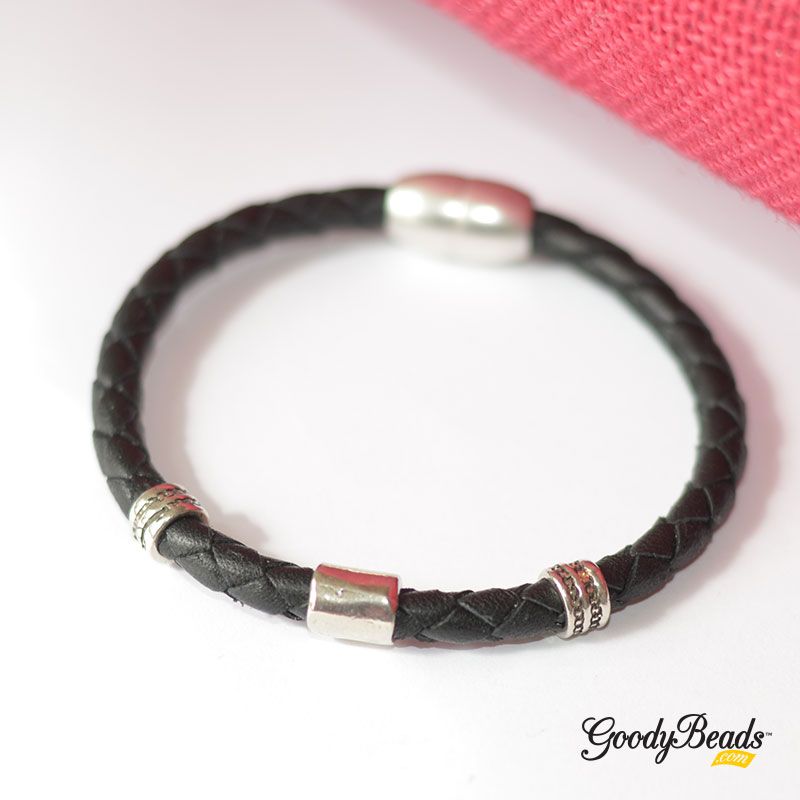
DIY Men’s Bracelet Set with Leather and Silver Findings
Today’s tutorial features this men’s bracelet set. Ladies can even love them too! These three bracelets consists of leather, metal beads and even hematite beads.
Cut elastic to twice your wrist length or about 15 inches. Pull and pre-stretch your elastic to loosen the elasticity.
Cut the tip of your needle. Fold your elastic in half and loop the needle at the mid point.
Slide on the elastic the following beads: 4 hematite beads and silver tube. Repeat 4 more times.
Wrap around your wrist to see if it enough to wrap around your wrist. If it is too much, remove a hematite bead. If it’s too tight, add another hematite bead.
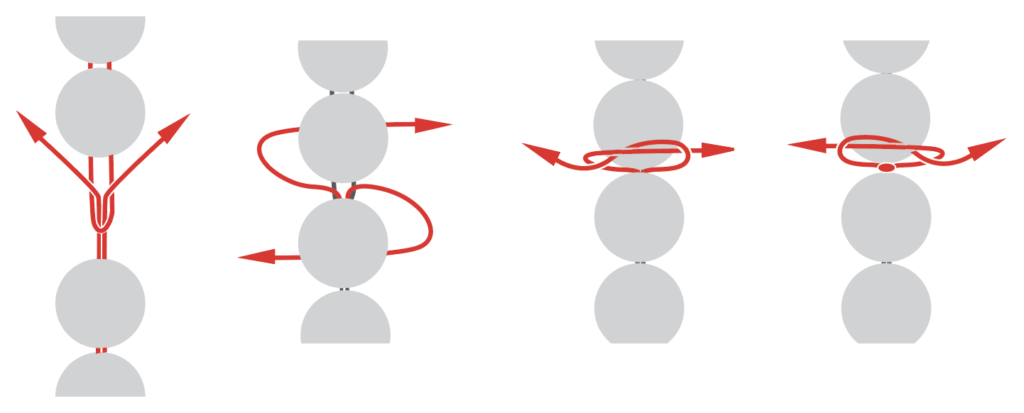
Follow illustrations below to make the Tricky Rick knot, to tie off your ends. Glue the knot if you would like. Cut excess elastic, leaving about a 1/4″ stub.
Cut all leather cord to 7.5″ or to your desired length.
Glue all three leather cord ends to end clasp with super new glue, situating the 10mm to the bottom. (Make sure to face the fronts of your leather pieces to one side of the clasp.) Let glue dry for a few minutes.
Cross the two 5mm leather and glue the other leather ends to the other side of the clasp. Hold leather in place for a minute or two to let the components bond. Let piece sit and dry for another few moments before wearing.
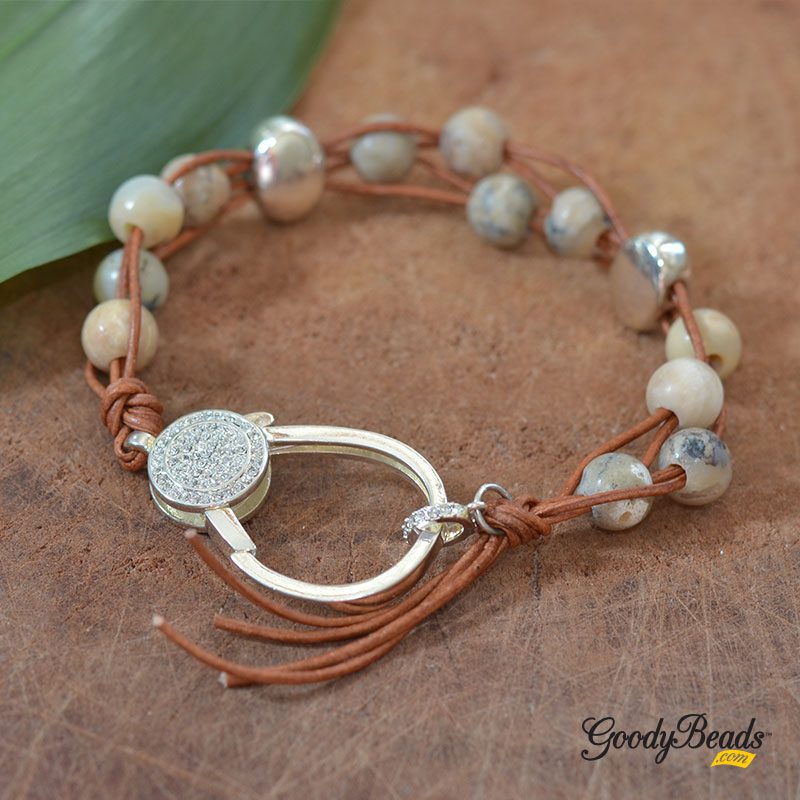
DIY Leather & Gemstone Bracelet with Large Rhinestone Clasp
One of our happiest combinations are leather and gemstone. Throw in a fantastic large rhinestone clasp and this bracelet is one you’ll wear all the time.
Cut the 2 meter of leather in half. Take one and cut in half again.
Take your two strands and slide both through rhinestone clasp loop and center. Make an overhand knot with all four strands, close to clasp loop.
Flare out your ends and determine which are your middle two strands and your side strands. Take one gemstone and slide through the two middle cords.
Decide your two left and right strands. Slide a gemstone through the two left strands and another gemstone to the two right strands.
Slide another gemstone through the two middle strands.
Take your two left strands and slide through one hole of oval bead. And take your two right strands and slide through other hole of oval bead.
Repeat Steps 3-6 one more time.
Repeat Steps 3-5 again.
Rhinestone clasp comes with an end connector with a small loop. Open jump ring, slide through small loop and close.
Make sure to wrap bracelet on your wrist to help determine where you want to situate your knot. Take your four ends and slide jump ring through all ends and do an overhand knot with the jump ring/ring connector within the knot.
Try on the bracelet and adjust knot you made previously if you need to make length shorter or longer. Cut leather ends as an option.
We’re starting June with one of our favorite style of DIY jewelry-making; memory wire wrap bracelets. Our DIY Wrap Pearl & Denim Blue Bracelet combines some of our favorite components; leather with hollow core, Swarovski pearls and tassels.
8mm pearl, seed bead, 8mm denim blue crystal, seed bead, 8mm pearl, curve tube, seed bead, 6mm pearl and 2 seed bead.
Cut Memory Wire with a 1/2″ to 3/4″ end.
Make a simple loop to that end with Memory Wire Finishing Pliers.
DIY Meteorite and Shungite Stretch Bracelet
Take a break and breathe. Our DIY today helps ground yourself and bring positivity to the wearer. It consists of Shungite beads, which can “aid in pulling negative energy from the wearer in general, which may help you to keep a more positive, focused attitude” and Muonionalusta Meteorite, which promotes clarity and spiritual growth.
Plus, when you wear these stones, feel its weight. Its solid form has a tangible weight and know that you have a piece of prehistoric stones and ‘out-of-this-world’ kind of beads!
Cut a piece of elastic to 9 inches. Pull and pre-stretch your elastic.
Slide on 23 Shungite beads. (Adjust length by adding or descreasing amount of beads to fit your wrist.)
Make a surgeon’s knot. Cut Excess elastic, leaving a small stub of elastic end.
Repeat all steps for other bracelet, while substituting a Shungite bead for a Meteor bead. Make a surgeon’s knot and cut off excess elastic.
Easy DIY Chain Bracelets
Today’s tutorial demonstrates how easy making simple bracelets can be. Simple and dainty with only three components; chain, jump rings and lobster clasp.
Measure chain to wrist size and then cut a link short of your measurement.
Open 4mm jump ring, slide on one end of chain end and through lobster clasp. Close jump ring.
Gently open split ring with a split ring pliers (FTTL0006) and slide split ring through other end of chain. Note: If you find that your bracelet is a bit long, take off clasp end, cut another chain link off and reattach lobster clasp. If you find that your bracelet is short, add another split ring with a 4mm jump ring to the first split ring you attached to the chain.
Repeat all steps for other bracelets.
DIY Criss Cross Leather Bracelet
We have a cute DIY for you today and it involves one of our favorite products, leather cord! We’re making an easy DIY leather bracelet with 2mm and 1mm leather cord to braid and make a criss cross design with flat ring links.
Your choice of button – (Item used in sample TC01245)
Directions:
Slide button onto the middle of a 30 Inch piece of 2mm leather and tie an overhand knot about ¾ of an inch from the button.
Do 7 macramé square knots starting right up against the overhand knot with 50 inches of 1mm leather cord.
Slide on a ring. In front of the ring cross the left piece of the 1mm over the 2 strands of 2mm cord and then cross the right piece over the left piece.
Take the ends of your 2 cords of 2mm leather and bend them back over the crisscrossed strands and go back thru the ring. Tighten, adjust and straighten your strands.
Repeat steps 3 and 4, 8 more times. Adjust number of rings to make bracelet larger or smaller.
After last ring do 7 macramé square knots.
With all 4 pieces of cord make an overhand knot where the macramé ends. Trim ends of the 1mm cord
Place another overhand knot using just the 2mm cords about one inch from first to create your button hole clasp.
Cut paper clip to chain to consist of 15 links (6 inches).
Open ring on star charm, slide through middle chain link and close ring.
Open jump ring, slide through link two links right from the middle link and slide on moon charm. Close jump ring.
Open jump ring, slide through link two from the left side of the middle link and slide on heart charm. Close jump ring.
Open jump ring from sliding clasp and attach to either ends of the paper clip chain. Close jump ring. Repeat on other end. NOTE: If adjustable clasp is too long, trim chain on each side 1-2 inches.
Delicate Delica Wrap Bracelets with Memory Wire
11/0 Miyuki Delica Mixes are some of our newer items here at GoodyBeads. And an interesting way of designing with them are some simple Memory Wire Bracelet. They are perfect for all ages and also the perfect bracelet to wear in warm summer months!
Memory Wire WR00126/WR00127 – Item used in bracelet WR00126 Note: do not use the Heavy or Extra Heavy Memory Wire. The thickness may not fit the Delicas.
On an eyepin, slide on pavé bead and make a simple loop.
Open loop, slide one loop of satin bracelet end. Close loop.
Repeat step 2 to other end of bead loop.
DIY Wrap Bracelet with Czech Fire Polish Beads
One of our favorite diy projects are making wrap bracelets. Using 1mm or 2mm leather cord, make wrap bracelets using all types of beads!
Today’s project is a version from our previous blog post on GoodyBeads Master Mixes with Swarovski® bicone crystals. Check out the blog post for a step-by-step look at how we sew on bicone crystals and seed beads. We will use this same method on this DIY wrap bracelet with Czech fire polish beads. Also, before you get started you will want to read the How to Make Leather Wrap Bracelets to help determine the length of leather cord you will need for your wrap bracelet.
Now that you’ve gotten those tips and tricks down, here is what you’ll need for this wrap bracelet:
1.5mm Leather Cord– item used in bracelet Z019143 Note: You can also use 1mm, 1.3mm and 2mm leather cord. The best use for small leather cord like 1mm-1.5mm is if you are using small beads like seed beads or sizes under 4 or 5mm in diameter. If you plan to use larger beads like 6mm or 8mm, using 2mm leather cord works best.
11/0 Seed Beads – item used in bracelet SB00423 Note: For smaller beads, use size 11/0 seed beads in the pattern. If using larger beads, you can use 8/0 or even size 6/0 seed beads.
3mm Czech Fire Polish Beads – item used in bracelet A008815 (Qty 3 strands) Note: We used about 140 beads for our double wrap bracelet, which is a quantity of 3 Czech fire polish bead strands. You will need more for more wraps in your bracelet.
Cut leather to length according to how many wraps you want. For a double wrap, we start out with 42 inches for a 7 inch bracelet.
Slide leather through button hole, situating the button in the center, fold leather in half and make an overhand knot close enough to the button.
With 4 feet of beading thread, tie the end of your beading thread to one piece of leather to harness your thread.
Ladder stitch a seed bead in between the two leather cords.
Ladder stitch two seed beads in between the two leather cords.
Pick up a seed bead and Czech bead. Sew both in between both leather cords.
Pick up a Czech bead and then a seed bead. Sew both between both leather cords.
Repeat Steps 6 and 7 until you’ve reach a suitable length for wrist size.
Tie off your beading thread and cut off excess.
Take both ends of your leather cords and make an overhand knot, close enough to last beads you’ve stitched on.
Make another overhand knot about 15mm to 20mm apart, or wide enough for your button to slide through. Optional: Make another overhand knot for an extended length if needed.
Cut a half coil of memory wire with memory wire cutters.
Wrap a loop or coil one end of the memory wire with memory wire finishing pliers. Slide on the memory wire: TWO 4mm crystal, 6mm crystal, 8mm crystal, 6mm crystal and TWO 4mm crystal. Cut memory wire end, leaving 3/4 inch end. Coil or make a simple loop to that end with memory wire finishing pliers. (NOTE: You can substitute 20-gauge gold-colored wire for the memory wire in Steps 1 and 2.)
Open a jump ring from adjustable bracelet and slide on one end of crystal link. Close jump ring.
Repeat to other end of link and adjustable bracelet.
Cut elastic to 8 inches. Pull and stretch the elastic to loosen its elasticity.
Slide on a sequence of beads to your choosing, while adding a 2mm czech bead in between each larger bead to fit your wrist size. (We alternated each bead in the sequence). MAKE SURE that a brass bead in at one end of your elastic.
Make a surgeon’s knot and cut off excess of elastic. Pull knot inside brass bead to hide knot.