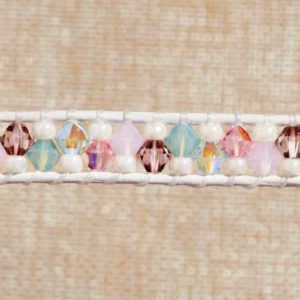
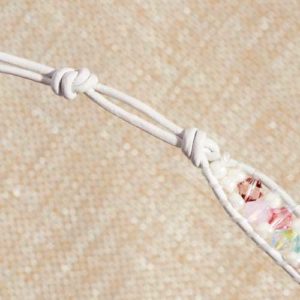
GoodyBeads EZ DIY Series: Swarovski® Crystal Flat Memory Wire Bracelet
We are in love with bracelets that wrap around and bling, of course! We have an EZ DIY tutorial on how to create this sparkling wrap bracelet with flat memory, Swarovski emerald-cut crystals and 24-gauge wire.
Tutorial
Items used:
WR00119 – Large Silver Flat Bracelet Remembrance Memory Wire
Pantone® Color of the Year for 2017 goes to Greenery. This yellow-green hue is “nature’s neutral.” While it resembles the awakening of spring and the new life the season brings, it also plays a part to represent “the reconnection we seek with nature, one another and a larger purpose.”
Colors that can be used to closely resemble the Greenery colors are lime green, peridot and chartreuse. Find out how we transform this color into jewelry pieces for 2017.
We used this lime green cabochon (A016880) and adhered it to a Kabela filigree circle center (Z007181). We even pulled this beaded chain (CH00288) that mimics the hues of Greenery.
We’ve offset the bright green color with earthly bronze and brown beads (A017137) to show-off the vibrancy of the green (A005377) in this stretch bracelet.
The sheen in this green miracle bead (A014932) is paired with the new cross tribe crystal pendant from Swarovski® (SW01518) for a long drop pair of earrings.
These chartreuse seed beads (SB00078) are sewn with size 11/0 galvanized silver seed beads (SB00422) around a drop groovy bead frame (Z019397) to create these simple pair of earrings.
How will you show off Pantone’s 2017 Color of the Year, Greenery?
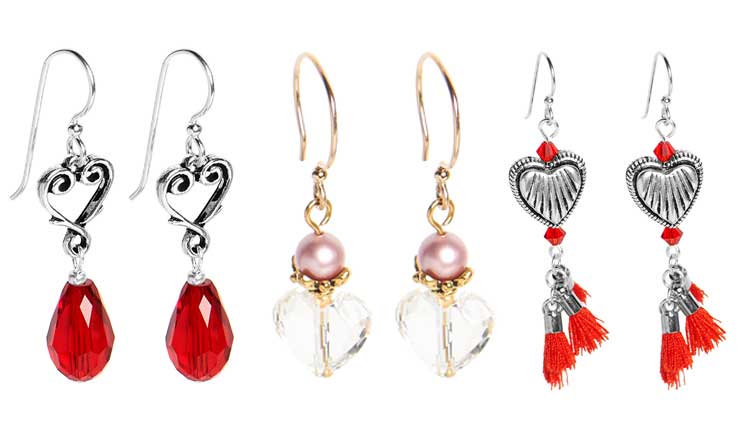
New GoodyBeads Valentine’s Day Kits – 2017
You’ll soon feel the love in the air because Valentine’s Day is coming. Our GoodyBeads Designers have new Valentine’s Day DIY kits to bling out your lovely look.
These kits include all the beads and findings, along with simple step-by-step instructions. They are also easy to make and give away as gifts.
Eat your heart out with a box of chocolates and a beautiful selection of heart earrings.
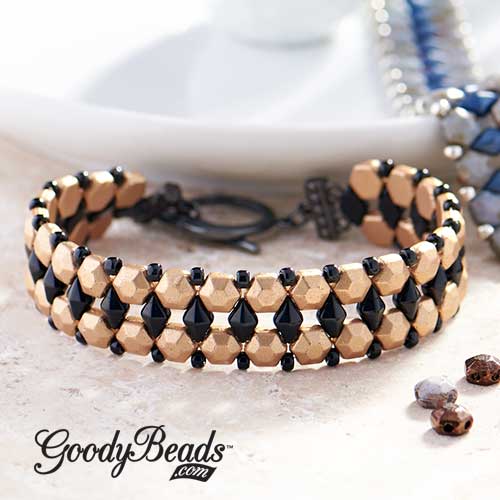
Czech Honeycomb Jewel Beads with Bracelet Tutorials
With the popularity of the Czech Honeycomb two-hole bead, comes the Honeycomb Jewel bead. Here are two projects where we used these beads to make a bead-stitched bracelet with DiamonDuos and as a wire cuff bracelet with bead wire.
What makes Czech Honeycomb Jewel beads different than other honeycomb beads? Honeycomb jewel beads are faceted on one side, to give depth and dimension, and flat on the other.
Honeycomb Jewel and DiamonDuo Bracelet with Tutorial
Designed by So Vang
We paired the Honeycomb Jewel shape with DiamonDuos, which plays off each others’ faceted look. We took the Chalk Lazure Jewel (Z018620) and gave this bracelet a pop with a bold hue of the Pastel Montana Blue DiamonDuo (SB03347).
GoodyBeads EZ DIY Series: How to Make a Rhinestone Link and Leather Bracelet
For supplies and tools totaling under $20, you can learn how to make a rhinestone link and leather bracelet with a Rhinestone Link Bracelet Kit (A020661/A020662) and 2mm Round Leather Cord.
Tutorial
Items used:
A020661 – Matte Silverstone Rhinestone Link Bracelet Kit
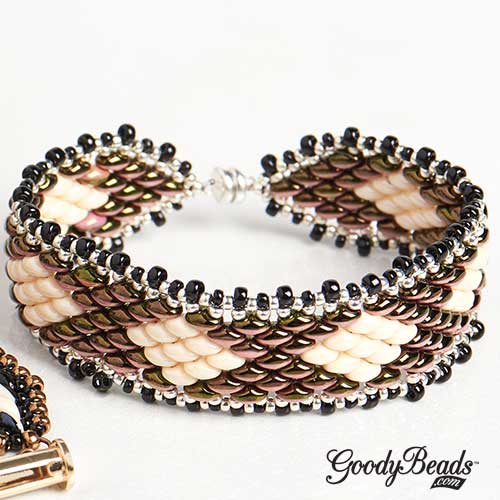
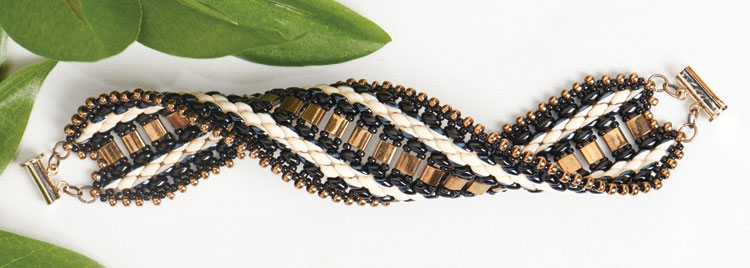
From BeadSmith® comes a new wave of SuperDuos beads: Duets. SuperDuo Duets features a two-toned color that shimmers, and different hues on each side of the bead. These unique beads are perfect for defining lines and beading accent color around borders.
BeadSmith has an inspiring video featuring these new SuperDuo Duets.
Color Shifting Bracelet from BeadSmith w/ Tutorial
We love the simplicity of this bracelet pattern from BeadSmith. We used the Black/Red Luster SuperDuo Duets (SB03501) with Orange Luster on Chalk SuperDuo (SB02110).
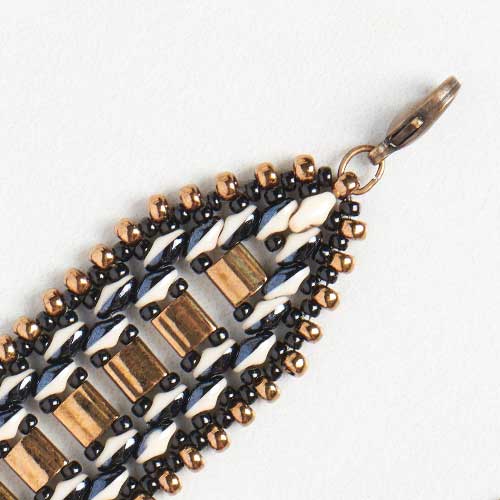
Here, we took the same pattern from the Color Shifting Bracelet and redesigned it by substituting the middle SuperDuos with a size 11/0 Miyuki seed bead, a Miyuki Tila and another size 11/0 Miyuki seed bead. We used Black/White Beige Luster SuperDuo Duet (SB03491) and layered the black sides of the duet together on the edges for an interesting stripe effect.
We also used 8/0 Miyuki Dark Bronze seed bead for the outer edges instead of alternating between a size 11/0 and 8/0 seed bead. Plus, check out the image below on how we’ve sewn our ends. We had sewn in a size 8/0 seed beads at the end to loop in a jump ring and lobster clasp on one end and chain link on the other.
We amped up the pattern and adding more rows of SuperDuos and SuperDuo Duets to the previous bracelet. This bracelet pattern will create a band width just under 1.5” with a cream and black stripe effect and bronze border.
Introducing our new gift jewelry kits perfect for gift-giving. Created by our in-house designers, So Vang, Tory Vezina and Heidi Urlaub, these kits are easy to make and versatile to wear to all of your upcoming events and celebrations. Plus, the kits are conveniently packaged inside a plastic pillow-shaped container for easy gift giving to the DIYers in your life!
Thinking of what to give this holiday season or for birthdays or special occasions? Gift kits are the perfect gift to give to your girlfriends, sisters, bridesmaids, work buddies, etc.
Heidi’s kits have an earthy and edgy vibe with her love of leather and gemstones. You can easily wear her jewelry with the intent of going everywhere and still be on trend. Her Tears of Leather Earringsand On the Fringe Leather Earrings are so gorgeous, you’ll long to own one, two or all of her styles! Meditation Stretch Bracelets have a harmonic combination of round gemstones and emerald-cut Swarovski® crystals, while the Boho Belle Tube Necklace is decorated with small gemstones and curved tubes that gently hug your collarbone.
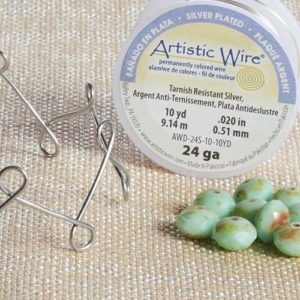
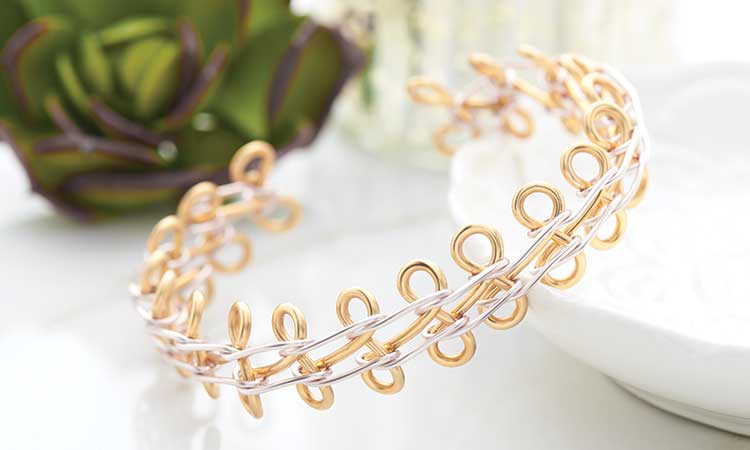
Beadalon® Artistic Wire® 3D Bracelet Jig and Tutorial
From Beadalon® Artistic Wire® is the 3D Bracelet Jig. You can create bangle bracelets, cuff bracelets, and curved components. We have a great informational video from Artistic Wire to get you started on creating your own custom-made bracelet.
Video Tutorial
This video, provided by Beadalon/Artistic Wire, gives you a tutorial on how to use the 3D Bracelet Jig and creating a simple wire bangle bracelet.
Bangle with Czech Beads Tutorial
Now that you have learned how to create a 3D bangle from the video above, it is a great base to add beads to. Here is a tutorial on how to create the bracelet above using 8mm rondelle beads. You can choose from Czech, Millefiori, Gemstones, Chinese crystals or Swarovski®.
What you will need:
3D Bangle made with 3D Bracelet Jig and 18 Gauge Wire (from video above)
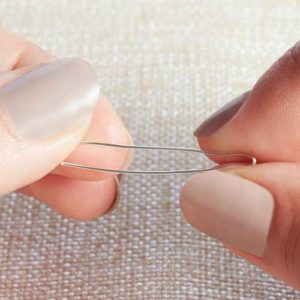
Step 2. Cut 3” of 24-Gauge Artistic Wire and bend in half. Pinch the fold.
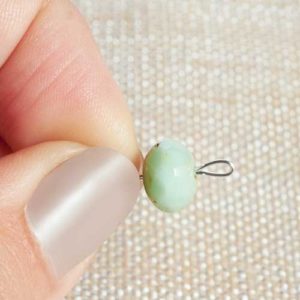
Step 3. Slide on rondelle bead. Tip: If loop is too long, clamp loop with flat nose pliers to create a smaller loop.
Step 4. Insert wire ends through one loop of the bangle bracelet. Separate the wire ends and spread them apart.
Step 5. Turn bracelet around and wrap wire end around three times on the bangle wire.
Step 6. Repeat to other wire end.
Step 7. With your fingers or finger nails, push the wrapped coils towards the middle.
Step 8. Cut excess wire and repeat all steps for remaining bangle loops.
3D Bracelet Examples
Here are other examples of what you can make with the 3D Bracelet Jig.
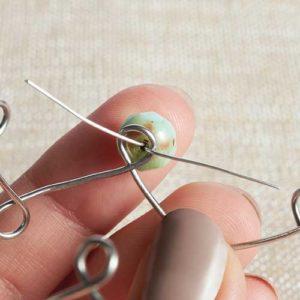
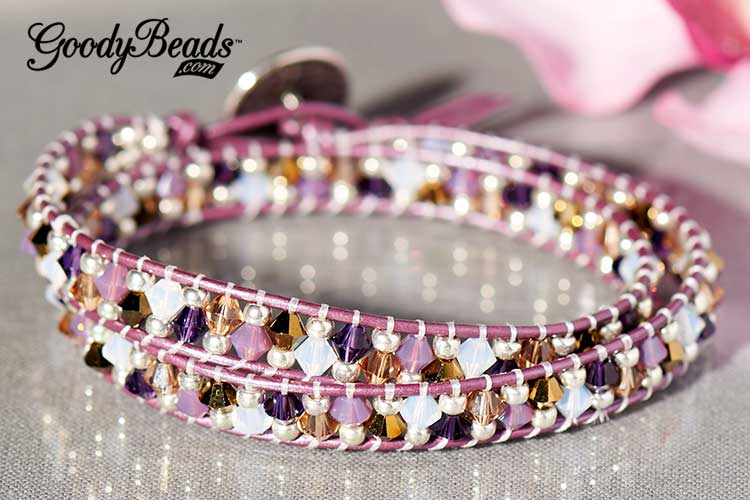
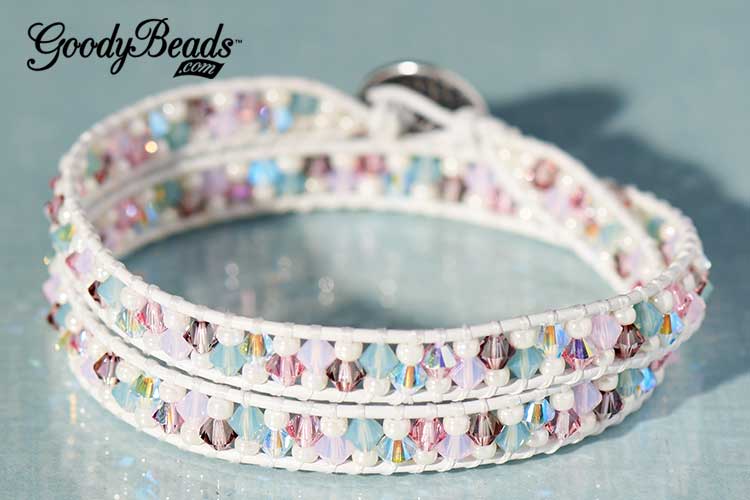
GoodyBeads’ Master Mixes with Swarovski® Crystals and Wrap Bracelets
Introducing all-new Master Mixes, hand-picked by our GoodyBeads’ in-house designers. Check out these new additions to GoodyBeads and how we use these mixes in making a leather wrap bracelet.
Swarovski 4mm Crystal Mixes
We did all the hard work for you in mixing and matching Swarovski crystals for any themed jewelry project. These selections of 4mm bicone crystals comes with a five or six color combination consisting of up to 150 crystals total. Each mix comes in a non-spill, poly-bag inside a gorgeously viewable tin.
Leather Wrap Bracelet with Swarovski Mixes
Be inspired with what you can make with these mixes. A favorite of ours is making wrap bracelets. Here are two examples:
Grapevine Bracelet by So Vang
Designed by So Vang
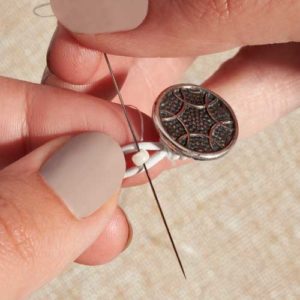
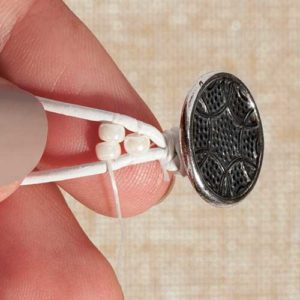
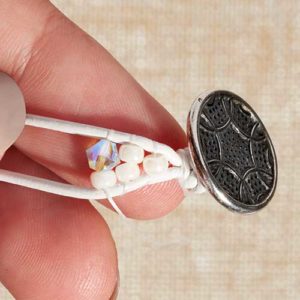
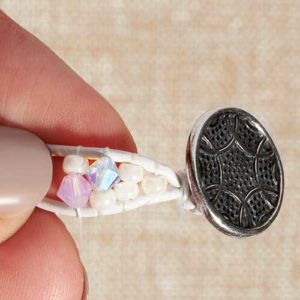
For this fall-theme bracelet, we used So’s Grapevine mix (MX00012), 1mm metallic berry leather cord (A022064), Crystal Fireline (A006587), size 8/0 galvanized silver seed beads (SB00106) and TierraCast® Button (TC01954).
Victorian Rose Bracelet by So Vang
Designed by So Vang
Or, for a lovely pastel combo, we used the Victorian Rose mix (MX00004), 1mm white leather cord (A022071), Crystal Fireline (A006585), size 8/0 ivory ceylon seed beads (SB00098) and TierraCast® Button (TC01954).
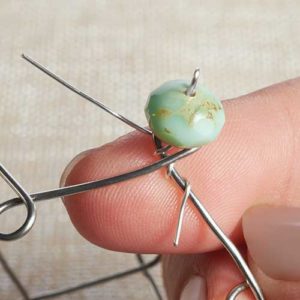
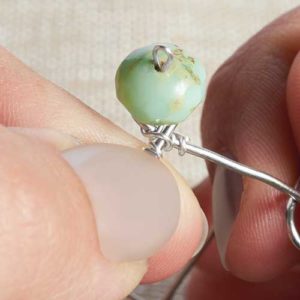
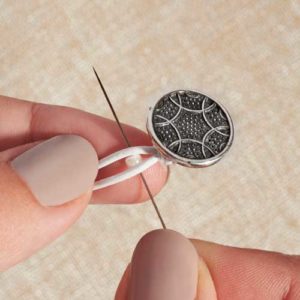
Leather Wrap Bracelet with Swarovski Master Mixes
Here is a quick tutorial on how to make these Swarovski mix leather wrap bracelets. You may want to check out our leather wrap DIY blog post to give you a refresher on how to make a leather wrap bracelet.
Step One: Slide button to the middle of your 1mm leather cord. Make a knot.
Step Two: Make a knot with your beading thread close to your leather knot. Pick up one 8/0 seed bead and lay in between and behind the leather cords. Pull your needle and thread through.
Step Three: Bring needle over leather cords and sew through seed bead.
Step Four: Repeat steps two and three with two seed beads in this row.
Step Five: For this row, you will pick up one seed bead and one bicone crystal from your mix, sewing under and then over the leather cords.
Step Six: For this row, you will pick up bicone crystal, then one seed bead. Sew under and then over the leather cords.
Step Seven: Repeat steps five and six until you’ve reached a comfortable length to wrap around your wrist two times.
Step Eight: End with a row of two seed bead and the last row with one seed bead. Tie off beading thread and cut off excess. You can add a small dab of glue to secure the knot. Make a knot with the leather cords close to the seed bead. Make a second knot with a gap wide enough for your button to pass through. Cut excess leather cord end.
You’ve completed with your leather wrap bracelet.
Seed Bead and Leather Bead-Weaving Kits
Kids are going back to school and you have tons of time on your hands. Why not get one of our seed bead and leather kits. From our in-house designers, Harper Gray and So Vang, come a wave of bead-weaving kits featuring popular leather wrap bracelets, seed bead peyote stitch earrings and honeycomb beads weaved to add to leather or chain.
Leather Wrap Bracelets designed by So Vang
Be on trend with a three-wrap leather bracelet. Each kit is personally designed with genuine gemstones to Swarovski® crystals or pearls, and from dainty Picasso seed beads to Czech two hole beads. All starting with a theme-matching button closure. These kits can be modified to fit a 6” wrist or use all of the beads and make to fit up to an 8” bracelet.
All beads, leather, and needles are included in the kit. All you need are a pair of scissors, optional glue and time.
Honeycomb Bracelet and Necklace designed by So Vang
Honeycomb beads are hot on the trending list, so no wonder our in-house designer So Vang created these masterpieces. Kit comes with all the beads, thread and a needle plus, detailed illustrated instructions to make each piece.
Harper Gray designed these earrings kits with an array of colors and finishes. Learn to make these earrings using peyote stitching skills. Each kit comes with detailed instructions and illustrations to help you make each pair of earrings. You’ll probably find yourself wanting them all!
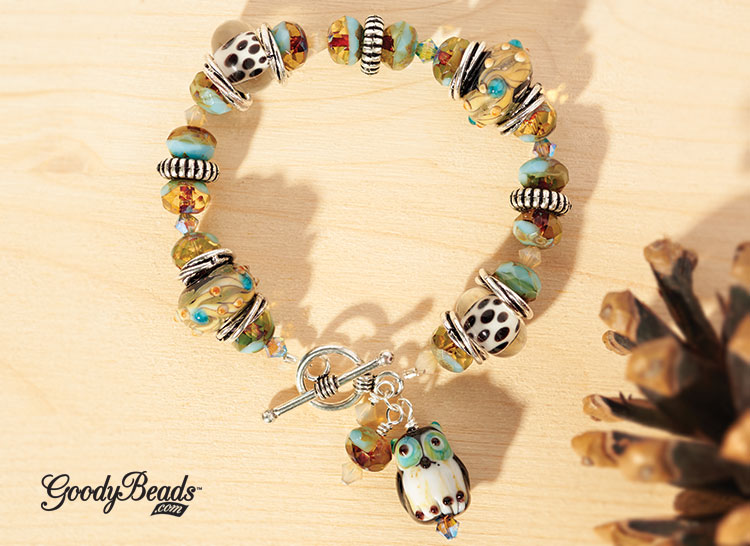
Owls are a hoot – I mean a hot motif trend. With their symbolism of knowledge and power, we’ve created two pieces of jewelry to show our love of owls.
It’s a Hoot Beaded Bracelet
Designed by So Vang
Selecting high-quality lampwork glass beads, fiery Czech beads and Swarovski® crystals, we pulled out hues of opaque turquoise, chalky browns and silver accents. Strung on elastic, this bracelet is easy to wear and perfect for an evening hike or bird watching.
Step 6. Loop one elastic end through toggle bar loop and back through crimp tube. Crimp tube with crimping pliers.
Step 7. Loop other elastic end through toggle round loop and back through crimp tube. Crimp tube with crimping pliers.
Step 8. Open jump ring and slide on the three bead dangles and loop of round toggle clasp.
Step 9. Close jump ring.
Owl Be It Necklace
Designed by Tory Vezina
You can just feel autumn with this owl necklace. The gradation of colors in the fairy necklace to the dangling leaf charm entices your senses of seeing the changing colors of treetops to hearing leaves crackling as they brush across the sidewalk.
Step 9. Line your ribbon ends together and make a knot.
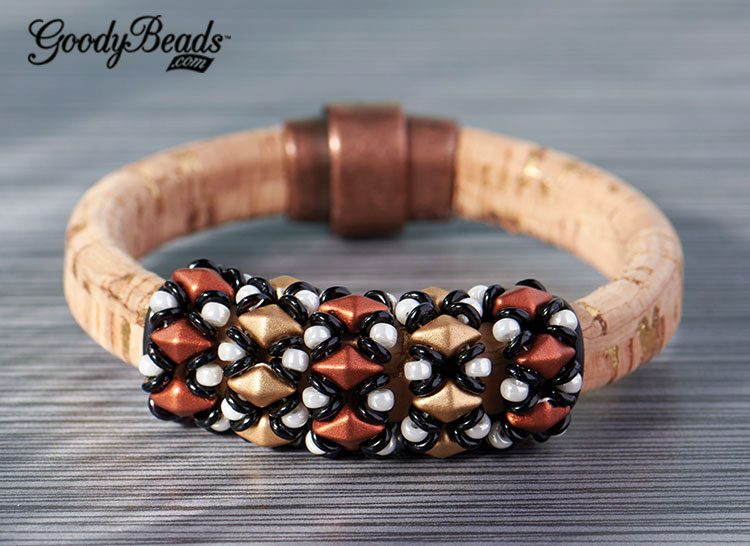
Beaded DiamonDuo Licorice Leather Bracelet with Tutorial
Featured in GoodyBeads July 2016 Trends, we are still loving the versatility of DiamonDuos especially when we pair them with licorice leather. Along with a FREE beaded loop tutorial, we will show you how to create DiamonDuo beaded loops and incorporate them in your licorice leather bracelets.
DiamonDuo Beaded Loop Tutorial
Download our DiamonDuo Beaded Loops pattern tutorial to get started. Create different color combinations with DiamonDuos, Czech O-beads and size 8/0 Miyuki round beads. Here are some examples of how we used these DiamonDuo Beaded Loops.
From our July 2016 trend, we featured this stunning bracelet with cork licorice leather. We made three loops with Matte Copper DiamonDuos and 2 with Matte Gold DiamonDuos. After cutting the cork licorice leather to your wrist size, slide on your beaded loops in alternating colors towards the center. We added a black rubber o-ring on both sides of the five loops to keep them in place. Glue on a clasp and let it dry for 24 hours before you wear. Crazy-neat, eh?
Using different colors can create a different look to your licorice leather. We created our DiamonDuo beaded loops using hues of metallic golds and white.
After we made five beaded loops, we cut our licorice leather to size. With some Super-lon Bead Cord (A012987), we wrapped the center section of our licorice leather with gold cord. Glue as needed on back side. Slide on a rubber ring, the 5 beaded loops and another rubber ring. ALL centered on the wrapped gold cord. Glue on a clasp and you have this flashy bracelet.
Lampwork Jewelry
Make your next jewelry POP with some lampwork beads. Our selection of these glass beads are quality handmade, which makes each bead uniquely one-of-a-kind. Check out our three simple designs that utilizes these stunning, focal beads.
Glass Menagerie Bracelet
Designed by Tory Vezina
Mix up different glass lampwork and Bali style beads for this sandy and colorful bracelet.
What you will need:
(1) A013548 – 20mm Spiral with Spots Glass Disc Beads
Slide on your crimp tube and beads. Refer to image to slide on the bead sequence. End with a crimp tube. (Click on image for a larger view)
Crimp both sides to the toggle clasp loops. Cut excess wire with flex wire cutters.
Place a crimp cover over the crimped tube. Use a flat-nose plier or serrated pliers to gently close the cover over the crimped tube. And you are done.
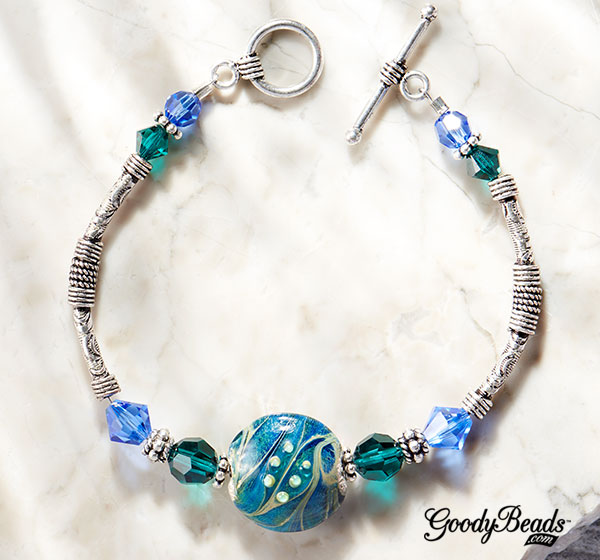
Coastal Ripples Bracelet
Designed by Tory Vezina
Sail away with beautiful thoughts of the ocean wearing our Coastal Ripples Bracelet. Our ocean waves disc bead is dressed with sparkling Swarovski® crystals and elongated with Bali style tube beads.
Compile your beads and tools. (List of components below.)
Slide a blue bicone crystal on headpin and make a simple loop. Make 4 bead dangles.
Slide a darker blue bicone crystal on headpin and make a simple loop. Make 4 bead dangles.
Slide a pearl on headpin and make a simple loop. Make 4 bead dangles.
Cut chain link to have 5 links.
Open eyepin and slip on chain link.
Attach two different bead dangles to each link and eyepin loop.
Slide these beads onto the eyepin and make a wrapped loop: pearl, bead cap, lampwork bead, bead cap, pearl.
Open earring loop and slide on eyepin dangle.
Repeat to other earring.
How to Use Silk Cord in Jewelry Making
Silk cord has been used as a stringing material in jewelry-making for centuries. No other beading cord offers the softness that natural silk provides. Jewelry designs made with 100% silk bead cord drape beautifully and the cord itself can become a feature with knotting techniques. Whether you’re looking to create a simple strand of beads or incorporate knotted bead clusters into your designs, GoodyBeads.com is here to show you how easy and versatile this timeless stringing material can be.
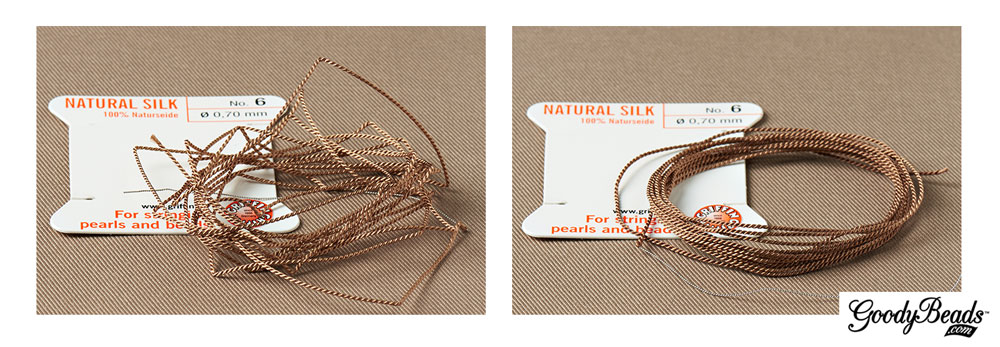
One of our favorite silk bead cord brands is Griffin. Griffin bead cords are made of 100% natural silk and come in a rainbow of colors and a variety of thread sizes.
Griffin bead cords are sold 2-meters per card. Two strands of twisted silk are wrapped around a cardboard backer. Each cord comes with its own needle for easy threading.
Choosing Silk Cord
Thread thickness is very important, especially if you plan on incorporating knots into your designs. Beads can slide over a knot if the cord is too thin for the bead hole you are working with. Griffin bead cords has its own numeric system for categorizing thread cord sizes: No. 0 – No. 12.
Each thread number has an associated millimeter size. Below is a quick reference guide for each number:
No. 0 = 0.30mm
No. 2 = 0.45mm
No. 4 = 0.60mm
No. 6 = 0.70mm
No. 8 = 0.80mm
No. 12 = 0.98mm
Smooth Out Silk Cord
Since silk bead cords come spooled on a card, you must prepare your new cord for use by smoothing out the kinks first.
To smooth out your cord, unravel the whole cord from the card. Starting from one end, dip your fingers in water and run your damp fingers through a section of the cord. Run your fingers over the section a few times to help straighten them out. Once that section is straight, continue on down to the next section of the cord with damp fingers until you’ve straightened the whole piece. Next, run a paper towel over the entire cord and gently squeeze to remove any residual water from the cord. That’s all you need to do. The cord will still be a bit damp but you can certainly use it right away. You can also wait a few minutes until it’s fully dried.
NOTE: You can use the same cord for multiple projects if you plan to keep using the needle that is attached to the cord. String bead(s) through the needle and utilize the end section of the cord.
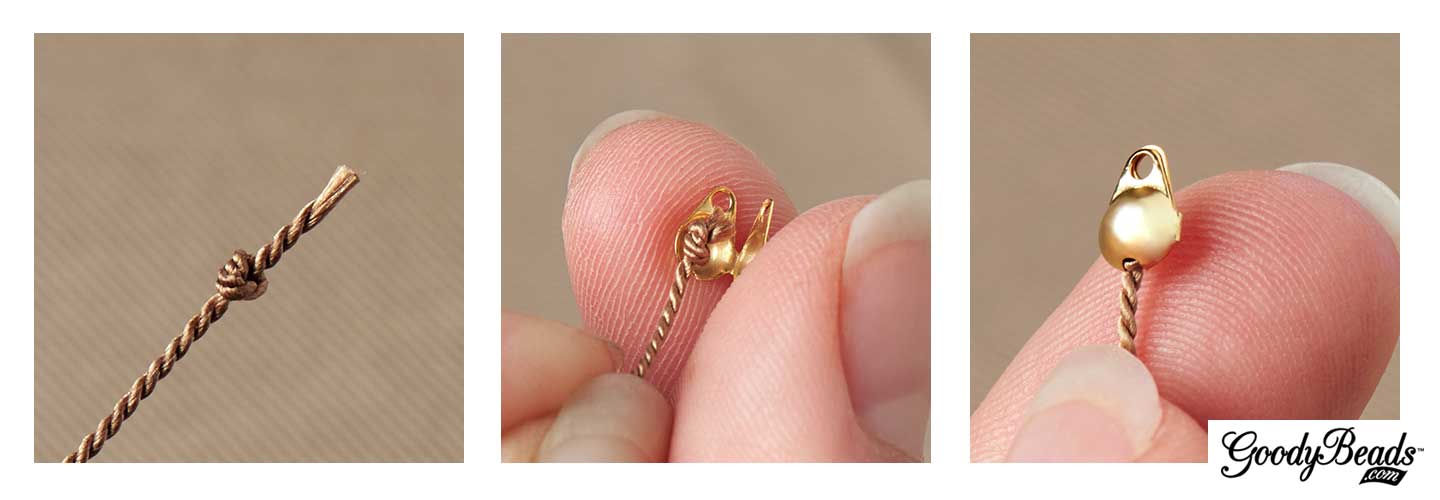
Using Clamshell Bead Tip with Silk Cord
A way to attach your silk cord to jump rings or clasps is to attach clamshell bead tips.
Start by making a knot at the end of your prepared silk cord. Cut any excess cord close to the knot. Add a dab of Super New Glue or fast-drying glue to the knot. Place the knot inside the clamshell center and fold the clamshell over the knot. The glue will keep the knot from unraveling and to adhere the silk cord to the inside of the clamshell bead tip. Once the glue is dry, it’s ready to use.
Need a little inspiration? Here are some ways we used Griffin silk bead cord in our jewelry designs. Plus, quick tips on how you can create these designs yourself!
Crystal Cluster Knotted Silk Cord Necklace
Designed by So Vang
Make a necklace with knotting in-between clusters of beads. Choose from Swarovski® crystals, Chinese crystals, seed beads or your favorite gemstones. For our necklace, we used the entire 2-meter cord and strung on clusters of one gold seed bead, three dainty round Chinese crystals and one gold seed bead, that were knotted with an inch gap between clusters. This version makes a 60” necklace that you can wrap around two or three times.
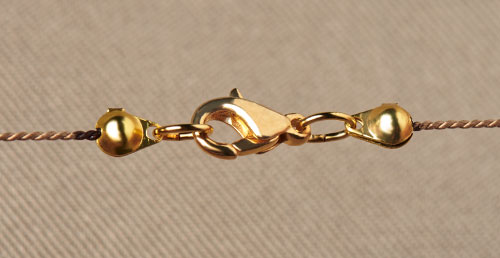
Here you can see how the clamshell bead tips are used in conjunction with jump rings and a lobster clasp.
Pearl beads and silk cord are a match made in heaven. Not only do they look great together, the silk cord also helps prolong the life of your pearl jewelry by preventing the beads from rubbing up against each other, which can breakdown the bead’s finish. Making this elegant necklace is super easy.
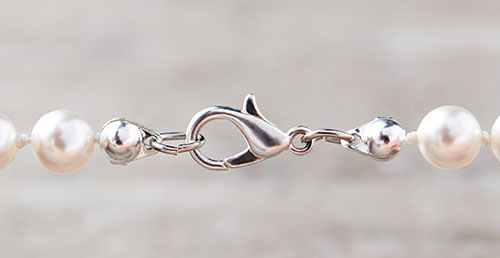
First, make a knot and clamp a clamshell over the knot. Make another knot close to the clamshell. String on a pearl. Make a knot close to that pearl. Repeat until a preferred length. Make two knots at the end and clamp a clamshell over the last knot. Finish with a lobster clasp and you’re done!
If you have a worn-out pearl necklace, you can undo all the pearls and restring on silk cord to extend its jewelry life.
Minimalist jewelry is a huge fashion trend right now. Dainty jewelry components shine alone or together in multiple strands like our layered silk cord necklace. For this necklace, we focused on the sleek simplicity of gold tube beads and the lightness of silk cord.
Step 1: String on 25 gold tube beads on white silk cord. With the beads strung on, cut 20” off the end of the silk cord. Make 2.
Step 2: String on 25 gold tube beads on white silk cord. With the beads strung on, cut 22” off the end of the silk cord. Make 2.
Step 3: Gather the four cord strands and make a knot. Repeat to the other end.
Step 4: Dab some Super New Glue to both knots. Clamp a clamshell over the knots.
Step 5: Add a jump ring to one of the clamshell tip ends.
Step 6: Add a jump ring and a lobster clasp to the other clamshell tip ends. Done.
This style of necklace is perfect for small dainty beads or seed beads or even some NEW 3mm or 2mm Czech round beads.
For this bracelet, we twisted groups of silk cord with size 11/0 Miyuki seed beads and gold plated chain.
Step 1: String on seed bead to 8” and cut 10” silk cord strands with seed bead on. Make twelve strands. Tip: You can use the Bead Spinner to help to string on seed beads.
Step 2: Gather three seed bead strands and knot all three strands at both ends as close as you can to the seed beads. Clamp a clamshell over the knots. Make four group of seed bead strands.
Step 3: Cut two chain links at 8” and attach oval jump rings to each end of the chains.
Step 4: Also cut a few links of chain for your bracelet chain extender.
Step 5: Open an oval jump ring and slide on your lobster clasp.
Step 6: Open a larger jump ring and slide on these:
chain extender piece, two seed bead groups, chain extender piece, two seed bead groups.
Step 7: Close Jump ring.
Step 8: Leaving the chain extender along, separate the strands into two sections of chain and two seed bead grouped strands. Make a “flemish twist” with the two sections.
Step 9: Open a large jump ring and slide on the other ends of the chain and grouped seed beads and lobster clasp jump ring.
Step 9: Close jump ring and you are done.
(Close-up shot of jump ring with grouped seed beads and chain links.)
We hope enjoyed these tips and tutorials. Check our next blog post where we show you how to create evenly spaced knots in your jewelry designs using The EasyKnotter® tool. Happy Beading!
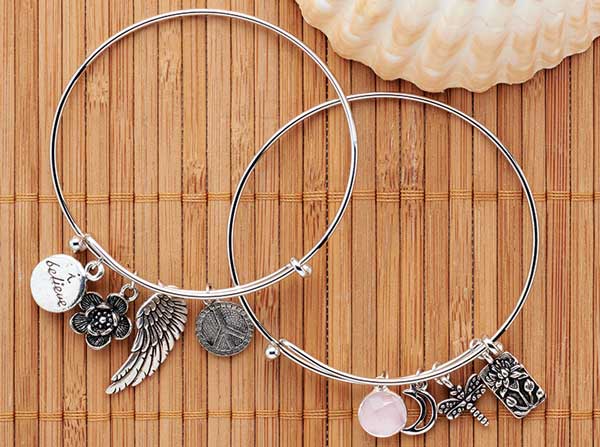
What kind of summer will you have? Whether it’s on the beach, surfing, roaming an outdoor mall or lounging on your back patio, be ready with our easy project using expandable wire bracelets and adjustable rings.
Stack multiple adjustable bracelets together. Or make a cluster of rings and wear them scattered around the base of your fingers or as knuckle rings. However you style it, remember to make it about you by personalizing and customizing them with simple charms and dangles with a quick open of a jump ring.
Expandable Bracelets
Designed by So Vang
What makes these bracelets expandable is the way you can slip them on and off any wrist size without altering the shape. You can get an antique silver finish or gold finish bracelet and complement them with gold or antique silver charms. Or mix up the colors. Create a theme or select your favorite charms. Attach charms with a jump ring and you are ready for summer fun!
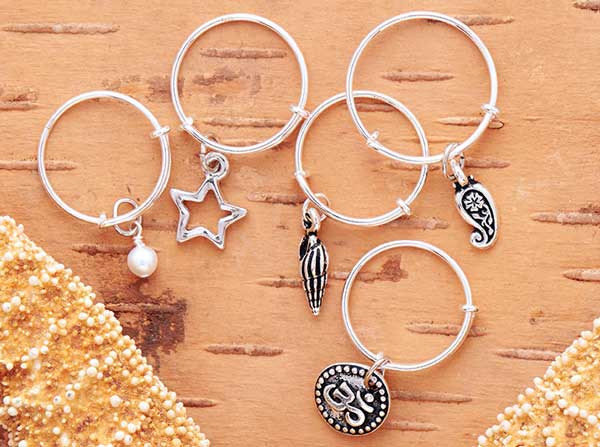
Adjustable Rings
Designed by So Vang
We are loving the versatility of these rings. They come in three different sizes to give you options to place them on your knuckles, thumbs or simply at the base of your fingers. We’ve added simple charms to our rings, as well as a cute pearl dangle to tie in a beachside look.
(2) Z003520 – Sterling Silver Adjustable Ring – Size 5-7
(2) Z003521 – Sterling Silver Adjustable Ring – Size 6-8
(1) Z003522 – Sterling Silver Adjustable Ring – Size 8-10
Boho Ring-Chain Bracelet
Designed by So Vang
Of course you can use these rings to help achieve a popular ring-chain bracelet. First, we made a simple chain bracelet with a lobster clasp. Then we put the ring on and measured a loose length of our chevron chain across the back of the hand. To finish, we connected the chevron chain to the ring and to the middle of the chain bracelet with two linked jump rings. It’s perfect for wearing with other selections of expandable bracelets and adjustable rings for a groovy summer!