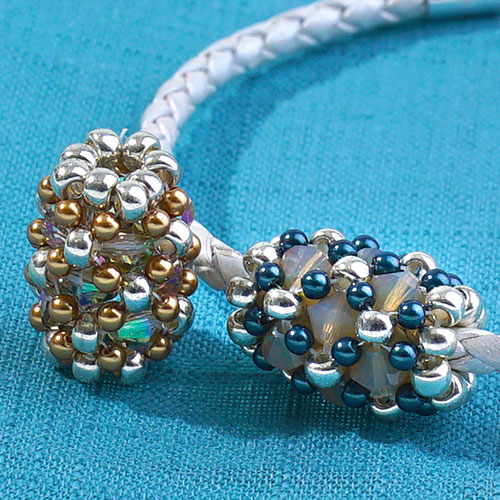
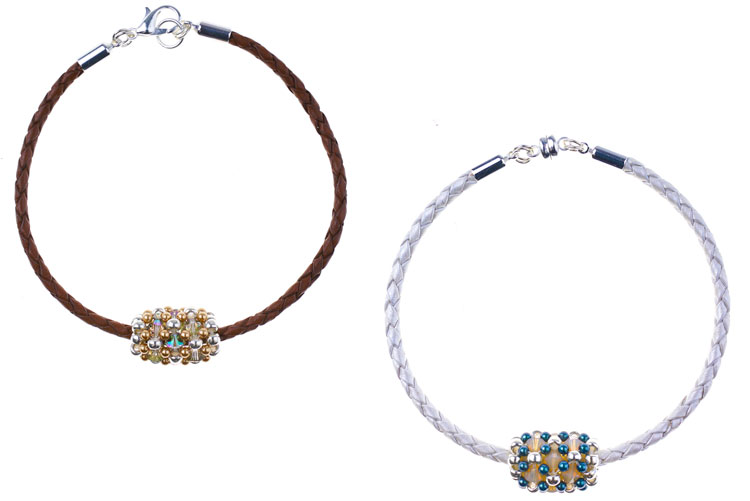
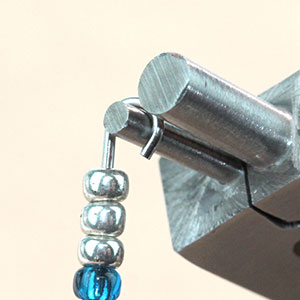
Beaded Bead with 2mm Swarovski® Pearl – Pattern Tutorial
New to GoodyBeads are 2mm Swarovski Pearls! Their glossy shine is sure to add fanciness to your designs. Here is a simple beaded bead using 2mm Swarovski pearls, 4mm Swarovski bicone crystals and 8/0 seed beads.
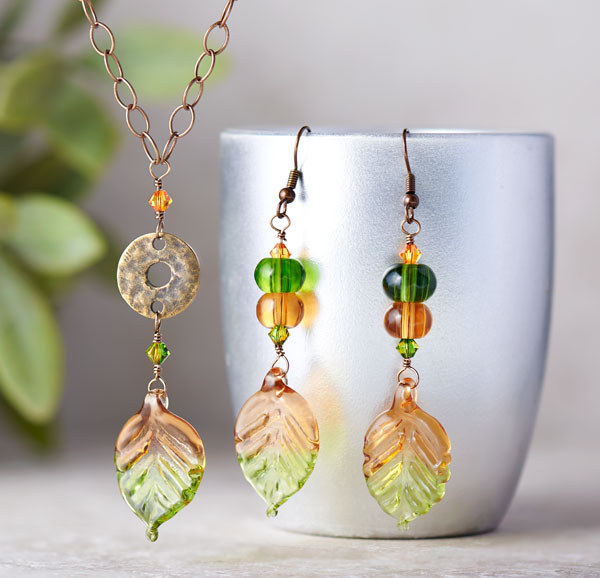
Falling Leaf Necklace and Earrings Set – Free Tutorial
We love Autumn. You get to bundle up and be cute in fashionable layers, scarves, boots and fluffy hats! We have this super simple DIY necklace and earrings set using Amber and Green Leaves Set (Y001056).
What you will need for Necklace and Earring:
Amber and Green Leaves and Rondelle Glass Beads Set (Y001056)
Cut a 4″ wire. Make a wrapped loop at one end while sliding on a glass bead before wrapping the loop. Make sure loop is big enough for glass leaf loop.
Slide on a fern/topaz bicone, the orange rondelle bead, the green bead and a topaz bicone.
Make a wrapped loop.
Open ear wire loop and slide on leaf dangle. Close loop.
Repeat all steps for other earrings.
Necklace Instructions:
Cut chain in half.
Cut a 3″ wire. Make a wrapped loop at one end while sliding on a glass bead before wrapping the loop. Make sure loop is big enough for glass leaf loop.
Slide on fern/topaz bicone and make a wrapped loop, while sliding on one end of the brass link. Finish wrapped loop.
Cut another 3″ wire and begin making a wrapped loop, while sliding on the other end of the brass link through. Finish wrapped loop.
Slide on topaz bicone crystal and beginning making another wrapped loop, while sliding on both ends of the two cut chain. Finish wrapped loop.
Open jump ring and slide on clasp loop and one end of chain. Close jump ring.
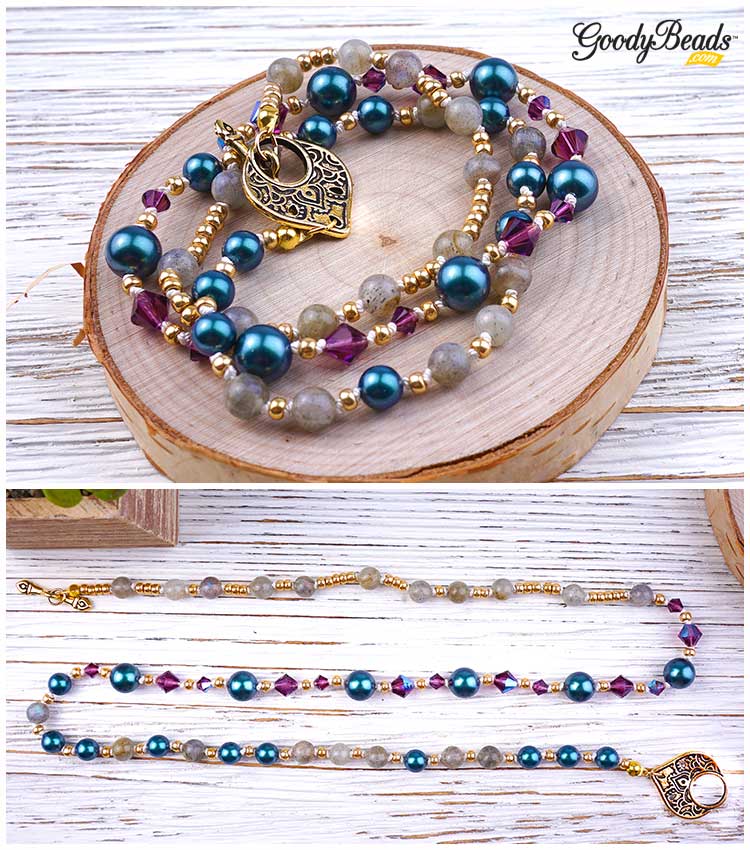
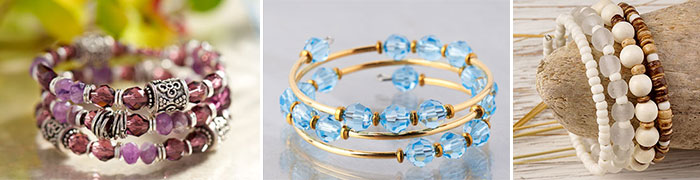
In this three -wrap bracelet, we used Griffin Silk Cord knotted with Tahitian Look Pearls, Amethyst Shimmer bicone crystals and 6mm Labradorite round beads with size 8/0 gold seed beads. Plus, we finished up this piece with gold findings.
Make a knot at the end of the silk cord and cut excess end. Slide over knot with a clamshell bead tip (Check previous blog on examples). Optional, add a small dab of Super New Glue to the knot before sliding the clamshell over.
Slide on a seed bead and make another knot flushed to the seed bead.
Slide on a 6mm Tahitian Pearl and make a knot.
Side on a seed bead and make another knot.
Repeat with alternating with pearl beads or 6mm Labradorite beads until you reach your desired wrist length. This will be your first row.
Next row, alternate a knot between an 8mm Amethyst Shimmer bicone crystal, seed bead, 4mm Amythest Shimmer bicone crystal, seed bead, 8mm Tahitian Pearl and seed bead. Repeat until your desired wrist length.
For your third row, alternate seed beads and Labradorite beads in no particular order to wrist length.
End with a knot, add a small dab of glue and cap off with a clamshell bead tip.
Open jump ring and attach either clamshell bead tip end to a toggle clasp. Repeat to other bead tip end.
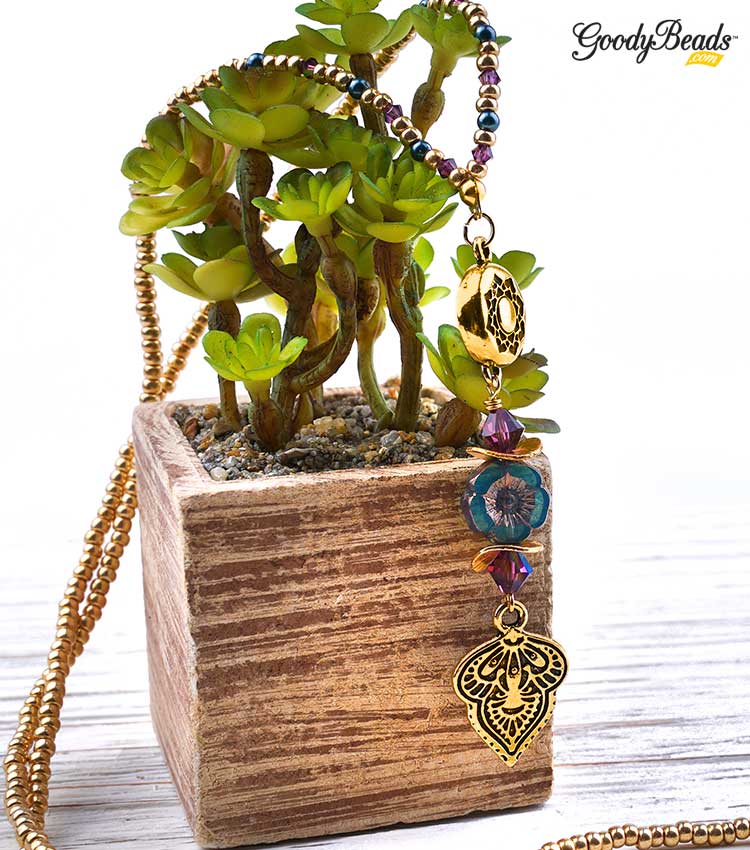
Passion Flower Necklace
We used the Griffin Silk cord to complete the bracelet with a necklace with similar beads as in the bracelet with TierraCast Findings.
Open loop of eyepin and slide on TierraCast Mehndi charm. Close loop.
Slide on the following beads onto the eyepin and make a simple loop or wrap loop: 8mm Ameythst Shimmer bicone crystal, wavy disc (concave down), Czech Hibiscus, wavy disc (concave up) and 8mm Amythest Shimmer bicone crystal. (If making a wrapped loop, make sure to slide on TierraCast magnetic clasp end before finishing loop off.)
Make a knot at the end of the silk cord. Slide on a seed bead, 3mm bicone, a seed bead, a pearl, 2 seed bead, 3mm bicone, 2 seed bead, a pearl, 3 seed bead, a 3mm bicone, 3 seed bead and a pearl.
Slide on seed beads to accomodate a length large enough to slide over your head.
End silk cord with pearl, 3 seed bead, 3mm bicone, 3 seed bead, a pearl, 2 seed bead, 3mm bicone, 2 seed bead, pearl, a seed bead, 3mm bicone and seed bead.
Take both ends of your silk cord and make a knot to tied the ends together.
Slide a clamshell bead tip over the knot.
Open jump ring and slide on loop of bead tip and other end of the TierraCast magnetic clasp. Close loop.
How to Make a Leather and Memory Wire Bracelet – Video Tutorial
Learn how make our popular leather and memory wire bracelets in our video tutorial and watch as we teach you how to finish your memory wire bracelet with the nifty Memory Wire Finishing Pliers.
Leather and Memory Wire Components
Here are items you need in order to make your leather and memory wire bracelet.
Round Leather
Round Leather is the star of your bracelet. We carry 5mm and 6mm round leather cord, which will need to have a hollow core or hole inside the leather. The hollow core helps the memory wire go through the leather. Make sure when selecting your leather cord to read the descriptions, as not all round leather cords have a hollow core or hole. All leather cord is sold in inches, so order according to the amount of inches you will need for your project.
Another type of cord you can use are Regaliz® Licorice Leather with Hole as seen in our Leather & Swarovski Trend. They are thicker in size with flatten sides.
You can also use Hollow Rubber Cord. These are 3mm in diameter and sold in foot increments. Make sure they say “hollow” in the description for memory wire.
Memory Wire
Memory Wire is the skeleton of your bracelet. Make sure the wire you are selecting is round as we also carry flat memory wire and that “Memory Wire” in the description and/or name.
End Caps
End caps will be used to cap the ends of your leather cord. They make your leather ends look cleaner and finished. When looking for end caps, you can find them in Findings: Clasps & End Caps, TierraCast Findings, or search “End Caps.” PLUS, read the descriptions to determine their inside diameter/opening. This will help to accommodate the round leather size you choose to order.
Some beads we would not recommend are large-hole beads like interchangeable large-holes or large-hole gemstones because their holes are large and may wiggle around on the memory wire. Some tubes will not work because their shape will not curve along with the memory wire. Pearl beads can be tricky because some will have holes to small for the memory wire.
Tools
The best tool to cut your memory wire is the Memory Wire Cutter (TL00206). This cutter is meant to cut through heavy-duty wire like memory wire or thicker gauge wires.
One of your best friends in making your bracelet is the Memory Wire Finishing Pliers (TLZ0207). It’s a sturdy round plier used to loop your wires. It has two mandrel sides to create a consistent 2mm or 4mm loop. This tool will make it easier for your hands to making a loop compared to your round-nose pliers.
Video Tutorial
Watch our facebook live spin-off video below to learn how to add leather cord and end caps to memory wire and how to loop with the Memory Wire Finishing Pliers.
Spring is here and we have some lovely seed bead ideas. If you have a stash of random seed beads, these are great ideas to combine and create with seed beads.
Featured from the trend 2018 Pantone Color of the Year: Ultra Violet, these silk ribbon tassel earrings are fun and flirty to wear. Learn to make these pair of earrings with a video tutorial.
Vergata ribbon is typically used for Kumihimo braiding, but we are using them as tassels because they create lovely thick tassels that are great for earrings or even a necklace tassel. Below is a video tutorial making tassels with vergata ribbon as well as other examples of using this technique.
Video Tutorial
Start by cutting a 5 feet long vergata ribbon. Tie the two ends together to create a loop. Using your four fingers, start wrapping the ribbon loop loosely around them, creating a width of 3″ of ribbon. Watch and follow as we use a 6″ piece of wire to make the tassel and adding a cap and beads to finish the earring dangle.
In our Ribbon Tassel Earrings trend, these tassels are smaller and dainty. Use 3 feet of vergata ribbon and after you’ve tied the two ends together, wrap the ribbon loops around two fingers loosely. Follow the rest of the video to add a cap and beads.
Miracle beads with a teardrop shape is the perfect bead to use for easy DIY earrings. Here are five examples of earrings using the teardrop miracle bead with various spacers and small accent beads.
Starting from the top and moving left to right here are different ways to embellish the bottoms of your teardrop earrings:
What is your favorite? What will you create with these lovely Miracle Beads? We would love to see what you create!
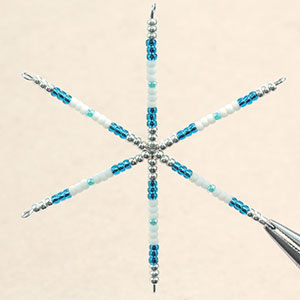
Wire Snowflake Ornament Forms and Tutorial
The holidays are coming up and we’ve got a fun tutorial with tips and tricks to creating snowflake ornaments with wire snowflake ornament forms.
Wire Snowflake Ornament Forms
The Wire Snowflake forms comes in FOUR different sizes. Depending on the amount of beads you want on each peg will determine which ornament form to buy.
Tools are important when completing your ornament. Because the snowflake form has thicker gauge wire, it is best to cut the wire with a Memory Wire Cutter (FTTL0005). You will create a simple loop at the tip of your pegs, for this you can use round nose pliers and roll a loop. However, we love to use the Memory Wire Finishing Pliers (TLZ0207), which creates less stress on looping the pegs. And Serrated Pliers (A001682) to close your loops because it helps grip the peg wires without slipping.
Tutorial
Step One: Slide beads onto a peg. Keep a 1/4″ peg end. Cut with memory wire cutters, if neccessary.
Step Two: Use your round nose pliers or memory wire finishing pliers to roll a simple loop as close as you can.
Step Three: Use a serrated nose pliers and squeeze the loop together.
Step Four: Squeezed loop.
Step Five: Fill the rest of your ornament by skipping one peg and repeat steps 1-3. Skip another peg and repeat until you’ve completed your ornament.
Inspirational Ornaments
Here are some inspiring ornaments you can create with lampwork beads, Swarovski® crystals, Chinese crystals, bead caps and more!
Each peg consists of: seed bead, bicone crystal, bead cap, lampwork, bead cap, bicone crystal and seed bead. Open jump ring, slide through one peg loop, through loop of tassel and close jump ring. Open another jump ring, slide on peg loop opposite of previous peg loop, through an ornament hook and close loop.
This is a different color version like the purple and white snowflake from above. Repeat the same steps for this blue and white ornament.
GoodyBeads Inspiration: Bead Weaving Ideas
Bead weaving and/or stitching can be a challenging, yet fun and fulfilling to create. Check out our selections of bead weaving ideas from hand-selected kits to easy and free beading tutorials.
Glam up your New Year’s Eve party with your favorite dress, dancing shoes and statement necklace. We have a few fashion trend necklaces sure to turn heads before the ball drops!
Tease your fun side with a statement necklace donned with Jesse James beads from our Dec ’16 trend. Create this statement necklace with the Cabin by the Lake Mix, chain, bib connectorsand feather charms. Finish it up with leather cord and you can get on with the partying!
Designed by So Vang
Check out this waterfall necklace from our June ‘16 Birthstone Trend. This statement necklace has Swarovski® pearls linked together by wire wrapping each dangle and attaching each dangle to the gold-plated necklace with jump rings.
From our July ’16 Birthstone Trend, this statement necklace has the perfect hues for the festive holidays. Headpins are strung with Czech fire polish beads, through Textured Large Oval Links (CH00738/CH00739) and teardrop Chinese crystals.
Designed by So Vang
Let these Dakota Stone Gemstone Pendants (Nov ’16 Trend) create the ultimate focal statement necklace. Simply string one of these pendants with small round beads to separate the stunning sets and add your favorite chain to complete a necklace you can wear year ‘round!
Introducing our new gift jewelry kits perfect for gift-giving. Created by our in-house designers, So Vang, Tory Vezina and Heidi Urlaub, these kits are easy to make and versatile to wear to all of your upcoming events and celebrations. Plus, the kits are conveniently packaged inside a plastic pillow-shaped container for easy gift giving to the DIYers in your life!
Thinking of what to give this holiday season or for birthdays or special occasions? Gift kits are the perfect gift to give to your girlfriends, sisters, bridesmaids, work buddies, etc.
Heidi’s kits have an earthy and edgy vibe with her love of leather and gemstones. You can easily wear her jewelry with the intent of going everywhere and still be on trend. Her Tears of Leather Earringsand On the Fringe Leather Earrings are so gorgeous, you’ll long to own one, two or all of her styles! Meditation Stretch Bracelets have a harmonic combination of round gemstones and emerald-cut Swarovski® crystals, while the Boho Belle Tube Necklace is decorated with small gemstones and curved tubes that gently hug your collarbone.
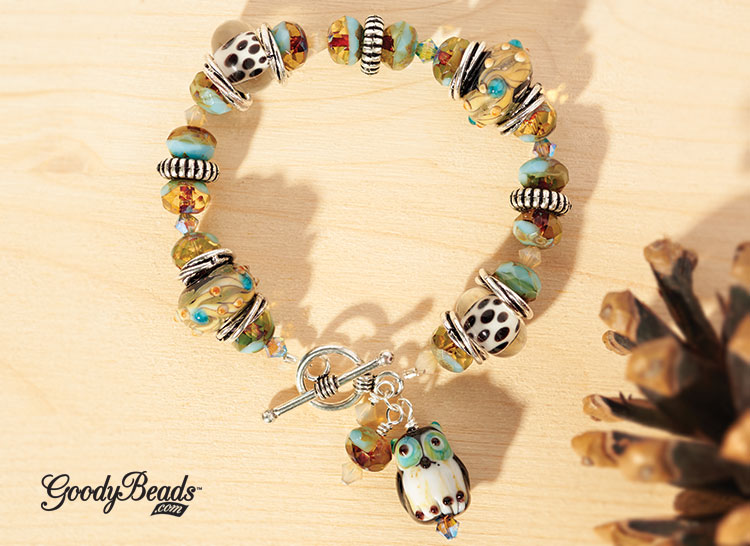
Owls are a hoot – I mean a hot motif trend. With their symbolism of knowledge and power, we’ve created two pieces of jewelry to show our love of owls.
It’s a Hoot Beaded Bracelet
Designed by So Vang
Selecting high-quality lampwork glass beads, fiery Czech beads and Swarovski® crystals, we pulled out hues of opaque turquoise, chalky browns and silver accents. Strung on elastic, this bracelet is easy to wear and perfect for an evening hike or bird watching.
Step 6. Loop one elastic end through toggle bar loop and back through crimp tube. Crimp tube with crimping pliers.
Step 7. Loop other elastic end through toggle round loop and back through crimp tube. Crimp tube with crimping pliers.
Step 8. Open jump ring and slide on the three bead dangles and loop of round toggle clasp.
Step 9. Close jump ring.
Owl Be It Necklace
Designed by Tory Vezina
You can just feel autumn with this owl necklace. The gradation of colors in the fairy necklace to the dangling leaf charm entices your senses of seeing the changing colors of treetops to hearing leaves crackling as they brush across the sidewalk.
Step 9. Line your ribbon ends together and make a knot.
Memorial Day DIY Jewelry
Memorial Day is a special day to honor those who have died while serving in the United States of America armed forces. We have a few DIY jewelry projects to commemorate this day and all American holidays.
Red, White and Blue Flat Leather Bracelet
Designed by So Vang
Here’s a clean and sleek bracelet made from 5mm flat leather and rivets. First, measure four strands of leather at your wrist size plus two more inches for the loops. You can learn how to rivet leather loops by reading our previous blog. Make sure to loop your ends through the bar end before you hammer your rivets. Add a clasp and you are ready to rock to the beat of an American song.
We made this bracelet easy to wear, make, and adjust. Take a strand of red, white and blue 2mm leather cord and line them up at one end. Take a silver clamp and clamp the three ends with serrated chain nose pliers. Hold your strands together and evenly straighten your strands. Make a flush cut at the other end and use another silver clamp to clamp those ends. Add your clasp and a simple USA charm. What’s versatile about this bracelet is that you can add knots in between your leather cords if you find the bracelet to be a bit loose. Plus, we think the added knots are a neat feature to the bracelet. Wrap 4 or 5 times around your wrist for a fire cracking weekend.
To make the pin, you will make Czech dagger rings by threading on Czech daggers and making a knot with the thread ends. Cut off excess thread. You will need to make three rings with 10 red Czech dagger beads, 9 red Czech dagger beads and 7 black Czech dagger beads.
Next, slide on your headpin the 8mm black round crystal, black dagger ring, red dagger smaller ring, red dagger larger ring and 8mm red bicone crystal. Make a simple loop. Open the headpin dangle loop and attach to the loop on the bow pin.
For this ring, you will need to make two rings with 10 red dagger beads and 7 red dagger beads. Use a fast-drying glue, like Super New Glue to add to the base of your ring. Lay the larger red ring on top and press down with your finger. This will help the ring to lay flat. This should only take a few seconds to dry. Add some glue on the inner part of the red dagger ring and add your smaller red dagger ring. Hold it in place with your finger for a few seconds. Add some glue to that layer and place the jet round crystal on top.
Holiday Swarovski® Cha-Cha Bling
With the holiday season quickly approaching, it’s time to get serious about our bling and what better way than to adorn with red and green Holiday Swarovski® Cha-Cha jewelry? Expandable bracelets and rings are perfect for every shape and size of gal pal, and who can resist some blingy baubles for your lovely lobes.
Holiday Swarovski® Cha-Cha Bracelet
Why red and green for the holidays? This tradition dates back thousands of years when folks used holly, ivy and mistletoe to beautify and brighten up their homes during the long dark winter. This was also a vital reminder that winter would NOT last forever and spring would definitely come blooming around the corner! The Romans exchanged evergreen branches in January and the Egyptians used palm branches to symbolize good luck. Red represented the color of fire and keeping warm. White symbolized peace and purity in the western cultures.
Slide a bicone onto a headpin and make a simple loop. NOTE: Be sure the loop is large enough to freely swing from the bracelet loops.
Repeat Step #1 for all the bicones.
Open bicone dangle and hook it through a bracelet loop, close loop. Complete bottom row with the following pattern: clear bicone, red bicone, clear bicone, green bicone.
Complete top row using the same pattern and add another round of bicones around this row so you end up with two bicone dangles per bracelet loop.
Holiday Swarovski® Cha-Cha Earrings
When creating our DIY Holiday Cha-Cha projects, we suggest making all the bicone simple loop dangles first. Get comfy on the couch and watch your fave movie or TV series marathon while you’re cranking these babies out. Practice makes perfect in the world of simple loop making! So why not perfect your talents while you’re on a roll and make them all at once?
Whether you believe the deeper meaning of these colors or simply just like how they look, nothing feels quite as festive as sparkly Swarovski® crystal holiday jewelry for your parties, the office or gifts. Of course put yourself first on that gift list, and while you’re beading away remember: one for you, one for your BFF, mom, sister, etc. Well, you get the picture. Now, get going and happy beading!